安装部署PostgreSQL实例(最详细噢,小白推荐)
题外话
PostgreSQL的Slogan是“世界上最先进的开源关系型数据库”。
MySQL的Slogan是“世界上最受欢迎的开源关系型数据库”。
两者都是目前开源关系型数据库的大佬,本文主要介绍PostgreSQL安装部署实践
一、环境介质准备
PostgreSQL包准备
PostgreSQL官方网站下载源码包或者YUM包
https://www.postgresql.org/
配置YUM包:
下载最新的源码包:
https://ftp.postgresql.org/pub/source/v12.3/
PS:可以根据自己的情况,自行选择需要的版本。
服务器准备
我这里使用的是centos 7.x,此方法适用于任何其他linux版本。
二、创建用户postgres
在创建数据库实例之前要做的第一件事是先创建一个独立的操作系统用户,也可以称为本地用户。创建这个用户的目的是为了防止应用软件的bug被攻击者利用,对系统造成破坏。它拥有该数据库实例管理的所有数据,是这个数据库实例的超级用户。通常我们使用postgres作为这个操作系统超级用户的用户名,这个用户将被用来对数据库实例进行start、stop、restart操作。如果使用yum安装,且操作系统中不存在postgres用户,安装程序会自动创建名为postgres的操作系统用户和名为postgres的数据库超级用户,尽管如此任然建议在yum安装之前预先手动创建postgres用户。
注意:出于安全考虑,这个操作系统用户不能是root或具有操作系统管理权限的账号,例如拥有sudo权限的用户。
1)创建用户和用户组:
groupadd postgres
useradd -g postgres postgres

2)如果是部署集群,建议配置NTP服务,统一集群中每个节点的操作系统用户的uid和gid:
groupadd -g 2002 postgres
useradd -g 2002 -u 2002 postgres

id postgres
uid=2002(postgres02) gid=2002(postgres02) groups=2002(postgres02)

3)如果集群中某些节点的数据库操作系统用户的uid和gid与其他节点不一致,可以通过groupmod命令和usermod命令进行修改:
groupmod -g 2000 postgres
usermod -u 2000 -g 2000 postgres

id postgres
uid=2000(postgres) gid=2000(postgres) groups=2000(postgres)
三、程序安装(二选一)
(1)YUM安装
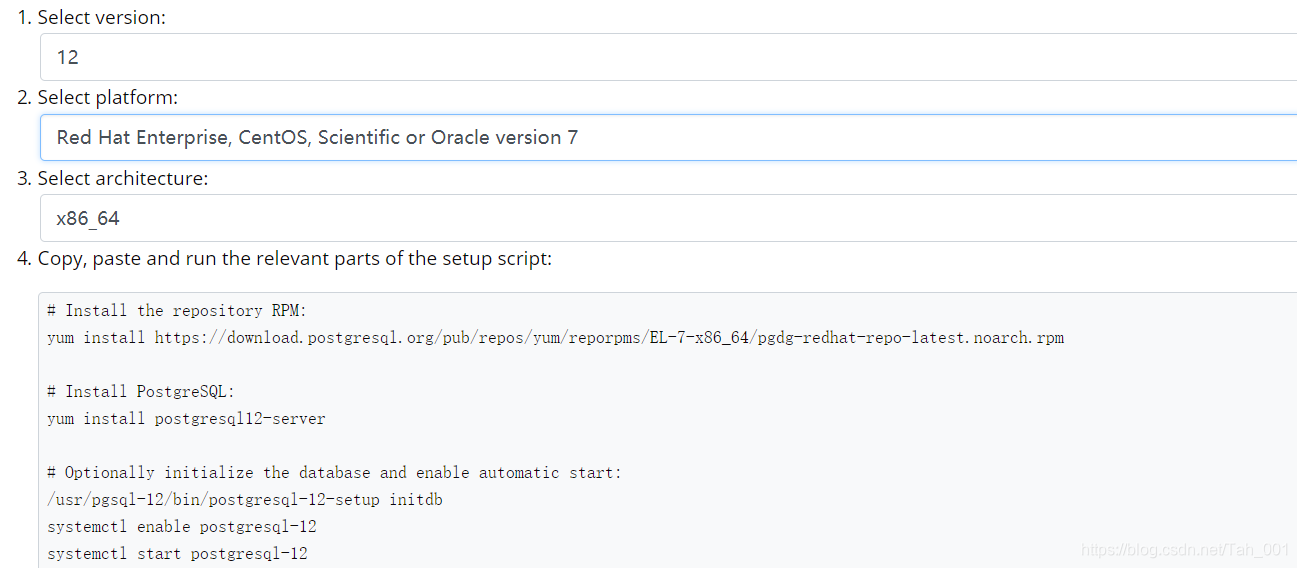
1、官网下载包
https://www.postgresql.org/

yum install https://download.postgresql.org/pub/repos/yum/reporpms/EL-7-x86_64/pgdg-redhat-repo-latest.noarch.rpm

执行完后,在/etc/yum.repos.d目录中可以看到名称为pgdg-redhat-all.repo的源配置文件


2、安装Postgresql

查看Postgresql 12的包:
yum search postgresql12-server

yum install postgresql12-server

会自动安装到/usr/pgsql-12/bin/
/usr/pgsql-12/bin/postgres --version
(2)通过源码编译安装
1、下载包
https://ftp.postgresql.org/pub/source/v12.3/  --  下载最近的源码包

wget https://ftp.postgresql.org/pub/source/v12.3/postgresql-12.3.tar.gz
tar -zxvf postgresql-12.3.tar.gz

2、安装依赖包:
yum install -y perl-ExtUtils-Embed readline-devel zlib-devel pam-devel libxml2-devel libxslt-devel openldap-devel python-devel gcc-c++ openssl-devel cmake

3、新建安装目录

mkdir -p /d/pgdata02

4、编译安装
cd postgresql-12.3
./configure --prefix=/d/pgdata02/ --with-pgport=5433   ---指定安装目录/d/pgdata02和端口号

gmake
All of PostgreSQL successfully made. Ready to install.  -- 此提示安装成功

gmake install
PostgreSQL installation complete.  -- 此提示安装成功

/d/pgdata02/bin/postgres --version
postgres (PostgreSQL) 12.3
四、初始化PostgreSQL实例
创建数据目录并授权
数据目录用来存放数据文件和数据库实例的配置文件,可以把这个m目录创建到任何合适的位置。有时候我们会遇到多实例并存的情况,为了区分可以建立/d/pgdata/12.x/xxx_data的目录作为数据库实例的数据目录,如:(默认的yum安装会自动创建 /var/lib/pgsql/12)
1、创建数据目录:
mkdir -p /d/pgdata/12/{data,backups,scripts,archive_wals}

2、授权:
chown -R postgres:postgres /d/pgdata/12
chmod 0700  /d/pgdata/12/data

3、初始化实例:
/usr/pgsql-12/bin/initdb --help

切换到postgres用户:
su - postgres

/usr/pgsql-12/bin/initdb -D /d/pgdata/12/data -W

-bash-4.2$ /usr/pgsql-12/bin/initdb -D /d/pgdata/12/data -W
The files belonging to this database system will be owned by user "postgres".
This user must also own the server process.

The database cluster will be initialized with locale "en_US.UTF-8".
The default database encoding has accordingly been set to "UTF8".
The default text search configuration will be set to "english".

Data page checksums are disabled.

Enter new superuser password:
Enter it again:

fixing permissions on existing directory /d/pgdata/12/data ... ok
creating subdirectories ... ok
selecting dynamic shared memory implementation ... posix
selecting default max_connections ... 100
selecting default shared_buffers ... 128MB
selecting default time zone ... Atlantic/Azores
creating configuration files ... ok
running bootstrap script ... ok
performing post-bootstrap initialization ... ok
syncing data to disk ... ok

initdb: warning: enabling "trust" authentication for local connections
You can change this by editing pg_hba.conf or using the option -A, or
--auth-local and --auth-host, the next time you run initdb.

Success. You can now start the database server using:

    /usr/pgsql-12/bin/pg_ctl -D /d/pgdata/12/data -l logfile start

因为指定了-W参数,所以在初始化的过程中,initdb工具会要求为数据库超级用户创建密码,最后一行提示了如何启动刚才初始化的数据库。


PS:
也可以用pg_ctl初始化:
/usr/pgsql-12/bin/pg_ctl init -D /d/pgdata/12/data -o "-W"


如果是通过yum来安装的,还可以使用
service postgresql-12 ini 来初始化/var/lib/pgsql/12/data
五、启动和停止数据库实例
a).通过service:
cd /etc/init.d/    --确认一下使用的service名称
service postgresql-12 start/stop/status

b).使用pg_ctl:
启动:
su - postgres

/usr/pgsql-12/bin/pg_ctl -D /d/pgdata/12/data start
/usr/pgsql-12/bin/pg_ctl -D /d/pgdata/12/data -l logfile start        (初始化时提供的语句)

查看状态:
/usr/pgsql-12/bin/pg_ctl -D /d/pgdata/12/data  status
/usr/pgsql-12/bin/pg_isready -p 5432

查看监听端口:
netstat -nlpt|grep 5432

关闭:
 pg_ctl stop     [-D DATADIR] [-m SHUTDOWN-MODE] [-W] [-t SECS] [-s]
/usr/pgsql-12/bin/pg_ctl -D /d/pgdata/12/data  -ms stop
/usr/pgsql-12/bin/pg_ctl -D /d/pgdata/12/data  -mf stop
/usr/pgsql-12/bin/pg_ctl -D /d/pgdata/12/data  -mi stop
(smart:等待客户端主动断开连接后才关闭;  fast回滚所有活动事务,强制断开客户端连接;  immediate 立即终止所有进程)
注意: pg的immediate停止 相当于oracle 的shutdown abort

c). postmaster或 postgres  以及kill命令
/usr/pgsql-12/bin/postgres -D /d/pgdata/12/data          这样命令会前台运行,可以加上&让它后台运行

kill -sigterm `head -1 /d/pgdata/12/data/postmaster.pid`
(SIGTERM,SIGINT,SIGQUIT对应于关闭的 smart ,fast,immediate模式)
六、配置文件
数据库实例初始化完成后,在数据目录的根目录下会有postgresql.conf、postgresql.auto.conf、pg_hba.conf和pg_ident.conf这几个配置文件。
除身份认证以外的数据库系统行为都由postgresql.conf配置。
修改数据目录下的postgresql.conf 及 pg_hba.conf文件
postgresql.conf --配置PostgreSQL数据库服务器的相应的参数。
pg_hba.conf --配置对数据库的访问权限,连接认证
1、vim postgresql.conf
修改 listen_addresses 为 * ,代表所有主机皆可访问
listen_addresses = ‘*’ # what IP address(es) to listen on;
2、
vim pg_hba.conf
#IPv4 local connections:
host all all 127.0.0.1/32 trust
host all all 0.0.0.0/0 trust
3、修改全局配置
(1)修改postgresql.conf
(2)alter system set listen_address=’*’; (alter system会自动编辑postgresql.auto.conf, 数据库启动时会加载这个文件,并用它的配置覆盖postgresql.conf中的配置)
(3)/usr/pgsql-10/bin/postgres -D /pgdata/10/data -c port=1922 (启动的时候修改)
4、b).修改非全局配置
(1)设置或重置database级别的设置:
alter database name set { TO | = }{ value | DEFAUT}
alter database name RESET configuration
(2)设置和重置session级别的配置:
SET { TO | = }{ value | DEFAUT}
SET TO DEFAULT;
(3)更新pg_settings视图:
update pg_settings set setting= <new_value> where name=’’;
(5)使用set_config函数更新会话配置:
select set_config(‘configparameter’,new_value,false);
(6)设置和重置ROLE 级别的配置:
alter role name in database database_name set configparameter { TO | = }{ value | DEFAUT}
alter role name in database database_name RESET configparameter
5、查看配置
select name,setting from pg_settings where name ~ ‘xxx’;
select current_setting(name);
show (show all) 命令
show ;
6、使配置生效
如果是不需要重启的参数,reload一次就可生效
mydb=#select pg_reload_conf();
也可以使用 pg_ctl:
su - postgres
/usr/pgsql-12/bin/pg_ctl -D /d/pgdata/12/data reload
七、简单操作
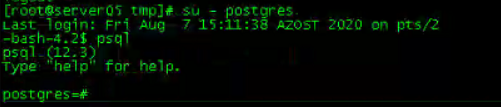
连接到数据库,需要切换到postgres用户下(默认的认证配置前提下)
su - postgres
在postgres用户下连接数据库,用psql连接到数据库是不需要密码的:
创建数据库ttdb01:
CREATE DATABASE ttdb01;

使用 \l 用于查看已经存在的数据库:
postgres=# \l
                                  List of databases
   Name    |  Owner   | Encoding |   Collate   |    Ctype    |   Access privileges
-----------+----------+----------+-------------+-------------+-----------------------
 postgres  | postgres | UTF8     | en_US.UTF-8 | en_US.UTF-8 |
 template0 | postgres | UTF8     | en_US.UTF-8 | en_US.UTF-8 | =c/postgres          +
           |          |          |             |             | postgres=CTc/postgres
 template1 | postgres | UTF8     | en_US.UTF-8 | en_US.UTF-8 | =c/postgres          +
           |          |          |             |             | postgres=CTc/postgres
 testdb    | postgres | UTF8     | en_US.UTF-8 | en_US.UTF-8 |
 testdb1   | postgres | UTF8     | en_US.UTF-8 | en_US.UTF-8 |
 ttdb01    | postgres | UTF8     | en_US.UTF-8 | en_US.UTF-8 |
(6 rows)

接下来我们可以使用 \c + 数据库名 来进入数据库:
postgres=# \c ttdb01
You are now connected to database "ttdb01" as user "postgres".

创建表:
ttdb01=# create table  test1(id int  not null  primary key,name  varchar(20),age int );
CREATE TABLE

ttdb01=# insert into test1 values(1,'aaa',28);
INSERT 0 1

ttdb01=# select * from test1;
 id | name | age
----+------+-----
  1 | aaa  |  28
(1 row)
常用控制台命令:
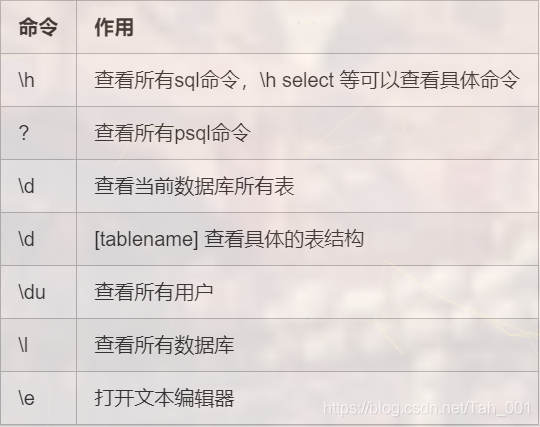
哎哟,不错噢! - - - - - - 欢迎指出有误的地方以及补充更好的方法