基于TCP/IP协议的Java服务端与Android客户端的Socket通信及数据交互
一、前言
1、Java服务端程序代码的项目名为TcpSocketServerOfJava,包名为com.example.tcpsocketserver,类名为TcpSocketServer。
2、Android客户端程序代码项目名为TcpSocketClientOfAndroid,包名为com.example.tcpsocketclientofandroid,类名为MainActivity。
二、Java服务端
Java服务端程序代码
Java服务端程序代码:TcpSocketServer.java
package com.example.tcpsocketserver;
import java.io.BufferedReader;
import java.io.BufferedWriter;
import java.io.IOException;
import java.io.InputStreamReader;
import java.io.OutputStreamWriter;
import java.io.PrintWriter;
import java.net.ServerSocket;
import java.net.Socket;
import java.util.ArrayList;
import java.util.List;
import java.util.concurrent.ExecutorService;
import java.util.concurrent.Executors;
 public class TcpSocketServer
{
  private static final int PORT = 12345;
  private List<Socket> mList = new ArrayList<Socket>();
  private ServerSocket server = null;
  private ExecutorService myExecutorService = null;
  private String receiveMsg;
  private String sendMsg;
  public static void main(String[] args)
 {
   new TcpSocketServer();
  }
  public TcpSocketServer()
 {
   try
  {
    server = new ServerSocket(PORT);
    myExecutorService = Executors.newCachedThreadPool();
    System.out.println("服务器已启动...");
    Socket client = null;
    while (true)
   {
     client = server.accept();
     mList.add(client);
     myExecutorService.execute(new Service(client));
    }
   }
   catch (Exception e)
  {
    e.printStackTrace();
   }
  }
   class Service implements Runnable
  {
    private Socket socket;
    private BufferedReader in = null;
    private PrintWriter printWriter=null;
    public Service(Socket socket)
   {
     this.socket = socket;
     try
    {
      printWriter = new PrintWriter(new BufferedWriter(new OutputStreamWriter(socket.getOutputStream(), "UTF-8")), true);
      in = new BufferedReader(new InputStreamReader(socket.getInputStream(),"UTF-8"));
      printWriter.println("成功连接服务器"+"(服务器发送)");
      System.out.println("成功连接服务器");
     }
     catch (IOException e)
    {
      e.printStackTrace();
     }

        }
     public void run()
    {
      try
     {
       while (true)
      {
        if ((receiveMsg = in.readLine())!=null)
       {
         System.out.println("receiveMsg:"+receiveMsg);
         if (receiveMsg.equals("0"))
        {
          System.out.println("客户端请求断开连接");
          printWriter.println("服务端断开连接"+"(服务器发送)");
          mList.remove(socket);
          in.close();
          socket.close();
          break;
         }
         else
        {
          sendMsg = "我已接收:" + receiveMsg + "(服务器发送)";
          printWriter.println(sendMsg);
         }
        }
       }
      }
      catch (Exception e)
     {
       e.printStackTrace();
      }
    }
   }
  }
三、Android客户端
(一)、Android客户端主程序的程序代码
Android客户端主程序的程序代码:MainActivity.java
package com.example.tcpsocketclientofandroid;
import java.io.BufferedReader;
import java.io.BufferedWriter;
import java.io.IOException;
import java.io.InputStreamReader;
import java.io.OutputStreamWriter;
import java.io.PrintWriter;
import java.net.Socket;
import java.util.concurrent.ExecutorService;
import java.util.concurrent.Executors;
import android.support.v7.app.ActionBarActivity;
import android.util.Log;
import android.view.View;
import android.widget.Button;
import android.widget.EditText;
import android.widget.TextView;
import android.os.Bundle;
 public class MainActivity extends ActionBarActivity
{
  private EditText mEditText;
  private TextView mTextView;
  private Button connect;
  private Button send;
  private Button disconnect;
  private static final String TAG = "TAG";
  private static final String HOST = "192.168.31.160";
  private static final int PORT = 12345;
  private PrintWriter printWriter;
  private BufferedReader in;
  private ExecutorService mExecutorService = null;
  private String receiveMsg;
  @Override
  protected void onCreate(Bundle savedInstanceState)
 {
   super.onCreate(savedInstanceState);
   setContentView(R.layout.activity_main);
   mEditText = (EditText) findViewById(R.id.editText);
   mTextView = (TextView) findViewById(R.id.textView);
   connect = (Button) findViewById(R.id.connect);
   send = (Button) findViewById(R.id.send);
   disconnect = (Button) findViewById(R.id.disconnect);
   mExecutorService = Executors.newCachedThreadPool();
   connect.setOnClickListener(new View.OnClickListener()
  {
    @Override
    public void onClick(View v)
   {
  	 mExecutorService.execute(new connectService());
    }
   });
   send.setOnClickListener(new View.OnClickListener()
  {
    @Override
    public void onClick(View v)
   {
     String sendMsg = mEditText.getText().toString();
     mExecutorService.execute(new sendService(sendMsg));
    }
   });
   disconnect.setOnClickListener(new View.OnClickListener()
  {
    @Override
    public void onClick(View v)
   {
     mExecutorService.execute(new sendService("0"));
    }
   });
  }
  private class sendService implements Runnable
 {
   private String msg;
   sendService(String msg)
  {
    this.msg = msg;
   }
   @Override
   public void run()
  {
    printWriter.println(this.msg);
   }
  }
  private class connectService implements Runnable
 {
   @Override
   public void run()
  {
    try
   {
     Socket socket = new Socket(HOST, PORT);
     socket.setSoTimeout(60000);
     printWriter = new PrintWriter(new BufferedWriter(new
     OutputStreamWriter(socket.getOutputStream(), "UTF-8")), true);
     in = new BufferedReader(new
     InputStreamReader(socket.getInputStream(), "UTF-8"));
     receiveMsg();
    }
    catch (Exception e)
   {
     Log.e(TAG, ("connectService:" + e.getMessage()));
    }
   }
  }
  private void receiveMsg()
 {
   try
  {
    while (true)
   {
     if ((receiveMsg = in.readLine()) != null)
    {
      Log.d(TAG, "receiveMsg:" + receiveMsg);
      runOnUiThread(new Runnable()
     {
       @Override
       public void run()
      {
        mTextView.setText(receiveMsg + "\n\n" + mTextView.getText());
       }
      });
     }
    }
   }
   catch (IOException e)
  {
    Log.e(TAG, "receiveMsg: ");
    e.printStackTrace();
   }
  }
 }
(二)、Android客户端界面布局的程序代码
Android客户端界面布局的程序代码:activity_main.xml
<LinearLayout xmlns:android="http://schemas.android.com/apk/res/android"
 xmlns:tools="http://schemas.android.com/tools"
 android:layout_width="match_parent"
 android:layout_height="match_parent"
 android:orientation="vertical"
 tools:context="com.example.tcpsocketclientofandroid.MainActivity" >
 <EditText
  android:id="@+id/editText"
  android:layout_width="match_parent"
  android:layout_height="wrap_content"
  android:hint=""/>
 <Button
  android:id="@+id/connect"
  android:layout_width="match_parent"
  android:layout_height="wrap_content"
  android:text="@string/connect" />
 <Button
  android:id="@+id/send"
  android:layout_width="match_parent"
  android:layout_height="wrap_content"
  android:text="@string/send" />
 <Button
  android:id="@+id/disconnect"
  android:layout_width="match_parent"
  android:layout_height="wrap_content"
  android:text="@string/disconnect" />
 <TextView
  android:id="@+id/textView"
  android:layout_width="match_parent"
  android:layout_height="match_parent"
  android:text="" />
</LinearLayout>
(三)、Android客户端编辑字符串的程序代码
Android客户端编辑字符串的程序代码:strings.xml
<?xml version="1.0" encoding="utf-8"?>
<resources>
 <string name="app_name">TcpSocketClientOfAndroid</string>
 <string name="hello_world">Hello world!</string>
 <string name="action_settings">Settings</string>
 <string name="connect">CONNECT</string>
 <string name="send">SEND</string>
 <string name="disconnect">DISCONNECT</string>
</resources>
(四)、Android客户端程序配置的程序代码
Android客户端程序配置的程序代码:AndroidManifest.xml
<?xml version="1.0" encoding="utf-8"?>
<manifest xmlns:android="http://schemas.android.com/apk/res/android"
 package="com.example.tcpsocketclientofandroid"
 android:versionCode="1"
 android:versionName="1.0" >
 <uses-sdk
  android:minSdkVersion="8"
  android:targetSdkVersion="19" />
  <uses-permission android:name="android.permission.INTERNET" />
  <application
   android:allowBackup="true"
   android:icon="@drawable/ic_launcher"
   android:label="@string/app_name"
   android:theme="@style/AppTheme" >
   <activity
    android:name=".MainActivity"
    android:label="@string/app_name" >
    <intent-filter>
     <action android:name="android.intent.action.MAIN" />
     <category android:name="android.intent.category.LAUNCHER" />
    </intent-filter>
   </activity>
  </application>
</manifest>
四、运行基于TCP/IP协议的Java服务端与Android客户端的流程图
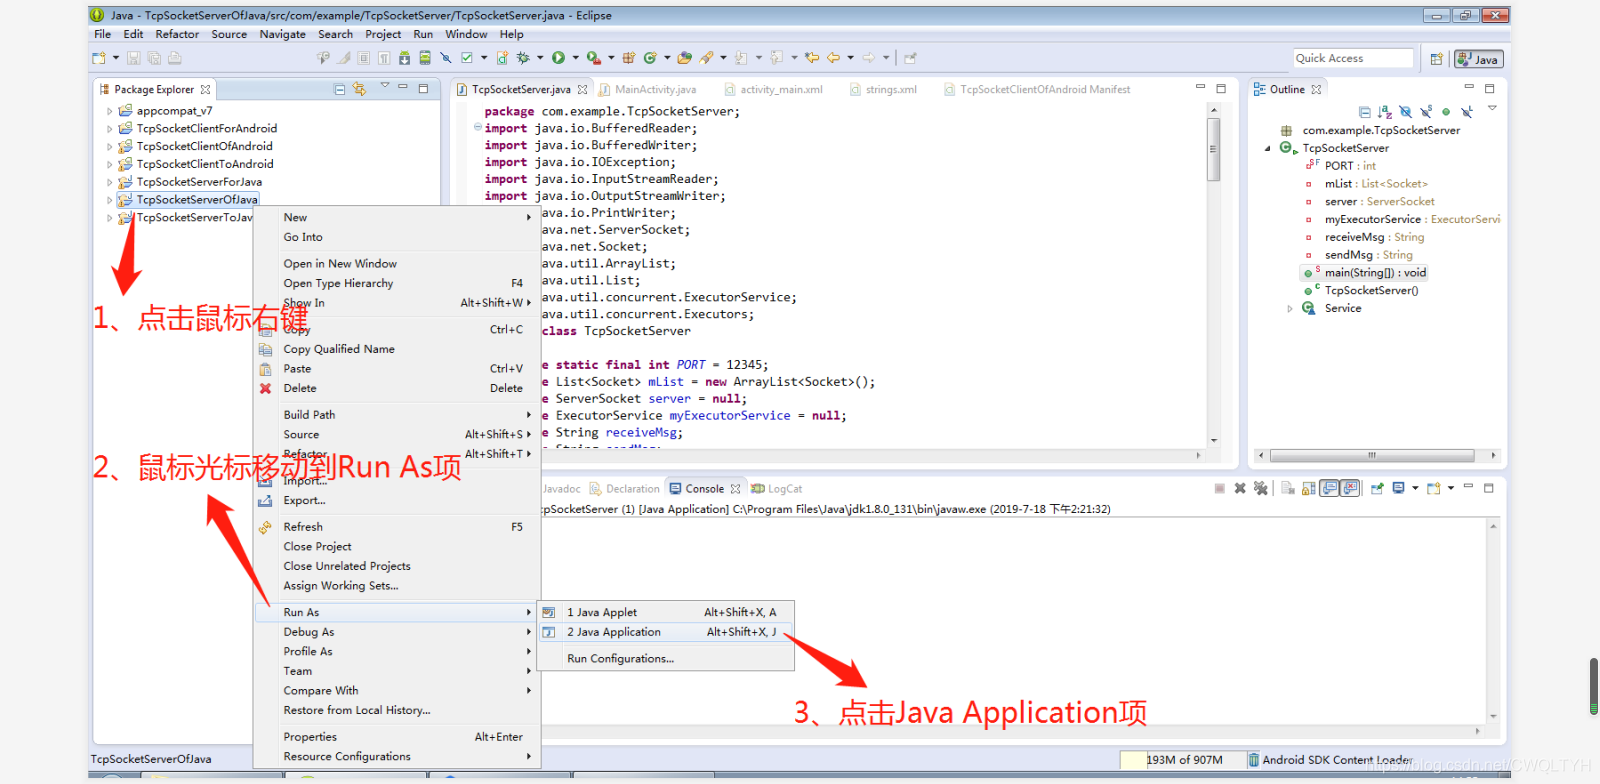
(1)、鼠标右键点击TcpSocketServerOfJava项目——鼠标光标移动到Run As项——点击Java Application项
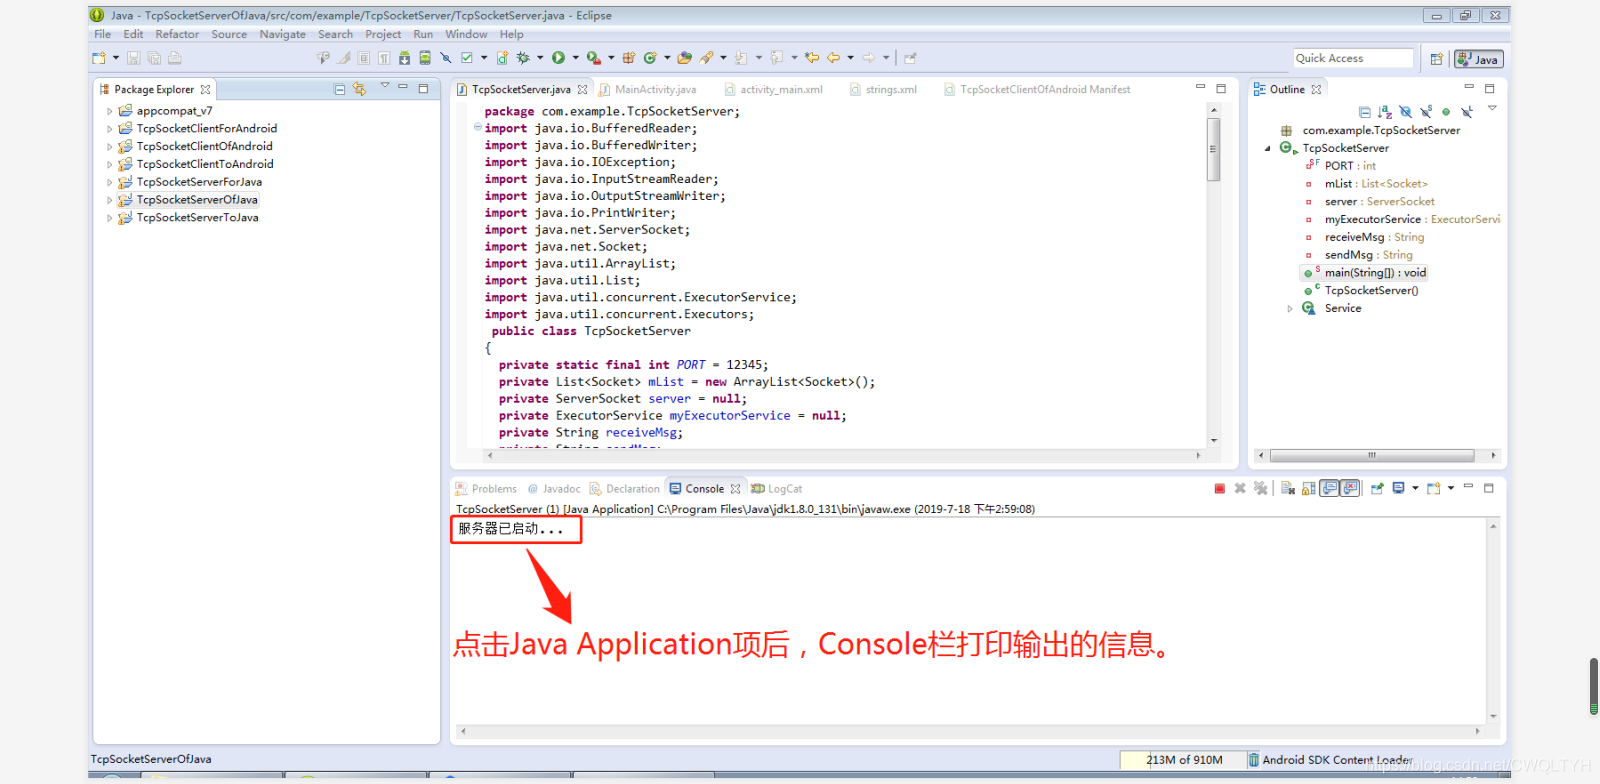
(2)、点击Java Application项后,Console栏打印输出信息。
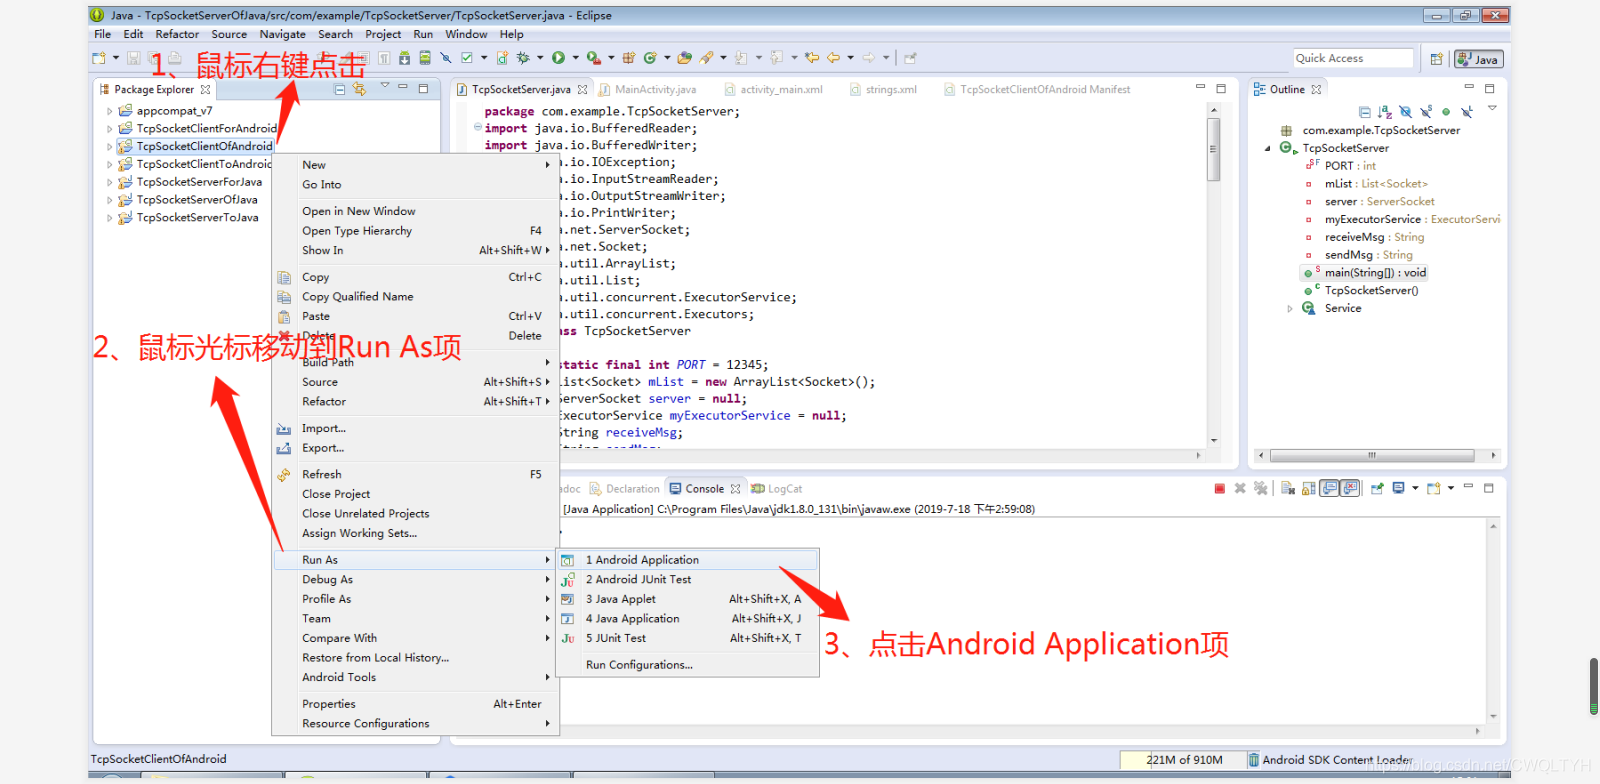
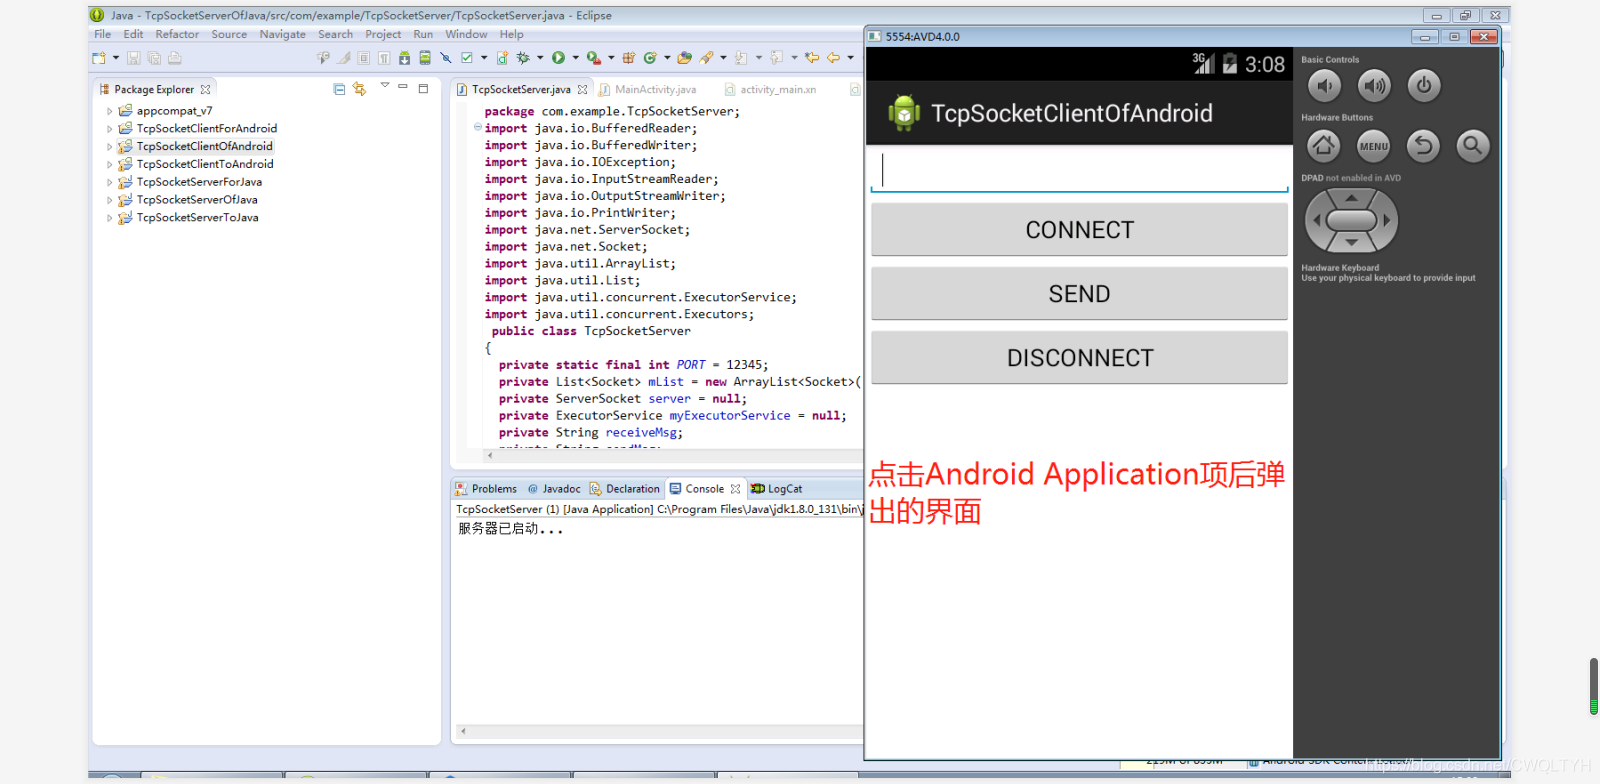
(3)、鼠标右键点击TcpSocketClientOfAndroid项目——鼠标光标移动到Run As项——点击Android Application项。
(4)、点击Android Application项后,弹出TcpSocketClientOfAndroid项目的Android模拟器客户端界面。
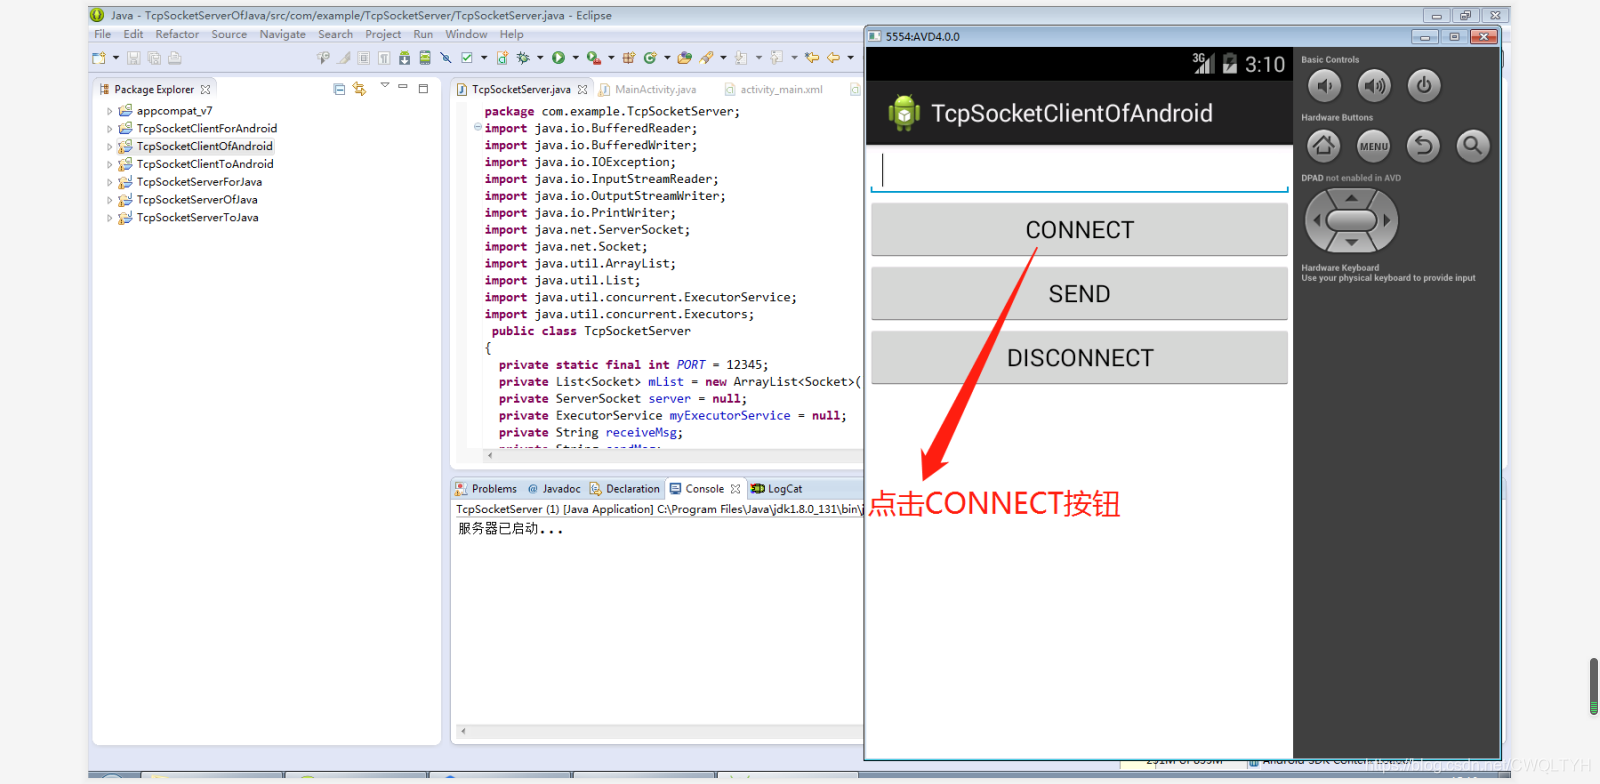
(5)、点击Android模拟器客户端界面上的CONNECT按钮
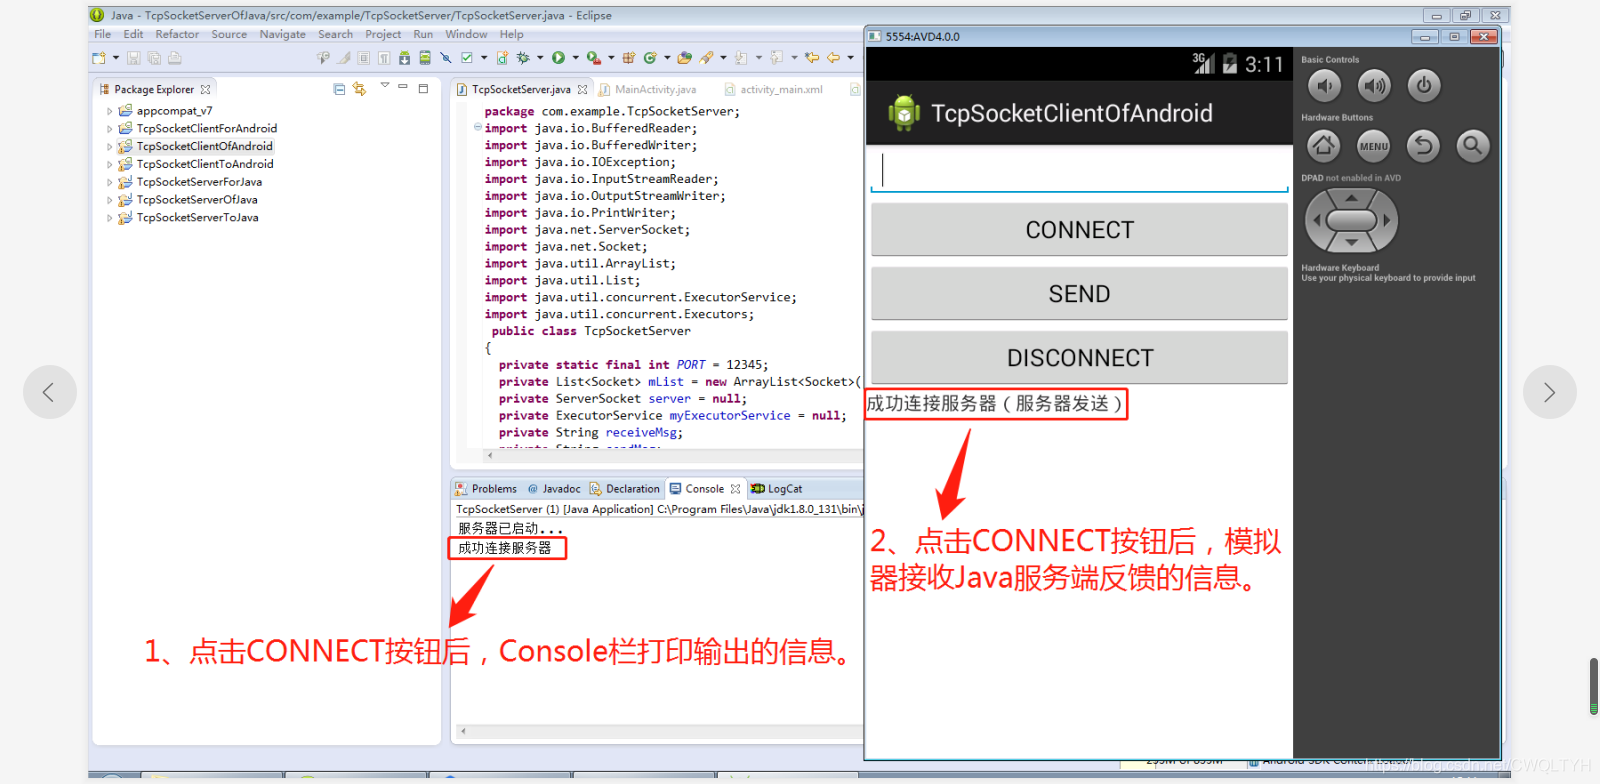
(6)、点击Android模拟器客户端界面上的CONNECT按钮后,Console栏打印输出信息,同时Android模拟器客户端界面接收Java服务端反馈回来的信息。
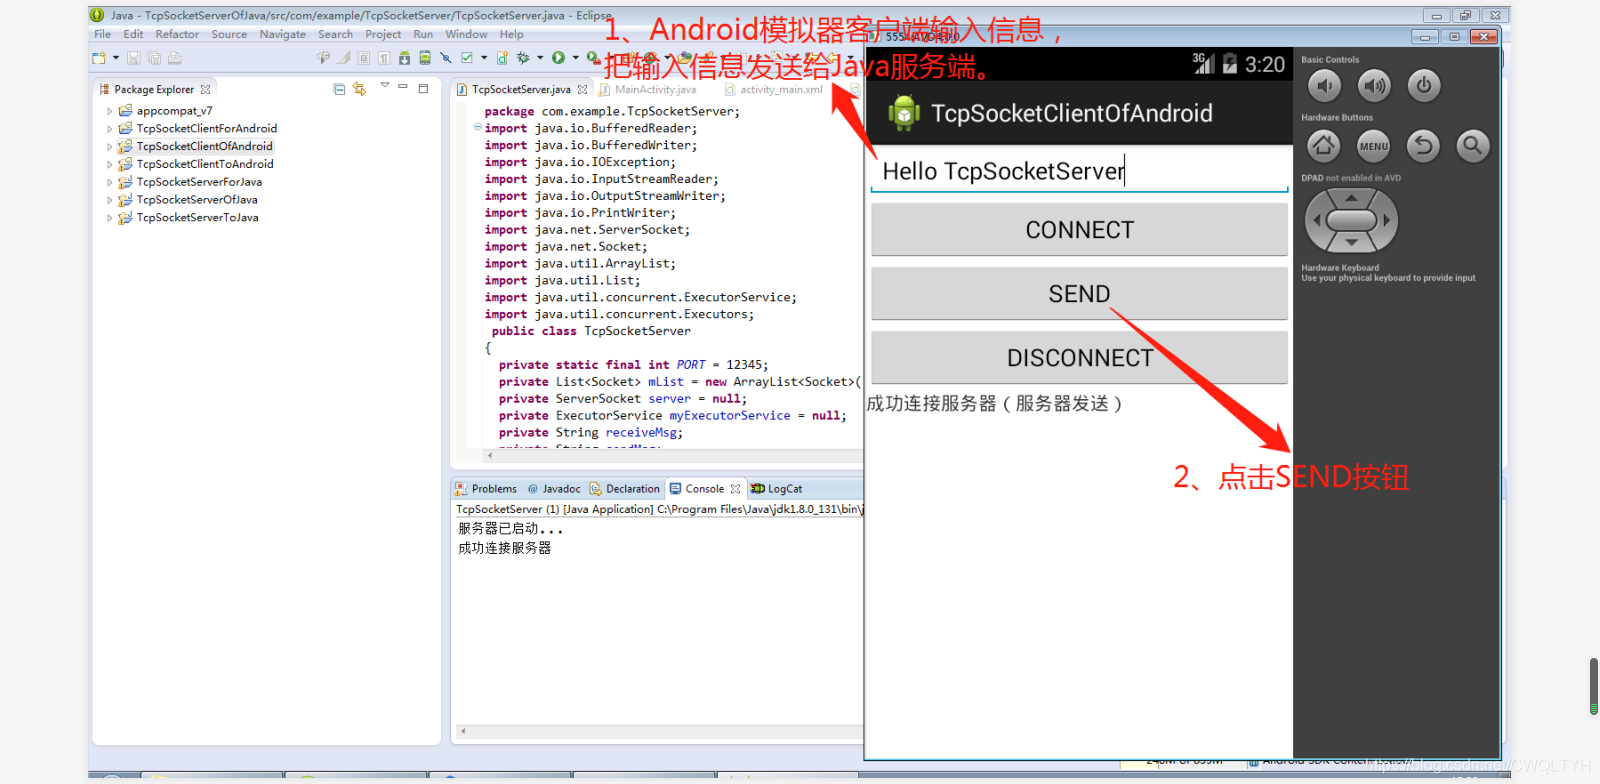
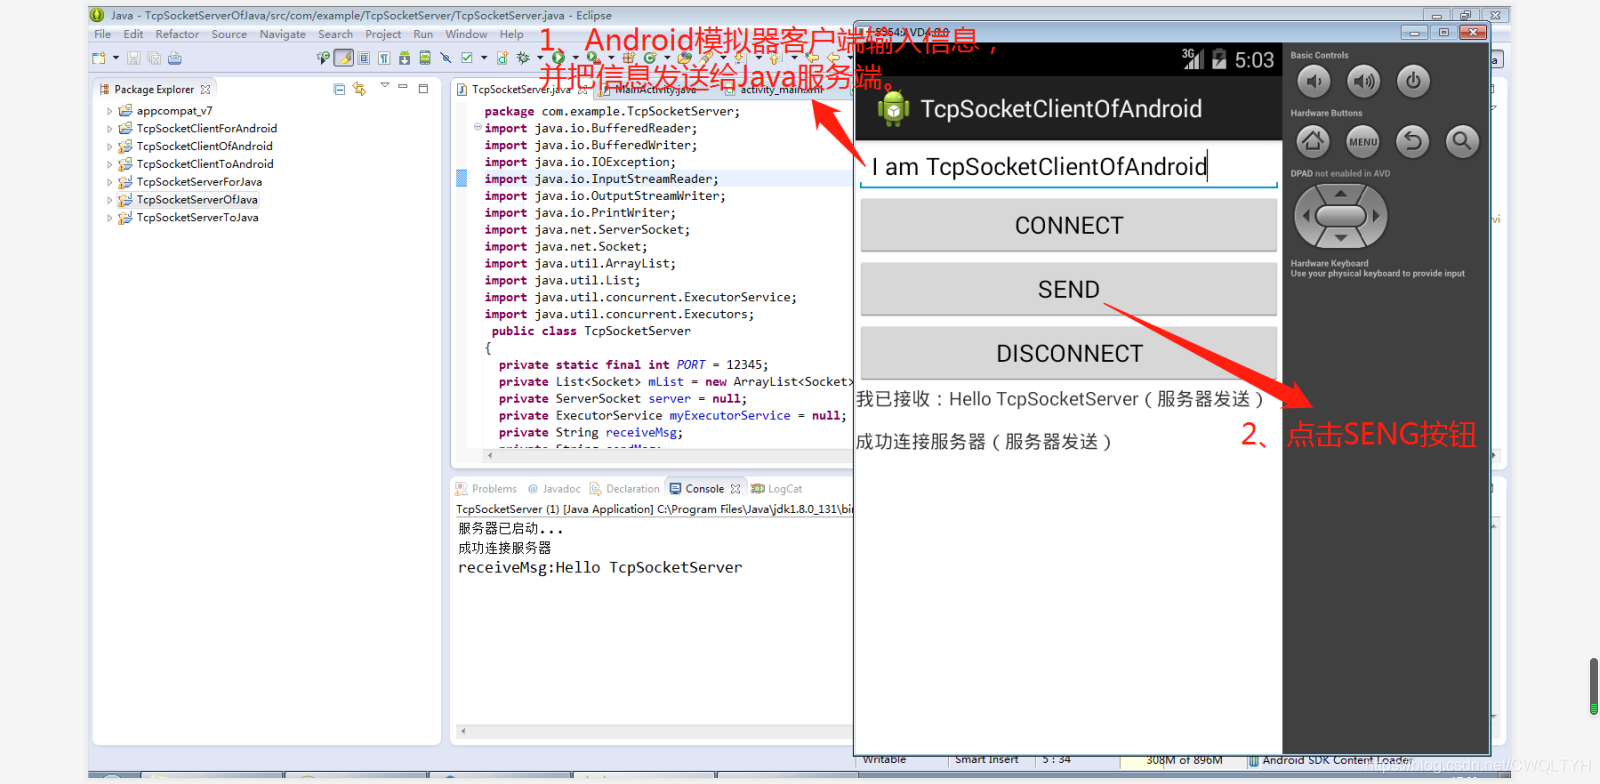
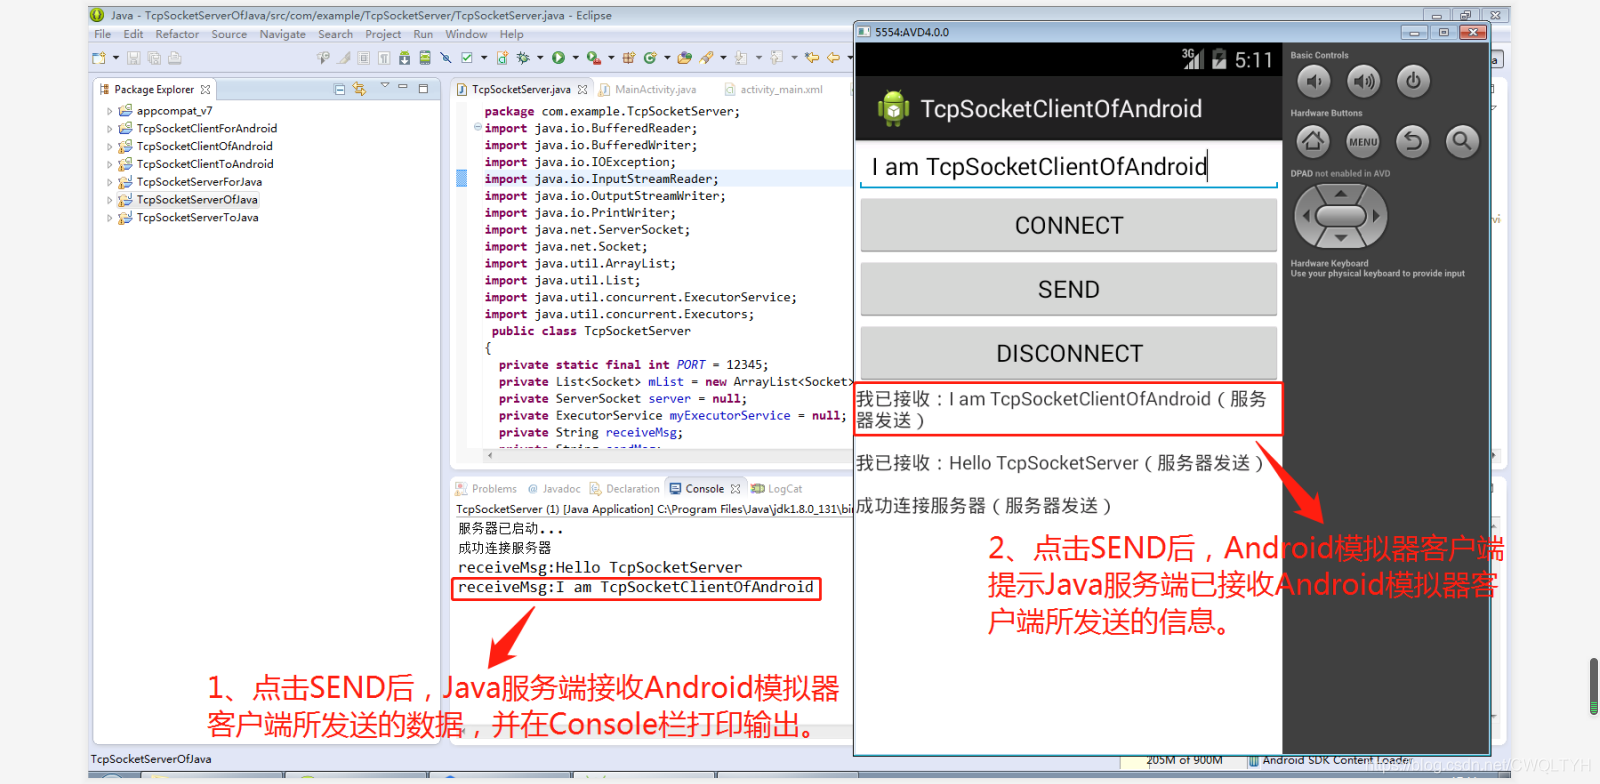
(7)、在Android模拟器客户端界面上的编辑框输入信息,再点击SEND按钮。
(8)、点击Android模拟器客户端界面上的SEND按钮后,Console栏打印输出信息,同时Android模拟器客户端界面接收Java服务端反馈回来的信息。

(9)、再次在Android模拟器客户端界面上的编辑框输入信息,再次点击SEND按钮。
(10)、点击Android模拟器客户端界面上的SEND按钮后,Console栏打印输出信息,同时Android模拟器客户端界面接收Java服务端反馈回来的信息。
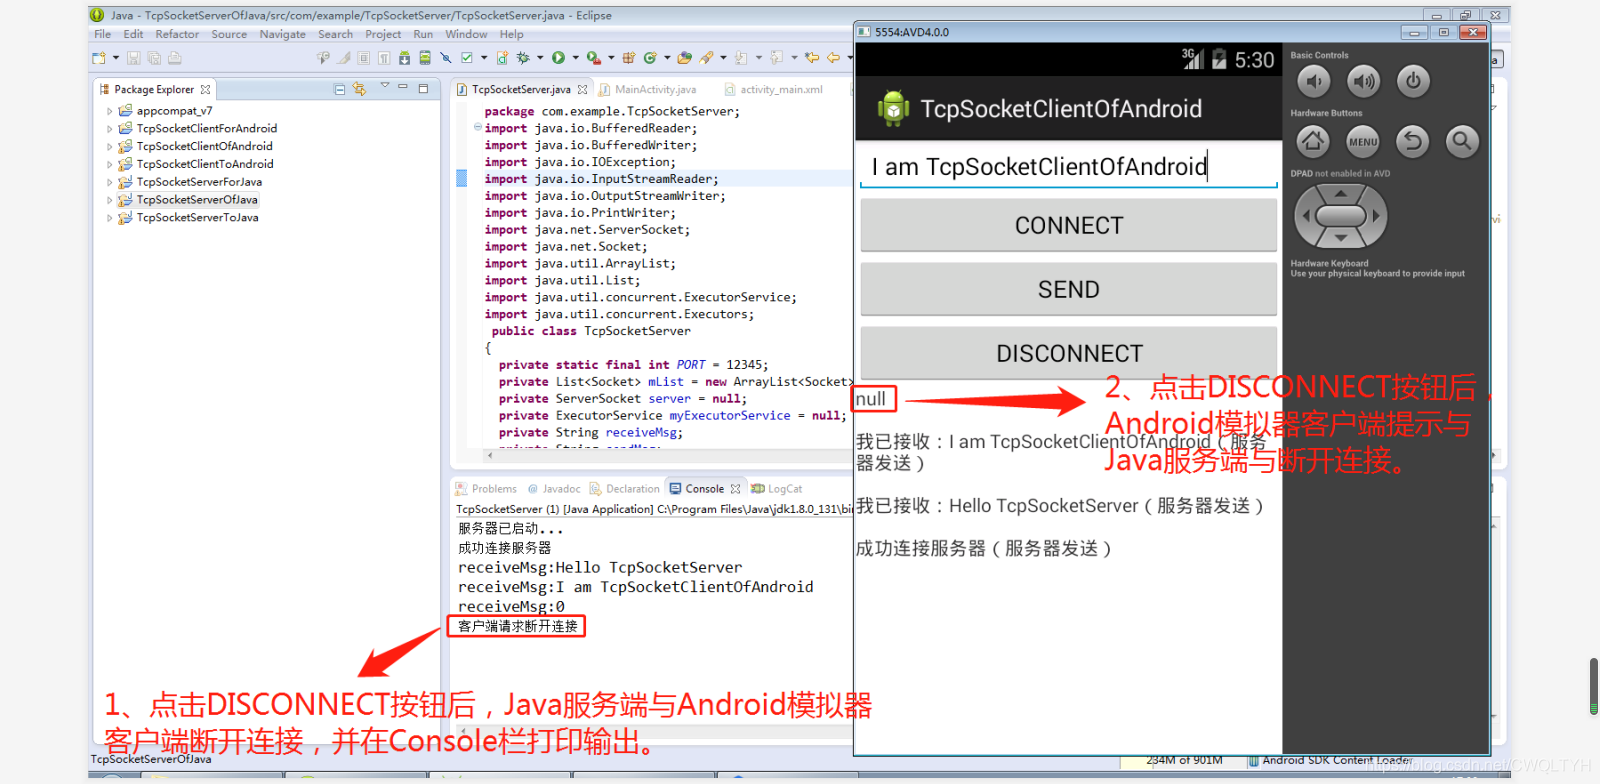
(11)、点击Android模拟器客户端界面上的DISCONNECT按钮
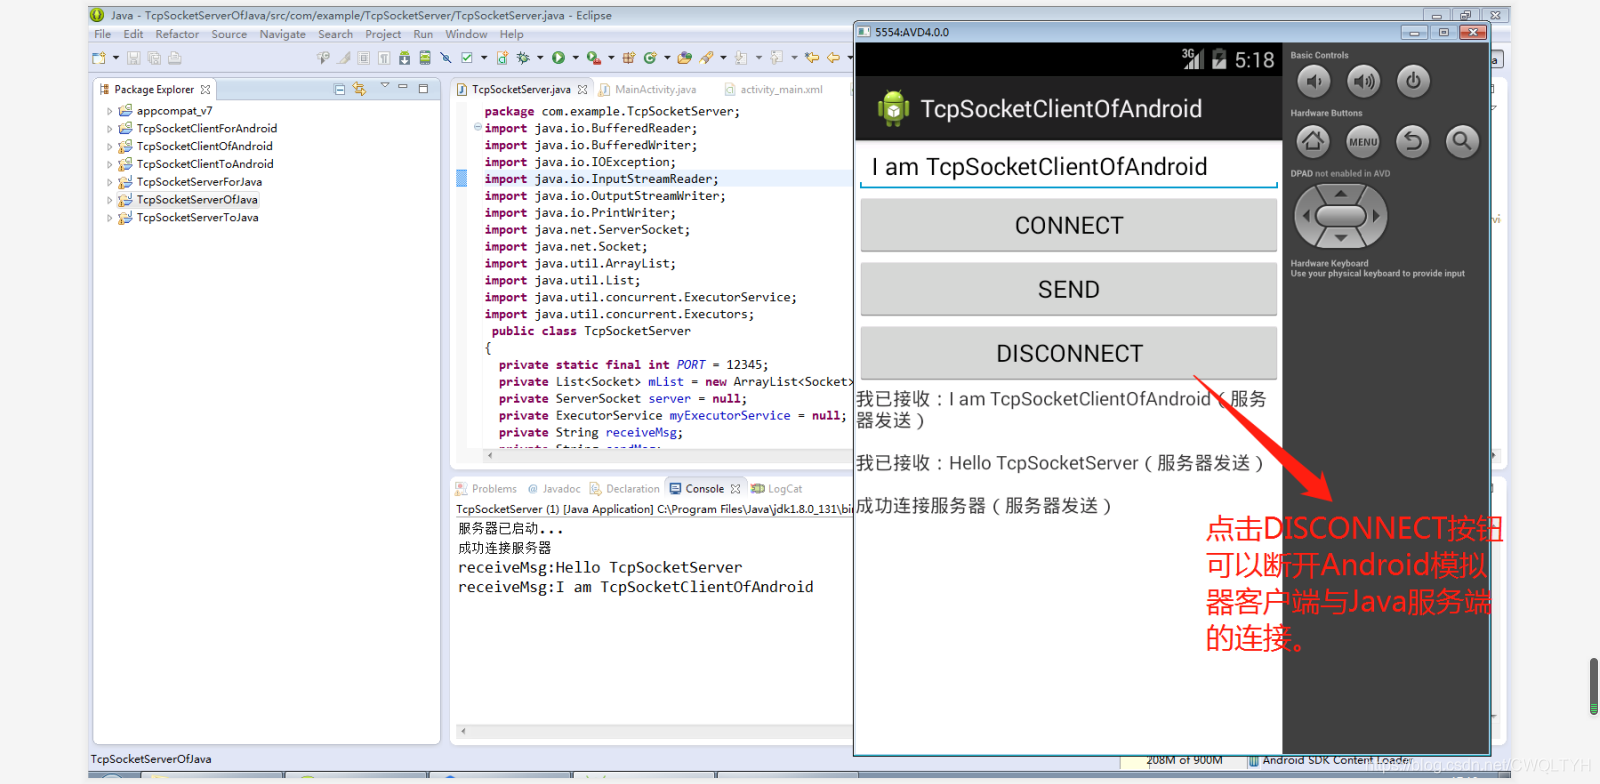
(12)、点击Android模拟器客户端界面上的DISCONNECT按钮后,Android模拟器客户端与Java服务端断开连接,Console栏打印输出信息,同时Android模拟器客户端界面接收Java服务端反馈回来的信息。