AOP使用了动态代理来抽取和增强冗余的代码块,首先就先复习了动态代理技术,很多都是固定写法,只有增强的方法需要改变。AOP的思想还是蛮好理解的,从切入点切出一个切面,切面周围可以加上抽取出来的冗余方法。当然最好用的还是环绕通知,spring框架提供的方式跟原生Java书写很类似,很惊喜。
动态代理
特点:
字节码随用随创建,随用随加载
作用:
不修改源码的基础上对方法增强
分类:
1.基于接口的动态代理
2.基于子类的动态代理
基于接口的动态代理:
1.涉及的类:Proxy
2.提供者:JDK官方
如何创建代理对象:
使用 Proxy类中的 newProxyInstance方法
创建代理对象的要求:
被代理类最少实现一个接口,如果没有则不能使用
newProxyInstance方法的参数:
1.ClassLoader:类加载器
它是用于加载代理对象字节码的,和被代理对象使用相同的类加载器。固定写法。
2.Class[]:字节码数组
它是用于让代理对象和被代理对象有相同方法。固定写法
3.InvocationHandler:用于提供增强的代码
它是让我们写如何代理,我们一般都是写一个该接口的实现类,通常情况下都是匿名内部类,但不是必须的。
Demo:
Producer proxyProducer=(Producer)Proxy.newProxyInstance(producer.getClass().getClassLoader(),producer.getClass().getInterfaces(),new InvocationHandler(){
	/**
	* 作用:执行被代理对象的任何接口方法都会经过该方法
	* 方法参数的含义
	* @param proxy 代理对象的引用
	* @param method 当前执行的方法
	* @param args 当前执行方法所需的参数
	* @return 和被代理对象方法有相同的返回值
	* @throws Throwable
	*/
	@Override
	public Object invoke(Object proxy,Method method,Object[] args)throws Throwable{
	//写增强代码
	return method.invoke(producer,args);
	}
});
基于子类的动态代理:
1.涉及的类:Enhancer
2.提供者:第三方cglib库
如何创建代理对象:
使用 Enhancer类中的 create方法
创建代理对象的要求:
被代理类不能是最终类
newProxyInstance方法的参数:
1.Class:字节码
它是用于指定被代理对象的字节码。
2.Callback:用于提供增强的代码
它是让我们写如何代理,我们一般都是写一个该接口的实现类,通常情况下都是匿名内部类,但不是必须的。
此接口的实现类都是谁用谁写。
一般写的都是该接口的子接口实现类:MethodInterceptor
Demo
Producer cglibProducer=(Producer)Enhancer.create(producer.getClass(),new MethodInterceptor(){
	/**
	* 作用:执行被代理对象的任何方法都会经过该方法
	* 方法参数的含义
	* @param proxy 代理对象的引用
	* @param method 当前执行的方法
	* @param args 当前执行方法所需的参数
	* 以上三个参数和基于接口的动态代理中invoke方法的参数是一样的
	* @return 和被代理对象方法有相同的返回值
	* @throws Throwable
	*/
	@Override
	public Object intercept(Object proxy,Method method,Object[] args,MethodProxy methodProxy)throws Throwable{
	//写增强代码
	return method.invoke(producer,args);;
	}
});
//调用
cglibProducer.增强的方法名称();
AOP的概念

作用:
把程序重复的代码抽取出来,在需要执行的时候,使用动态代理的计数,在不修改源码的基础上,对已有方法进行增强
优势:
1.减少重复代码
2.提高开发效率
3.维护方便
术语:
Joinpoint(连接点):
所谓连接点是指那些被拦截到的点。在spring中,这些点指的是方法,因为spring只支持方法类型的连接点。
Pointcut(切入点):
所谓切入点是指我们要对哪些Joinpoint进行拦截的定义。
Advice(通知/增强):
所谓通知是指拦截到Joinpoint之后所要做的事情就是通知。
通知的类型:前置通知,后置通知,异常通知,最终通知,环绕通知。
Introduction(引介):
引介是一种特殊的通知在不修改类代码的前提下,Introduction可以在运行期为类动态地添加一些方法或Field
Target(目标对象):
代理的目标对象
Weaving(织入):
是指把增强应用到目标对象来创建新的代理对象的过程。
spring采用动态代理织入,而AspectJ采用编译期织入和类装载期织入。
Proxy(代理):
一个类被AOP织入增强后,就产生一个结果代理类。
Aspect(切面):
是切入点和通知(引介)的结合。
spring中基于XML的AOP配置步骤
1.把通知Bean也交给spring来管理
2.使用aop:config标签表明开始AOP的配置
3.使用aop:aspect标签表明配置切面
id属性:是给切面提供一个唯一标识
ref属性:是指定通知类bean的Id
4.在aop:aspect标签内部使用对应标签来配置通知的类型
aop:before:表示配置前置通知
method属性:用于指定Logger类中哪个方法是前置通知
pointcut属性,用于指定切入点表达式,该表达式的含义指的是对业务层中哪些方法增强
切入点表达式的写法
关键字:execution(表达式)
表达式:访问修饰符 返回值 包名.包名.包名.类名.方法名(参数列表)
//标准的表达式写法:
    public void itRay.service.impl.AccountServiceImpl.saveAccount()
//访问修饰符可省略:
    void itRay.service.impl.AccountServiceImpl.saveAccount()
//返回值可以使用通配符,表示任意返回值:
    * itRay.service.impl.AccountServiceImpl.saveAccount()
//包名可以使用通配符,表示任意包,但是有几级包,就需要写几个*:
    * *.*.*.AccountServiceImpl.saveAccount()
//包名可以使用..表示当前包及其子包
    * *..AccountServiceImpl.saveAccount()
//类名和方法名都可以使用*来实现通配
    * *..*.*()
//全通配写法:
    * *..*.*(..)
参数列表:
1.可以直接写数据类型:
基本类型直接写名称
引用类型写包名.类名的方式
2.可以使用通配符表示任意类型,但是必须有参数
3.可以使用…表示有无参数均可,有参数可以是任意类型
实际开发中切入点表达式的通常写法:
//切到业务层实现类下的所有方法
* itRay.service.impl.*.*(..)
案例
使用xml实现
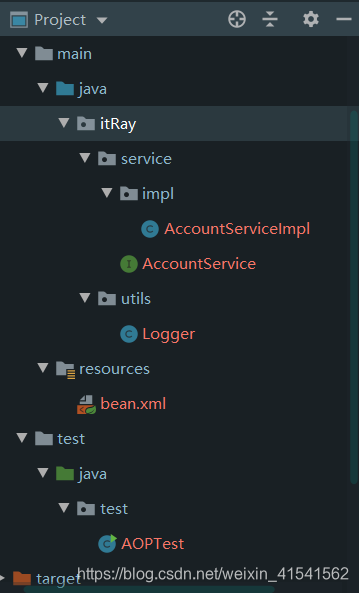
文件路径树如下:
pom.xml,导入需要的依赖坐标
<?xml version="1.0" encoding="UTF-8"?>
<project xmlns="http://maven.apache.org/POM/4.0.0"
         xmlns:xsi="http://www.w3.org/2001/XMLSchema-instance"
         xsi:schemaLocation="http://maven.apache.org/POM/4.0.0 http://maven.apache.org/xsd/maven-4.0.0.xsd">
    <modelVersion>4.0.0</modelVersion>

    <groupId>org.example</groupId>
    <artifactId>spring_AOP_xml</artifactId>
    <version>1.0-SNAPSHOT</version>
    <packaging>jar</packaging>

    <dependencies>
        <dependency>
            <groupId>org.springframework</groupId>
            <artifactId>spring-context</artifactId>
            <version>5.0.2.RELEASE</version>
        </dependency>

		<!--用来解析表达式-->
        <dependency>
            <groupId>org.aspectj</groupId>
            <artifactId>aspectjweaver</artifactId>
            <version>1.8.7</version>
        </dependency>


    </dependencies>

</project>
AccountService接口
package itRay.service;

/**
 * 账户的业务层接口
 */
public interface AccountService {
    /**
     * 模拟保存账户
     */
    void saveAccount();

    /**
     * 模拟更新账户
     */
    void updateAccount(int i);

    /**
     * 删除账户
     */
    int deleteAccount();
}
AccountServiceImpl实体类
package itRay.service.impl;

import itRay.service.AccountService;

public class AccountServiceImpl implements AccountService {
    public void saveAccount() {
        System.out.println("执行保存");
    }

    public void updateAccount(int i) {
        System.out.println("执行更新"+i);
    }

    public int deleteAccount() {
        System.out.println("执行删除");
        return 0;
    }
}
logger类,用来配置公共代码
package itRay.utils;

import org.aspectj.lang.ProceedingJoinPoint;

/**
 * 用于记录日志的工具类,提供了公共的代码
 */
public class Logger {
    /**
     * 前置通知
     */
    public void beforePrintLog(){
        System.out.println("前置通知Logger类中的beforePrintLog方法开始记录日志");
    }

    /**
     * 后置通知
     */
    public void afterReturnPrintLog(){
        System.out.println("后置通知Logger类中的afterReturnPrintLog方法开始记录日志");
    }

    /**
     * 异常通知
     */
    public void afterThrowPrintLog(){
        System.out.println("异常通知Logger类中的afterThrowPrintLog方法开始记录日志");
    }

    /**
     * 最终通知
     */
    public void afterPrintLog(){
        System.out.println("最终通知Logger类中的afterPrintLog方法开始记录日志");
    }

    /**
     * 环绕通知
     * 问题分析,当我们配置了环绕通知之后,切入点方法没有执行,而通知方法执行了。
     *
     * 解决通过对比动态代理中的环绕通知代码,发现动态代理的环绕通知有明确的切入点方法调用,而我们的代码中没有。
     *
     * Spring框架为我们提供了一个接口:ProceedingJoinPoint。该接口有一个方法proceed,此方法就相当于明确调用切入点方法。
     *
     * 该接口可以作为环绕通知的方法参数,在程序执行时,spring框架会为我们提供该接口的实现类供我们使用。
     */
    public Object aroundPrintLog(ProceedingJoinPoint pjp){
        Object rtValue=null;
        try{
            Object[] args = pjp.getArgs();  //得到方法执行所需的参数
            System.out.println("前置环绕通知Logger类中的aroundPrintLog方法开始记录日志");
            rtValue=pjp.proceed(args);  //明确调用业务层方法(切入点方法)
            System.out.println("后置环绕通知Logger类中的aroundPrintLog方法开始记录日志");
            return rtValue;
        }catch (Throwable t){
            System.out.println("异常环绕通知Logger类中的aroundPrintLog方法开始记录日志");
            throw new RuntimeException(t);
        }finally {
            System.out.println("最终环绕通知Logger类中的aroundPrintLog方法开始记录日志");
        }
    }
}
bean.xml,核心
<?xml version="1.0" encoding="UTF-8" ?>
<beans xmlns="http://www.springframework.org/schema/beans"
        xmlns:xsi="http://www.w3.org/2001/XMLSchema-instance"
        xmlns:aop="http://www.springframework.org/schema/aop"
        xsi:schemaLocation="http://www.springframework.org/schema/beans
            http://www.springframework.org/schema/beans/spring-beans.xsd
            http://www.springframework.org/schema/aop
            http://www.springframework.org/schema/aop/spring-aop.xsd">
    <!--配置spring的Ioc,把service对象配置进来-->
    <bean id="accountService" class="itRay.service.impl.AccountServiceImpl"></bean>
    <!--spring中基于XML的AOP配置步骤
        1.把通知Bean也交给spring来管理
        2.使用aop:config标签表明开始AOP的配置
        3.使用aop:aspect标签表明配置切面
            id属性:是给切面提供一个唯一标识
            ref属性:是指定通知类bean的Id
        4.在aop:aspect标签内部使用对应标签来配置通知的类型
            该示例是让printLog方法在切入点方法执行之前执行,是前置通知
            aop:before:表示配置前置通知
                method属性:用于指定Logger类中哪个方法是前置通知
                pointcut属性,用于指定切入点表达式,该表达式的含义指的是对业务层中哪些方法增强

            切入点表达式的写法:
                关键字:execution(表达式)
                表达式:访问修饰符 返回值 包名.包名.包名.类名.方法名(参数列表)
                标准的表达式写法:
                    public void itRay.service.impl.AccountServiceImpl.saveAccount()
                访问修饰符可省略:
                    void itRay.service.impl.AccountServiceImpl.saveAccount()
                返回值可以使用通配符,表示任意返回值:
                    * itRay.service.impl.AccountServiceImpl.saveAccount()
                包名可以使用通配符,表示任意包,但是有几级包,就需要写几个*:
                    * *.*.*.AccountServiceImpl.saveAccount()
                包名可以使用..表示当前包及其子包
                    * *..AccountServiceImpl.saveAccount()
                类名和方法名都可以使用*来实现通配
                    * *..*.*()
                全通配写法:
                    * *..*.*(..)
                参数列表:
                    可以直接写数据类型:
                        基本类型直接写名称
                        引用类型写包名.类名的方式
                    可以使用通配符表示任意类型,但是必须有参数
                    可以使用..表示有无参数均可,有参数可以是任意类型
                实际开发中切入点表达式的通常写法:
                    切到业务层实现类下的所有方法
                        * itRay.service.impl.*.*(..)
-->

    <!--配置Logger类-->
    <bean id="logger" class="itRay.utils.Logger"></bean>

    <!--配置AOP-->
    <aop:config>
        <!--配置切入点表达式,id属性用于指定表达式的唯一标识,expression属性用于指定表达式内容。
            此标签写在asp:aspect标签内部只能当前切面使用
            它还可以写在asp:aspect外面,此时就变成了所有切面可用-->
        <aop:pointcut id="pt1" expression="execution(* itRay.service.impl.*.*(..))"/>
        <!--配置切面-->
        <aop:aspect id="logAdvice" ref="logger">
            <!--配置通知的类型,并且建立通知方法和切入点方法的关联-->
            <!--配置前置通知
            <aop:before method="beforePrintLog" pointcut-ref="pt1"></aop:before> -->
            <!--配置后置通知
            <aop:after-returning method="afterReturnPrintLog" pointcut-ref="pt1"></aop:after-returning> -->
            <!--配置异常通知
            <aop:after-throwing method="afterThrowPrintLog" pointcut-ref="pt1"></aop:after-throwing> -->
            <!--配置最终通知
            <aop:after method="afterPrintLog" pointcut-ref="pt1"></aop:after> -->
            <!--配置环绕通知-->
            <aop:around method="aroundPrintLog" pointcut-ref="pt1"></aop:around>
        </aop:aspect>
    </aop:config>
</beans>
AOPTest,测试类
package test;

import itRay.service.AccountService;
import org.springframework.context.ApplicationContext;
import org.springframework.context.support.ClassPathXmlApplicationContext;

public class AOPTest {
    public static void main(String[] args) {
        ApplicationContext ac=new ClassPathXmlApplicationContext("bean.xml");
        AccountService as = (AccountService) ac.getBean("accountService");
        as.saveAccount();
    }
}
测试结果

使用注解实现
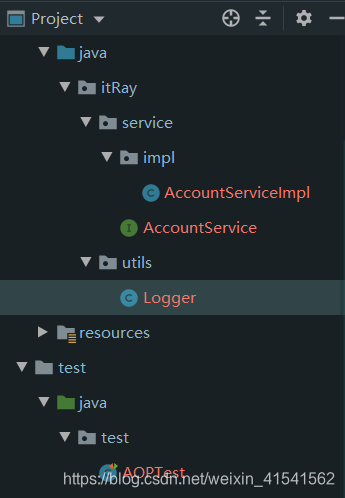
文件路径树如下:
pom.xml,导入依赖坐标
<?xml version="1.0" encoding="UTF-8"?>
<project xmlns="http://maven.apache.org/POM/4.0.0"
         xmlns:xsi="http://www.w3.org/2001/XMLSchema-instance"
         xsi:schemaLocation="http://maven.apache.org/POM/4.0.0 http://maven.apache.org/xsd/maven-4.0.0.xsd">
    <modelVersion>4.0.0</modelVersion>

    <groupId>org.example</groupId>
    <artifactId>spring_AOP_annotation</artifactId>
    <version>1.0-SNAPSHOT</version>
    <packaging>jar</packaging>

    <dependencies>
        <dependency>
            <groupId>org.springframework</groupId>
            <artifactId>spring-context</artifactId>
            <version>5.0.2.RELEASE</version>
        </dependency>

        <dependency>
            <groupId>org.springframework</groupId>
            <artifactId>spring-test</artifactId>
            <version>5.0.2.RELEASE</version>
        </dependency>

        <dependency>
            <groupId>org.aspectj</groupId>
            <artifactId>aspectjweaver</artifactId>
            <version>1.8.7</version>
        </dependency>

        <dependency>
            <groupId>junit</groupId>
            <artifactId>junit</artifactId>
            <version>4.12</version>
            <scope>test</scope>
        </dependency>

    </dependencies>


</project>
AccountServiceImpl实体类
package itRay.service.impl;

import itRay.service.AccountService;
import org.springframework.stereotype.Service;

@Service("accountService")
public class AccountServiceImpl implements AccountService {
    public void saveAccount() {
        System.out.println("执行保存");
    }

    public void updateAccount(int i) {
        System.out.println("执行更新"+i);
    }

    public int deleteAccount() {
        System.out.println("执行删除");
        return 0;
    }
}
logger类
package itRay.utils;

import org.aspectj.lang.ProceedingJoinPoint;
import org.aspectj.lang.annotation.*;
import org.springframework.context.annotation.ComponentScan;
import org.springframework.context.annotation.Configuration;
import org.springframework.context.annotation.EnableAspectJAutoProxy;
import org.springframework.stereotype.Component;

/**
 * 用于记录日志的工具类,提供了公共的代码
 */
@Configuration//表示为配置类
@ComponentScan(basePackages = "itRay")//表示创建核心容器时扫描这些包
@EnableAspectJAutoProxy//表示配置spring开启注解AOP的支持
@Component("logger")//表示注入核心容器
@Aspect//表示当前类是一个切面类

public class Logger {
    @Pointcut("execution(* itRay.service.impl.*.*(..))")
    private void pt1(){ }
    /**
     * 前置通知
     */
    //@Before("pt1()")
    public void beforePrintLog(){
        System.out.println("前置通知Logger类中的beforePrintLog方法开始记录日志");
    }

    /**
     * 后置通知
     */
    //@AfterReturning("pt1()")
    public void afterReturnPrintLog(){
        System.out.println("后置通知Logger类中的afterReturnPrintLog方法开始记录日志");
    }

    /**
     * 异常通知
     */
    //AfterThrowing("pt1()")
    public void afterThrowPrintLog(){
        System.out.println("异常通知Logger类中的afterThrowPrintLog方法开始记录日志");
    }

    /**
     * 最终通知
     */
    //@After("pt1()")
    public void afterPrintLog(){
        System.out.println("最终通知Logger类中的afterPrintLog方法开始记录日志");
    }

    /**
     * 环绕通知
     * 问题分析,当我们配置了环绕通知之后,切入点方法没有执行,而通知方法执行了。
     *
     * 解决通过对比动态代理中的环绕通知代码,发现动态代理的环绕通知有明确的切入点方法调用,而我们的代码中没有。
     *
     * Spring框架为我们提供了一个接口:ProceedingJoinPoint。该接口有一个方法proceed,此方法就相当于明确调用切入点方法。
     *
     * 该接口可以作为环绕通知的方法参数,在程序执行时,spring框架会为我们提供该接口的实现类供我们使用。
     */
    @Around("pt1()")
    public Object aroundPrintLog(ProceedingJoinPoint pjp){
        Object rtValue=null;
        try{
            Object[] args = pjp.getArgs();  //得到方法执行所需的参数
            System.out.println("前置环绕通知Logger类中的aroundPrintLog方法开始记录日志");
            rtValue=pjp.proceed(args);  //明确调用业务层方法(切入点方法)
            System.out.println("后置环绕通知Logger类中的aroundPrintLog方法开始记录日志");
            return rtValue;
        }catch (Throwable t){
            System.out.println("异常环绕通知Logger类中的aroundPrintLog方法开始记录日志");
            throw new RuntimeException(t);
        }finally {
            System.out.println("最终环绕通知Logger类中的aroundPrintLog方法开始记录日志");
        }
    }
}
AOPTest,测试类
package test;

import itRay.service.AccountService;
import itRay.utils.Logger;
import org.junit.Test;
import org.junit.runner.RunWith;
import org.springframework.beans.factory.annotation.Autowired;
import org.springframework.test.context.ContextConfiguration;
import org.springframework.test.context.junit4.SpringJUnit4ClassRunner;

/**
 * 使用junit单元测试
 * Spring整合junit的配置
 *      1.导入spring整合junit的jar
 *      2.使用Junit提供的注解把原有的main方法替换,替换成spring提供的
 *      @Runwith
 *      3.告知spring的运行器,spring和ioc创建是基于xml还是注解的,并且说明位置
 *          @ContextConfiguration
 *              Location:指定xml文件的位置,加上classpath关键字,表示在类路径下
 *              classes:指定注解类所在地位置
 *     当我们使用spring 5.x版本的时候,要求junit的jar必须是4.12及以上
 */
@RunWith(SpringJUnit4ClassRunner.class)
@ContextConfiguration(classes = Logger.class)
public class AOPTest {
    @Autowired
    private AccountService as=null;
    @Test
    public void testSaveAccount(){
        as.saveAccount();
    }
}
测试结果

这是使用环绕通知的结果,如果使用多种通知,结果会是以下
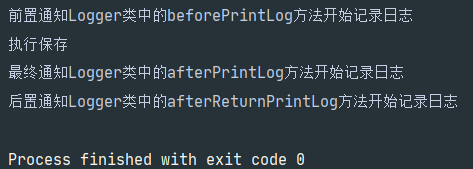
可以看到最终通知和后置通知的顺序颠倒了,所以推荐使用环绕通知