前言
路由框架是干什么的:
首先看百度百科,路由_百度百科,“路由(routing)是指分组从源到目的地时,决定端到端路径的网络范围的进程。” 在Android程序里,相当于有一个可以帮用户转发两个客户的通信信息。比如页面路由转发,即Activity跳转,但这里的框架不限于此。
我需要么?
一般android开发中,进行页面跳转时,一般写法如下:
Intent intent = new Intent(mContext, XXActivity.class);
intent.putExtra(“key”,“value”);
startActivity(intent);
这样的写法通常导致依赖性增加,各种跳转添加的intent-filter不好维护,不利多人开发。项目做到一定程度,代码量和功能集都非常大,导致耦合严重,不利于应对功能变化。所以我们要组件化开发,分成多个module由不同的人开发,不同module间的通信和页面跳转就需要路由框架支持。
ARouter框架
ARouter:一个用于帮助 Android App 进行组件化改造的框架 —— 支持模块间的路由、通信、解耦。
准备知识:
要想理解本篇所涉及的知识,需要事先做一定的功课,如果都了解可以忽略。
- 注解知识,路由框架通过注解进行依赖注入。有需要可以参考:Android注解-看这篇文章就够了
- APT即注解处理器或者反射知识。由于本篇的注解类型相比与简单框架难度有所提高,有需要的可以参考:手写简化EventBus,理解框架核心原理,此篇为反射实现。 和手写简化EventBus之注解处理器方式,理解框架核心原理。 由于eventbus框架较简单,对此框架熟悉的可以先看此两篇文章加深过程印象。 对AutoService和javapoet有一定了解。
- javapoet, 模板文件生成代码的框架。可以自动按我们的设定去生成代码。
ARouter框架使用
想要学习一个框架,首先需要了解框架的基本使用,然后才能对框架中代码的作用有一定的了解,当然所有的源码都是为了使用设定的。由于框架目前的功能较多,这里只提纲挈领的介绍,最终我们自己动手撸框架也是实现其核心原理,否则,要实现一样功能集的框架那时间就太久了。如果想看详细说明,可以参见ARouter框架的git地址:https://github.com/alibaba/ARouter/blob/master/README_CN.md
添加依赖和配置
android {
    defaultConfig {
        ...
        javaCompileOptions {
            annotationProcessorOptions {
            //这里是在gradle配置中将module的名字作为参数传入,可以在注解处理器中的init方法中收到,用来生成不同的类文件
                arguments = [AROUTER_MODULE_NAME: project.getName()]
            }
        }
    }
}

dependencies {
    // 替换成最新版本, 需要注意的是api
    // 要与compiler匹配使用,均使用最新版可以保证兼容
    compile 'com.alibaba:arouter-api:x.x.x'
    //每个使用了注解的module都需要添加,用来开始注解处理
    annotationProcessor 'com.alibaba:arouter-compiler:x.x.x'
    ...
}
添加注解
// 在支持路由的页面上添加注解(必选)
// 这里的路径需要注意的是至少需要有两级,/xx/xx, 注解处理器生成模板代码时会根据第一级名字生成类名。
@Route(path = "/test/activity")
public class YourActivity extend Activity {
    ...
}
初始化SDK
ARouter.init(mApplication); // 尽可能早,推荐在Application中初始化
发起路由操作
// 1. 应用内简单的跳转(通过URL跳转在'进阶用法'中)
ARouter.getInstance().build("/test/activity").navigation();

// 2. 跳转并携带参数
ARouter.getInstance().build("/test/1")
            .withLong("key1", 666L)
            .withString("key3", "888")
            .withObject("key4", new Test("Jack", "Rose"))
            .navigation();
通过依赖注入解耦:服务管理(一) 暴露服务
由于我们不只会使用页面跳转,还会调用其他module提供的接口方法,也可以通过路由框架进行解耦,依赖注入。
// 声明接口,其他组件通过接口来调用服务,这里对外提供了一个方法接口,而此接口需要继承IProvider,用于路由框架知道此接口需要处理,即依赖注入。
public interface HelloService extends IProvider {
    String sayHello(String name);
}

// 实现接口
@Route(path = "/yourservicegroupname/hello", name = "测试服务")
public class HelloServiceImpl implements HelloService {

    @Override
    public String sayHello(String name) {
    return "hello, " + name;
    }
....
}
通过依赖注入解耦:服务管理(二) 发现服务
public class Test {
    @Autowired
    HelloService helloService;

    @Autowired(name = "/yourservicegroupname/hello")
    HelloService helloService2;
    HelloService helloService3;
    HelloService helloService4;

    public Test() {
    ARouter.getInstance().inject(this);
    }

    public void testService() {
    // 1. (推荐)使用依赖注入的方式发现服务,通过注解标注字段,即可使用,无需主动获取
    // Autowired注解中标注name之后,将会使用byName的方式注入对应的字段,不设置name属性,会默认使用byType的方式发现服务(当同一接口有多个实现的时候,必须使用byName的方式发现服务)
    helloService.sayHello("Vergil");
    helloService2.sayHello("Vergil");

    // 2. 使用依赖查找的方式发现服务,主动去发现服务并使用,下面两种方式分别是byName和byType
    helloService3 = ARouter.getInstance().navigation(HelloService.class);
    helloService4 = (HelloService) ARouter.getInstance().build("/yourservicegroupname/hello").navigation();
    helloService3.sayHello("Vergil");
    helloService4.sayHello("Vergil");
    }
}
框架原理
如下为Arouter路由框架的核心部分原理图。其实也和事件总线框架有相似的地方,就是代码中不需要直接依赖调用方的类,而是由中间层进行统管调度转发。
 上节中框架使用例子中的path路径,即是两方联络的暗号,这样,如果是两个模块或者两个组件即不需要直接联系,而是由这个框架去完成通信。 如果有多个模块或组件呢,那就像是下图所示黑色部分的互相联系调用,各模块互相依赖类方法,改动一处可能影响多个组件的功能,而绿色箭头则使用了路由框架,对需要依赖的组件都由路由进行联系,自己维护的代码对其他组件没有依赖。

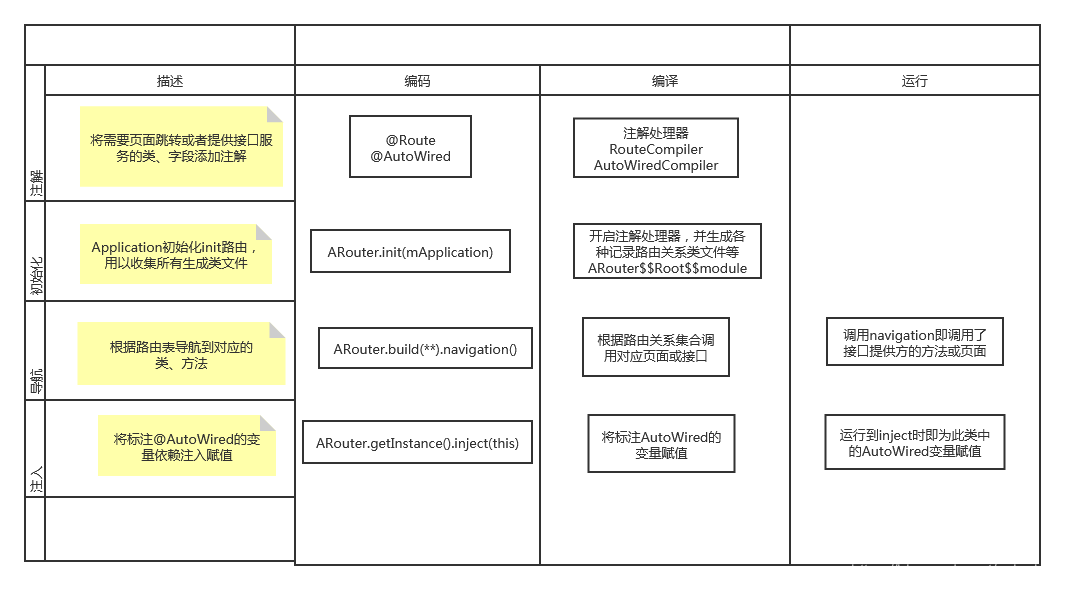
手写路由
接下来我们开始根据理解手写路由框架,当然大部分设计是参考ARouter框架的源码,我们只把核心部分代码和部分数据集合参考使用到手写框架中。ARouter目前的功能集很强大,这里只抓住主干了解核心,这样,其他部分的实现也是类似的,我们便能够更快的理解。为了与ARouter进行区分,这里我们改名为ZRouter。通过本篇内容,希望可以帮助需要的人,从简单的框架理解核心设计原理,然后再去学习ARouter的源码,会收到事半功倍的效果。
相关源码见github地址:https://github.com/qingdaofu1/ZRouter
1.自定义注解
根据ARouter的使用经验,我们需要创建自定义注解,这是最基础的工作。这里采用和ARouter同样的注解名字,以方便我们联想到ARouter的使用经验,加深印象。
为了管理注解、方便路由框架使用、应用使用和注解处理器解析,这里将注解单独module管理,不过这里是java-library module。如下为自定义注解Route和AutoWired,功能和ARouter的注解功能一致,前者是页面跳转或接口路由,用path指代目标,后者是变量的注解,用以传递值和调用接口。
@Target(ElementType.TYPE)
@Retention(RetentionPolicy.CLASS)
public @interface Route {
    String path();
}
@Target(ElementType.FIELD)
@Retention(RetentionPolicy.CLASS)
public @interface AutoWired {
    String name() default "";
}
另外,为了管理各种使用注解的类,还需要自定义RouteType用以区分不同类的使用,如Activity、Fragment、Provider等。
2.创建路由Api
第二步即创建路由SDK接口,用于向用户提供功能接口,用户按照接口使用规范去实现组件化的解耦能力。
基本接口如下,这里借鉴ARouter的同名方法,并用自己的源码实现功能,当然思路有借鉴☻。具体方法的含义请参阅ARouter基本使用。
public static void init(Application application)
public RouteManager build(String path)
public <T> T navigation(Class<? extends T> serviceClass)
public void inject(Object object)
根据接口设计类文件名如下所示:
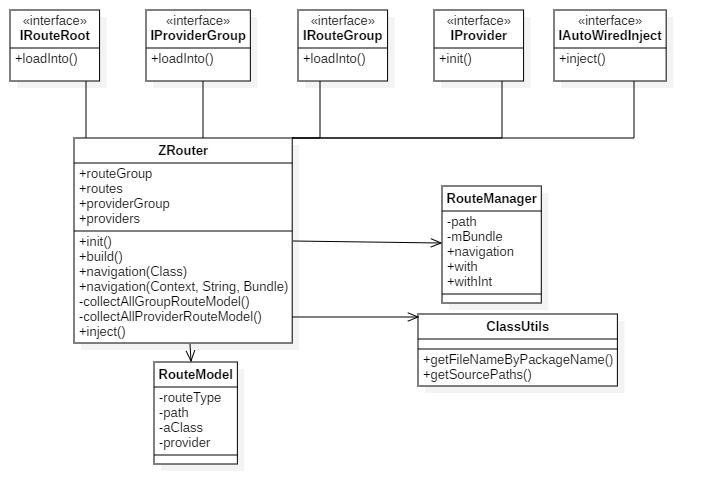 设计的多个Interface接口都是用于注解生成类文件需要继承实现的接口,这样,路由框架就能够获取生成类文件生成的页面或接口信息。
重点是ClassUtils中的两个方法,getFileNameByPackageName用来获得所有对应包名的类文件名,当然,下一节我们会知道,生成的类都是在固定的包路径,可以方便我们全部获取。
/**
     * 通过指定包名,扫描包下面包含的所有的ClassName
     *
     * @param context     U know
     * @param packageName 包名
     * @return 所有class的集合
     */
    public static Set<String> getFileNameByPackageName(Context context, final String packageName) throws PackageManager.NameNotFoundException, IOException, InterruptedException {
和getSourcePaths获取所有dex文件路径
  /**
     * get all the dex path
     *
     * @param context the application context
     * @return all the dex path
     * @throws PackageManager.NameNotFoundException
     * @throws IOException
     */
    public static List<String> getSourcePaths(Context context) throws PackageManager.NameNotFoundException, IOException {
3.生成模板类
模板类的生成,一个可以根据自己设定的规则生成,为了普适性,需要考虑不会和用户的类文件有冲突。 这里呢,就不浪费脑细胞了 ,依葫芦画瓢。ARouter什么规则,我们也按其规则设定,不过文件的Interface接口文件都已经在步骤2中确定了的。这里的改动是将ARouter改为ZRouter。
 这里呢肯定是经过一番测试,最终确定了ARouter生成的文件规则。
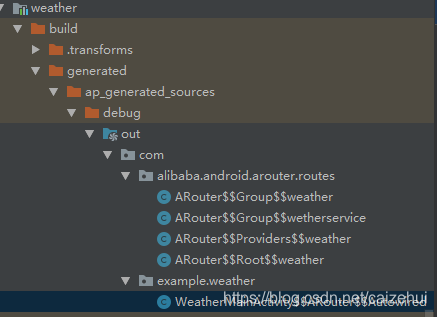
ZRouter$$Root$$moduleName:
此文件记录所有Activity页面信息和所有提供服务的继承了IProvider的生成类信息,一个module只会生成一个此类,且在固定的包名下,ARouter是生成在com.alibaba.android.arouter.routes包路径下。
public class ZRouter$$Root$$WeatherModule implements IRouteRoot {
    @Override
    public void loadInto(Map<String, Class<? extends IRouteGroup>> routes) {
        routes.put("weathermodule", ZRouter$$Group$$weathermodule.class);
        routes.put("wetherservice", ZRouter$$Group$$weatherservice.class);
    }
}
ZRouter$$Providers$$moduleName:
此类记录所有提供IProvider服务的类的信息,一个module只会生成一个类。且在固定的包名下,ARouter是生成在com.alibaba.android.arouter.routes包路径下。
public class ZRouter$$Providers$$weathermodule implements IProviderGroup {
    @Override
    public void loadInto(Map<String, RouteModel> providers) {
        providers.put("com.example.weathermodule.IWeatherService", new RouteModel(RouteType.PROVIDER,
                "/wetherservice/getinfo", WeatherServiceImpl.class));
    }
}
ZRouter$$Group$$groupName:
此类记录每个组名的所有页面信息,每个分组生成一个类文件。即如果@Route(path = “/test/activity”),则test是组名。且在固定的包名下,ARouter是生成在com.alibaba.android.arouter.routes包路径下。
public class ZRouter$$Group$$weathermodule implements IRouteGroup {
    @Override
    public void loadInto(Map<String, RouteModel> atlas) {
        atlas.put("/weather/weatheractivity", new RouteModel(RouteType.ACTIVITY,
                "/weather/weatheractivity", WeatherMainActivity.class));
    }
}
groupName$$ZRouter$$AutoWired:
此文件为类中注解了AutoWired的变量进行依赖注入赋值,即调用inject时,通过参数this,根据路由映射表对变量进行赋值。此类生成在对应文件的相同包名路径下。
public class WeatherMainActivity$$ZRouter$$AutoWired implements IAutoWiredInject {
    @Override
    public void inject(Object object) {
        WeatherMainActivity substitute = (WeatherMainActivity) object;
        substitute.msg = substitute.getIntent().getStringExtra("map");
    }
}
到这里我们把模板文件生成ok了,接下来需要测试模板代码的正确性,因为这就是要注解处理器自动生成的代码部分,需要先确保模板的正确性。
由于我们是在源码目录中生成的,如果待会儿注解处理器生成了相同的类文件就会出现问题,为了规避,下一步,我们可以将分隔符$$改为$$$,用以区分,当然对应的ZRouter SDK中的方法中也要找对应的分隔符。
4.注解处理器生成代码
注解处理器是处理自定义注解使用的,本项目设定了两个自定义注解Route和AutoWired,所以我们需要两个注解处理器RouteCompiler和AutoWiredCompiler,名字可以自定义,但是类内部需要通过注解或实现抽象方法标明要处理的注解路径。
如RouteCompiler类:
@AutoService(Processor.class)
@SupportedSourceVersion(SourceVersion.RELEASE_7)
@SupportedAnnotationTypes("com.example.annotations.Route")
public class RouteCompiler extends BaseProcessor {
其中BaseProcessor 是抽离了两个注解处理器相同的工具类和公用变量部分,实际的抽象接口是要实现AbstractProcessor的process方法。
其gradle配置中需要加入如下配置。
dependencies {
    implementation group: 'com.google.auto.service', name: 'auto-service', version: '1.0-rc6'
    annotationProcessor 'com.google.auto.service:auto-service:1.0-rc6'
    implementation group: 'com.squareup', name: 'javapoet', version: '1.12.1'
    implementation project(path: ':annotations')
}
其中的各库需要详细了解的可以去搜索了解,这里就不再介绍了,再之前的手写Eventbus框架的文章里也有简单的介绍。 主要是通过javapoet框架实现上小节中的模板代码。哦,对了,这个注解处理器所在的module也是java-library类型。
在RouteCompiler类中,需要创建的类有:ZRouter$$Root$$moduleName,ZRouter$$Providers$$moduleName和按组数量创建的ZRouter$$Group$$groupName文件。这里就不贴代码了,最后会贴出github地址,有需要可以了解下,最主要的是练习javapoet的接口使用,只看用法说明不行,实际上手还是需要手动操作。
这里只附上主方法中的代码,相关文件具体实现见github地址:https://github.com/qingdaofu1/ZRouter。
 @Override
    public boolean process(Set<? extends TypeElement> annotations, RoundEnvironment roundEnv) {
        if (alreadyHandledModule.contains(moduleName)) {
            return false;
        }
        alreadyHandledModule.add(moduleName);
        Set<? extends Element> elements = roundEnv.getElementsAnnotatedWith(Route.class);
        Map<String, CompilerRouteModel> routeMap = new HashMap<>();
        for (Element element : elements) {
            TypeElement typeElement = (TypeElement) element;
            Route annotation = typeElement.getAnnotation(Route.class);
            String path = annotation.path();
            messager.printMessage(Diagnostic.Kind.NOTE, "path is " + path);

            //path = "/weather/weatheractivity"  获取GroupName   此例为weather
            String[] split = path.split("/");
            if (split.length < 3) {
                messager.printMessage(Diagnostic.Kind.NOTE, "the path is incorrect, need two \\");
                return false;
            }
            String groupName = split[1];
            CompilerRouteModel compilerRouteModel = routeMap.get(groupName);
            if (compilerRouteModel == null) {
                compilerRouteModel = new CompilerRouteModel();
                routeMap.put(groupName, compilerRouteModel);
            }
            //同一group的model的集合
            compilerRouteModel.putElement(path, typeElement);
        }


        createGroupFiles(routeMap);
        createProviderFile(providerMap);
        createRootFile(groupFileMap);
        return false;
    }
测试验证
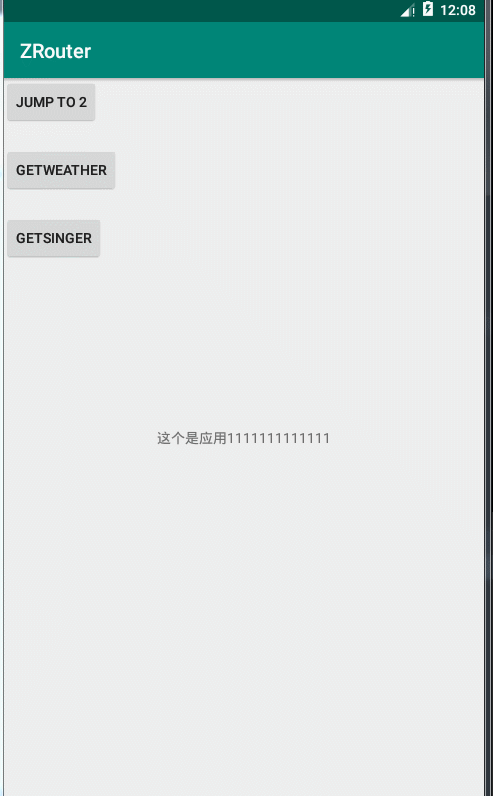
为了验证接口的正确性,一开始其实就设计了demo程序用于持续的验证。这里以两个module作为例子。其中app module可调用页面weather并传递String类型数据,和调用接口IWeatherService 、IMediaService 接口。 weathermodule的页面调用页面app,并传递String数据。
Module:app
这个页面的path设为"/main/activity", 即groupName为main,在生成的中间类文件中会有体现。且IWeatherService 有多种调用方式,本例示例了三种方式。
@Route(path = "/main/activity")
public class MainActivity extends AppCompatActivity {
    @AutoWired(name = "/wetherservice/getinfo")
    IWeatherService weatherService;

    @AutoWired(name="ok")
    public String extra;
    findViewById(R.id.btn_jump_app2).setOnClickListener(new View.OnClickListener() {
            @Override
            public void onClick(View v) {
                ZRouter.getInstance()
                        .build("/weather/weatheractivity")
                        .withString("map", "hello kitty")
                        .navigation();
                finish();
            }
        });
        Toast.makeText(this, "get extra = " + extra, Toast.LENGTH_SHORT).show();

        findViewById(R.id.btn_getweather).setOnClickListener(new View.OnClickListener() {
            @Override
            public void onClick(View v) {
                int type = 1;
                //方式1
//                String weatherInfo = weatherService.getWeatherInfo("上海");
//                 Toast.makeText(MainActivity.this, weatherInfo, Toast.LENGTH_SHORT).show();
                //方式2
//                IWeatherService weatherService1 = (IWeatherService) ZRouter.getInstance()
//                        .build("/wetherservice/getinfo")
//                        .navigation();
//                String weatherInfo1 = weatherService1.getWeatherInfo("北京");
//                Toast.makeText(MainActivity.this, weatherInfo1, Toast.LENGTH_SHORT).show();
                //方式3
                IWeatherService weatherService2  = ZRouter.getInstance()
                        .navigation(IWeatherService.class);
                String weatherInfo2 = weatherService2.getWeatherInfo("杭州");
                Toast.makeText(MainActivity.this, weatherInfo2, Toast.LENGTH_SHORT).show();
            }
        });

        findViewById(R.id.btn_getsinger).setOnClickListener(new View.OnClickListener() {
            @Override
            public void onClick(View v) {
                IMediaService mediaService = (IMediaService) ZRouter.getInstance()
                        .build("/wetherservice_group2/getsinger")
                        .navigation();
                Toast.makeText(MainActivity.this, " singer is "+mediaService.getArtister(), Toast.LENGTH_SHORT).show();
            }
        });
Module:weathermodule
activity界面的代码
@Route(path = "/weather/weatheractivity")
public class WeatherMainActivity extends AppCompatActivity {

    @AutoWired(name = "map")
    public String msg;

    @Override
    protected void onCreate(Bundle savedInstanceState) {
        super.onCreate(savedInstanceState);
        setContentView(R.layout.activity_weather_main);
        ZRouter.getInstance().inject(this);
        findViewById(R.id.btn_jump_to1).setOnClickListener(new View.OnClickListener() {
            @Override
            public void onClick(View v) {
                ZRouter.getInstance()
                        .build("/main/activity")
                        .withString("ok", "dddddddddddddd")
                        .navigation();
                finish();
            }
        });
        Toast.makeText(this, "get string extra is= " + msg, Toast.LENGTH_SHORT).show();
    }
}
然后是提供天气信息接口的实现类WeatherServiceImpl ,继承接口IWeatherService ,设了path为"/wetherservice/getinfo";
@Route(path = "/wetherservice/getinfo")
public class WeatherServiceImpl implements IWeatherService {
    @Override
    public String getWeatherInfo(String city) {
        return city + "今天天气挺好的";
    }

    @Override
    public void init(Context context) {

    }
}
最后是MediaImpl ,继承接口IMediaService
@Route(path = "/wetherservice_group2/getsinger")
public class MediaImpl implements IMediaService {
    @Override
    public String getArtister() {
        return "周杰伦";
    }

    @Override
    public void init(Context context) {

    }
}
验证结果:
后记
目前很多框架都使用了APT的框架,以实现其切面AOP编程的思想。注解处理器通了,几乎就可以很方便的了解大部分框架的实现原理。希望文章能够帮助到需要的人,如有任何问题欢迎留言沟通。