SpringCloud实战之路 | 应用篇(七)分布式配置中心Spring Cloud Config+Bus
文章内容输出来源:拉勾教育Java高薪训练营;
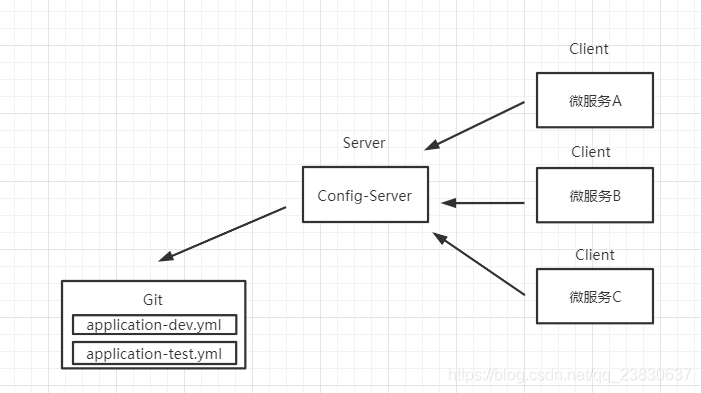
问题场景
在分布式环集群境下会存在多个微服务,并且在实际工作中还存在不同的环境(开发dev,测试test,生产prod),当我们需要修改他们的配置信息时(比如application.yml),不可能去一个一个修改,在一定场景下还需要在运行期间进行配置信息的调整,达到动态刷新配置信息的效果,在这种场景下,我们就需要引入分布式配置中心来对所有服务配置文件进行集中式管理。
Spring Cloud Config
Spring Cloud Config是一个分布是配置中心的解决方案,它主要包含Server端和Client端两个部分。
- Server端: 提供配置文件存储,以接口形式将配置文件内容提供出去,通过使用@EnableConfigServer注解在Spring boot 应用中嵌入
- Client端: 通过接口获取配置数据并初始化自己的应用服务
代码实现
Spring Cloud Config通过将配置文件托管到到远程的仓库中(默认是git),每个服务从git上获取到配置信息来进行加载。
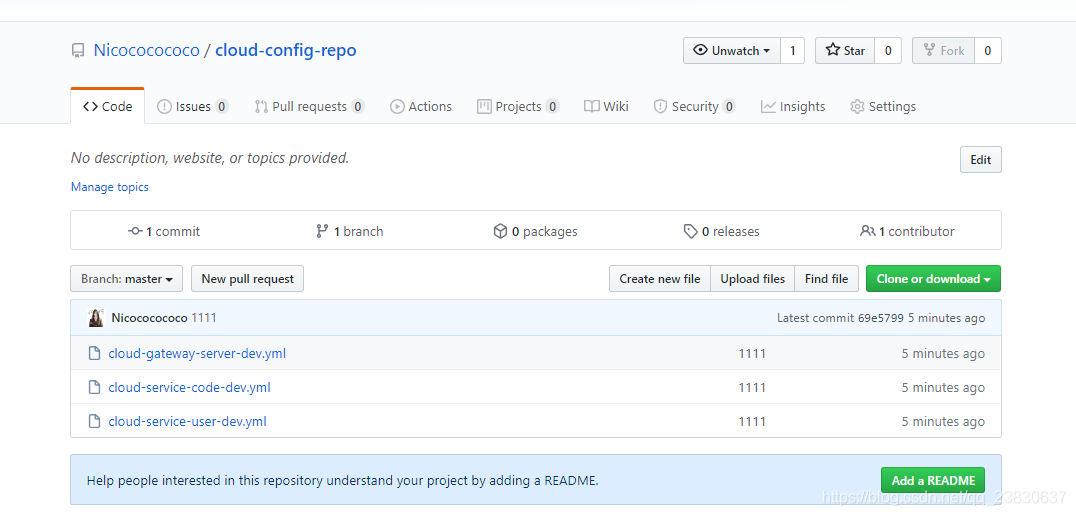
(一)创建配置信息仓库
登录到github,创建版本库(这里取名为cloud-config-repo),上传配置文件信息
配置文件命名规则:{application}-{profile}.yml或.properties
application对应项目名称,profile对应环境(dev:开发,test:测试,prod:生产)
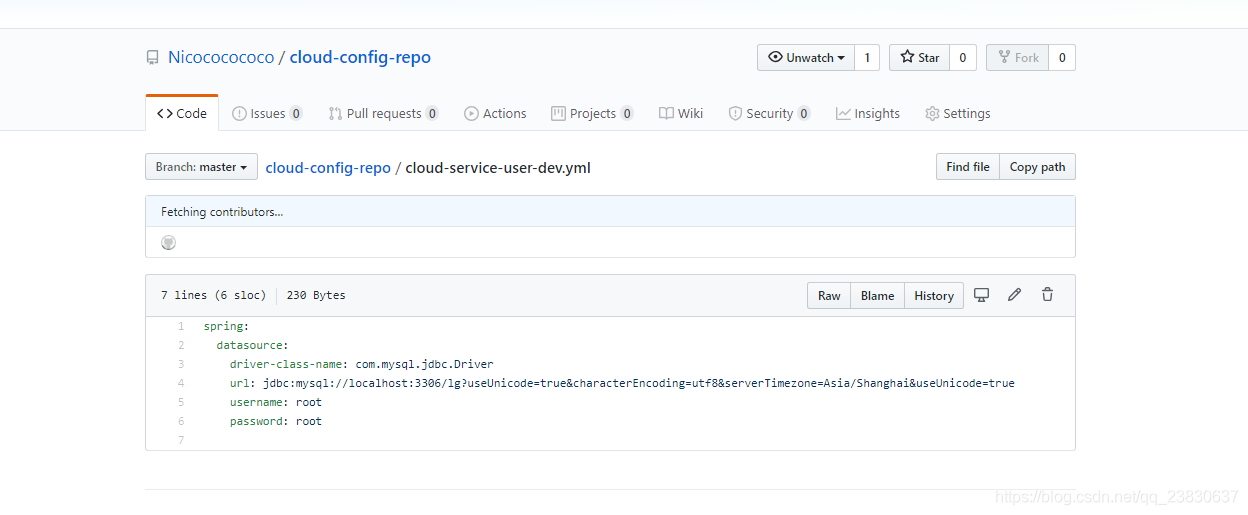
例如:这里创建了三个配置文件中的cloud-service-user-dev
其中:cloud-service-user对应{application},dev对应{profile}
(二)构建ConfigServer服务
引入maven依赖
<?xml version="1.0" encoding="UTF-8"?>
<project xmlns="http://maven.apache.org/POM/4.0.0"
         xmlns:xsi="http://www.w3.org/2001/XMLSchema-instance"
         xsi:schemaLocation="http://maven.apache.org/POM/4.0.0 http://maven.apache.org/xsd/maven-4.0.0.xsd">
    <parent>
        <artifactId>cloud-parent</artifactId>
        <groupId>com.cloud</groupId>
        <version>1.0-SNAPSHOT</version>
    </parent>
    <modelVersion>4.0.0</modelVersion>

    <artifactId>cloud-config-server</artifactId>

    <dependencies>
        <!--eureka client 客户端依赖引入-->
        <dependency>
            <groupId>org.springframework.cloud</groupId>
            <artifactId>spring-cloud-starter-netflix-eureka-client</artifactId>
        </dependency>
        <!--config配置中心服务端-->
        <dependency>
            <groupId>org.springframework.cloud</groupId>
            <artifactId>spring-cloud-config-server</artifactId>
        </dependency>
    </dependencies>


</project>
创建入口启动类
package com.cloud;

import org.springframework.boot.SpringApplication;
import org.springframework.boot.autoconfigure.SpringBootApplication;
import org.springframework.cloud.client.discovery.EnableDiscoveryClient;
import org.springframework.cloud.config.server.EnableConfigServer;

@SpringBootApplication
@EnableDiscoveryClient
@EnableConfigServer  // 开启配置中心功能
public class ConfigServerApplication {

    public static void main(String[] args) {
        SpringApplication.run(ConfigServerApplication.class,args);
    }

}
创建配置文件yml
server:
  port: 9006
#注册到Eureka服务中心
eureka:
  client:
    service-url:
      # 注册到集群,就把多个Eurekaserver地址使用逗号连接起来即可;注册到单实例(非集群模式),那就写一个就ok
      defaultZone: http://LagouEurekaServerA:8761/eureka,http://LagouEurekaServerB:8762/eureka
  instance:
    prefer-ip-address: true
    instance-id: ${spring.cloud.client.ip-address}:${spring.application.name}:${server.port}:@project.version@
spring:
  application:
    name: cloud-config-server
  cloud:
    config:
      server:
        git:
          uri: https://github.com/Nicococococo/cloud-config-repo.git #配置git服务地址 即上文创建的git仓库地址
          username: [email protected] #配置git用户名
          password: 123456 #配置git密码
          search-paths:
            - cloud-config-repo #对应上文创建的git的资源库名称
      # 读取分支
      label: master
management:
  endpoints:
    web:
      exposure:
        include: "*"
  # 暴露健康接口的细节
  endpoint:
    health:
      show-details: always
(三)构建Client端服务
每个微服务引入maven依赖
		<!--Config 客户端依赖-->
        <dependency>
            <groupId>org.springframework.cloud</groupId>
            <artifactId>spring-cloud-config-client</artifactId>
        </dependency>
		<!-- Actuator可以帮助你监控和管理Spring Boot应用-->
        <dependency>
            <groupId>org.springframework.boot</groupId>
            <artifactId>spring-boot-starter-actuator</artifactId>
        </dependency>
修改微服务application.yml配置⽂件,添加配置中心的地址
server:
  port: 8080
#注册到Eureka服务中心
eureka:
  client:
    service-url:
      # 注册到集群,就把多个Eurekaserver地址使用逗号连接起来即可;注册到单实例(非集群模式),那就写一个就ok
      defaultZone: http://EurekaServerA:8761/eureka,http://EurekaServerB:8762/eureka
  instance:
    prefer-ip-address: true
    instance-id: ${spring.cloud.client.ip-address}:${spring.application.name}:${server.port}:@project.version@
spring:
  application:
    name: cloud-service-user
  datasource:
    jpa:
      database: MySQL
      show-sql: true
      hibernate:
        naming:
          physical-strategy: org.hibernate.boot.model.naming.PhysicalNamingStrategyStandardImpl  #避免将驼峰命名转换为下划线命名
  cloud:
    # config客户端配置,和ConfigServer通信,并告知ConfigServer希望获取的配置信息在哪个文件中
    config:
      name: cloud-service-user  #配置文件名称 对应上文在git仓库中创建的配置文件名称的{application}
      profile: dev  #后缀名称  对应上文在git仓库中创建的配置文件名称的{profile}
      label: master #分支名称
      uri: http://localhost:9006    #ConfigServer配置中心地址
management:
  endpoints:
    web:
      exposure:
        include: "*"
  # 暴露健康接口的细节
  endpoint:
    health:
      show-details: always
完成Client端的修改
到这里就完成Spring Cloud Config的搭建了,在启动服务后,会自动从git上拉去配置文件信息来进行加载
Config配置手动刷新
在配置文件进行修改后可以通过手动向client客户端发送post请求http://localhost:8080/actuator/refresh,即可刷新配置信息,但是需要在Client客户端中使用到配置信息的类上加上@RefreshScope
Config配置自动刷新
在微服务架构中可以通过结合消息总线Bus实现分布式配置的自动更新
config server引入依赖
<dependency>
 <groupId>org.springframework.cloud</groupId>
 <artifactId>spring-cloud-starter-bus-amqp</artifactId>
</dependency>
config server添加配置
spring:
 rabbitmq:
   host: 127.0.0.1
   port: 5672
   username: guest
   password: guest
重启服务,更改配置之后发送请求http://localhost:9003/actuator/bus-refresh,各客户端服务配置即可实现自动刷新