为了更加展示tfrecord数据的相关操作,笔者后续又写了一个实践的简单例子进一步解释,具体可以看:
https://blog.csdn.net/weixin_42001089/article/details/90236241
正文:
tfrecord数据文件是一种将图像数据和标签统一存储的二进制文件,能更好的利用内存,在tensorflow中快速的复制,移动,读取,存储等.
一首先是转化为tfrecord文件格式:
-
-
with tf.python_io.TFRecordWriter(output_filename)
as tfrecord_writer:
-
-
#生成protocol数据类型
-
example = image_to_tfexample(image, labels)
-
tfrecord_writer.write(example.SerializeToString())
其中output_filename就是定义输出的文件位置如./datasets/train.tfrecords
然后通过tf.python_io.TFRecordWriter class中的write方法将tfrecord文件写入到output_filename
一般的话这里会将数据集分成测试集和训练集,所以可以这样定义一个生成tfrecord的函数:
-
def gen_tfrecord(split_name, filenames, dataset_dir):
-
assert split_name
in [
'train',
'test']
-
-
with tf.Session()
as sess:
-
#定义tfrecord文件的路径+名字
-
output_filename = os.path.join(dataset_dir,split_name +
'.tfrecords')
-
with tf.python_io.TFRecordWriter(output_filename)
as tfrecord_writer:
-
for i,filename
in enumerate(filenames):
-
try:
-
sys.stdout.write(
'\r>> Converting image %d/%d' % (i+
1, len(filenames)))
-
sys.stdout.flush()
-
-
#生成protocol数据类型
-
example = image_to_tfexample(image, labels)
-
tfrecord_writer.write(example.SerializeToString())
-
-
except IOError
as e:
-
print(
'Could not read:',filename)
-
print(
'Error:',e)
-
sys.stdout.write(
'\n')
-
sys.stdout.flush()
split_name就是指定是训练集还是测试集
filenames是每一张图片的路径
然后外部通过下面切分为训练集还是测试集
-
training_filenames = photo_filenames[FLAGS.
test_num:]
-
testing_filenames = photo_filenames[
:FLAGS.test_num]
然后调用即可
-
gen_tfrecord(
'train', training_filenames,FLAGS.dataset_dir)
-
gen_tfrecord(
'test', testing_filenames, FLAGS.dataset_dir)
其中dataset_dir就是图片的目录./datasets/images/
关于image和labels,对源数据集做预处理得到的
例如image的获得:
-
#读取图片
-
image = Image.open(filename)
-
#根据模型的结构resize
-
image = image_data.resize((
224,
224))
-
#灰度化
-
image = np.
array(image_data.convert(
'L'))
-
#将图片转化为bytes
-
image= image_data.tobytes()
labels的获得:
-
#获取label
-
labels = filename.
split(
'/')[-
1][
0:
4]
-
关于二者的获取可以在外部处理也可以集成到gen_tfrecord函数中,生成的tfrecord也同时放到了图片目录下。
故:
-
def gen_tfrecord(split_name, filenames, dataset_dir):
-
assert split_name
in [
'train',
'test']
-
-
with tf.Session()
as sess:
-
#定义tfrecord文件的路径+名字
-
output_filename = os.path.join(dataset_dir,split_name +
'.tfrecords')
-
with tf.python_io.TFRecordWriter(output_filename)
as tfrecord_writer:
-
for i,filename
in enumerate(filenames):
-
try:
-
sys.stdout.write(
'\r>> Converting image %d/%d' % (i+
1, len(filenames)))
-
sys.stdout.flush()
-
-
#读取图片
-
image_data = Image.open(filename)
-
#根据模型的结构resize
-
image_data = image_data.resize((
224,
224))
-
#灰度化
-
image_data = np.array(image_data.convert(
'L'))
-
#将图片转化为bytes
-
image_data = image_data.tobytes()
-
-
#获取label
-
labels = filename.split(
'/')[
-1][
0:
4]
-
-
#生成protocol数据类型
-
example = image_to_tfexample(image_data, labels)
-
tfrecord_writer.write(example.SerializeToString())
-
-
except IOError
as e:
-
print(
'Could not read:',filename)
-
print(
'Error:',e)
-
sys.stdout.write(
'\n')
-
sys.stdout.flush()
上面的数据集中图片的名字正好是其label,当然二者获取的方式不尽相同,也有可能是images目录下对应三个子目录例如:
cat,dog,fish然后每个目录下面是对应的图片,这时候预处理无非就是要变,定义的gen_tfrecord函数也可能稍微变一下
好了接下来说一下当中的 image_to_tfexample函数,这个也需要自己定义:
-
-
def image_to_tfexample(image, label):
-
return tf.train.Example(features=tf.train.Features(feature={
-
'image': tf.train.Feature(bytes_list = tf.train.BytesList(value=[img]))
-
'label': tf.train.Feature(int64_list = tf.train.Int64List(value=[label])),
-
-
}))
-
tf.train.Example 是一块 buffer即协议缓冲区,其中包含了各种feature并以字典的形式赋值。
关于这里说明三点:
1 正如value=[XXX]其中XXX必须是列表形式,也就是说如果传进来的label是列表,那么就可以这样写:
'label': tf.train.Feature(int64_list = tf.train.Int64List(value=label)
2 传进来的不必要非得是一个label,什么意思呢?比如多任务的时候,可以将label(比如验证码:256)拆分为多个label,每个数字代表一个label
-
#获取label
-
labels = filename.split(
'/')[
-1][
0:
3]
-
num_labels = []
-
for j in
range(
3):
-
num_labels.
append(
int(labels[j]))
那么就是这样:
example = image_to_tfexample(image_data, num_labels[0], num_labels[1], num_labels[2])
-
def image_to_tfexample(image_data, label0, label1, label2):
-
return tf.train.Example(features=tf.train.Features(feature={
-
'image': tf.train.Feature(bytes_list = tf.train.BytesList(value=[img]))
-
'label0': tf.train.Feature(int64_list = tf.train.Int64List(value=label0)),
-
'label1': tf.train.Feature(int64_list = tf.train.Int64List(value=label1)),
-
'label2': tf.train.Feature(int64_list = tf.train.Int64List(value=label2)),
-
}))
3 tfrecord支持的格式除了上面的整型和二进制二种格式,还支持浮点数即
tf.train.Feature(bytes_list = tf.train.FloatList(value=[float_scalar]))
二 读取tfrecord文件:
首先介绍下epoch,比如我们要训练的数据集是10张图片即1.jpg、2.jpg、3.jpg、....10.jpg,我们先全部训练这10张图片,然后还可以再来一轮,就是再用这十张图片训练一次,这里的epoch就是轮数当epoch=20时,就是用20轮数据集。
所以过程是这样的:
当epoch=10时,
现将10张图片全部都装载到文件名队列(q1)(装载10次)
| 1.jpg |
| 2.jpg |
| ....... |
| 10.jpg |
| 1.jpg |
| 2.jpg |
| ....... |
| 10.jpg |
| ................ |
| ................ |
| 1.jpg |
| 2.jpg |
| ....... |
| 10.jpg |
当我们的程序sess.run运行时,内存队列(q2)会从q1依次读取10图片到q2
tf中提供了相关API
使用tf.train.string_input_producer函数,系统会自动将它转为一个文件名队列,其有两个参数num_epochs和shuffle
num_epochs就是epoch数,shuffle就是说是否将一个epoch内文件的顺序是打乱,即不按照1.jpg、2.jpg、3.jpg、....10.jpg,而是9.jpg、5.jpg、3.jpg、....10.jpg等等,shuffle=Ture时,就是打乱
关于内存队列不用我们自己建立,使用各种reader对象从文件名队列中读取数据就可以了,具体到tfrecord的reader即为
reader = tf.TFRecordReader()
之后调用tf.TFRecordReader的tf.parse_single_example解析器,将Example协议缓冲区(protocol buffer)解析为张量
解析了image后还进行了一些预处理,整体如下:
-
def read_and_decode(filename):
-
# 根据文件名生成一个队列
-
filename_queue = tf.train.string_input_producer([filename])
-
reader = tf.TFRecordReader()
-
# 返回文件名和文件
-
_, serialized_example = reader.read(filename_queue)
-
features = tf.parse_single_example(serialized_example,
-
features={
-
'image' : tf.FixedLenFeature([], tf.string),
-
'label': tf.FixedLenFeature([], tf.int64),
-
-
})
-
# 获取图片数据
-
image = tf.decode_raw(features[
'image'], tf.uint8)
-
-
# tf.train.shuffle_batch必须确定shape
-
image = tf.reshape(image, [
224,
224])
-
-
# 图片预处理
-
image = tf.cast(image, tf.float32) /
255.0
-
image = tf.subtract(image,
0.5)
-
image = tf.multiply(image,
2.0)
-
-
# 获取label
-
label = tf.cast(features[
'label'], tf.int32)
-
-
return image, label
如果是上面所说的多任务有多个标签的相应读取tfrecord函数可以为:
-
def read_and_decode(filename):
-
# 根据文件名生成一个队列
-
filename_queue = tf.train.string_input_producer([filename])
-
reader = tf.TFRecordReader()
-
# 返回文件名和文件
-
_, serialized_example = reader.read(filename_queue)
-
features = tf.parse_single_example(serialized_example,
-
features={
-
'image' : tf.FixedLenFeature([], tf.string),
-
'label0': tf.FixedLenFeature([], tf.int64),
-
'label1': tf.FixedLenFeature([], tf.int64),
-
'label2': tf.FixedLenFeature([], tf.int64),
-
-
})
-
# 获取图片数据
-
image = tf.decode_raw(features[
'image'], tf.uint8)
-
# tf.train.shuffle_batch必须确定shape
-
image = tf.reshape(image, [
224,
224])
-
# 图片预处理
-
image = tf.cast(image, tf.float32) /
255.0
-
image = tf.subtract(image,
0.5)
-
image = tf.multiply(image,
2.0)
-
# 获取label
-
label0 = tf.cast(features[
'label0'], tf.int32)
-
label1 = tf.cast(features[
'label1'], tf.int32)
-
label2 = tf.cast(features[
'label2'], tf.int32)
-
-
return image, label0, label1, label2
在实际中要分batch进行读取数据(就是说比如数据集有1000M,每一个batch=10M):
那么在一个epoch内分100次读取,每次转载10M的数据,关于batch,tf一般有两个相关的API即tf.train.batch和tf.train.shuffle_batch
tf.train.batch:
-
batch(tensors, batch_size, num_threads=
1, capacity=
32,
-
enqueue_many=
False, shapes=
None, dynamic_pad=
False,
-
allow_smaller_final_batch=
False, shared_name=
None, name=
None)
- 第一个参数tensors:tensor序列或tensor字典,可以是含有单个样本的序列;
- 第二个参数batch_size: 生成的batch的大小;
- 第三个参数num_threads:执行tensor入队操作的线程数量,可以设置使用多个线程同时并行执行,提高运行效率,但也不是数量越多越好;
- 第四个参数capacity: 定义生成的tensor序列的最大容量;
- 第五个参数enqueue_many: 定义第一个传入参数tensors是多个tensor组成的序列,还是单个tensor;
- 第六个参数shapes: 可选参数,默认是推测出的传入的tensor的形状;
- 第七个参数dynamic_pad: 定义是否允许输入的tensors具有不同的形状,设置为True,会把输入的具有不同形状的tensor归一化到相同的形状;
- 第八个参数allow_smaller_final_batch: 设置为True,表示在tensor队列中剩下的tensor数量不够一个batch_size的情况下,允许最后一个batch的数量少于batch_size, 设置为False,则不管什么情况下,生成的batch都拥有batch_size个样本;
- 第九个参数shared_name: 可选参数,设置生成的tensor序列在不同的Session中的共享名称;
- 第十个参数name: 操作的名称;
一般的话只需要定义前三个即:
tf.train.batch([example, label], batch_size=batch_size, capacity=capacity)
tf.train.shuffle_batch:(和tf.train.batch差不多,最大的差别就是打乱输出一个batch,而不是依次取出一个batch)
tf.train.shuffle_batch([example, label], batch_size=batch_size, capacity=capacity, min_after_dequeue,num_threads=threads)
里面的相同的参数意思也同上。关于min_after_dequeue是出队后,队列至少剩下min_after_dequeue个数据,但其往往是用来定义混乱级别的,即在定义了随机取样的缓冲区大小的时候,min_after_dequeue越大表示更大级别的混合但是会导致启动更加缓慢,并且会占用更多的内存,同时一定要保证这参数小于capacity参数的值,否则会出错。
一般的话:capacity=(min_after_dequeue+(num_threads+a small safety margin∗batchsize)
num_threads指的是线程数
关于tf.train.shuffle_batch更多的可以看官方文档或者这篇https://blog.csdn.net/u013555719/article/details/77679964
以上按batch读取的话,最后会自动在前面添加一个维度,比如数据的维度是[100],batch_size是10,那么读取出来的shape就是[10,100]
除此之外使用tf.train.string_input_producer创建文件名队列后,其实系统其实还是处于“停滞状态”的,只有tf.train.start_queue_runners之后,才会启动填充队列的线程即
-
# 创建一个协调器,管理线程
-
coord = tf.train.Coordinator()
-
# 启动QueueRunner, 此时文件名队列已经进队
-
threads = tf.train.start_queue_runners(sess=sess, coord=coord)
程序进行完后记关闭线程:
-
# 通知其他线程关闭
-
coord.request_stop()
-
# 其他所有线程关闭之后,这一函数才能返回
-
coord.
join(threads)
所以最后总结一下步骤:
一:定义 gen_tfrecord函数,是源数据转化为tfrecord文件(test and train)
二:定义 read_and_decode函数,读取tfrecord,获得数据(类如image)及其label
三:通过tf.train.batch或者tf.train.shuffle_batch将数据进行分批次的打包(batch为一个批次)
四:定义epoch数,即要利用源数据多少轮,代码中就是最外面的一个for
五:在每一个epoch下,将一个个batch feed给神经网络进行训练
注意:在训练前启动线程tf.train.start_queue_runners,不要程序一直会停留在“停滞状态”
为了更直观的了解上面过程,下面举个简单类子来说明一下:
注:类子主要来自于https://www.bilibili.com/video/av20542427/?p=1的up主。
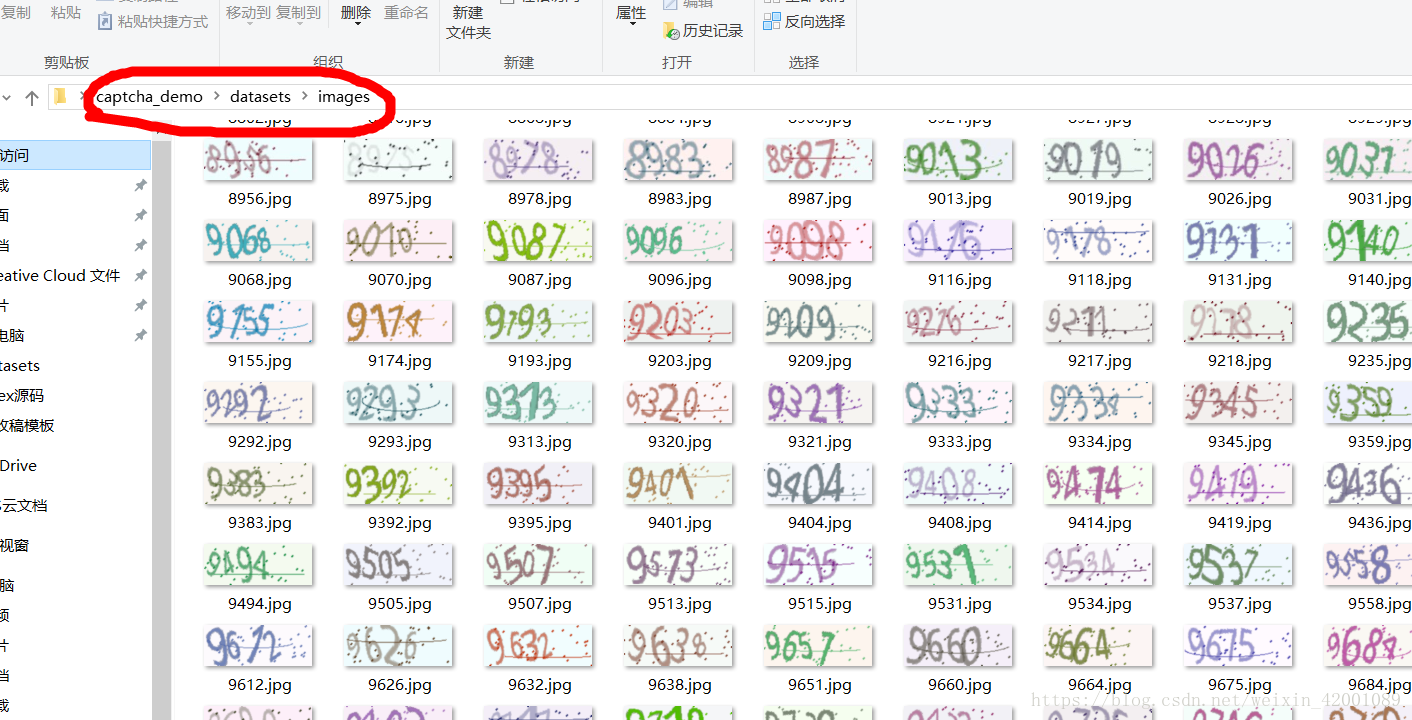
首先准备一个数据集(验证码),
首先要生成验证码图片,在datasets目录下有gen_image.py用于生成验证码图片。这里可以通过下载或者爬虫获取各种数据集,笔者采用下面方法
需要安装captcha(这是一个生成验证码图片的库)
pip install captcha
如果报错no module named setuptools可以参考
https://www.cnblogs.com/Mr-Rice/p/3960487.html
然后运行产生图片的脚本(gen_image.bat)
-
python C:/Users/asus-/Desktop/captcha_demo/datasets/gen_image.py ^
-
--output_dir C:/Users/asus-/Desktop/captcha_demo/datasets/images/ ^
-
--Captcha_size
4 ^
-
--image_num
1000 ^
-
pause
--output_dir就是输出图片的存储路径
--Captcha_size就是识别码图片上面字符的个数
--image_num就是产生图片的数量,但是有可能少于这个数,因为有可能产生重复的随机数,会覆盖前面的
关于gen_image.py为:
-
import tensorflow
as tf
-
from captcha.image
import ImageCaptcha
-
import random
-
import sys
-
-
FLAGS = tf.app.flags.FLAGS
-
-
tf.app.flags.DEFINE_string(
'output_dir',
'/ ',
'This is the saved directory of the picture')
-
tf.app.flags.DEFINE_integer(
'Captcha_size',
3,
'This is the number of characters of captcha')
-
tf.app.flags.DEFINE_integer(
'image_num',
1000,
'This is the number of pictures generated ,but less than image_num')
-
-
-
#验证码内容
-
Captcha_content = [
'0',
'1',
'2',
'3',
'4',
'5',
'6',
'7',
'8',
'9']
-
-
# 生成字符
-
def random_captcha_text():
-
captcha_text = []
-
for i
in range(FLAGS.Captcha_size):
-
ch = random.choice(Captcha_content)
-
captcha_text.append(ch)
-
return captcha_text
-
-
# 生成字符对应的验证码
-
def gen_captcha_text_and_image():
-
image = ImageCaptcha()
-
captcha_text = random_captcha_text()
-
captcha_text =
''.join(captcha_text)
-
captcha = image.generate(captcha_text)
-
image.write(captcha_text, FLAGS.output_dir + captcha_text +
'.jpg')
-
-
-
def main(unuse_args):
-
for i
in range(FLAGS.image_num ):
-
gen_captcha_text_and_image()
-
sys.stdout.write(
'\r>> Creating image %d/%d' % (i+
1, FLAGS.image_num))
-
sys.stdout.flush()
-
sys.stdout.write(
'\n')
-
sys.stdout.flush()
-
print(
"Finish!!!!!!!!!!!")
-
-
if __name__ ==
'__main__':
-
tf.app.run()
运行后为:

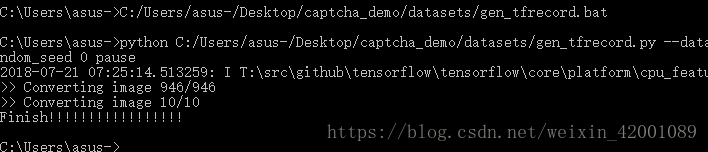
转化图片为tfrecord格式
同样这里写了一个简单的脚本:
-
python C:/Users/asus-/Desktop/captcha_demo/datasets/gen_tfrecord.py ^
-
--dataset_dir C:/Users/asus-/Desktop/captcha_demo/datasets/images/ ^
-
--output_dir C:/Users/asus-/Desktop/captcha_demo/datasets/ ^
-
--test_num
10 ^
-
--random_seed
0 ^
-
pause
从上到下依次是数据集位置,tfrecord生成位置,测试集个数,随机种子(用于打乱数据集)
-
import tensorflow
as tf
-
import os
-
import random
-
import math
-
import sys
-
from PIL
import Image
-
import numpy
as np
-
-
FLAGS = tf.app.flags.FLAGS
-
-
tf.app.flags.DEFINE_string(
'dataset_dir',
'/ ',
'This is the source directory of the picture')
-
tf.app.flags.DEFINE_string(
'output_dir',
'/ ',
'This is the saved directory of the picture')
-
tf.app.flags.DEFINE_integer(
'test_num',
20,
'This is the number of test of captcha')
-
tf.app.flags.DEFINE_integer(
'random_seed',
0,
'This is the random_seed')
-
-
#判断tfrecord文件是否存在
-
def dataset_exists(dataset_dir):
-
for split_name
in [
'train',
'test']:
-
output_filename = os.path.join(dataset_dir,split_name +
'.tfrecords')
-
if
not tf.gfile.Exists(output_filename):
-
return
False
-
return
True
-
-
#获取所有验证码图片
-
def get_filenames_and_classes(dataset_dir):
-
photo_filenames = []
-
for filename
in os.listdir(dataset_dir):
-
#获取文件路径
-
path = os.path.join(dataset_dir, filename)
-
photo_filenames.append(path)
-
return photo_filenames
-
-
def int64_feature(values):
-
if
not isinstance(values, (tuple, list)):
-
values = [values]
-
return tf.train.Feature(int64_list=tf.train.Int64List(value=values))
-
-
def bytes_feature(values):
-
return tf.train.Feature(bytes_list=tf.train.BytesList(value=[values]))
-
-
def image_to_tfexample(image_data, label0, label1, label2, label3):
-
#Abstract base class for protocol messages.
-
return tf.train.Example(features=tf.train.Features(feature={
-
'image': bytes_feature(image_data),
-
'label0': int64_feature(label0),
-
'label1': int64_feature(label1),
-
'label2': int64_feature(label2),
-
'label3': int64_feature(label3),
-
}))
-
-
#把数据转为TFRecord格式
-
def convert_dataset(split_name, filenames, dataset_dir):
-
assert split_name
in [
'train',
'test']
-
-
with tf.Session()
as sess:
-
#定义tfrecord文件的路径+名字
-
output_filename = os.path.join(FLAGS.output_dir,split_name +
'.tfrecords')
-
with tf.python_io.TFRecordWriter(output_filename)
as tfrecord_writer:
-
for i,filename
in enumerate(filenames):
-
try:
-
sys.stdout.write(
'\r>> Converting image %d/%d' % (i+
1, len(filenames)))
-
sys.stdout.flush()
-
-
#读取图片
-
image_data = Image.open(filename)
-
#根据模型的结构resize
-
image_data = image_data.resize((
224,
224))
-
#灰度化
-
image_data = np.array(image_data.convert(
'L'))
-
#将图片转化为bytes
-
image_data = image_data.tobytes()
-
-
#获取label
-
labels = filename.split(
'/')[
-1][
0:
4]
-
num_labels = []
-
for j
in range(
4):
-
num_labels.append(int(labels[j]))
-
-
#生成protocol数据类型
-
example = image_to_tfexample(image_data, num_labels[
0], num_labels[
1], num_labels[
2], num_labels[
3])
-
tfrecord_writer.write(example.SerializeToString())
-
-
except IOError
as e:
-
print(
'Could not read:',filename)
-
print(
'Error:',e)
-
sys.stdout.write(
'\n')
-
sys.stdout.flush()
-
-
-
def main(unuse_args):
-
-
if dataset_exists(FLAGS.output_dir):
-
print(
'tfcecord file has been existed!!')
-
-
else:
-
#获得所有图片
-
photo_filenames = get_filenames_and_classes(FLAGS.dataset_dir)
-
#把数据切分为训练集和测试集,并打乱
-
random.seed(FLAGS.random_seed)
-
random.shuffle(photo_filenames)
-
training_filenames = photo_filenames[FLAGS.test_num:]
-
testing_filenames = photo_filenames[:FLAGS.test_num]
-
-
#数据转换
-
convert_dataset(
'train', training_filenames,FLAGS.dataset_dir)
-
convert_dataset(
'test', testing_filenames, FLAGS.dataset_dir)
-
print(
'Finish!!!!!!!!!!!!!!!!!')
-
-
if __name__ ==
'__main__':
-
tf.app.run()
运行后:

下面是读取tfrecord格式
我们读取的是test测试集,这里test中有十个样本(batch=1,即每次取一个样本)
-
import tensorflow
as tf
-
import image_reader
as ir
-
-
BATCH_SIZE=
1
-
-
image, label0, label1, label2, label3 = ir.read_and_decode(
'C:/Users/asus-/Desktop/captcha_demo/datasets/test.tfrecords')
-
-
#使用shuffle_batch可以随机打乱
-
image_batch, label_batch0, label_batch1, label_batch2, label_batch3 = tf.train.shuffle_batch(
-
[image, label0, label1, label2, label3], batch_size =BATCH_SIZE,
-
capacity =
50000, min_after_dequeue=
10000, num_threads=
1)
-
-
with tf.Session()
as sess:
-
-
sess.run(tf.global_variables_initializer())
-
-
coord = tf.train.Coordinator()
-
threads = tf.train.start_queue_runners(sess=sess, coord=coord)
-
-
for i
in range(
30):
-
b_image, b_label0, b_label1 ,b_label2 ,b_label3 = sess.run([image_batch, label_batch0, label_batch1, label_batch2, label_batch3])
-
print(
'label:',b_label0, b_label1 ,b_label2 ,b_label3)
-
-
coord.request_stop()
-
coord.join(threads)
其中image_reader:
-
import tensorflow
as tf
-
# 从tfrecord读出数据
-
def read_and_decode(filename):
-
# 根据文件名生成一个队列
-
filename_queue = tf.train.string_input_producer([filename])
-
reader = tf.TFRecordReader()
-
# 返回文件名和文件
-
_, serialized_example = reader.read(filename_queue)
-
features = tf.parse_single_example(serialized_example,
-
features={
-
'image' : tf.FixedLenFeature([], tf.string),
-
'label0': tf.FixedLenFeature([], tf.int64),
-
'label1': tf.FixedLenFeature([], tf.int64),
-
'label2': tf.FixedLenFeature([], tf.int64),
-
'label3': tf.FixedLenFeature([], tf.int64),
-
})
-
# 获取图片数据
-
image = tf.decode_raw(features[
'image'], tf.uint8)
-
# tf.train.shuffle_batch必须确定shape
-
image = tf.reshape(image, [
224,
224])
-
# 图片预处理
-
image = tf.cast(image, tf.float32) /
255.0
-
image = tf.subtract(image,
0.5)
-
image = tf.multiply(image,
2.0)
-
# 获取label
-
label0 = tf.cast(features[
'label0'], tf.int32)
-
label1 = tf.cast(features[
'label1'], tf.int32)
-
label2 = tf.cast(features[
'label2'], tf.int32)
-
label3 = tf.cast(features[
'label3'], tf.int32)
-
-
return image, label0, label1, label2, label3
第一次我们使用tf.train.shuffle_batch运行后:

可以看到是乱序的,并不是依次取出
接下来我们用tf.train.batch来看一下结果:

可以看到,每十次循环一次,而且顺序不变!!
当实际项目中需要feed给神经网络时,在外面再加一个for循环用于epoch数即可!!!
如果想看类子的全部过程请看:
https://blog.csdn.net/weixin_42001089/article/details/81136954
参考:
https://blog.csdn.net/happyhorizion/article/details/77894055