基础篇: Html5中Canvas绘制、样式详解(不包含动画部分)
此篇为后续
目录
1.状态的保存和恢复
save()
保存画布(canvas)的所有状态
restore()
save 和 restore 方法是用来保存和恢复 canvas 状态的,都没有参数。Canvas 的状态就是当前画面应用的所有样式和变形的一个快照。
Canvas状态存储在栈中,每当save()方法被调用后,当前的状态就被推送到栈中保存。一个绘画状态包括:
当前应用的变形(即移动,旋转和缩放,见下)
以及下面这些属性:strokeStyle, fillStyle, globalAlpha, lineWidth, lineCap, lineJoin, miterLimit, lineDashOffset, shadowOffsetX, shadowOffsetY, shadowBlur, shadowColor, globalCompositeOperation, font, textAlign, textBaseline, direction, imageSmoothingEnabled
当前的裁切路径(clipping path)
你可以调用任意多次 save方法。每一次调用 restore 方法,上一个保存的状态就从栈中弹出,所有设定都恢复。
save 和 restore 的应用例子
function draw() {
  var ctx = document.getElementById('canvas').getContext('2d');

  ctx.fillRect(0,0,150,150);   // 使用默认设置绘制一个矩形
  ctx.save();                  // 保存默认状态

  ctx.fillStyle = '#09F'       // 在原有配置基础上对颜色做改变
  ctx.fillRect(15,15,120,120); // 使用新的设置绘制一个矩形

  ctx.save();                  // 保存当前状态
  ctx.fillStyle = '#FFF'       // 再次改变颜色配置
  ctx.globalAlpha = 0.5;
  ctx.fillRect(30,30,90,90);   // 使用新的配置绘制一个矩形

  ctx.restore();               // 重新加载之前的颜色状态
  ctx.fillRect(45,45,60,60);   // 使用上一次的配置绘制一个矩形

  ctx.restore();               // 加载默认颜色配置
  ctx.fillRect(60,60,30,30);   // 使用加载的配置绘制一个矩形
}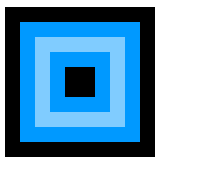
第一步是用默认设置画一个大四方形,然后保存一下状态。改变填充颜色画第二个小一点的蓝色四方形,然后再保存一下状态。再次改变填充颜色绘制更小一点的半透明的白色四方形。
一旦我们调用 restore,状态栈中最后的状态会弹出,并恢复所有设置。如果不是之前用 save 保存了状态,那么我们就需要手动改变设置来回到前一个状态,这个对于两三个属性的时候还是适用的,一旦多了,我们的代码将会猛涨。
当第二次调用 restore 时,已经恢复到最初的状态,因此最后是再一次绘制出一个黑色的四方形。
2. translate移动
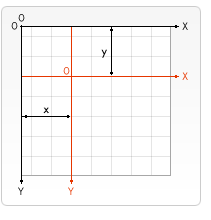
translate 方法,它用来移动 canvas 和它的原点到一个不同的位置。
translate(x, y)
translate 方法接受两个参数。x 是左右偏移量,y 是上下偏移量
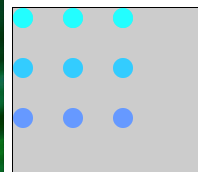
例子 平移之后画个圆,然后恢复状态,再平移再画个圆,再恢复状态,每次都画在原点上,每次原点都不在一个位置上
function draw3() {
  var ctx = document.getElementById('canvas').getContext('2d');
  for (var i = 0; i < 3; i++) {
    for (var j = 0; j < 3; j++) {
      ctx.save();
      ctx.fillStyle = 'rgb(' + (51 * i) + ', ' + (255 - 51 * i) + ', 255)';
      ctx.translate(10 + j * 50, 10 + i * 50);
      ctx.beginPath();
      ctx.arc(0, 0, 10, 0, Math.PI*2, true);
      ctx.fill();
      ctx.restore();
    }
  }
}
效果
3. 旋转Rotating
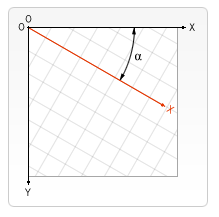
rotate 方法,它用于以原点为中心旋转 canvas
rotate(angle)
这个方法只接受一个参数:旋转的角度(angle),它是顺时针方向的,以弧度为单位的值。
旋转的中心点始终是 canvas 的原点,如果要改变它,我们需要用到 translate 方法。
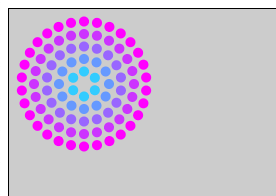
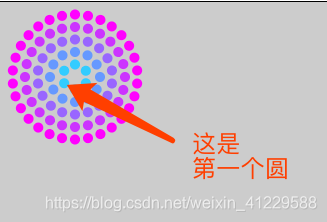
来个例子,记住是坐标系旋转,想问题的时候要想清楚 此案例先把中心移到了圆的中心
function draw() {
  var ctx = document.getElementById('canvas').getContext('2d');
  ctx.translate(75,75);

  for (var i=1;i<6;i++){ // Loop through rings (from inside to out)
    ctx.save();
    ctx.fillStyle = 'rgb('+(51*i)+','+(255-51*i)+',255)';

    for (var j=0;j<i*6;j++){ // draw individual dots
      ctx.rotate(Math.PI*2/(i*6));
      ctx.beginPath();
      ctx.arc(0,i*12.5,5,0,Math.PI*2,true);
      ctx.fill();
    }

    ctx.restore();
  }
}
效果:
4. 缩放Scaling
我们用它来增减图形在 canvas 中的像素数目,对形状,位图进行缩小或者放大
scale(x, y)
scale 方法可以缩放画布的水平和垂直的单位。两个参数都是实数,可以为负数,x 为水平缩放因子,y 为垂直缩放因子,如果比1小,会比缩放图形, 如果比1大会放大图形。默认值为1, 为实际大小。
画布初始情况下, 是以左上角坐标为原点的第一象限。如果参数为负实数, 相当于以x 或 y轴作为对称轴镜像反转(例如, 使用translate(0,canvas.height); scale(1,-1); 以y轴作为对称轴镜像反转, 就可得到著名的笛卡尔坐标系,左下角为原点)。
默认情况下,canvas 的 1 个单位为 1 个像素。举例说,如果我们设置缩放因子是 0.5,1 个单位就变成对应 0.5 个像素,这样绘制出来的形状就会是原先的一半。同理,设置为 2.0 时,1 个单位就对应变成了 2 像素,绘制的结果就是图形放大了 2 倍。
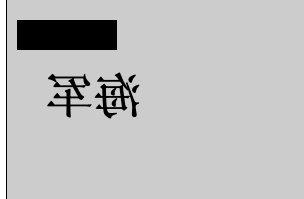
scale 的例子
function draw6() {
  var ctx = document.getElementById('canvas').getContext('2d');
  ctx.save();
  ctx.scale(10, 3);
  ctx.fillRect(1, 10, 10, 10);
  ctx.restore();

  // 镜像x轴
  ctx.scale(-1, 1);
  ctx.font = '48px serif';
  ctx.fillText('海军', -135, 120);
}
效果图
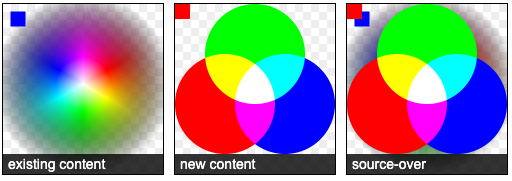
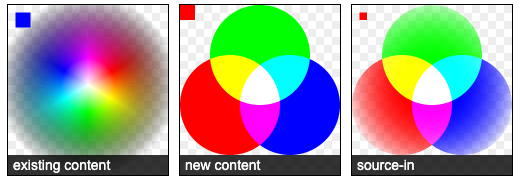
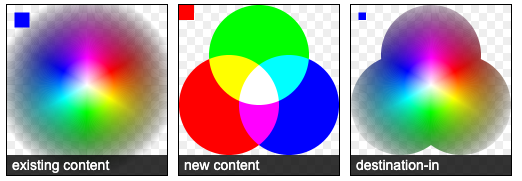
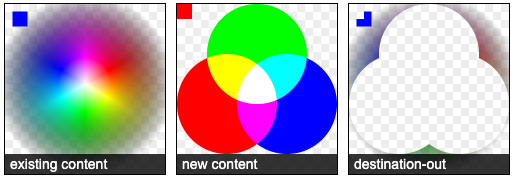
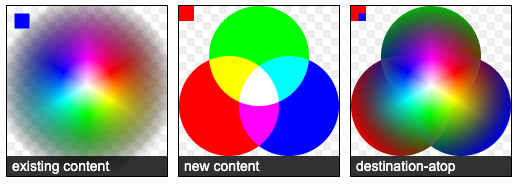
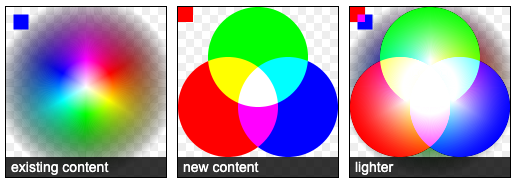
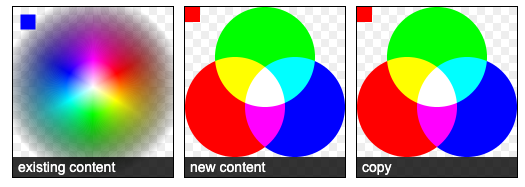
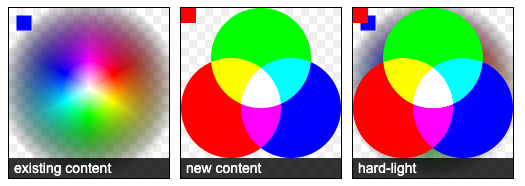
5. 图形相互交叉显示规则
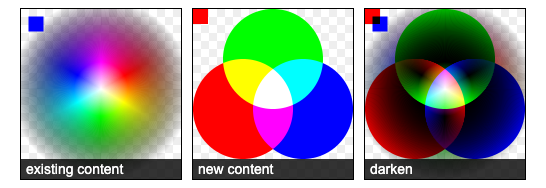
ctx.globalCompositeOperation = type这个属性设定了在画新图形时采用的遮盖策略,其值是一个标识12种遮盖方式的字符串。
source-over
这是默认设置,并在现有画布上下文之上绘制新图形。
source-in
新图形只在新图形和目标画布重叠的地方绘制。其他的都是透明的。
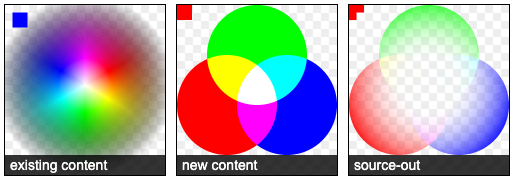
source-out
在不与现有画布内容重叠的地方绘制新图形。
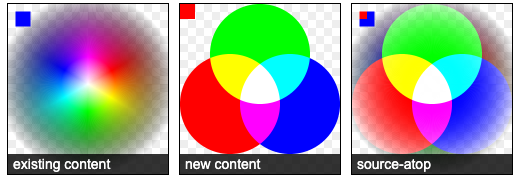
source-atop
新图形只在与现有画布内容重叠的地方绘制。
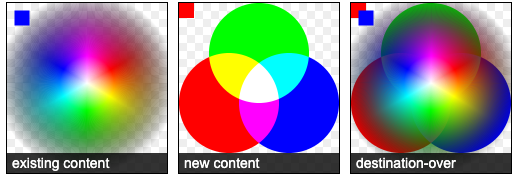
destination-over
在现有的画布内容后面绘制新的图形。
destination-in
现有的画布内容保持在新图形和现有画布内容重叠的位置。其他的都是透明的。
destination-out
现有内容保持在新图形不重叠的地方。
destination-atop
现有的画布只保留与新图形重叠的部分,新的图形是在画布内容后面绘制的。
lighter
两个重叠图形的颜色是通过颜色值相加来确定的。
copy
只显示新图形。
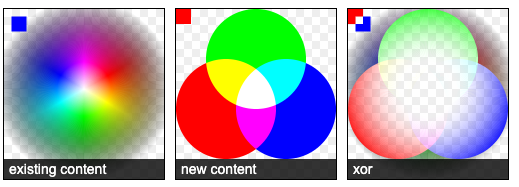
xor
图像中,那些重叠和正常绘制之外的其他地方是透明的。
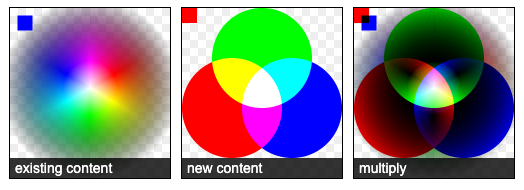
multiply
将顶层像素与底层相应像素相乘,结果是一幅更黑暗的图片。
screen
像素被倒转,相乘,再倒转,结果是一幅更明亮的图片。

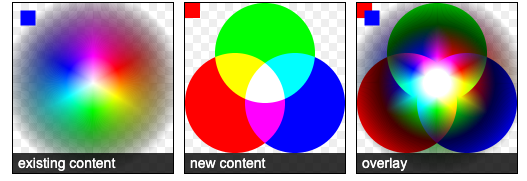
overlay
multiply和screen的结合,原本暗的地方更暗,原本亮的地方更亮。
darken
保留两个图层中最暗的像素。
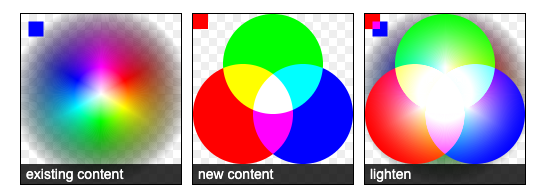
lighten
保留两个图层中最亮的像素。
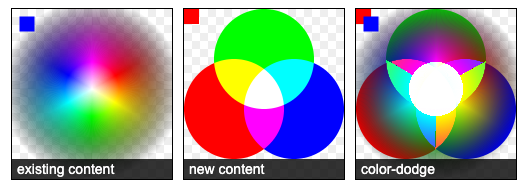
color-dodge
将底层除以顶层的反置。
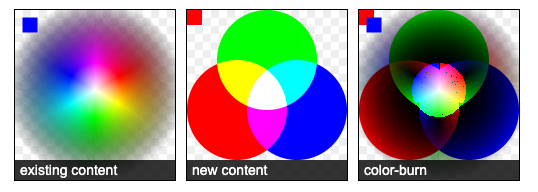
color-burn
将反置的底层除以顶层,然后将结果反过来。
hard-light
屏幕相乘(A combination of multiply and screen)类似于叠加,但上下图层互换了。
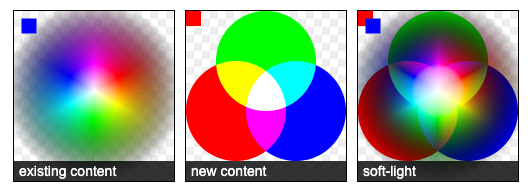
soft-light
用顶层减去底层或者相反来得到一个正值。
difference
一个柔和版本的强光(hard-light)。纯黑或纯白不会导致纯黑或纯白。

exclusion
和difference相似,但对比度较低。

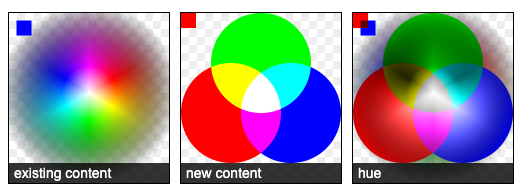
hue
保留了底层的亮度(luma)和色度(chroma),同时采用了顶层的色调(hue)。
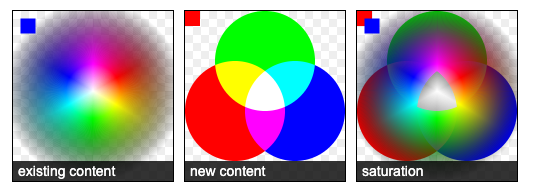
saturation
保留底层的亮度(luma)和色调(hue),同时采用顶层的色度(chroma)。
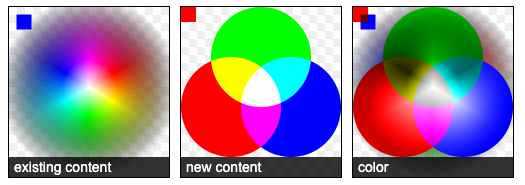
color
保留了底层的亮度(luma),同时采用了顶层的色调(hue)和色度(chroma)。
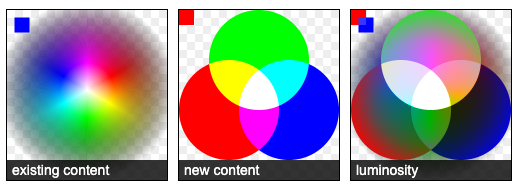
luminosity
保持底层的色调(hue)和色度(chroma),同时采用顶层的亮度(luma)。
6. 裁切路径
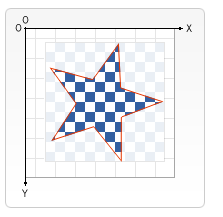
裁切路径和普通的 canvas 图形差不多,不同的是它的作用是遮罩,用来隐藏不需要的部分。如上图所示。红边五角星就是裁切路径,所有在路径以外的部分都不会在 canvas 上绘制出来。
与globalCompositeOperation 属性作一比较,它可以实现与 source-in 和 source-atop差不多的效果。最重要的区别是裁切路径不会在 canvas 上绘制东西,而且它永远不受新图形的影响。这些特性使得它在特定区域里绘制图形时相当好用。
clip()方法
将当前正在构建的路径转换为当前的裁剪路径。
看案例
function draw() {
  var ctx = document.getElementById('canvas').getContext('2d');
  ctx.fillRect(0,0,150,150);
  ctx.translate(75,75);

  // Create a circular clipping path
  ctx.beginPath();
  ctx.arc(0,0,60,0,Math.PI*2,true);
  ctx.clip();

  // draw background
  var lingrad = ctx.createLinearGradient(0,-75,0,75);
  lingrad.addColorStop(0, '#232256');
  lingrad.addColorStop(1, '#143778');

  ctx.fillStyle = lingrad;
  ctx.fillRect(-75,-75,150,150);

  // draw stars
  for (var j=1;j<50;j++){
    ctx.save();
    ctx.fillStyle = '#fff';
    ctx.translate(75-Math.floor(Math.random()*150),
                  75-Math.floor(Math.random()*150));
    drawStar(ctx,Math.floor(Math.random()*4)+2);
    ctx.restore();
  }

}
function drawStar(ctx,r){
  ctx.save();
  ctx.beginPath()
  ctx.moveTo(r,0);
  for (var i=0;i<9;i++){
    ctx.rotate(Math.PI/5);
    if(i%2 == 0) {
      ctx.lineTo((r/0.525731)*0.200811,0);
    } else {
      ctx.lineTo(r,0);
    }
  }
  ctx.closePath();
  ctx.fill();
  ctx.restore();
}
用了一个圆形的裁切路径来限制随机星星的绘制区域。
首先,画了一个与 canvas 一样大小的黑色方形作为背景,然后移动原点至中心点。然后用 clip 方法创建一个弧形的裁切路径。裁切路径也属于 canvas 状态的一部分,可以被保存起来。如果我们在创建新裁切路径时想保留原来的裁切路径,我们需要做的就是保存一下 canvas 的状态。
裁切路径创建之后所有出现在它里面的东西才会画出来。在画线性渐变时我们就会注意到这点。然后会绘制出50 颗随机位置分布(经过缩放)的星星,当然也只有在裁切路径里面的星星才会绘制出来。
效果图

7.动画基本步骤
你可以通过以下的步骤来画出一帧:
- 清空 canvas
除非接下来要画的内容会完全充满 canvas (例如背景图),否则你需要清空所有。最简单的做法就是用clearRect方法。 - 保存 canvas 状态
如果你要改变一些会改变 canvas 状态的设置(样式,变形之类的),又要在每画一帧之时都是原始状态的话,你需要先保存一下。 - 绘制动画图形(animated shapes)
这一步才是重绘动画帧。(重绘是相当费时的,而且性能很依赖于电脑的速度。) - 恢复 canvas 状态
如果已经保存了 canvas 的状态,可以先恢复它,然后重绘下一帧。
为了实现动画,我们需要一些可以定时执行重绘的方法。有两种方法可以实现这样的动画操控。首先可以通过 setInterval 和 setTimeout 方法来控制在设定的时间点上执行重绘。
requestAnimationFrame(draw)
告诉浏览器你希望执行一个动画,并在重绘之前,请求浏览器执行一个特定的函数来更新动画。
如果你并不需要与用户互动,你可以使用setInterval()方法,它就可以定期执行指定代码。如果我们需要做一个游戏,我们可以使用键盘或者鼠标事件配合上setTimeout()方法来实现。通过设置事件监听,我们可以捕捉用户的交互,并执行相应的动作。
简答的案例
function draw9() {
  var ctx = document.getElementById('canvas').getContext('2d');
  ctx.globalCompositeOperation = 'destination-over';
  ctx.clearRect(0,0,500,500); // clear canvas
  ctx.fillStyle = 'green';
  ctx.strokeStyle = 'blueviolet';
  ctx.save();
  ctx.translate(180,180);
  ctx.beginPath();
  ctx.arc(0,0,150,0,Math.PI*2,false);
  ctx.stroke();
  var time = new Date();
  ctx.rotate( ((2*Math.PI)/60)*time.getSeconds() + ((2*Math.PI)/60000)*time.getMilliseconds() )
  ctx.beginPath();
  ctx.arc(0,150,20,0,Math.PI*2,false);
  ctx.fill();
  ctx.closePath();
  ctx.restore();
  window.requestAnimationFrame(draw9)
}
window.requestAnimationFrame(draw9);
效果就是一个小圆绕着大圆旋转

案例2模拟太阳系
var sun = new Image();
var moon = new Image();
var earth = new Image();
function init(){
  sun.src = 'https://mdn.mozillademos.org/files/1456/Canvas_sun.png';
  moon.src = 'https://mdn.mozillademos.org/files/1443/Canvas_moon.png';
  earth.src = 'https://mdn.mozillademos.org/files/1429/Canvas_earth.png';
  window.requestAnimationFrame(draw);
}

function draw() {
  var ctx = document.getElementById('canvas').getContext('2d');

  ctx.globalCompositeOperation = 'destination-over';
  ctx.clearRect(0,0,300,300); // clear canvas

  ctx.fillStyle = 'rgba(0,0,0,0.4)';
  ctx.strokeStyle = 'rgba(0,153,255,0.4)';
  ctx.save();
  ctx.translate(150,150);

  // Earth
  var time = new Date();
  ctx.rotate( ((2*Math.PI)/60)*time.getSeconds() + ((2*Math.PI)/60000)*time.getMilliseconds() );
  ctx.translate(105,0);
  ctx.fillRect(0,-12,50,24); // Shadow
  ctx.drawImage(earth,-12,-12);

  // Moon
  ctx.save();
  ctx.rotate( ((2*Math.PI)/6)*time.getSeconds() + ((2*Math.PI)/6000)*time.getMilliseconds() );
  ctx.translate(0,28.5);
  ctx.drawImage(moon,-3.5,-3.5);
  ctx.restore();

  ctx.restore();

  ctx.beginPath();
  ctx.arc(150,150,105,0,Math.PI*2,false); // Earth orbit
  ctx.stroke();

  ctx.drawImage(sun,0,0,300,300);

  window.requestAnimationFrame(draw);
}

init();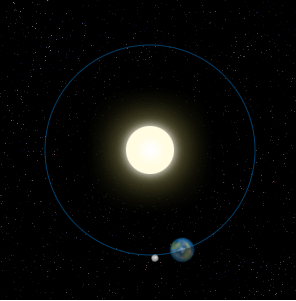
案例3动画时钟
function clock(){
  var now = new Date();
  var ctx = document.getElementById('canvas').getContext('2d');
  ctx.save();
  ctx.clearRect(0,0,150,150);
  ctx.translate(75,75);
  ctx.scale(0.4,0.4);
  ctx.rotate(-Math.PI/2);
  ctx.strokeStyle = "black";
  ctx.fillStyle = "white";
  ctx.lineWidth = 8;
  ctx.lineCap = "round";

  // Hour marks
  ctx.save();
  for (var i=0;i<12;i++){
    ctx.beginPath();
    ctx.rotate(Math.PI/6);
    ctx.moveTo(100,0);
    ctx.lineTo(120,0);
    ctx.stroke();
  }
  ctx.restore();

  // Minute marks
  ctx.save();
  ctx.lineWidth = 5;
  for (i=0;i<60;i++){
    if (i%5!=0) {
      ctx.beginPath();
      ctx.moveTo(117,0);
      ctx.lineTo(120,0);
      ctx.stroke();
    }
    ctx.rotate(Math.PI/30);
  }
  ctx.restore();

  var sec = now.getSeconds();
  var min = now.getMinutes();
  var hr  = now.getHours();
  hr = hr>=12 ? hr-12 : hr;

  ctx.fillStyle = "black";

  // write Hours
  ctx.save();
  ctx.rotate( hr*(Math.PI/6) + (Math.PI/360)*min + (Math.PI/21600)*sec )
  ctx.lineWidth = 14;
  ctx.beginPath();
  ctx.moveTo(-20,0);
  ctx.lineTo(80,0);
  ctx.stroke();
  ctx.restore();

  // write Minutes
  ctx.save();
  ctx.rotate( (Math.PI/30)*min + (Math.PI/1800)*sec )
  ctx.lineWidth = 10;
  ctx.beginPath();
  ctx.moveTo(-28,0);
  ctx.lineTo(112,0);
  ctx.stroke();
  ctx.restore();

  // Write seconds
  ctx.save();
  ctx.rotate(sec * Math.PI/30);
  ctx.strokeStyle = "#D40000";
  ctx.fillStyle = "#D40000";
  ctx.lineWidth = 6;
  ctx.beginPath();
  ctx.moveTo(-30,0);
  ctx.lineTo(83,0);
  ctx.stroke();
  ctx.beginPath();
  ctx.arc(0,0,10,0,Math.PI*2,true);
  ctx.fill();
  ctx.beginPath();
  ctx.arc(95,0,10,0,Math.PI*2,true);
  ctx.stroke();
  ctx.fillStyle = "rgba(0,0,0,0)";
  ctx.arc(0,0,3,0,Math.PI*2,true);
  ctx.fill();
  ctx.restore();

  ctx.beginPath();
  ctx.lineWidth = 14;
  ctx.strokeStyle = '#325FA2';
  ctx.arc(0,0,142,0,Math.PI*2,true);
  ctx.stroke();

  ctx.restore();

  window.requestAnimationFrame(clock);
}

window.requestAnimationFrame(clock);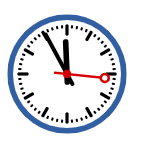
关于动画要了解的可不止这些,包括速率,加速度,边界,拖尾效果,鼠标控制等等
举个栗子
var canvas = document.getElementById('canvas');
var ctx = canvas.getContext('2d');
var raf;
var running = false;

var ball = {
  x: 100,
  y: 100,
  vx: 5,
  vy: 1,
  radius: 25,
  color: 'blue',
  draw: function() {
    ctx.beginPath();
    ctx.arc(this.x, this.y, this.radius, 0, Math.PI * 2, true);
    ctx.closePath();
    ctx.fillStyle = this.color;
    ctx.fill();
  }
};

function clear() {
  ctx.fillStyle = 'rgba(255,255,255,0.3)';
  ctx.fillRect(0,0,canvas.width,canvas.height);
}

function draw() {
  clear();
  ball.draw();
  ball.x += ball.vx;
  ball.y += ball.vy;

  if (ball.y + ball.vy > canvas.height || ball.y + ball.vy < 0) {
    ball.vy = -ball.vy;
  }
  if (ball.x + ball.vx > canvas.width || ball.x + ball.vx < 0) {
    ball.vx = -ball.vx;
  }

  raf = window.requestAnimationFrame(draw);
}

canvas.addEventListener('mousemove', function(e){
  if (!running) {
    clear();
    ball.x = e.offsetX;
    ball.y = e.offsetY;
    ball.draw();
  }
});

canvas.addEventListener('click',function(e){
  if (!running) {
    raf = window.requestAnimationFrame(draw);
    running = true;
  }
});

canvas.addEventListener('mouseout', function(e){
  window.cancelAnimationFrame(raf);
  running = false;
});

ball.draw();
用你的鼠标移动小球,点击可以释放。

8. canvas相关的动画js框架
Three.js
这个流行的库提供了非常多的3D显示功能,以一种直观的方式使用 WebGL。这个库提供了<canvas>、 <svg>、CSS3D 和 WebGL渲染器,让我们在设备和浏览器之间创建丰富的交互体验。该库于2010年4月首次推出
pixi.js
虽然只是个渲染框架而非游戏引擎,但是pixi.js挺适合写游戏的,你可以看下netent上的博彩游戏,上万款游戏全是pixi.js写的。pixi.js刚接触的时候觉得很简陋,文档都是英文的,有时候还需要看源码(源码写的非常的优秀)才能理解怎么回事,这对很多人是个很高的门槛,但是如果你能克服这些,会发现用着真的很舒服。
周边插件也挺丰富的,动画(spine/dragonbones),粒子系统,物理引擎等等,想用什么就引入什么,和unix设计哲学一样,每个工具只干一件事并把这件事做好,你可以组合很多工具完成复杂的功能。