文章目录
【笔记于学习尚硅谷课程所作】
0、问题及解决
分库分表后如何查询: sharding column + ES + HBase,参考分库分表后的查询问题
1、ShardingSphere
- 一套开源的分布式数据库中间件解决方案
- 有三个产品:Sharding-JDBC 和 Sharding-Proxy
- 定位为关系型数据库中间件,合理在分布式环境下使用关系型数据库操作
2、分库分表
- 垂直分表:将一个表按照字段分成多表,每个表存储其中一部分字段。
- 垂直分库:是指按照业务将表进行分类,分布到不同的数据库上面,每个库可以放在不同的服务器上,它的核心理念是专库专用。
- 水平分表:是在同一个数据库内,把同一个表的数据按一定规则拆到多个表中。
- 水平分库:是把同一个表的数据按一定规则拆到不同的数据库中,每个库可以放在不同的服务器上。
优点:
-
垂直分表:可以把一个宽表的字段按访问频次、是否是大字段的原则拆分为多个表,这样既能使业务清晰,还能提升部分性能。拆分后,尽量从业务角度避免联查,否则性能方面将得不偿失。
-
垂直分库:可以把多个表按业务耦合松紧归类,分别存放在不同的库,这些库可以分布在不同服务器,从而使访问压力被多服务器负载,大大提升性能,同时能提高整体架构的业务清晰度,不同的业务库可根据自身情况定制优化方案。但是它需要解决跨库带来的所有复杂问题。
-
水平分库:可以把一个表的数据(按数据行)分到多个不同的库,每个库只有这个表的部分数据,这些库可以分布在不同服务器,从而使访问压力被多服务器负载,大大提升性能。它不仅需要解决跨库带来的所有复杂问题,还要解决数据路由的问题(数据路由问题后边介绍)。
-
水平分表:可以把一个表的数据(按数据行)分到多个同一个数据库的多张表中,每个表只有这个表的部分数据,这样做能小幅提升性能,它仅仅作为水平分库的一个补充优化。
注意: 一般来说,在系统设计阶段就应该根据业务耦合松紧来确定垂直分库,垂直分表方案,在数据量及访问压力不是特别大的情况,首先考虑缓存、读写分离、索引技术等方案。若数据量极大,且持续增长,再考虑水平分库水平分表方案。
3、读写分离(主从复制)
3.1介绍
其实就是将数据库分为了主从库,一个主库用于写数据,多个从库完成读数据的操作,主从库之间通过某种机制进行数据的同步,是一种常见的数据库架构。
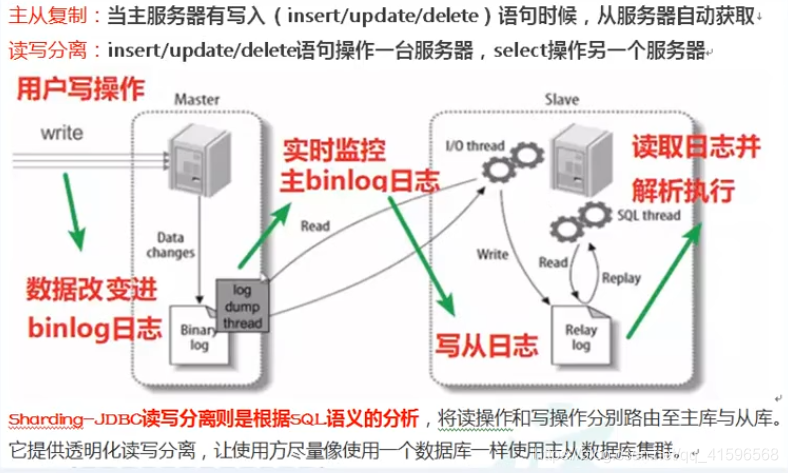
Sharding-JDBC 通过 sql 语句语义分析,实现读写分离过程,不会做数据同步
3.2配置主从复制
- 创建两个MySQL 数据库服务,并且启动两个MySQL服务
- 配置 MySQL 主从服务器
- 创建用于主从复制的账号
- 主从数据同步设置
4、Sharding-JDBC
4.1 简介
- 是轻量级的 java 框架,是增强版的 JDBC 驱动
- 作用:简化对分库分表之后数据相关操作
- 功能:数据分片、读写分离

4.2 环境搭建
技术:SpringBoot 2.2.1+ MyBatisPlus + Sharding-JDBC + Druid 连接池
1.快速创建SpringBoot项目
2.导入相关依赖
<!--核心依赖spring-boot-starter-parent版本为2.2.1-->
<dependencies>

    <!--shardingsphere依赖-->
    <dependency>
 		<groupId>org.apache.shardingsphere</groupId>
 		<artifactId>sharding-jdbc-spring-boot-starter</artifactId>
 		<version>4.0.0-RC1</version>
 	</dependency>

    <!--===============下面的依赖都是正常项目导入的,如果导入过可自行略过===============-->

 	<dependency>
 		<groupId>org.springframework.boot</groupId>
 		<artifactId>spring-boot-starter</artifactId>
 	</dependency>

    <dependency>
 		<groupId>org.springframework.boot</groupId>
 		<artifactId>spring-boot-starter-test</artifactId>
 	</dependency>

    <!--druid连接池依赖-->
    <dependency>
 		<groupId>com.alibaba</groupId>
		<artifactId>druid-spring-boot-starter</artifactId>
 		<version>1.1.20</version>
 	</dependency>

     <!--mysql依赖-->
    <dependency>
 		<groupId>mysql</groupId>
 		<artifactId>mysql-connector-java</artifactId>
	</dependency>

    <!--mybatis-plus依赖-->
    <dependency>
		<groupId>com.baomidou</groupId>
 		<artifactId>mybatis-plus-boot-starter</artifactId>
 		<version>3.0.5</version>
 	</dependency>

    <!--lombok依赖,简化开发-->
    <dependency>
 		<groupId>org.projectlombok</groupId>
 		<artifactId>lombok</artifactId>
 	</dependency>

</dependencies>
4.3 简单测试
(1)水平分表
1.按照水平分表的方式,创建数据库和数据库表
(1)创建数据库 course_db
(2)在数据库创建两张表 course_1 和 course_2
(3)约定规则:如果添加课程 id 是偶数把数据添加 course_1,如果奇数添加到 course_2
2.编写代码实现对分库分表后数据的操作
(1)创建实体类和mapper
3.配置Sharding-JDBC分片策略
(1)在项目 application.properties 配置文件中进行配置
# shardingjdbc 分片策略
# 配置数据源,给数据源起名称
spring.shardingsphere.datasource.names=m1

# 一个实体类对应两张表,覆盖
spring.main.allow-bean-definition-overriding=true

#配置数据源具体内容,包含连接池,驱动,地址,用户名和密码
spring.shardingsphere.datasource.m1.type=com.alibaba.druid.pool.DruidDataSourc
e
spring.shardingsphere.datasource.m1.driver-class-name=com.mysql.cj.jdbc.Driver
spring.shardingsphere.datasource.m1.url=jdbc:mysql://localhost:3306/course_db?
serverTimezone=GMT%2B8
spring.shardingsphere.datasource.m1.username=root
spring.shardingsphere.datasource.m1.password=root #指定 course 表分布情况,配置表在哪个数据库里面,表名称都是什么 m1.course_1 ,
m1.course_2
spring.shardingsphere.sharding.tables.course.actual-data-nodes=m1.course_$-
>{1..2}
# 指定 course 表里面主键 cid 生成策略 SNOWFLAKE
spring.shardingsphere.sharding.tables.course.key-generator.column=cid
spring.shardingsphere.sharding.tables.course.key-generator.type=SNOWFLAKE
# 指定分片策略 约定 cid 值偶数添加到 course_1 表,如果 cid 是奇数添加到 course_2
表
spring.shardingsphere.sharding.tables.course.table-strategy.inline.shardingcolumn=cid
spring.shardingsphere.sharding.tables.course.table-strategy.inline.algorithmexpression=course_$->{cid % 2 + 1}
# 打开 sql 输出日志
spring.shardingsphere.props.sql.show=true
5、编写测试代
4.编写测试代码
(2)水平分库
在上面分表的基础上继续分库
1.按需求创建两个数据库edu_db_1和edu_db_2
2.创建表
3.配置文件添加数据库分片规则
# shardingjdbc 分片策略
# 配置数据源,给数据源起名称,
# 水平分库,配置两个数据源
spring.shardingsphere.datasource.names=m1,m2
# 一个实体类对应两张表,覆盖
spring.main.allow-bean-definition-overriding=true #配置第一个数据源具体内容,包含连接池,驱动,地址,用户名和密码
spring.shardingsphere.datasource.m1.type=com.alibaba.druid.pool.DruidDataSourc
e
spring.shardingsphere.datasource.m1.driver-class-name=com.mysql.cj.jdbc.Driver
spring.shardingsphere.datasource.m1.url=jdbc:mysql://localhost:3306/edu_db_1?s
erverTimezone=GMT%2B8
spring.shardingsphere.datasource.m1.username=root
spring.shardingsphere.datasource.m1.password=root #配置第二个数据源具体内容,包含连接池,驱动,地址,用户名和密码
spring.shardingsphere.datasource.m2.type=com.alibaba.druid.pool.DruidDataSourc
e
spring.shardingsphere.datasource.m2.driver-class-name=com.mysql.cj.jdbc.Driver
spring.shardingsphere.datasource.m2.url=jdbc:mysql://localhost:3306/edu_db_2?s
erverTimezone=GMT%2B8
spring.shardingsphere.datasource.m2.username=root
spring.shardingsphere.datasource.m2.password=root #指定数据库分布情况,数据库里面表分布情况
# m1 m2 course_1 course_2
spring.shardingsphere.sharding.tables.course.actual-data-nodes=m$-
>{1..2}.course_$->{1..2}
# 指定 course 表里面主键 cid 生成策略 SNOWFLAKE
spring.shardingsphere.sharding.tables.course.key-generator.column=cid
spring.shardingsphere.sharding.tables.course.key-generator.type=SNOWFLAKE
# 指定表分片策略 约定 cid 值偶数添加到 course_1 表,如果 cid 是奇数添加到
course_2 表
spring.shardingsphere.sharding.tables.course.table-strategy.inline.shardingcolumn=cid
spring.shardingsphere.sharding.tables.course.table-strategy.inline.algorithmexpression=course_$->{cid % 2 + 1}
# 指定数据库分片策略 约定 user_id 是偶数添加 m1,是奇数添加 m2
#spring.shardingsphere.sharding.default-database-strategy.inline.shardingcolumn=user_id
#spring.shardingsphere.sharding.default-database-strategy.inline.algorithm- expression=m$->{user_id % 2 + 1}
spring.shardingsphere.sharding.tables.course.databasestrategy.inline..sharding-column=user_id
spring.shardingsphere.sharding.tables.course.databasestrategy.inline.algorithm-expression=m$->{user_id % 2 + 1}

# 打开 sql 输出日志
spring.shardingsphere.props.sql.show=true
4.编写测试代码
(3)垂直分库
在前面测试的基础上
1.按需求创建数据库user_db
2.创建表t_user
3.创建 user 实体类和 mapper
4.配置文件添加垂直分库策略
# shardingjdbc 分片策略
# 配置数据源,给数据源起名称,
# 水平分库,配置两个数据源
spring.shardingsphere.datasource.names=m1,m2,m0
# 一个实体类对应两张表,覆盖
spring.main.allow-bean-definition-overriding=true #配置第一个数据源具体内容,包含连接池,驱动,地址,用户名和密码
spring.shardingsphere.datasource.m1.type=com.alibaba.druid.pool.DruidDataSourc
e
spring.shardingsphere.datasource.m1.driver-class-name=com.mysql.cj.jdbc.Driver
spring.shardingsphere.datasource.m1.url=jdbc:mysql://localhost:3306/edu_db_1?s
erverTimezone=GMT%2B8
spring.shardingsphere.datasource.m1.username=root
spring.shardingsphere.datasource.m1.password=root #配置第二个数据源具体内容,包含连接池,驱动,地址,用户名和密码
spring.shardingsphere.datasource.m2.type=com.alibaba.druid.pool.DruidDataSourc
e
spring.shardingsphere.datasource.m2.driver-class-name=com.mysql.cj.jdbc.Driver
spring.shardingsphere.datasource.m2.url=jdbc:mysql://localhost:3306/edu_db_2?s
erverTimezone=GMT%2B8
spring.shardingsphere.datasource.m2.username=root
spring.shardingsphere.datasource.m2.password=root
#配置第三个数据源具体内容,包含连接池,驱动,地址,用户名和密码
spring.shardingsphere.datasource.m0.type=com.alibaba.druid.pool.DruidDataSourc
e
spring.shardingsphere.datasource.m0.driver-class-name=com.mysql.cj.jdbc.Driver
spring.shardingsphere.datasource.m0.url=jdbc:mysql://localhost:3306/user_db?se
rverTimezone=GMT%2B8
spring.shardingsphere.datasource.m0.username=root
spring.shardingsphere.datasource.m0.password=root
# 配置 user_db 数据库里面 t_user 专库专表
spring.shardingsphere.sharding.tables.t_user.actual-data-nodes=m$->{0}.t_user
# 指定 course 表里面主键 cid 生成策略 SNOWFLAKE
spring.shardingsphere.sharding.tables.t_user.key-generator.column=user_id
spring.shardingsphere.sharding.tables.t_user.key-generator.type=SNOWFLAKE
# 指定表分片策略 约定 cid 值偶数添加到 course_1 表,如果 cid 是奇数添加到
course_2 表
spring.shardingsphere.sharding.tables.t_user.table-strategy.inline.shardingcolumn=user_id
spring.shardingsphere.sharding.tables.t_user.table-strategy.inline.algorithmexpression=t_user
5.编写测试代码
(4)操作公共表
1.公共表
(1)存储固定数据的表,表数据很少发生变化,查询时候经常进行关联
(2)在每个数据库中创建出相同结构公共表
2.在多个数据库都创建相同结构公共表
3.在项目配置文件 application.properties 进行公共表配置
# 配置公共表
spring.shardingsphere.sharding.broadcast-tables=t_udict
spring.shardingsphere.sharding.tables.t_udict.key-generator.column=dictid
spring.shardingsphere.sharding.tables.t_udict.key-generator.type=SNOWFLAKE
4.创建新实体类和 mapper
5.编写测试代码
(5)主从分离
1.在项目配置文件 application.properties 进行公共表配置
# user_db 从服务器
spring.shardingsphere.datasource.s0.type=com.alibaba.druid.pool.DruidDataSourc
e
spring.shardingsphere.datasource.s0.driver-class-name=com.mysql.cj.jdbc.Driver
spring.shardingsphere.datasource.s0.url=jdbc:mysql://localhost:3307/user_db?se
rverTimezone=GMT%2B8
spring.shardingsphere.datasource.s0.username=root
spring.shardingsphere.datasource.s0.password=root
# 主库从库逻辑数据源定义 ds0 为 user_db
spring.shardingsphere.sharding.master-slave-rules.ds0.master-data-sourcename=m0
spring.shardingsphere.sharding.master-slave-rules.ds0.slave-data-sourcenames=s0
# 配置 user_db 数据库里面 t_user 专库专表
#spring.shardingsphere.sharding.tables.t_user.actual-data-nodes=m$->{0}.t_user
# t_user 分表策略,固定分配至 ds0 的 t_user 真实表
spring.shardingsphere.sharding.tables.t_user.actual-data-nodes=ds0.t_user
2.编写测试代码
5、Sharding-Proxy
5.1简介
- 定位为透明的数据库代理端
- Sharding-Proxy 独立应用,需要安装服务,进行分库分表或者读写分离配置,启动使用

5.2 安装与配置
(1)安装
1.官网下载
2.把下载之后压缩文件,解压,启动 bin 目录启动文件就可以了
(2)启动
1.启动 Sharding-Proxy 服务(默认端口号 3307),进入bin目录,双击start.bat
2.通过 Sharding-Proxy 启动端口进行连接
方式一:打开 cmd 窗口连接 Sharding-Proxy,连接方式和连接 mysql 一样的
mysql -P3307 -u root -p
方式二:通过可视化工具打开
(3)配置
1.进入 conf 目录,修改文件 server.yaml,打开两段内容注释
authentication:
  users:
    root:
      password: root
    sharding:
      password: sharding
      authorizedSchemas: sharding_db

props:
  max.connections.size.per.query: 1
  acceptor.size: 16  # The default value is available processors count * 2.
  executor.size: 16  # Infinite by default.
  proxy.frontend.flush.threshold: 128  # The default value is 128.
    # LOCAL: Proxy will run with LOCAL transaction.
    # XA: Proxy will run with XA transaction.
    # BASE: Proxy will run with B.A.S.E transaction.
  proxy.transaction.type: LOCAL
  proxy.opentracing.enabled: false
  query.with.cipher.column: true
  sql.show: false
2.复制 mysql 驱动 jar 包到 lib 目录
3.进入 conf 目录,修改 config-sharding.yaml
schemaName: sharding_db

dataSources:
  ds_0:
    url: jdbc:mysql://127.0.0.1:3306/edu_db_1?serverTimezone=UTC&useSSL=false
    username: root
    password: root
    connectionTimeoutMilliseconds: 30000
    idleTimeoutMilliseconds: 60000
    maxLifetimeMilliseconds: 1800000
    maxPoolSize: 50

shardingRule:
  tables:
    t_order:
      actualDataNodes: ds_${0..1}.t_order_${1..2}
      tableStrategy:
        inline:
          shardingColumn: order_id
          algorithmExpression: t_order_${order_id % 2 + 1}
      keyGenerator:
        type: SNOWFLAKE
        column: order_id
  bindingTables:
    - t_order
  defaultDatabaseStrategy:
    inline:
      shardingColumn: user_id
      algorithmExpression: ds_${user_id % 2}
  defaultTableStrategy:
    none:
(4)分库配置
1.创建相应数据库
2.找到 conf 目录,config-sharding.yaml
schemaName: sharding_db

dataSources:
  ds_0:
    url: jdbc:mysql://127.0.0.1:3306/edu_db_1?serverTimezone=UTC&useSSL=false
    username: root
    password: root
    connectionTimeoutMilliseconds: 30000
    idleTimeoutMilliseconds: 60000
    maxLifetimeMilliseconds: 1800000
    maxPoolSize: 50
  ds_1:
    url: jdbc:mysql://127.0.0.1:3306/edu_db_2?serverTimezone=UTC&useSSL=false
    username: root
    password: root
    connectionTimeoutMilliseconds: 30000
    idleTimeoutMilliseconds: 60000
    maxLifetimeMilliseconds: 1800000
    maxPoolSize: 50

shardingRule:
  tables:
    t_order:
      actualDataNodes: ds_${0..1}.t_order_${1..2}
      tableStrategy:
        inline:
          shardingColumn: order_id
          algorithmExpression: t_order_${order_id % 2 + 1}
      keyGenerator:
        type: SNOWFLAKE
        column: order_id
  bindingTables:
    - t_order
  defaultDatabaseStrategy:
    inline:
      shardingColumn: user_id
      algorithmExpression: ds_${user_id % 2}
  defaultTableStrategy:
    none:
(5)读写分离配置
1.创建相应数据库
2.修改 conf 里面配置文件,config-master-slave.yaml
schemaName: master_slave_db

dataSources:
  master_ds:
    url: jdbc:mysql://127.0.0.1:3306/demo_ds_master?serverTimezone=UTC&useSSL=false
    username: root
    password: root
    connectionTimeoutMilliseconds: 30000
    idleTimeoutMilliseconds: 60000
    maxLifetimeMilliseconds: 1800000
    maxPoolSize: 50
  slave_ds_0:
    url: jdbc:mysql://127.0.0.1:3306/demo_ds_slave_0?serverTimezone=UTC&useSSL=false
    username: root
    password: root
    connectionTimeoutMilliseconds: 30000
    idleTimeoutMilliseconds: 60000
    maxLifetimeMilliseconds: 1800000
    maxPoolSize: 50
  slave_ds_1:
    url: jdbc:mysql://127.0.0.1:3306/demo_ds_slave_1?serverTimezone=UTC&useSSL=false
    username: root
    password: root
    connectionTimeoutMilliseconds: 30000
    idleTimeoutMilliseconds: 60000
    maxLifetimeMilliseconds: 1800000
    maxPoolSize: 50

masterSlaveRule:
  name: ms_ds
  masterDataSourceName: master_ds
  slaveDataSourceNames:
    - slave_ds_0
    - slave_ds_1