如何在Centos7上安装MySQL数据库
一、MySQL获取:
从官方网站下载安装包
1.从官方网站下载源代码包
2.从官方网站下载二进制包
从发行版本光盘中获取安装包
二、MySQL安装部署
1.1安装包获取
点击此处进入官网:这里实例的是Centos7,MySQL Community Server 8.0.20
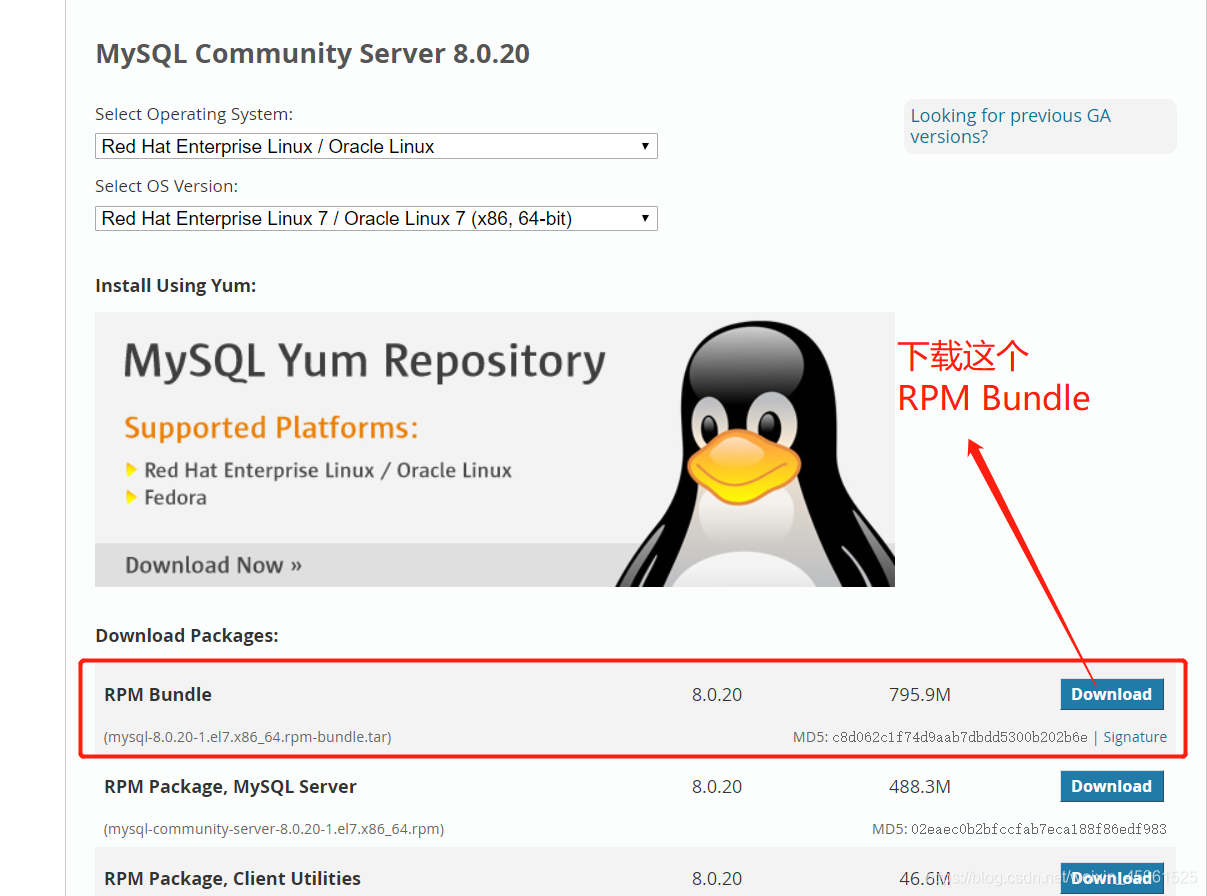
2.2rpm包安装
相关软件包:
由于RHEL7以后安装光盘不在提供MySQL,可以将所有的RPM包下载来安装,也可以配置MySQL官方提供的YUM源文件
点击此处前往官网获取
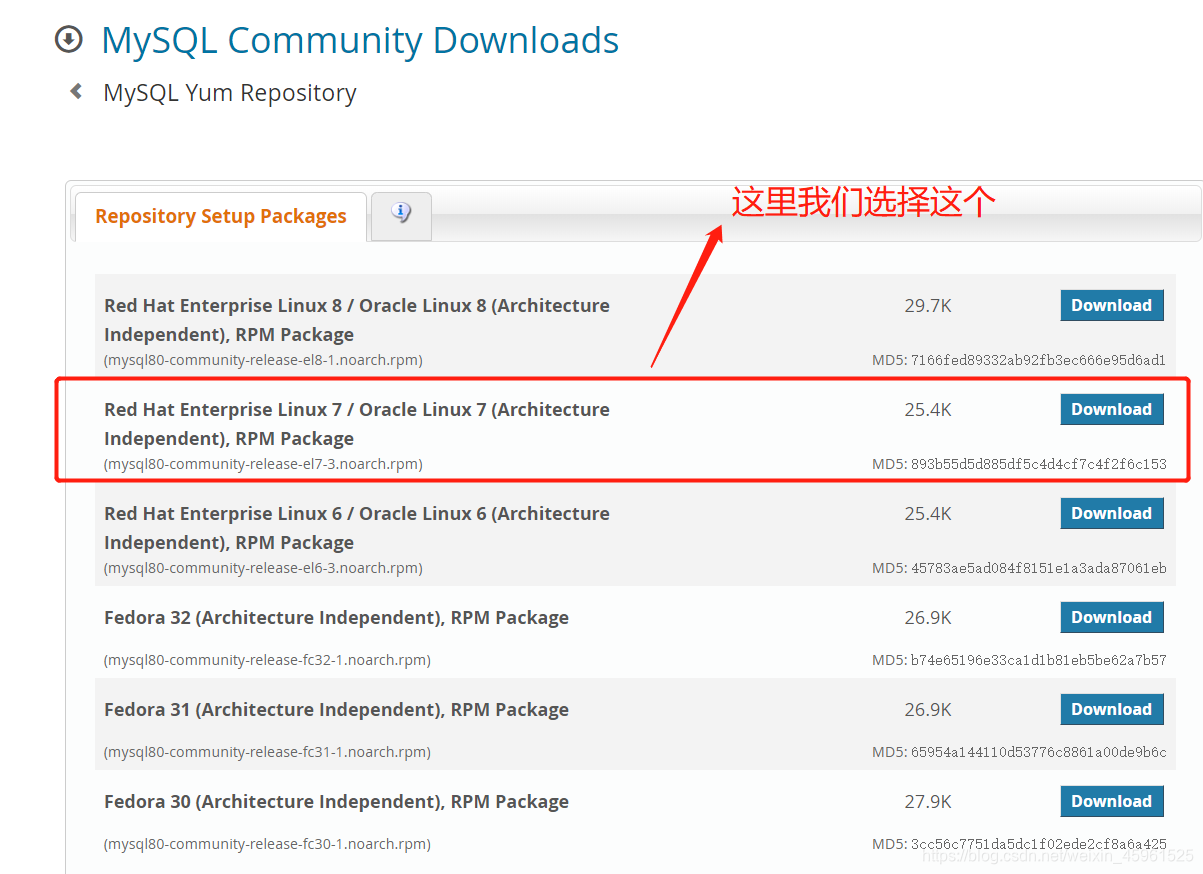
方法一:官方yum源方式安装
[root@kehu ~]# yum install mysql80-community-release-el7-3.noarch.rpm
[root@kehu ~]# yum list | grep "mysql-community"
[root@kehu ~]# yum install mysql-community-client mysql-community-server
由于官方yum源安装速度很慢,所以我们不采用它
方法二:下载RPM包安装:
注意:使用该方法安装安装时,虽然安装包已经下载到了本地,但是安装过程中仍然可能存在依赖,因此修改安装网络源来解除以来。
这里介绍使用阿里云yum方案
点击此处:跳转至我的另一条博客:也可以去阿里镜像站自行下载安装
注意:下载时首先需要下载wget命令--yum install wget
安装步骤:(这里是我之前已经安装好的8.0.19版本)
1、卸载Mariadb(这是Linux自带的数据库)
[root@kehu ~]# rpm -e mariadb-libs postfix
2、安装
[root@kehu ~]# groupadd mysql
[root@kehu ~]# useradd -g mysql mysql
[root@kehu ~]# mkdir mysql
[root@kehu ~]# ls
anaconda-ks.cfg mount.sh mysql-8.0.19-1.el7.x86_64.rpm-bundle.tar
jiaoben mysql mysql80-community-release-el7-3.noarch.rpm
[root@kehu ~]# tar xf mysql-8.0.19-1.el7.x86_64.rpm-bundle.tar -C mysql
[root@kehu ~]# cd mysql
[root@kehu mysql]# ls
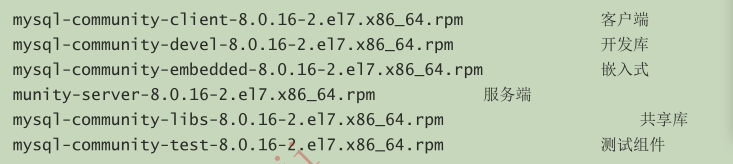
mysql-community-client-8.0.19-1.el7.x86_64.rpm
mysql-community-common-8.0.19-1.el7.x86_64.rpm
mysql-community-devel-8.0.19-1.el7.x86_64.rpm
mysql-community-embedded-compat-8.0.19-1.el7.x86_64.rpm
mysql-community-libs-8.0.19-1.el7.x86_64.rpm
mysql-community-libs-compat-8.0.19-1.el7.x86_64.rpm
mysql-community-server-8.0.19-1.el7.x86_64.rpm
mysql-community-test-8.0.19-1.el7.x86_64.rpm
[root@kehu mysql]# yum localinstall mysql-community-client-8.0.19-1.el7.x86_64.rpm mysql-community-common-8.0.19-1.el7.x86_64.rpm mysql-community-devel-8.0.19-1.el7.x86_64.rpm mysql-community-embedded-compat-8.0.19-1.el7.x86_64.rpm mysql-community-libs-8.0.19-1.el7.x86_64.rpm mysql-community-libs-compat-8.0.19-1.el7.x86_64.rpm mysql-community-server-8.0.19-1.el7.x86_64.rpm
3、启动
[root@kehu mysql]# systemctl start mysqld
[root@kehu mysql]# systemctl enable mysqld
4、MySQL安装完成后,在/var/log/mysqld.log文件中给root生成了一个默认密码。通过下面的方式找到root默认密码,然后再登陆MySQL进行修改:
[root@kehu mysql]# grep "temporary password" /var/log/mysqld.log
2020-07-11T04:20:58.300811Z 5 [Note] [MY-010454] [Server] A temporary password is generated for root@localhost: -AgKi:jwt71a
-AgKi:jwt71a为默认密码,注意前面没有空格。
[root@kehu mysql]# mysql -uroot -p
Enter password:
Welcome to the MySQL monitor.  Commands end with ; or \g.
Your MySQL connection id is 9
Server version: 8.0.19

Copyright (c) 2000, 2020, Oracle and/or its affiliates. All rights reserved.

Oracle is a registered trademark of Oracle Corporation and/or its
affiliates. Other names may be trademarks of their respective
owners.

Type 'help;' or '\h' for help. Type '\c' to clear the current input statement.
输入下面命令进行修改密码:密码必须复杂,要不然报错,大写,小写,数字,特殊符号

mysql> alter user 'root'@'localhost' identified by 'ABC123.com'
    -> ;
Query OK, 0 rows affected (0.01 sec)

mysql> exit
Bye
[root@kehu mysql]# mysql -uroot -p
Enter password:
Welcome to the MySQL monitor.  Commands end with ; or \g.
Your MySQL connection id is 11
Server version: 8.0.19 MySQL Community Server - GPL

Copyright (c) 2000, 2020, Oracle and/or its affiliates. All rights reserved.

Oracle is a registered trademark of Oracle Corporation and/or its
affiliates. Other names may be trademarks of their respective
owners.

Type 'help;' or '\h' for help. Type '\c' to clear the current input statement.
2.3通过二进制安装
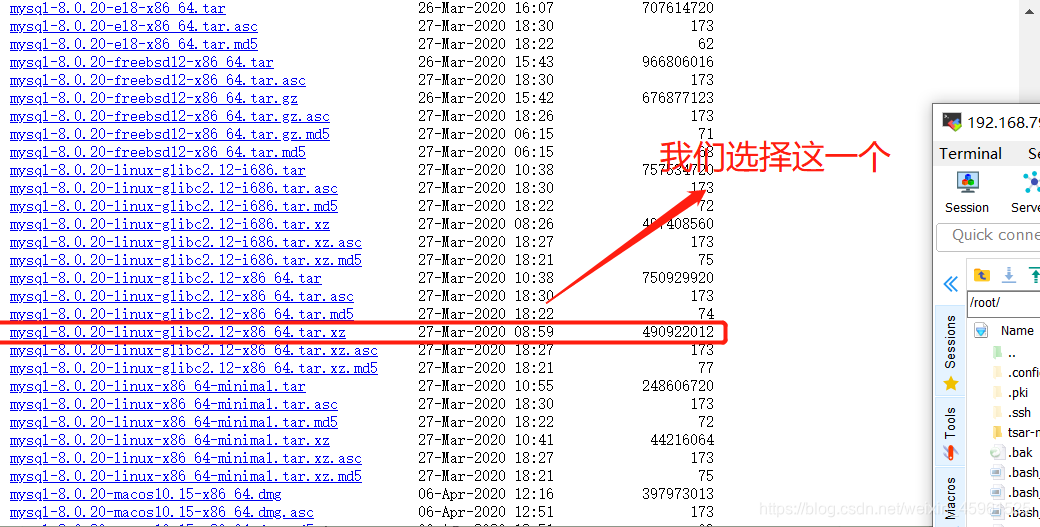
2.3.1下载glibc版本的MySQL
点击此处前往官网获取二进制安装包
2.3.2安装系统依赖包
[root@localhost ~]# yum -y install make gcc-c++ cmake bison-devel ncurses-devel readline-devel libaio-devel perl libaio wget lrzsz vim libnuma* bzip2 xz
2.3.3关闭selinux

2.3.4修改系统限制参数

或者:

2.3.5 修改内核参数
/etc/sysctl.conf
cat >>/etc/sysctl.conf <<"EOF"
vm.swappiness=0
#增加tcp支持的队列数
net.ipv4.tcp_max_syn_backlog = 65535
#减少断开连接时,资源回收
net.ipv4.tcp_max_tw_buckets = 8000
net.ipv4.tcp_tw_reuse = 1
net.ipv4.tcp_tw_recycle = 1
net.ipv4.tcp_fin_timeout = 10
#改变本地的端口范围
net.ipv4.ip_local_port_range = 1024 65535
#允许更多的连接进入队列
net.ipv4.tcp_max_syn_backlog = 4096
#对于只在本地使用的数据库服务器
net.ipv4.tcp_fin_timeout = 30
#端口监听队列
net.core.somaxconn=65535
#接受数据的速率
net.core.netdev_max_backlog=65535
net.core.wmem_default=87380
net.core.wmem_max=16777216
net.core.rmem_default=87380
net.core.rmem_max=16777216
EOF
[root@localhost ~]# sysctl -p
net.ipv4.ip_forward = 1
vm.swappiness = 0
net.ipv4.tcp_max_syn_backlog = 65535
net.ipv4.tcp_max_tw_buckets = 8000
net.ipv4.tcp_tw_reuse = 1
net.ipv4.tcp_tw_recycle = 1
net.ipv4.tcp_fin_timeout = 10
net.ipv4.ip_local_port_range = 1024 65535
net.ipv4.tcp_max_syn_backlog = 4096
net.ipv4.tcp_fin_timeout = 30
net.core.somaxconn = 65535
net.core.netdev_max_backlog = 65535
net.core.wmem_default = 87380
net.core.wmem_max = 16777216
net.core.rmem_default = 87380
net.core.rmem_max = 16777216
2.3.6MySQL的安装配置
解压安装包
[root@localhost ~]# tar xjf mysql-8.0.19-linux-glibc2.12-x86_64.tar.xz -C /opt/
做软连接到/usr/bin
[root@localhost ~]# cd /opt/
[root@localhost opt]# cd /usr/local/
[root@localhost local]# ln -s /opt/mysql-8.0.19-linux-glibc2.12-x86_64 mysql/
[root@localhost local]# ll
总用量 0
drwxr-xr-x. 2 root root  6 4月  11 2018 bin
drwxr-xr-x. 2 root root  6 4月  11 2018 etc
drwxr-xr-x. 2 root root  6 4月  11 2018 games
drwxr-xr-x. 2 root root  6 4月  11 2018 include
drwxr-xr-x. 2 root root  6 4月  11 2018 lib
drwxr-xr-x. 2 root root  6 4月  11 2018 lib64
drwxr-xr-x. 2 root root  6 4月  11 2018 libexec
drwxr-xr-x. 3 root root 18 4月  21 20:57 man
lrwxrwxrwx. 1 root root 41 7月  10 15:54 mysql -> /opt/mysql-8.0.19-linux-glibc2.12-x86_64/
drwxr-xr-x. 2 root root  6 4月  11 2018 sbin
drwxr-xr-x. 5 root root 49 4月  15 02:37 share
drwxr-xr-x. 3 root root 25 4月  21 20:51 src
drwxr-xr-x. 4 root root 35 4月  21 20:57 tsar
修改目录权限
[root@localhost local]# chown -R mysql.mysql mysql/*
初始化数据库
[root@localhost local]# cd mysql/
[root@localhost mysql]# bin/mysqld --initialize --user=mysql --basedir=/usr/local/mysql --datadir=/usr/local/mysql/data
创建配置文件,配置文件若存在,需要先注释
[root@localhost mysql]# if [ -f /etc/my.cnf ]; then mv /etc/my.cnf "/etc/my.cnf. `date +%Y%m%d%H%m`.bak"; fi
修改配置文件
[root@localhost mysql]# cd /etc/profile.d/
[root@localhost profile.d]# ls
256term.csh    colorgrep.sh  csh.local  less.csh  sh.local  which2.csh
256term.sh     colorls.csh   lang.csh   less.sh   vim.csh   which2.sh
colorgrep.csh  colorls.sh    lang.sh    mysql.sh  vim.sh
[root@localhost profile.d]# vim /etc/my.cnf
[client]
port = 3306
socket = /tmp/mysql.sock

[mysqld]
server_id=10
port = 3306
user = mysql
character-set-server = utf8
default_storage_engine = innodb
log_timestamps = SYSTEM
socket = /tmp/mysql.sock
basedir = /usr/local/mysql
datadir = /usr/local/mysql/data
pid-file = /usr/local/mysql/data/mysqld.pid
max_connections = 1000
max_connect_errors = 1000
table_open_cache = 1024
max_allowed_packet = 128M
open_files_limit = 65535
#####====================================[innodb]==============================
innodb_buffer_pool_size = 1024M
innodb_file_per_table = 1
innodb_write_io_threads = 4
innodb_read_io_threads = 4
innodb_purge_threads = 2
innodb_flush_log_at_trx_commit = 1
innodb_log_file_size = 512M
innodb_log_files_in_group = 2
innodb_log_buffer_size = 16M
innodb_max_dirty_pages_pct = 80
innodb_lock_wait_timeout = 30
innodb_data_file_path=ibdata1:10M:autoextend

#####====================================[log]==============================
log_error = /var/log/mysql-error.log
slow_query_log = 1
long_query_time = 1
slow_query_log_file = /var/log/mysql-slow.log

sql_mode=NO_ENGINE_SUBSTITUTION,STRICT_TRANS_TABLES
为MySQL提供sysv服务脚本
[root@localhost profile.d]# cd /usr/local/mysql/
[root@localhost mysql]# cp support-files/mysql.server /etc/rc.d/init.d/mysqld
[root@localhost mysql]# chmod +x /etc/rc.d/init.d/mysqld
启动MySQL
[root@localhost mysql]# chkconfig --add mysqld      --添加为系统服务
[root@localhost mysql]# chkconfig mysqld on   --开机自启动
[root@localhost mysql]# systemctl start mysqld
将MySQL的bin目录加入PATH环境变量,编辑/etc/profile文件,使用mysql客户端命令
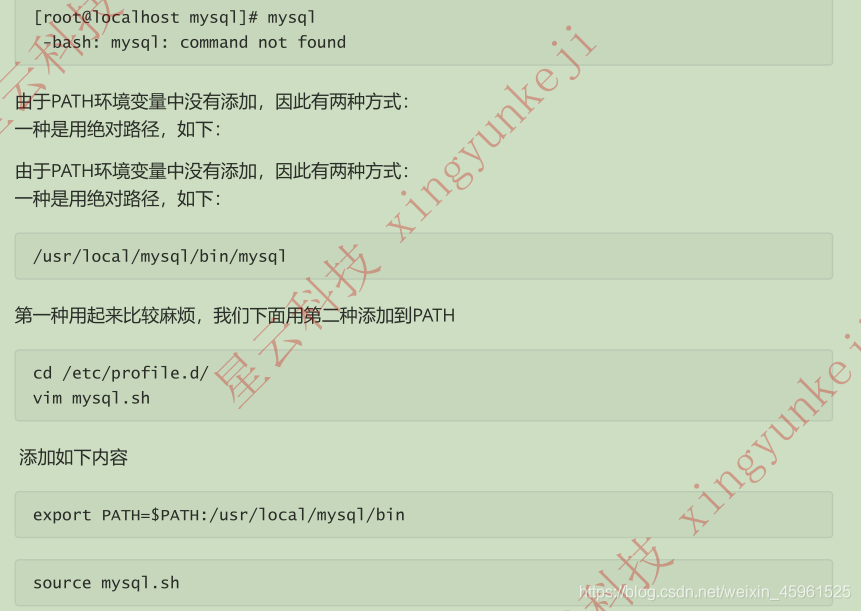
2.3.7数据库登录并修改密码
密码在初始化时,就会自动产生默认密码
[root@localhost mysql]# mysql -uroot -p
Enter password:
Welcome to the MySQL monitor.  Commands end with ; or \g.
Your MySQL connection id is 8
Server version: 8.0.19 MySQL Community Server - GPL

Copyright (c) 2000, 2020, Oracle and/or its affiliates. All rights reserved.

Oracle is a registered trademark of Oracle Corporation and/or its
affiliates. Other names may be trademarks of their respective
owners.

Type 'help;' or '\h' for help. Type '\c' to clear the current input statement.
mysql> alter user 'root'@'localhost' identified by 'ABC123.com';