1、实验环境介绍
虚拟机:
cpu:16核心
内存:64G
操作系统:centos 7.8
优化脚本:mysqltuner
测试脚本:sysbench.sh
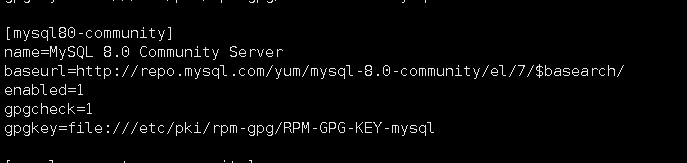
2、下载yum源rpm并安装
yum源下载地址:https://dev.mysql.com/downloads/repo/yum/
rpm -ivh mysql80-community-release-el7-3.noarch.rpm
注:可以通过修改yum文件来禁用或者启用yum源enabled=0禁用,enabled=1启用
3、安装mysql
yum install mysql-community-server
4、启动mysql
service mysqld start
5、获取初始化的mysql密码
grep 'temporary password' /var/log/mysqld.log
6、登录mysql(输入刚才查找到的密码)
mysql -uroot -p
7、更改mysql密码
ALTER USER 'root'@'localhost' IDENTIFIED BY 'MyNewPass4!';
8、下载并使用优化脚本
脚本依赖perl环境,先安装环境
yum install perl* -y
下载脚本
wget http://mysqltuner.pl/ -O mysqltuner.pl
wget https://raw.githubusercontent.com/major/MySQLTuner-perl/master/basic_passwords.txt -O basic_passwords.txt
wget https://raw.githubusercontent.com/major/MySQLTuner-perl/master/vulnerabilities.csv -O vulnerabilities.csv
元数据统计信息更新会严重影响数据库服务器和MySQLTuner的性能。确保禁用innodb_stats_on_metadata。
mysql> set global innodb_stats_on_metadata = 0;
使用脚本
perl mysqltuner.pl --host targetDNS_IP --user admin_user --pass admin_password
根据脚本提示向my.cnf添加参数
例如
tmp_table_size=256M
max_heap_table_size=256M
innodb_buffer_pool_size=51200M
innodb_log_file_size=12800M
完整mysql.cnf示例
主:
# For advice on how to change settings please see
# http://dev.mysql.com/doc/refman/8.0/en/server-configuration-defaults.html

[mysqld]
#
# Remove leading # and set to the amount of RAM for the most important data
# cache in MySQL. Start at 70% of total RAM for dedicated server, else 10%.
# innodb_buffer_pool_size = 128M
#
# Remove the leading "# " to disable binary logging
# Binary logging captures changes between backups and is enabled by
# default. It's default setting is log_bin=binlog
# disable_log_bin
#
# Remove leading # to set options mainly useful for reporting servers.
# The server defaults are faster for transactions and fast SELECTs.
# Adjust sizes as needed, experiment to find the optimal values.
# join_buffer_size = 128M
# sort_buffer_size = 2M
# read_rnd_buffer_size = 2M
#
# Remove leading # to revert to previous value for default_authentication_plugin,
# this will increase compatibility with older clients. For background, see:
# https://dev.mysql.com/doc/refman/8.0/en/server-system-variables.html#sysvar_default_authentication_plugin
# default-authentication-plugin=mysql_native_password

datadir=/var/lib/mysql
socket=/var/lib/mysql/mysql.sock

log-error=/var/log/mysqld.log
pid-file=/var/run/mysqld/mysqld.pid

tmp_table_size=256M
max_heap_table_size=256M
innodb_buffer_pool_size=51200M
innodb_log_file_size=12800M

server-id=1
#半同步复制-主
#rpl_semi_sync_master_timeout = 10000 #仅主数据库开启
plugin-load=rpl_semi_sync_master=semisync_master.so
rpl_semi_sync_master_enabled=1

#半同步优化参数
innodb_flush_log_at_trx_commit=2
sync_binlog=1000
从:
# For advice on how to change settings please see
# http://dev.mysql.com/doc/refman/8.0/en/server-configuration-defaults.html

[mysqld]
#
# Remove leading # and set to the amount of RAM for the most important data
# cache in MySQL. Start at 70% of total RAM for dedicated server, else 10%.
# innodb_buffer_pool_size = 128M
#
# Remove the leading "# " to disable binary logging
# Binary logging captures changes between backups and is enabled by
# default. It's default setting is log_bin=binlog
# disable_log_bin
#
# Remove leading # to set options mainly useful for reporting servers.
# The server defaults are faster for transactions and fast SELECTs.
# Adjust sizes as needed, experiment to find the optimal values.
# join_buffer_size = 128M
# sort_buffer_size = 2M
# read_rnd_buffer_size = 2M
#
# Remove leading # to revert to previous value for default_authentication_plugin,
# this will increase compatibility with older clients. For background, see:
# https://dev.mysql.com/doc/refman/8.0/en/server-system-variables.html#sysvar_default_authentication_plugin
# default-authentication-plugin=mysql_native_password

datadir=/var/lib/mysql
socket=/var/lib/mysql/mysql.sock

log-error=/var/log/mysqld.log
pid-file=/var/run/mysqld/mysqld.pid

tmp_table_size=256M
max_heap_table_size=256M
innodb_buffer_pool_size=51200M
innodb_log_file_size=12800M

server-id=2
#半同步设置-从
plugin-load=rpl_semi_sync_slave=semisync_slave.so
rpl_semi_sync_slave_enabled=1

#半同步优化参数
innodb_flush_log_at_trx_commit=2
sync_binlog=1000
9、配置mysql异步复制(加载半同步模块后就会变成半同步复制)
主库:
创建用户和授权
mysql> CREATE USER 'slave'@'10.99.19.%' IDENTIFIED WITH mysql_native_password BY '1qazXSW@';
mysql> GRANT REPLICATION SLAVE ON *.* TO 'slave'@'10.99.19.%';
mysql> flush privileges;
查看主库日志情况
mysql> show master status;

从库:
change master to
master_host='10.99.19.71',
master_port=3306,
master_user='slave',
master_password='1qazXSW@',
master_log_file='binlog.000005',
master_log_pos=1203;
启动slave
mysql> start slave;

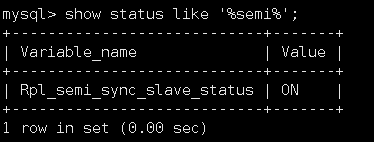
检查主库半同步状态
mysql> show status like '%semi%';

检查从库半同步状态
mysql> show status like '%semi%';
10、进行压力测试
脚本示例
#!/bin/bash

function log_info(){
    local msg=$1
	echo -e "\033[1;32;40m[INFO]\033[0m [`date +'%Y-%m-%d %H:%M:%S'`] $msg "
    return 0
}

function log_warn(){
    local msg=$1
	echo -e "\033[1;31;40m[WARN]\033[0m [`date +'%Y-%m-%d %H:%M:%S'`] $msg "
    return 1
}

function print_help(){
    cat <<EOF
=========================================================================
		Run SysBench Test
		         [email protected]

OPTS:
  ./sysbench.sh help : show help
  ./sysbench.sh install : install fio sysbench
  ./sysbench.sh fio_4k : Test fio 4k files
  ./sysbench.sh fio_16k : Test fio 16k files
  ./sysbench.sh create_sbtest : Create sbtest
  ./sysbench.sh sysbench_prepare : Prepare test data
  ./sysbench.sh sysbench_run : Run MySQL Test
  ./sysbench.sh sysbench_cleanup : Cleanup test data
  ./sysbench.sh sysbench_io : Run System files IO R/W Test
  ./sysbench.sh sysbench_locks : Test System locks
  ./sysbench.sh sysbench_thread : Test System threads
Note:
  Please Install MySQL and ./sysbench.sh install
=========================================================================
EOF
}

IP=`ip a | grep -w "inet" | grep eth |sed 's/^.*inet //g'|sed 's/\/[0-9][0-9].*$//g'|awk 'NR==1{print $1}'`
if [ -z "$IP" ];then
IP=`ip a | grep -w "inet" | grep ens |sed 's/^.*inet //g'|sed 's/\/[0-9][0-9].*$//g'|awk 'NR==1{print $1}'`
fi

DIR=`pwd`

function install(){
yum -y install epel-release
yum -y install fio sysbench
}

function fio_4k(){
#fio
fio -filename=/tmp/test_rw -direct=1 -iodepth 1 -thread -rw=randrw -ioengine=psync -bs=4k -size=2G -numjobs=10 -runtime=600 -group_reporting -name=mytest  >> ${DIR}/mysysbench-${IP}.log
rm -rf /tmp/test_rw
if [ $? -eq 127 ];then
log_warn "Please install ./sysbench.sh install"
print_help
fi
}
function fio_16k(){
#fio
fio -filename=/tmp/test_rw -direct=1 -iodepth 1 -thread -rw=randrw -ioengine=psync -bs=16k -size=2G -numjobs=10 -runtime=600 -group_reporting -name=mytest  >> ${DIR}/mysysbench-${IP}.log
rm -rf /tmp/test_rw
if [ $? -eq 127 ];then
log_warn "Please install ./sysbench.sh install"
print_help
fi
}
function create_sbtest(){
#登录数据库创建账号密码
mysql -uroot -pSmtgbk_123 -e"grant all on sbtest.* to sbtest@'%' identified by '1qazXSW@' ;flush privileges;create database sbtest;"
if [ $? -eq 127 ];then
log_warn "Please install MySQL"
print_help
else
log_info "sysbench账号、数据库创建成功"
fi
}

function sysbench_prepare(){
#数据准备
log_info "正在创建压测数据,数据大小约160G。"
sysbench  --num-threads=32 --max-time=600 --max-requests=999999999 --test= /usr/share/sysbench/tests/include/oltp_legacy/oltp.lua --oltp-table-size=10000000 --oltp-tables-count=64 --db-driver=mysql --mysql-table-engine=innodb --mysql-host="127.0.0.1" --mysql-port=3306 --mysql-user="sbtest" --mysql-password="1qazXSW@" prepare
if [ $? -eq 127 ];then
log_warn "Please install ./sysbench.sh install or ./sysbench.sh create_sbtest"
print_help
fi
}

function sysbench_run(){
#压测性能
log_info "正在执行测试,结果将保存在${DIR}/mysysbench-${IP}.log"
sysbench --num-threads=32 --max-time=600 --max-requests=999999999 --test= /usr/share/sysbench/tests/include/oltp_legacy/oltp.lua --oltp-table-size=10000000 --oltp-tables-count=64 --db-driver=mysql --mysql-table-engine=innodb --mysql-host="127.0.0.1" --mysql-port=3306 --mysql-user="sbtest" --mysql-password="1qazXSW@" run >> ${DIR}/mysysbench-${IP}.log
}
function sysbench_cleanup(){
log_info "正在清理文件"
#清理环境
sysbench --num-threads=32 --max-time=600 --max-requests=999999999 --test= /usr/share/sysbench/tests/include/oltp_legacy/oltp.lua --oltp-table-size=10000000 --oltp-tables-count=64 --db-driver=mysql --mysql-table-engine=innodb --mysql-host="127.0.0.1" --mysql-port=3306 --mysql-user="sbtest" --mysql-password="1qazXSW@" cleanup
}
function sysbench_io(){
log_info "正在执行测试,结果将保存在${DIR}/mysysbench-${IP}.log"
#文件io测试
sysbench --threads=12 --events=10000 fileio --file-total-size=2G --file-test-mode=rndrw prepare
if [ $? -eq 127 ];then
log_warn "Please install ./sysbench.sh install"
print_help
exit 0
fi
sysbench --threads=12 --events=10000 fileio --file-total-size=2G --file-test-mode=rndrw run >> ${DIR}/mysysbench-${IP}.log
sysbench --threads=12 --events=10000 fileio --file-total-size=2G --file-test-mode=rndrw cleanup
}
function sysbench_locks(){
log_info "正在执行测试,结果将保存在${DIR}/mysysbench-${IP}.log"
#锁测试互斥锁测试模拟所有线程在同一时刻并发运行。
sysbench --threads=12 mutex --mutex-num=1024 --mutex-locks=10000 --mutex-loops=10000 run >> ${DIR}/mysysbench-${IP}.log
if [ $? -eq 127 ];then
log_warn "Please install ./sysbench.sh install"
print_help
exit 0
fi
}
function sysbench_thread(){
log_info "正在执行测试,结果将保存在${DIR}/mysysbench-${IP}.log"
#线程测试
sysbench threads --num-threads=64 --thread-yields=100 --thread-locks=2 run >> ${DIR}/mysysbench-${IP}.log
if [ $? -eq 127 ];then
log_warn "Please install ./sysbench.sh install"
print_help
exit 0
fi
}
$1

#help support
if [ "$1"x == ""x ]; then
 print_help
fi;
安装sysbench
./sysbench.sh install
创建测试数据库和用户
CREATE USER 'sbtest'@'%' IDENTIFIED WITH mysql_native_password BY '1qazXSW@';
grant all on sbtest.* to sbtest@'%';
flush privileges;
create database sbtest;
准备测试数据
./sysbench.sh sysbench_prepare
执行压力测试
./sysbench.sh sysbench_run
11、测试结果
半同步复制结果

单机节点测试结果
