文章目录
整合MyBatis
在SpringBoot中,MyBatis官方提供了一套自动化方案,可以做到MyBatis开箱即用。
创建工程,添加依赖
<!-- 添加mybatis依赖 -->
<dependency>
    <groupId>org.mybatis.spring.boot</groupId>
    <artifactId>mybatis-spring-boot-starter</artifactId>
    <version>1.3.2</version>
</dependency>
<!-- 添加数据依赖 -->
<dependency>
    <groupId>mysql</groupId>
    <artifactId>mysql-connector-java</artifactId>
    <scope>runtime</scope>
</dependency>
<!-- 添加数据连接池依赖 -->
<dependency>
    <groupId>com.alibaba</groupId>
    <artifactId>druid</artifactId>
    <version>1.1.9</version>
</dependency>
创建数据库、表、实体类等
配置数据库、表、实体类
配置DemoApplication和properties
在DemoApplication.java中添加@MapperScan注解

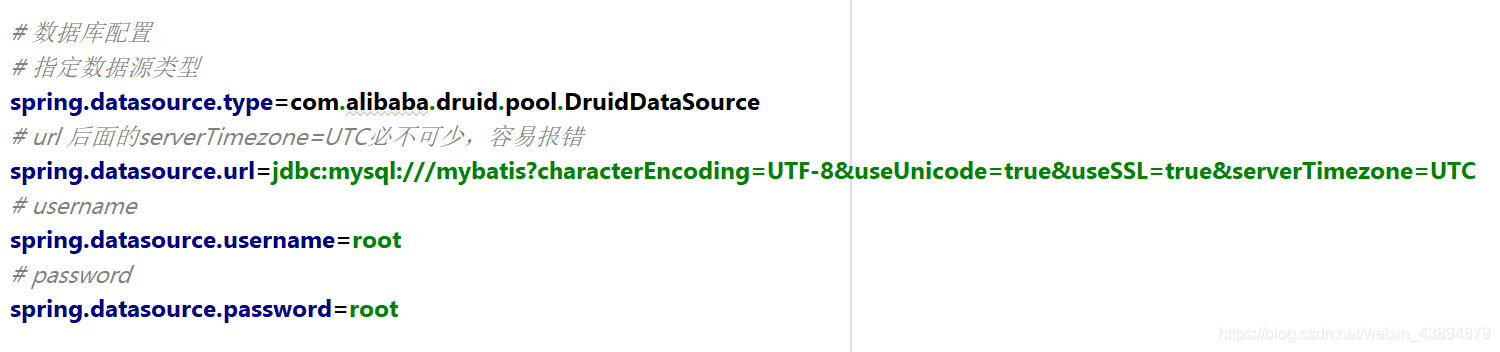
在properties中配置数据库
创建数据访问层
Mapper.java
/**
 * (Student)表数据库访问层
 *
 * @author Lw中
 * @since 2020-06-10 08:36:07
 *
 * @Mapper:表明该接口是一个MyBatis中的Mapper
 * @Component:为了防止在Service中注入Mapper出现报错(虽然不影响运行)而添加
 */
@Mapper
@Component
public interface StudentMapper {
    /**
     * 通过ID查询单条数据
     *
     * @param id 主键
     * @return 实例对象
     */
    Student queryById(Integer id);
    /**
     * 查询指定行数据
     *
     * @param offset 查询起始位置
     * @param limit 查询条数
     * @return 对象列表
     */
    List<Student> queryAllByLimit(@Param("offset") int offset, @Param("limit") int limit);
    /**
     * 通过实体作为筛选条件查询
     *
     * @param student 实例对象
     * @return 对象列表
     */
    List<Student> queryAll(Student student);
}
Mapper.xml
<?xml version="1.0" encoding="UTF-8"?>
<!DOCTYPE mapper PUBLIC "-//mybatis.org//DTD Mapper 3.0//EN" "http://mybatis.org/dtd/mybatis-3-mapper.dtd">
<mapper namespace="com.lwz.demo.mapper.StudentMapper">
    <resultMap type="com.lwz.demo.entity.Student" id="StudentMap">
        <result property="id" column="id" jdbcType="INTEGER"/>
        <result property="studentId" column="student_id" jdbcType="INTEGER"/>
        <result property="studentName" column="student_name" jdbcType="VARCHAR"/>
        <result property="age" column="age" jdbcType="INTEGER"/>
        <result property="gender" column="gender" jdbcType="VARCHAR"/>
        <result property="className" column="class_name" jdbcType="VARCHAR"/>
    </resultMap>
    <!--查询单个-->
    <select id="queryById" resultMap="StudentMap">
        select
          id, student_id, student_name, age, gender, class_name
        from mybatis.t_student
        where id = #{id}
    </select>
    <!--查询指定行数据-->
    <select id="queryAllByLimit" resultMap="StudentMap">
        select
          id, student_id, student_name, age, gender, class_name
        from mybatis.t_student
        limit #{offset}, #{limit}
    </select>
    <!--通过实体作为筛选条件查询-->
    <select id="queryAll" resultMap="StudentMap">
        select
          id, student_id, student_name, age, gender, class_name
        from mybatis.t_student
        <where>
            <if test="id != null">
                and id = #{id}
            </if>
            <if test="studentId != null">
                and student_id = #{studentId}
            </if>
            <if test="studentName != null and studentName != ''">
                and student_name = #{studentName}
            </if>
            <if test="age != null">
                and age = #{age}
            </if>
            <if test="gender != null and gender != ''">
                and gender = #{gender}
            </if>
            <if test="className != null and className != ''">
                and class_name = #{className}
            </if>
        </where>
    </select>
创建Controller类
此处省略Service类的编写
@RestController
public class StudentController {
    @Autowired
    StudentService studentService;
    @GetMapping("/studentOps")
    public void studentOps() {
        Student student = new Student();
        student.setStudentId(2018123444);
        student.setStudentName("Lw中");
        student.setAge(19);
        student.setGender("男");
        student.setClassName("18软件技术777");
        Student insert = studentService.insert(student);
        System.out.println(insert.getStudentName());
        Student student1 = new Student();
        student1.setId(9);
        student1.setStudentId(2018123444);
        student1.setStudentName("Lw中update");
        student1.setAge(19);
        student1.setGender("男");
        student1.setClassName("18软件技术777");
        Student update = studentService.update(student1);
        System.out.println(update.getStudentName());
        boolean b = studentService.deleteById(3);
        if (b) {
            System.out.println("删除成功");
        }
    }
}
整合MyBatis-Plus
创建工程,添加依赖
<dependency>
    <groupId>org.springframework.boot</groupId>
    <artifactId>spring-boot-starter-web</artifactId>
</dependency>
<dependency>
    <groupId>org.springframework.boot</groupId>
    <artifactId>spring-boot-starter</artifactId>
</dependency>
<dependency>
    <groupId>org.projectlombok</groupId>
    <artifactId>lombok</artifactId>
    <optional>true</optional>
</dependency>
<dependency>
    <groupId>com.baomidou</groupId>
    <artifactId>mybatis-plus-boot-starter</artifactId>
    <version>3.3.2</version>
</dependency>
<dependency>
    <groupId>mysql</groupId>
    <artifactId>mysql-connector-java</artifactId>
</dependency>
<!-- 添加数据连接池依赖 -->
<dependency>
    <groupId>com.alibaba</groupId>
    <artifactId>druid</artifactId>
    <version>1.1.9</version>
</dependency>
创建MyBatis-plus配置类
@Configuration
@MapperScan("com.lwz.demo.mapper")
@ConditionalOnClass(value = {PaginationInterceptor.class})
public class MybatisPlusConfig {
    @Bean
    public PaginationInterceptor paginationInterceptor() {
        PaginationInterceptor paginationInterceptor = new PaginationInterceptor();
        return paginationInterceptor;
    }
}
创建实体类
@Data
public class Acount {

    private int id;
    private String userName;
    private double balance;
}
创建mapper文件
mapper类要继承BaseMapper<Acount>
public interface AcountMapper extends BaseMapper<Acount> {

}
编写测试类,测试结果
@RunWith(SpringRunner.class)
@SpringBootTest
class DemoApplicationTests {
    @Resource
    private AcountMapper acountMapper;
    @Test
    void contextLoads() {
        Acount acount = acountMapper.selectById(1);
        System.out.println(acount.getUserName());
    }
}
结果如下图所示:

在Mybatis-plus中编写原生sql的两种方法
第一:在pom.xml文件中添加
<build>
    <plugins>
        <plugin>
            <groupId>org.springframework.boot</groupId>
            <artifactId>spring-boot-maven-plugin</artifactId>
        </plugin>
    </plugins>
    <resources>
        <resource>
            <directory>src/main/java</directory>
            <includes>
                <include>**/*.xml</include>
            </includes>
        </resource>
    </resources>
</build>
第二:把xml文件放到resources里面的mapper文件中

使用MyBatis-plus进行分页查询
创建工程,添加依赖
<dependency>
    <groupId>com.baomidou</groupId>
    <artifactId>mybatis-plus-boot-starter</artifactId>
    <version>3.3.2</version>
</dependency>
<dependency>
    <groupId>mysql</groupId>
    <artifactId>mysql-connector-java</artifactId>
</dependency>
<!-- 添加数据连接池依赖 -->
<dependency>
    <groupId>com.alibaba</groupId>
    <artifactId>druid</artifactId>
    <version>1.1.9</version>
</dependency>
创建Controller类
中间的步骤省略,直接到Controller类中编写接口进行测试
@RestController
public class queryList {
@Resource
UserMapper userMapper;
@GetMapping("queryUser")
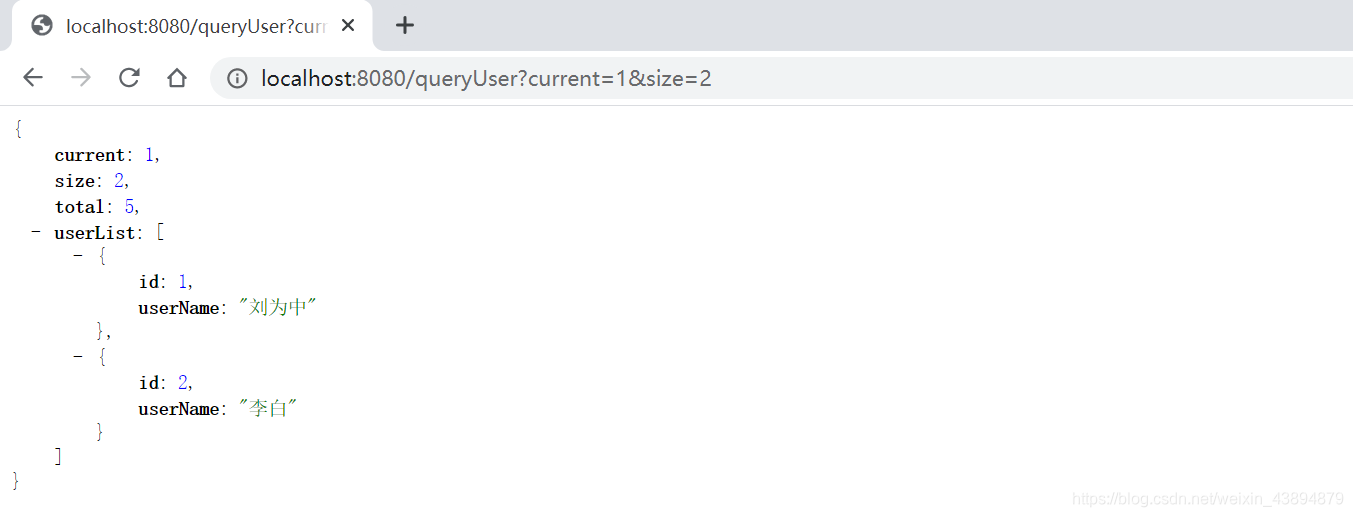
public UserVo queryList(Integer current, Integer size) {
UserVo userVo = new UserVo();
IPage<User> page = new Page<>(current, size);
userMapper.selectPage(page, null);
userVo.setCurrent(current);
userVo.setSize(size);
userVo.setTotal(page.getTotal());
userVo.setUserList(page.getRecords());
return userVo;
}
}
在浏览器中输入http://localhost:8080/queryUser?current=1&size=2,查看测试结果