解析WindowManager
WindowManager是于WindowMangerService(以后简称WMS)关联最紧密的类,因为,为了更好的理解WMS,需要先了解WindowManager的相关知识,本文将基于Android8.1.0系统来介绍WindowManger的体系、Window的属性和Window的操作。
1. Window、WindowManager 和 WMS
Window 它是一个抽象类,具体的实现类为 PhoneWindow ,它对 View 进行管理。 WindowManager 是一个接口类,继承自接口 ViewManager ,它是用来管理 Window 的,它的实现类为 WindowManagerImpl 。如果我们想要对 Window (View) 进行添加、更新和删除操作就可以使用 WindowManager, WindowManager 会将具体的工作交由 WMS 来处理, WindowManager 和 WMS 通过 Binder 来进行跨进程通信, WMS 作为系统服务有很多 API 是不会暴露给 WindowManager 的,这一点与 ActivityManager 和 AMS 的关系有些类似。 Window、WindowManager 和 WMS 的关系可以简略地用图1 来表示。
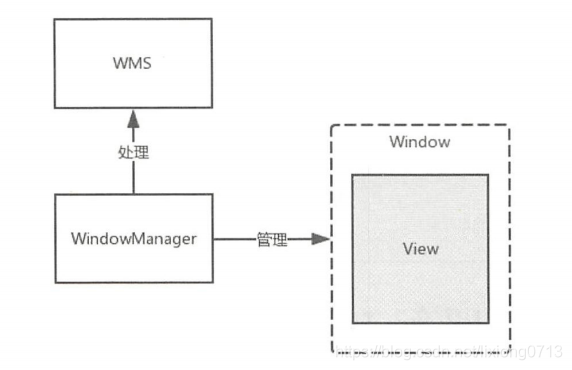
Window 包含了 View 并对 View 进行管理, Window 用虚线来表示是因为 Window 是一个抽象概念,用来描述一个窗口,并不是真实存在的, Window 的实体其实也是 View 。WindowManager 用来管理 Window ,而 WindowManager 所提供的功能最终会由 WMS 进行处理。
2. WindowManager 的关联类
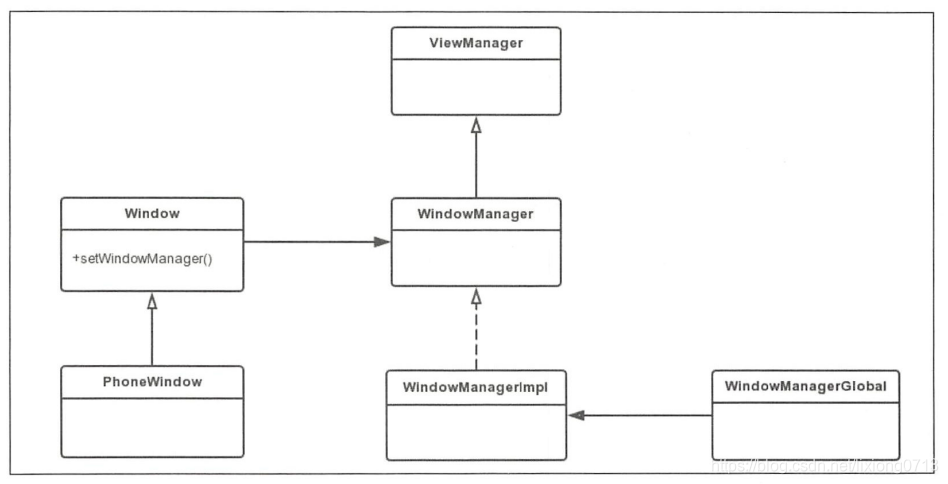
WindowManager 是一个接口类,继承自接口 ViewManager, ViewManager 中定义了 3个方法,分别用来添加、更新和删除 View ,代码如下所示:
frameworks/base/core/java/android/view/ViewManager.java
public interface ViewManager
{
    public void addView(View view, ViewGroup.LayoutParams params);
    public void updateViewLayout(View view, ViewGroup.LayoutParams params);
    public void removeView(View view);
}
frameworks/base/core/java/android/view/WindowManager.java
    public Display getDefaultDisplay();

public void removeViewImmediate(View view); final void attach(Context context, ActivityThread aThread,
Instrumentation instr, IBinder token, int ident,
Application application, Intent intent, ActivityInfo info,
CharSequence title, Activity parent, String id,
NonConfigurationInstances lastNonConfigurationInstances,
Configuration config, String referrer, IVoiceInteractor voiceInteractor,
Window window, ActivityConfigCallback activityConfigCallback) {
attachBaseContext(context);
mFragments.attachHost(null /*parent*/);
mWindow = new PhoneWindow(this, window, activityConfigCallback); // ... 1
...
mWindow.setWindowManager(
(WindowManager)context.getSystemService(Context.WINDOW_SERVICE),
mToken, mComponent.flattenToString(),
(info.flags & ActivityInfo.FLAG_HARDWARE_ACCELERATED) != 0); // ... 2
if (mParent != null) {
mWindow.setContainer(mParent.getWindow());
}
mWindowManager = mWindow.getWindowManager();
mCurrentConfig = config;
mWindow.setColorMode(info.colorMode);
}在注释1处创建了PhoneWindow,在注释2处调用了PhoneWindow的setWindowManager方法,这个方法在PhoneWindow的父类Window中实现。代码如下所示:
    public void setWindowManager(WindowManager wm, IBinder appToken, String appName,
            boolean hardwareAccelerated) {
        mAppToken = appToken;
        mAppName = appName;
        mHardwareAccelerated = hardwareAccelerated
                || SystemProperties.getBoolean(PROPERTY_HARDWARE_UI, false);
        if (wm == null) {
            wm = (WindowManager)mContext.getSystemService(Context.WINDOW_SERVICE); // ... 1
        }
        mWindowManager = ((WindowManagerImpl)wm).createLocalWindowManager(this); // ... 2
}frameworks/base/core/java/android/app/Contextlmpl.java
    public Object getSystemService(String name) {
        return SystemServiceRegistry.getSystemService(this, name);
} public static Object getSystemService(ContextImpl ctx, String name) {
ServiceFetcher<?> fetcher = SYSTEM_SERVICE_FETCHERS.get(name); // ... 1
return fetcher != null ? fetcher.getService(ctx) : null; // ... 2
}final class SystemServiceRegistry {
...
private SystemServiceRegistry() { }
static {
...
registerService(Context.WINDOW_SERVICE, WindowManager.class,
new CachedServiceFetcher<WindowManager>() {
@Override
public WindowManager createService(ContextImpl ctx) {
return new WindowManagerImpl(ctx); // ... 1
}});
...
}
...
} private static <T> void registerService(String serviceName, Class<T> serviceClass,
ServiceFetcher<T> serviceFetcher) {
SYSTEM_SERVICE_NAMES.put(serviceClass, serviceName);
SYSTEM_SERVICE_FETCHERS.put(serviceName, serviceFetcher); // ... 1
}registerService方法内部会将传入的服务的名称存入到 SYSTEM_SERVICE_NAMES 中。在注释1处以服务的名称为key,new CachedServiceFetcher<WindowManager>() 匿名对象为value存储在SYSTEM_SERVICE_FETCHERS中,我们回到SystemServiceRegistry 的 getSystemService方法的注释1处得到的fetcher对象实质上指向的就是new CachedServiceFetcher<WindowManager>() 这个匿名对象,通过注释2处的fetcher.getService方法来获取服务,我们接下来查看CachedServiceFetcher类的定义,代码如下所示:
frameworks/base/core/java/android/app/SystemServiceRegistry.java
    static abstract class CachedServiceFetcher<T> implements ServiceFetcher<T> {
        private final int mCacheIndex;

        public CachedServiceFetcher() {
            mCacheIndex = sServiceCacheSize++;
        }

        @Override
        @SuppressWarnings("unchecked")
        public final T getService(ContextImpl ctx) {
            final Object[] cache = ctx.mServiceCache;
            synchronized (cache) {
                // Fetch or create the service.
                Object service = cache[mCacheIndex];
                if (service == null) {
                    try {
                        service = createService(ctx); // ... 1
                        cache[mCacheIndex] = service;
                    } catch (ServiceNotFoundException e) {
                        onServiceNotFound(e);
                    }
                }
                return (T)service;
            }
        }

        public abstract T createService(ContextImpl ctx) throws ServiceNotFoundException;
}在注释1处调用了createService方法,而createService方法是一个抽象方法,它在刚才分析的registerService方法中创建的匿名对象new CachedServiceFetcher<WindowManager>() 中实现的,因此我们可以得出结论,在SystemServiceRegistry 的 getSystemService方法的注释2处得到的就是WindowManagerImpl实例。
    public WindowManagerImpl createLocalWindowManager(Window parentWindow) {
        return new WindowManagerImpl(mContext, parentWindow);
} public void addView(@NonNull View view, @NonNull ViewGroup.LayoutParams params) {
applyDefaultToken(params);
mGlobal.addView(view, params, mContext.getDisplay(), mParentWindow); // ... 1
}frameworks/base/core/java/android/view/WindowManagerlmpl.java
public final class WindowManagerImpl implements WindowManager {
    private final WindowManagerGlobal mGlobal = WindowManagerGlobal.getInstance(); // ... 1
    private final Context mContext;
    private final Window mParentWindow; // ... 2

    private IBinder mDefaultToken;

    public WindowManagerImpl(Context context) {
        this(context, null);
    }

    private WindowManagerImpl(Context context, Window parentWindow) {
        mContext = context;
        mParentWindow = parentWindow; // ... 3
    }
}
3. Window的属性
Window的属性被定义在WindowManager的内部类LayoutParams 中,了解 Window 的属性能够更好地理解 WMS 的内部原理。 Window 的属性有很多种,与应用开发最密切的有3种,它们分别是 Type (Window 的类型)、 Flag (Window 的标志)和SoftlnputMode (软键盘相关模式),下面分别介绍这3种 Window 的属性。
3.1 Window 的类型和显示次序
Window 的类型有很多种,比如应用程序窗口、系统错误窗口、输入法窗口、 PopupWindow 、Toast 、Dialog 等。总的来说 Window 分为三大类型,分别是 application Window (应用程序窗口 )、 Sub Window (子窗口)、 System Window (系统窗口),每个大类型中又包含了很多种类型,它们都定义在 WindowManager 的静态内部类 LayoutParams 中,接下 来分别对这大类型进行讲解。
1. 应用程序窗口
Activity 就是一个典型的应用程序窗口,应用程序窗口包含的类型如下所示:
frameworks/base/core/java/android/view/WindowManager.java
      /**
       * Start of window types that represent normal application windows.
       */
      public static final int FIRST_APPLICATION_WINDOW = 1; // ... 1

      /**
       * Window type: an application window that serves as the "base" window
       * of the overall application; all other application windows will
       * appear on top of it.
       * In multiuser systems shows only on the owning user's window.
       *
       * 窗口的基础值,其他的窗口值都要大于这个值
       */
       public static final int TYPE_BASE_APPLICATION   = 1;

       /**
        * Window type: a normal application window.  The {@link #token} must be
        * an Activity token identifying who the window belongs to.
        * In multiuser systems shows only on the owning user's window.
        *
        * 普通的应用程序窗口类型
        */
        public static final int TYPE_APPLICATION        = 2;

        /**
         * Window type: special application window that is displayed while the
         * application is starting.  Not for use by applications themselves;
         * this is used by the system to display something until the
         * application can show its own windows.
         * In multiuser systems shows on all users' windows.
         *
         *  应用程序启动的窗口类型,用于系统在应用程序窗口启动前显示的窗口
         */
        public static final int TYPE_APPLICATION_STARTING = 3;

        /**
         * Window type: a variation on TYPE_APPLICATION that ensures the window
         * manager will wait for this window to be drawn before the app is shown.
         * In multiuser systems shows only on the owning user's window.
         */
        public static final int TYPE_DRAWN_APPLICATION = 4;

        /**
         * End of types of application windows.
         */
public static final int LAST_APPLICATION_WINDOW = 99; // ... 22. 子窗口
        /**
         * Start of types of sub-windows.  The {@link #token} of these windows
         * must be set to the window they are attached to.  These types of
         * windows are kept next to their attached window in Z-order, and their
         * coordinate space is relative to their attached window.
         *
         * 子窗口类型的初始值
         */
        public static final int FIRST_SUB_WINDOW = 1000;

        /**
         * Window type: a panel on top of an application window.  These windows
         * appear on top of their attached window.
         */
        public static final int TYPE_APPLICATION_PANEL = FIRST_SUB_WINDOW;

        /**
         * Window type: window for showing media (such as video).  These windows
         * are displayed behind their attached window.
         */
        public static final int TYPE_APPLICATION_MEDIA = FIRST_SUB_WINDOW + 1;

        /**
         * Window type: a sub-panel on top of an application window.  These
         * windows are displayed on top their attached window and any
         * {@link #TYPE_APPLICATION_PANEL} panels.
         */
        public static final int TYPE_APPLICATION_SUB_PANEL = FIRST_SUB_WINDOW + 2;

        /** Window type: like {@link #TYPE_APPLICATION_PANEL}, but layout
         * of the window happens as that of a top-level window, <em>not</em>
         * as a child of its container.
         */
        public static final int TYPE_APPLICATION_ATTACHED_DIALOG = FIRST_SUB_WINDOW + 3;

        /**
         * Window type: window for showing overlays on top of media windows.
         * These windows are displayed between TYPE_APPLICATION_MEDIA and the
         * application window.  They should be translucent to be useful.  This
         * is a big ugly hack so:
         * @hide
         */
        public static final int TYPE_APPLICATION_MEDIA_OVERLAY  = FIRST_SUB_WINDOW + 4;

        /**
         * Window type: a above sub-panel on top of an application window and it's
         * sub-panel windows. These windows are displayed on top of their attached window
         * and any {@link #TYPE_APPLICATION_SUB_PANEL} panels.
         * @hide
         */
        public static final int TYPE_APPLICATION_ABOVE_SUB_PANEL = FIRST_SUB_WINDOW + 5;

        /**
         * End of types of sub-windows.
         *
         * 子窗口类型的结束值
         */
        public static final int LAST_SUB_WINDOW = 1999;
可以看出子窗口的 Type 值范围为 1000 ~1999。
3. 系统窗口
Toast、输入法窗口、系统音量调窗口、系统错误窗口都属于系统窗口。系统窗口的类型定义如下所示:
frameworks/base/core/java/android/view/WindowManager.java
        /**
         * Start of system-specific window types.  These are not normally
         * created by applications.
         *
         * 系统窗口类型的初始值
         */
        public static final int FIRST_SYSTEM_WINDOW     = 2000;

        /**
         * Window type: the status bar.  There can be only one status bar
         * window; it is placed at the top of the screen, and all other
         * windows are shifted down so they are below it.
         * In multiuser systems shows on all users' windows.
         *
         *  系统状态栏窗口
         */
        public static final int TYPE_STATUS_BAR         = FIRST_SYSTEM_WINDOW;

        /**
         * Window type: the search bar.  There can be only one search bar
         * window; it is placed at the top of the screen.
         * In multiuser systems shows on all users' windows.
         *
         * 系统搜索条窗口
         */
        public static final int TYPE_SEARCH_BAR         = FIRST_SYSTEM_WINDOW+1;

        /**
         * Window type: phone.  These are non-application windows providing
         * user interaction with the phone (in particular incoming calls).
         * These windows are normally placed above all applications, but behind
         * the status bar.
         * In multiuser systems shows on all users' windows.
         * @deprecated for non-system apps. Use {@link #TYPE_APPLICATION_OVERLAY} instead.
         *
         * 系统通话窗口
         */
        @Deprecated
        public static final int TYPE_PHONE              = FIRST_SYSTEM_WINDOW+2;

        /**
         * Window type: system window, such as low power alert. These windows
         * are always on top of application windows.
         * In multiuser systems shows only on the owning user's window.
         * @deprecated for non-system apps. Use {@link #TYPE_APPLICATION_OVERLAY} instead.
         *
         * 系统Alert窗口
         */
        @Deprecated
        public static final int TYPE_SYSTEM_ALERT       = FIRST_SYSTEM_WINDOW+3;

        /**
         * Window type: keyguard window.
         * In multiuser systems shows on all users' windows.
         * @removed
         *
         * 系统锁屏窗口
         */
        public static final int TYPE_KEYGUARD           = FIRST_SYSTEM_WINDOW+4;

        /**
         * Window type: transient notifications.
         * In multiuser systems shows only on the owning user's window.
         * @deprecated for non-system apps. Use {@link #TYPE_APPLICATION_OVERLAY} instead.
         *
         * Toast 窗口
         */
        @Deprecated
        public static final int TYPE_TOAST              = FIRST_SYSTEM_WINDOW+5;


        ...

        /**
         * End of types of system windows.
         */
public static final int LAST_SYSTEM_WINDOW = 2999;4. 窗口的显示次序
当一个进程向 WMS 申请一个窗口时, WMS 会为窗口确定显示次序。为了方便窗口显示次序的管理,手机屏幕可以虚拟地用 X、Y、Z 轴来表示,其中 Z 轴垂直于屏幕,从屏幕内指向屏幕外,这样确定窗口显示次序也就是确定窗口在 Z 轴上的次序,这个次序称为 Z-Oder。Type 值是 Z-Oder 排序的依据,我们知道应用程序窗口的 Type 值范围为1 ~ 99, 子窗口 1000 ~1999 ,系统窗口 2000 ~ 2999 ,在一般情况下, Type 值越大则 Z-Oder 排序越靠前,就越靠近用户。当然窗口显示次序的逻辑不会这么简单,情况会比较多,这个逻辑不在本文的讨论范围 ,这里我们只需要知道窗口显示次序的基本规则就可以了。
3.2 Window 的标志
Window的标志也就是Flag,用于控制Window的显示,同样被定义在WindowManager的内部类LayoutParams中,这里给出几个比较常用的标志,如表1所示:
| Flag | 描述 |
| FLAG_ALLOW_LOCK_WHILE_SCREEN_ON | 只要窗口可见,就允许在开启状态的屏幕上锁屏 |
| FLAG_NOT_FOCUSABLE | 窗口不能获取输入焦点,设置该标志的同时,FLAG_NOT_TOUCH_MODAL也会被设置 |
| FLAG_NOT_TOUCHABLE | 窗口不接收任何触摸事件 |
| FLAG_NOT_TOUCH_MODAL | 将该窗口区域外的触摸事件传递给其他的Window,而自己只会处理窗口区域内的触摸事件 |
| FLAG_KEEP_SCREEN_ON | 只要窗口可见,屏幕就会一直亮着 |
| FLAG_LAYOUT_IN_SCREEN | 允许窗口超过屏幕之外 |
| FLAG_FULLSCREEN | 隐藏所有的屏幕装饰窗口,比如在游戏、播放器中的全屏显示 |
| FLAG_SHOW_WHEN_LOCKED | 窗口可以在锁屏的窗口之上显示 |
| FLAG_IGNORE_CHEEK_PRESSES | 当用户的脸贴近屏幕时(比如打电话时),不会去响应此事件 |
| FLAG_TURN_SCREEN_ON | 窗口显示时将屏幕点亮 |
设置 Window 的 Flag 有3 种方法,第一种是通过 Window 的 addFlags 方法:
Window mWindow =getWindow() ;
mWindow.addFlags(WindowManager.LayoutParams.FLAG_FULLSCREEN);
第二种是通过Window的setFlags方法:
Window mWindow = getWindow() ;
mWindow.setFlags(WindowManager.LayoutParams.FLAG FULLSCREEN, WindowManager.LayoutParams.FLAG FULLSCREEN) ;WindowManager.LayoutParams mWindowLayoutParams = new WindowManager.LayoutParams();
mWindowLayoutParams.flags = WindowManager.LayoutParams.FLAG_FULLSCREEN ;
WindowManager mWindowManager = (WindowManager) getSystemService(Context.WINDOW_SERVICE);
TextView mTextView = new TextView(this);
mWindowManager.addView(mTextView, mWindowLayoutParams);3.3 软键盘相关模式
窗口和窗口的叠加是十分常见的场景,但如果其中的窗口是软键盘窗口,可能就会出现一些问题,比如典型的用户登录界面,默认的情况是弹出的软键盘窗口可能会盖住输入框下方的按钮,这样用户体验就非常糟糕。为了使得软键盘窗口能够按照期望的方式来显示,WindowManager的静态内部类LayoutParams中定义了软键盘相关模式,这里给出常用的几种模式,如表2所示:
| SoftInputMode | 描述 |
| SOFT_INPUT_STATE_UNSPECIFIED | 没有指定状态,系统会选择一个合适的状态或者依赖于主题的设置 |
| SOFT_INPUT_STATE_UNCHANGED | 不会改变软键盘的状态 |
| SOFT_INPUT_STATE_HIDDEN | 当用户进入该窗口时,软键盘默认隐藏 |
| SOFT_INPUT_STATE_ALWAYS_HIDDEN | 当窗口获取焦点时,软键盘总是被隐藏 |
| SOFT_INPUT_ADJUST_RESIZE | 当软键盘弹出时,窗口会调整大小 |
| SOFT_INPUT_ADJUST_PAN | 当软键盘弹出时,窗口不需要调整大小,要确保输入焦点时可见的 |
getWindow().setSoftInputMode(WindowManager.LayoutParams.SOFT_INPUT_ADJUST_RESIZE);4. Window 的操作
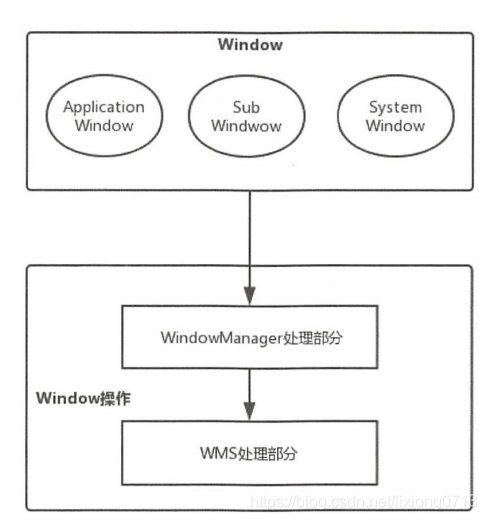
本篇文章主要讲解Window操作的WIndowManager处理部分。
4.1 系统窗口的添加过程
系统窗口的添加过程也会根据不同的系统窗口有所区别, 这里以系统窗口 StatusBar 为例, StatusBar 是 SystemUI 的重要组成部分,具体就是指系统状态栏 ,用于显示时间、电量和信号等信息。首先来查看 StatusBar 的 addStatusBarWindow 方法,这个方法负责为 StatusBar 添加 Window ,如下所示:
frameworks/base/packages/systemui/src/com/android/systemui/statusbar/phone/StatusBar.java
    private void addStatusBarWindow() {
        makeStatusBarView(); // ... 1
        mStatusBarWindowManager = Dependency.get(StatusBarWindowManager.class);
        mRemoteInputController = new RemoteInputController(mHeadsUpManager);
        mStatusBarWindowManager.add(mStatusBarWindow, getStatusBarHeight()); // ... 2
} public void add(View statusBarView, int barHeight) {
// Now that the status bar window encompasses the sliding panel and its
// translucent backdrop, the entire thing is made TRANSLUCENT and is
// hardware-accelerated.
mLp = new WindowManager.LayoutParams(
ViewGroup.LayoutParams.MATCH_PARENT,
barHeight,
WindowManager.LayoutParams.TYPE_STATUS_BAR, // ... 1
WindowManager.LayoutParams.FLAG_NOT_FOCUSABLE
| WindowManager.LayoutParams.FLAG_TOUCHABLE_WHEN_WAKING
| WindowManager.LayoutParams.FLAG_SPLIT_TOUCH
| WindowManager.LayoutParams.FLAG_WATCH_OUTSIDE_TOUCH
| WindowManager.LayoutParams.FLAG_DRAWS_SYSTEM_BAR_BACKGROUNDS,
PixelFormat.TRANSLUCENT);
mLp.token = new Binder();
mLp.gravity = Gravity.TOP;
mLp.softInputMode = WindowManager.LayoutParams.SOFT_INPUT_ADJUST_RESIZE;
mLp.setTitle("StatusBar");
mLp.packageName = mContext.getPackageName();
mStatusBarView = statusBarView;
mBarHeight = barHeight;
mWindowManager.addView(mStatusBarView, mLp); // ... 2
mLpChanged = new WindowManager.LayoutParams();
mLpChanged.copyFrom(mLp);
}
frameworks/base/core/java/android/WindowManagerlmpl.java
    @Override
    public void addView(@NonNull View view, @NonNull ViewGroup.LayoutParams params) {
        applyDefaultToken(params);
        mGlobal.addView(view, params, mContext.getDisplay(), mParentWindow);
    }
addView方法的第一个参数的类型为 View ,说明窗口也是以 View 形式 存在的,addView 方法中会调用 WindowManagerGlobal 的 addView方法 ,代码如下所示:
frameworks/base/core/java/android/view/WindowManagerGlobal.java
    public void addView(View view, ViewGroup.LayoutParams params,
            Display display, Window parentWindow) {
        ...
        final WindowManager.LayoutParams wparams = (WindowManager.LayoutParams) params;
        if (parentWindow != null) {
            parentWindow.adjustLayoutParamsForSubWindow(wparams); // ... 1
        } else {
            // If there's no parent, then hardware acceleration for this view is
            // set from the application's hardware acceleration setting.
            final Context context = view.getContext();
            if (context != null
                    && (context.getApplicationInfo().flags
                            & ApplicationInfo.FLAG_HARDWARE_ACCELERATED) != 0) {
                wparams.flags |= WindowManager.LayoutParams.FLAG_HARDWARE_ACCELERATED;
            }
        }

        ViewRootImpl root;
        View panelParentView = null;

        synchronized (mLock) {
            ...

            root = new ViewRootImpl(view.getContext(), display); // ... 2

            view.setLayoutParams(wparams);

            mViews.add(view); // ... 3
            mRoots.add(root); // ... 4
            mParams.add(wparams); // ... 5

            // do this last because it fires off messages to start doing things
            try {
                root.setView(view, wparams, panelParentView); // ... 6
            } catch (RuntimeException e) {
                // BadTokenException or InvalidDisplayException, clean up.
                if (index >= 0) {
                    removeViewLocked(index, true);
                }
                throw e;
            }
        }
    }
 public void setView(View view, WindowManager.LayoutParams attrs, View panelParentView) {
        synchronized (this) {
            if (mView == null) {
                ...
                try {
                    mOrigWindowType = mWindowAttributes.type;
                    mAttachInfo.mRecomputeGlobalAttributes = true;
                    collectViewAttributes();
                    res = mWindowSession.addToDisplay(mWindow, mSeq, mWindowAttributes,
                            getHostVisibility(), mDisplay.getDisplayId(),
                            mAttachInfo.mContentInsets, mAttachInfo.mStableInsets,
                  }
                ...
             }
            ...
        }
    }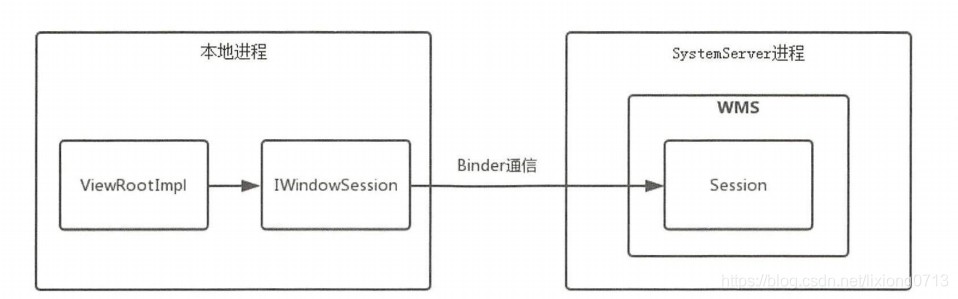
frameworks/base/services/core/java/com/android/server/wm/Session.java
    @Override
    public int addToDisplay(IWindow window, int seq, WindowManager.LayoutParams attrs,
            int viewVisibility, int displayId, Rect outContentInsets, Rect outStableInsets,
            Rect outOutsets, InputChannel outInputChannel) {
        return mService.addWindow(this, window, seq, attrs, viewVisibility, displayId,
                outContentInsets, outStableInsets, outOutsets, outInputChannel);
}4.2 Activity的添加过程
    final void handleResumeActivity(IBinder token,
            boolean clearHide, boolean isForward, boolean reallyResume, int seq, String reason) {
        ...
        r = performResumeActivity(token, clearHide, reason); // ... 1

        if (r != null) {
            ...
            if (r.window == null && !a.mFinished && willBeVisible) {
                r.window = r.activity.getWindow();
                View decor = r.window.getDecorView();
                decor.setVisibility(View.INVISIBLE);
                ViewManager wm = a.getWindowManager(); // ... 2
                WindowManager.LayoutParams l = r.window.getAttributes();
                a.mDecor = decor;
                l.type = WindowManager.LayoutParams.TYPE_BASE_APPLICATION;
                l.softInputMode |= forwardBit;
                if (r.mPreserveWindow) {
                    a.mWindowAdded = true;
                    r.mPreserveWindow = false;
                    // Normally the ViewRoot sets up callbacks with the Activity
                    // in addView->ViewRootImpl#setView. If we are instead reusing
                    // the decor view we have to notify the view root that the
                    // callbacks may have changed.
                    ViewRootImpl impl = decor.getViewRootImpl();
                    if (impl != null) {
                        impl.notifyChildRebuilt();
                    }
                }
                if (a.mVisibleFromClient) {
                    if (!a.mWindowAdded) {
                        a.mWindowAdded = true;
                        wm.addView(decor, l); // ... 3
                    } else {
                        a.onWindowAttributesChanged(l);
                    }
                }
                ...
            }
        }
        ...
    }
4.3 Window 的更新过程
    public void updateViewLayout(View view, ViewGroup.LayoutParams params) {
        if (view == null) {
            throw new IllegalArgumentException("view must not be null");
        }
        if (!(params instanceof WindowManager.LayoutParams)) {
            throw new IllegalArgumentException("Params must be WindowManager.LayoutParams");
        }

        final WindowManager.LayoutParams wparams = (WindowManager.LayoutParams)params;

        view.setLayoutParams(wparams); // ... 1

        synchronized (mLock) {
            int index = findViewLocked(view, true); // ... 2
            ViewRootImpl root = mRoots.get(index); // ... 3
            mParams.remove(index);  // ... 4
            mParams.add(index, wparams); // ... 5
            root.setLayoutParams(wparams, false); // ... 6
        }
    }
    void scheduleTraversals() {
        if (!mTraversalScheduled) {
            mTraversalScheduled = true;
            mTraversalBarrier = mHandler.getLooper().getQueue().postSyncBarrier();
            mChoreographer.postCallback(
                    Choreographer.CALLBACK_TRAVERSAL, mTraversalRunnable, null); // ... 1
            if (!mUnbufferedInputDispatch) {
                scheduleConsumeBatchedInput();
            }
            notifyRendererOfFramePending();
            pokeDrawLockIfNeeded();
        }
}frameworks/base/core/java/android/view/ViewRootlmpl.java
    final class TraversalRunnable implements Runnable {
        @Override
        public void run() {
            doTraversal();
        }
    }
在 TraversalRunnable 的 run 方法中调用了 doTraversal 方法,如下所示:
frameworks/base/core/java/android/view/ViewRootlmpl.java
    void doTraversal() {
        if (mTraversalScheduled) {
            mTraversalScheduled = false;
            mHandler.getLooper().getQueue().removeSyncBarrier(mTraversalBarrier);

            if (mProfile) {
                Debug.startMethodTracing("ViewAncestor");
            }

            performTraversals();

            if (mProfile) {
                Debug.stopMethodTracing();
                mProfile = false;
            }
        }
}在doTraversal 方法中又调用了 performTraversals 方法, performTraversals 方法使得 ViewTree 开始 View 的工作流程,如下所示:
frameworks/base/core/java/android/view/ViewRootlmpl.java
  private void performTraversals() {
        ...
        int relayoutResult = 0;
        ...
        if (mFirst || windowShouldResize || insetsChanged ||
                viewVisibilityChanged || params != null || mForceNextWindowRelayout) {
            mForceNextWindowRelayout = false;
            ...
            try {
                ...
                relayoutResult = relayoutWindow(params, viewVisibility, insetsPending); // ... 1
                ...
            } catch (RemoteException e) {
            }

            ...

            if (!mStopped || mReportNextDraw) {
                boolean focusChangedDueToTouchMode = ensureTouchModeLocally(
                        (relayoutResult&WindowManagerGlobal.RELAYOUT_RES_IN_TOUCH_MODE) != 0);
                if (focusChangedDueToTouchMode || mWidth != host.getMeasuredWidth()
                        || mHeight != host.getMeasuredHeight() || contentInsetsChanged ||
                        updatedConfiguration) {
                    int childWidthMeasureSpec = getRootMeasureSpec(mWidth, lp.width);
                    int childHeightMeasureSpec = getRootMeasureSpec(mHeight, lp.height);

                    ...

                     // Ask host how big it wants to be
                    performMeasure(childWidthMeasureSpec, childHeightMeasureSpec); // ... 2
                    ...
                }
            }
        }
        ...
        if (didLayout) {
            performLayout(lp, mWidth, mHeight); // ... 3
            ...
        }
        ...
        if (!cancelDraw && !newSurface) {
            if (mPendingTransitions != null && mPendingTransitions.size() > 0) {
                for (int i = 0; i < mPendingTransitions.size(); ++i) {
                    mPendingTransitions.get(i).startChangingAnimations();
                }
                mPendingTransitions.clear();
            }

            performDraw(); // ... 4
        } else {
           ...
        }

        mIsInTraversal = false;
    }