做一个天气查询
效果图

html+css部分
html
先上代码再分析
<div class="app" id="app">
	<div class="img">
		知 天 气
	</div>
<div class="input-item">
	<input type="text" v-model="city" @keyup.enter="searchWeather" class="input" placeholder="输入要查询的天气"/>
	<button class="btn" @click="searchWeather()"></button>
	<div class="aaa">
		<div class="a1"><a href="#" @click="find">北京</a></div>
		<div class="a1"><a href="#" @click="find1">南宁</a></div>
		<div class="a1"><a href="#" @click="find2">青岛</a></div>
	</div>
</div>

<ul style="display: flex;">
	<li v-for="item in weatherList" class="ul">
		<div><span>{{item.type}}</span></div>
		<div>
			<b>{{item.low}}</b>
			~
			<b>{{item.high}}</b>
		</div>
		<div><span>{{item.date}}</span></div>
	</li>
<!-- 			<li class="ul">
		测试点
	</li> -->
</ul>
</div>
1.首先最外层用一个div包起来,第一部分“知天气”三个字也用一个div框起来。
2.接下来就是一个输入框和一个按钮,以及三个小的div,这里可以选择喜欢的元素,span,label等都是可以的,这里三个地区的功能是用户点击直接可以获取这三个地区的天气信息
3.下面显示信息的部分使用ul和li无序列表。
布局比较简单不再赘述
css
	*{
		padding: 0;
		margin: 0;
	}
	.app{
		background-image: url(img/blue%20sky.png);
		background-repeat: no-repeat;
		height: 100%;
		background-size:100% 100%;
	}
最外层div样式,引用图片作为背景图片,并且不平铺,高度给到100%,背景图片的宽高也都设为100%,此时背景图片可以跟随页面大小改动,并且铺满整个屏幕。
	.img{
		height: 180px;
		line-height: 10em;
		text-align: center;
		font-size: 50px;
		font-weight: 700;
	}

	.btn{
		display: inline-block;
		width: 114px;
	    background: url(./img/search.png);
		margin: 20px;
		border-radius: 30px;
		outline:0;
		height: 51px;
		margin-top: 180px;
	}
	.input{
		display: block;
		margin-right: 1.25rem;
		border-radius: 30px;
		width: 200px;
		height: 45px;
		margin-top: 180px;
		outline: none;
	}
样式都比较简单,值得注意的是outline:none可以去除鼠标点中按钮,input框时候出现的描边。
接下来是li的样式以及a的样式,值得注意的是将包住三个a的div使用绝对定位。前面学习过当我们给了position属性的时候,元素将出现一个坐标系,我们就可以调整位置。这里还是用了伪类:hover当鼠标放上去的时候样式改变。
	li{
		display: inline-block;
		border: 1px solid saddlebrown;
		margin: 20px 70px;
		z-index: 999;
		text-align: center;
		border-radius: 20px;
	}
	.aaa{
		display: flex;
		position:absolute;
		margin-left: -130px;
		margin-top: 235px;
	}
	.a1{
		padding: 0px 6px;
	}

	.aaa a{
		text-decoration: none;
		color: saddlebrown;
	}

	.aaa a:hover{
		font-weight: bold;
		color: #ccb452;
	}
JS部分
使用到了vue框架以及axios网络请求。
var app = new Vue({
		el:"#app",
		data:{
			city:"",
			weatherList:[]
		},
1.首先挂载dom,使用最外层div的id#app。因为我们需要将请求到的东西存在一个数组中而后再在无序列表中进行遍历,所以声明一个数数组在data中。
2.首先要使用axios先添加
<script src="https://unpkg.com/axios/dist/axios.min.js"></script>
从网上找能用的接口,this.city就是用户输入的城市,用v-model双向绑定
axios.get('http://wthrcdn.etouch.cn/weather_mini?city='+this.city)
.then((res)=>{
	console.log(res);
	that.weatherList = res.data.data.forecast
})
通过打印结果查看接口为我们返回的数据。接口返回了对象数组,我们挑选我们需要的属性
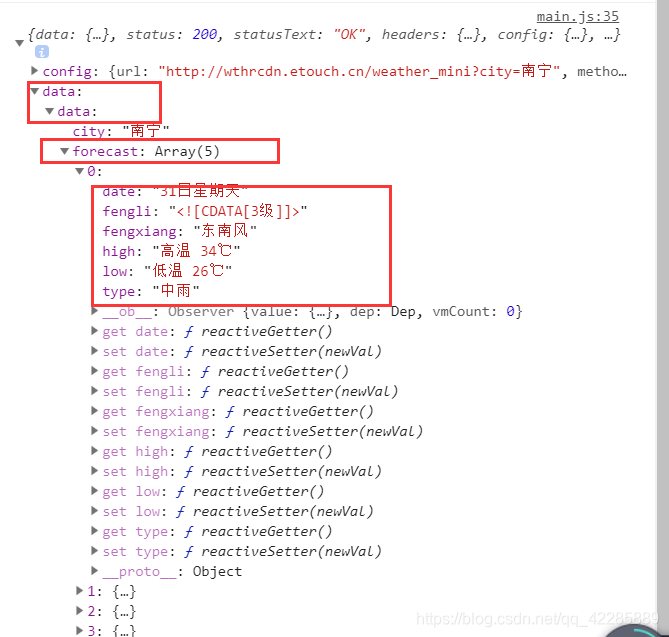
data属性里的data属性里的forecast属性是我们想要的数据。于是使用js中then方法使用箭头函数获取到返回的对象数组res。按着路径把forcast里的数据传给weatherList数组即可。这里不能够给直接使用this.weatherList传值。要在外面var that = this 用然后使用that.weatherList.
<li v-for="item in weatherList">
				<div><span>{{item.type}}</span></div>
				<div>
					<b>{{item.low}}</b>
					~
					<b>{{item.high}}</b>
				</div>
				<div><span>{{item.date}}</span></div>
			</li>
使用v-for的方法将数据遍历到li上,item可以理解为一个对象,这个对象基于weatherList数组,item.属性,即可拿到对应的数据。
总结
这是一个简单的练习,主要学习axios的使用。用来网络请求数据。以及v-model双向绑定,使用v-for遍历数组等知识的复习。
