主题
MyCat介绍、MyCat核心概念、MyCat分片规则、MyCat读写分离
目标
理解MyCat介绍和核心概念
掌握MyCat分片规则
掌握MyCat读写分离
能够使用MyCat进行分库分表和读写分离
MyCat介绍
什么是Mycat?
官方网站:http://www.mycat.org.cn/
和 shradingJDBC不同,它是一个软件,可以认为是Mysql的代理,shradingJDBC只是一个jar包。
- 一个彻底开源的,面向企业应用开发的大数据库集群
- 支持事务、ACID、可以替代MySQL的加强版数据库
- 一个可以视为MySQL集群的企业级数据库,用来替代昂贵的Oracle集群
- 一个融合内存缓存技术、NoSQL技术、HDFS大数据的新型SQL Server
- 结合传统数据库和新型分布式数据仓库的新一代企业级数据库产品
- 一个新颖的数据库中间件产品
Mycat架构
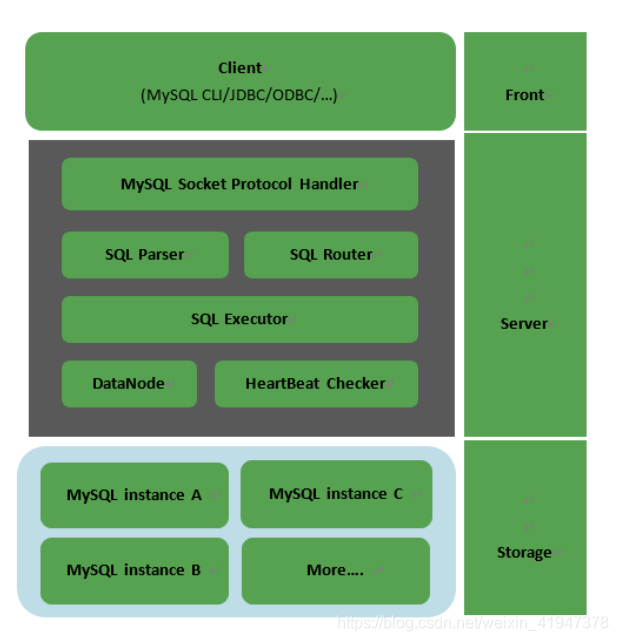
- Front 前端
- Server 服务层(核心)
- MySQL Socket Protocol Handler :Mysql连接协议控制器
- SQL Parser:解析
- SQL Router:路由
- SQL Executor:执行
- DataNode:数据节点
- HeartBeat Checker:心跳检查,监听数据库实例
- Storage 存储层
- MySQL instanceA/B/C:具体的数据库实例
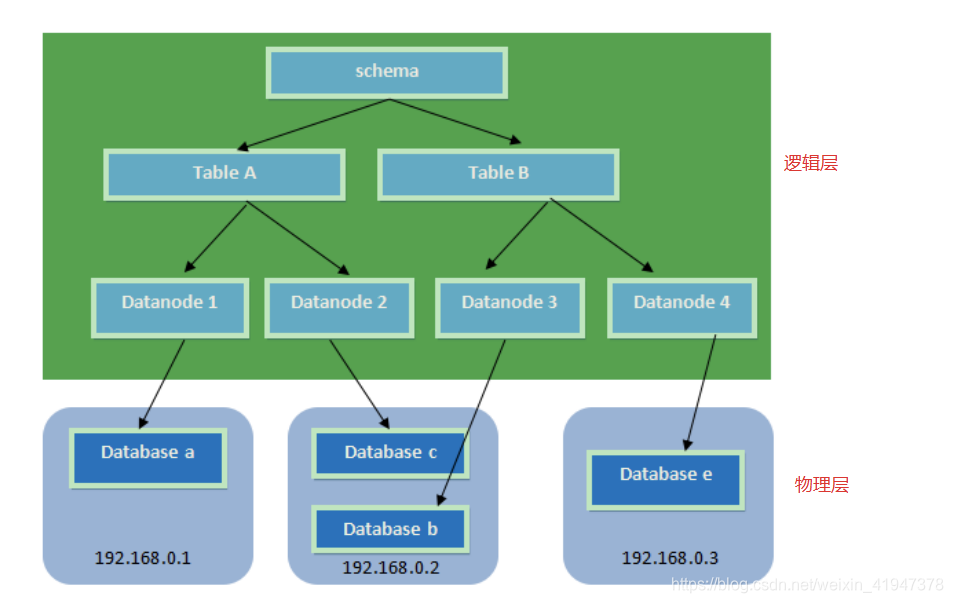
MyCat核心概念
- Schema:由它指定逻辑数据库(相当于MySQL的database数据库)
- Table:逻辑表(相当于MySQL的table表)
- DataNode:真正存储数据的物理节点
- DataHost:存储节点所在的数据库主机(指定MySQL数据库的连接信息)
- User:MyCat的用户(类似于MySQL的用户,支持多用户)
Mycat主要解决的问题
- 海量数据存储
- 查询优化
Mycat对多数据库的支持

Mycat分片策略
- MyCAT支持水平分片与垂直分片:
- 水平分片:一个表格的数据分割到多个节点上,按照行分隔。
- 垂直分片:一个数据库中多个表格A,B,C,A存储到节点1上,B存储到节点2上,C存储到节点3上。

- MyCAT通过定义表的分片规则来实现分片,每个表格可以捆绑一个分片规则,每个分片规则指定一个分片字段并绑定一个函数,来实现动态分片算法。
- 1.Schema:逻辑库,与MySQL中的Database(数据库)对应,一个逻辑库中定义了所包括的Table。
- 2.Table:表,即物理数据库中存储的某一张表,与传统数据库不同,这里的表格需要声明其所存储的逻辑数据节点DataNode。在此可以指定表的分片规则。
- 3.DataNode:MyCAT的逻辑数据节点,是存放table的具体物理节点,也称之为分片节点,通过DataHost来关联到后端某个具体数据库上
- 4.DataHost:主机地址,定义某个物理库的访问地址,用于捆绑到Datanode上
Mycat安装
注意:需要先安装jdk(操作系统如果是64位,必须安装64位的JDK)
-
第一步:下载MyCat
-
wget http://dl.mycat.io/1.6-RELEASE/Mycat-server-1.6-RELEASE-20161028204710-linux.tar.gz
-
-
第二步:解压缩,得到mycat目录
-
tar -zxvf Mycat-server-1.6-RELEASE-20161028204710-linux.tar.gz
-
-
第三步:进入mycat/bin,启动MyCat
-
- 启动命令:./mycat start
- 停止命令:./mycat stop
- 重启命令:./mycat restart
- 查看状态:./mycat status
-
-
第四步:访问Mycat
-
使用mysql的客户端直接连接mycat服务。默认服务端口为【8066】
mysql -uroot -p123456 -h127.0.0.1 -P8066
-
-
目录结构介绍
- bin:存放了各种命令
- conf:存放了各种配置文件,重点关注schema.xml(逻辑库分片配置)、rule.xml(分片规则算法)、server.xml(配置管理连接)
- logs:存放了日志信息
- wrapper.log:如果配错了会有错误日志
- mycat.log:记录了sql语句信息,是和数据库打交道的日志信息
Mycat分片
配置说明
schema.xml
schema.xml介绍
schema.xml作为Mycat中重要的配置文件之一,管理着Mycat的逻辑库、表、分片规则、DataNode以及DataHost之间的映射关系。弄懂这些配置,是正确使用Mycat的前提。
- schema 标签用于定义MyCat实例中的逻辑库
- Table 标签定义了MyCat中的逻辑表
- dataNode 标签定义了MyCat中的数据节点,也就是我们通常说所的数据分片。
- dataHost标签在mycat逻辑库中也是作为最底层的标签存在,直接定义了具体的数据库实例、读写分离配置和心跳语句。
schema.xml配置
<?xml version="1.0"?>
<!DOCTYPE mycat:schema SYSTEM "schema.dtd">
<mycat:schema xmlns:mycat="http://io.mycat/">
	<!--
		schema : 逻辑库 name:逻辑库名称
		checkSQLschema:是否检测sql语法
		sqlMaxLimit:一次取多少条数据,默认100 要超过用limit xxx
		table:逻辑表
		dataNode:数据节点 对应datanode标签
		rule:分片规则,对应rule.xml
		subTables:子表
		primaryKey:分片主键 可缓存
	-->
	<schema name="TESTDB" checkSQLschema="false" sqlMaxLimit="100">
		<!-- auto sharding by id (long) -->
		<!-- 逻辑表item,分三个数据节点,mod-long:取模分片,primaryKey:片键,用哪个键取模 -->
		<table name="item" dataNode="dn1,dn2,dn3" rule="mod-long" primaryKey="ID"/>
	</schema>

	<!-- <dataNode name="dn1$0-743" dataHost="localhost1" database="db$0-743"/> -->
	<!--
		数据节点
		name:数据节点名
		dateHost:数据主机name
		database:真实存在的数据库
	 -->
	<dataNode name="dn1" dataHost="localhost1" database="db1" />
	<dataNode name="dn2" dataHost="localhost1" database="db2" />
	<dataNode name="dn3" dataHost="localhost1" database="db3" />

	<!--
		dataHost : 数据主机(节点主机)
		maxCon:最大连接数
		minCon:最小连接数
		balance:1 :读写分离 0 : 读写不分离
		writeType:0 第一个writeHost写, 1 随机writeHost写
		dbType:数据库类型
		dbDriver: 数据库驱动 native就是MySQL,如果不是配置JDBC,然后dbType配:Oracle、SQLServer
		switchType: 是否主动读
			1、主从自动切换
			-1 不切换
			2 当从机延时超过slaveThreshold值时切换为主读
		slaveThreshold:从机读延迟时间
		<heartbeat>:心跳,MyCat和当前配置的数据库实例连接的时候,发送配置的sql语句检查数据库实例是否活着。
		<writeHost>:写机器地址
	-->
	<dataHost name="localhost1" maxCon="1000" minCon="10" balance="0"
			writeType="0" dbType="mysql" dbDriver="native" switchType="1" slaveThreshold="100">
		<heartbeat>select user()</heartbeat>
		<writeHost host="hostM1" url="192.168.24.129:3306" user="root" password="root" >
		</writeHost>
	</dataHost>
</mycat:schema>
Server.xml
server.xml介绍
server.xml几乎保存了所有mycat需要的系统配置信息。最常用的是在此配置用户名、密码及权限。
server.xml配置
<?xml version="1.0" encoding="UTF-8"?>
<!DOCTYPE mycat:server SYSTEM "server.dtd">
<mycat:server xmlns:mycat="http://io.mycat/">
	<system>
		<property name="defaultSqlParser">druidparser</property>
	</system>
	<user name="mycat">
		<property name="password">mycat</property>
		<property name="schemas">TESTDB</property>
	</user>
</mycat:server>
rule.xml
介绍
rule.xml里面就定义了我们对表进行拆分所涉及到的规则定义。我们可以灵活的对表使用不同的分片算法,或者对表使用相同的算法但具体的参数不同。这个文件里面主要有tableRule和function这两个标签。在具体使用过程中可以按照需求添加tableRule和function。
配置
- 此配置文件可以不用修改,使用默认即可。
- tableRule 标签配置说明
- name 属性指定唯一的名字,用于标识不同的表规则
- rule 标签则指定对物理表中的哪一列进行拆分和使用什么路由算法。
- columns 内指定要拆分的列名字。
- algorithm 使用 function 标签中的 name 属性。连接表规则和具体路由算法。当然,多个表规则可以连接到同一个路由算法上。 table 标签内使用。让逻辑表使用这个规则进行分片。
- function 标签配置说明:
- name 指定算法的名字。
- class 制定路由算法具体的类名字。
- property 为具体算法需要用到的一些属性。
<?xml version="1.0" encoding="UTF-8"?>
<!DOCTYPE mycat:rule SYSTEM "rule.dtd">
<mycat:rule xmlns:mycat=”http://io.mycat/“ >
	<tableRule name="sharding-by-intfile">
		<rule>
			<columns>sharding_id</columns>
			<algorithm>hash-int</algorithm>
		</rule>
	</tableRule>
	<function name="hash-int" class="io.mycat.route.function.PartitionByFileMap">
		<property name="mapFile">partitio n-hash-int.txt</property>
	</function>
</mycat:rule>
MyCat分片规则
连续分片
一、日期列分区法
- 配置说明:
- tableRule标签:
- columns :标识将要分片的表字段
- algorithm :指定分片函数
- function标签:
- dateFormat :日期格式
- sBeginDate :开始日期
- sPartionDay :分区天数,即默认从开始日期算起,分隔10天一个分区
- tableRule标签:
-
  <!--按固定时间分片-->
  <tableRule name="sharding-by-date">
  	<rule>
  		<columns>create_time</columns>
  		<algorithm>sharding-by-date</algorithm>
  	</rule>
  </tableRule>
  <function name="sharding-by-date" class="io.mycat.route.function..PartitionByDate">
  	<property name="dateFormat">yyyy-MM-dd</property>
  	<property name="sBeginDate">2014-01-01</property>
  	<property name="sPartionDay">10</property>
  </function>

  <!--按自然月分片-->
  <tableRule name="sharding-by-month">
  	<rule>
  		<columns>create_time</columns>
  		<algorithm>sharding-by-month</algorithm>
  	</rule>
  </tableRule>
  <function name="sharding-by-month" class="io.mycat.route.function..PartitionByMonth">
  	<property name="dateFormat">yyyy-MM-dd</property>
  	<property name="sBeginDate">2014-01-01</property>
  </function>

  <!--
  	按单月小时分片
  	适合做日志,每月末,手工清理
  -->
  <tableRule name="sharding-by-hour">
  	<rule>
  		<columns>create_time</columns>
  		<algorithm>sharding-by-hour</algorithm>
  	</rule>
  </tableRule>
  <function name="sharding-by-hour" class="io.mycat.route.function..LastestMonthPartition">
  	<property name="splitOneDay">24</property>
  </function>
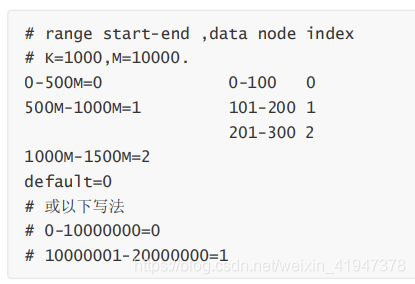
二、范围约定
-
配置说明:
- tableRule标签:
- columns :标识将要分片的表字段
- algorithm :指定分片函数
- function标签:
- mapFile :指定分片函数需要的配置文件名称
- tableRule标签:
-
<tableRule name="auto-sharding-long"> <rule> <columns>user_id</columns> <algorithm>rang-long</algorithm> </rule> </tableRule> <function name="rang-long" class="io.mycat.route.function.AutoPartitionByLong"> <property name="mapFile">autopartition-long.txt</property> </function> -
autopartition-long.txt文件内容:
- 所有的节点配置都是从0开始,及0代表节点1,此配置非常简单,即预先制定可能的id范围对应某个分片
连续分片优势和缺点
- 优势:扩容无需迁移数据
- 缺点:热点数据,并发受限
离散分片
一、枚举法
- 配置说明:
- tableRule标签:
- columns :标识将要分片的表字段
- algorithm :指定分片函数
- function标签:
- mapFile :指定分片函数需要的配置文件名称
- type :默认值为0,0表示Integer,非零表示String
- defaultNode :指定默认节点,小于0表示不设置默认节点,大于等于0表示设置默认节点,0代表节点1。
- 默认节点的作用:枚举分片时,如果碰到不识别的枚举值,就让它路由到默认节点。
- 如果不配置默认节点(defaultNode值小于0表示不配置默认节点),碰到不识别的枚举值就会报错:can’t find datanode for sharding column:column_name val:ffffffff
- tableRule标签:
-
<tableRule name="sharding-by-intfile"> <rule> <columns>user_id</columns> <algorithm>hash-int</algorithm> </rule> </tableRule> <function name="hash-int" class="io.mycat.route.function.PartitionByFileMap"> <property name="mapFile">partition-hash-int.txt</property> <property name="type">0</property> <property name="defaultNode">0</property> </function> - partition-hash-int.txt 配置:

二、求模法
此种配置非常明确,即根据id与count(你的结点数)进行求模运算,相比方式1,此种在批量插入时需要切换数据源,id不连续
- 配置说明:
- tableRule标签:
- columns :标识将要分片的表字段
- algorithm :指定分片函数
- function标签:
- count :节点数量
- tableRule标签:
-
  <tableRule name="mod-long">
  	<rule>
  		<columns>user_id</columns>
  		<algorithm>mod-long</algorithm>
  	</rule>
  </tableRule>
  <function name="mod-long" class="io.mycat.route.function.PartitionByMod">
  	<!-- how many data nodes -->
  	<property name="count">3</property>
  </function>
三、字符串拆分hash解析
此规则是截取字符串中的int数值hash分片
-
配置说明:
- tableRule标签:
- columns :标识将要分片的表字段
- algorithm :指定分片函数
- function标签:
- length :代表字符串hash求模基数
- count :分区数
- hashSlice : hash预算位,即根据子字符串中int值 hash运算
-
“2” -> (0,2)
“1:2” -> (1,2)
“1:” -> (1,0)
“-1:” -> (-1,0)
“:” -> (0,0)
-
- tableRule标签:
-
<tableRule name="sharding-by-stringhash"> <rule> <columns>user_id</columns> <algorithm>sharding-by-stringhash</algorithm> </rule> </tableRule> <function name="sharding-by-stringhash" class="io.mycat.route.function.PartitionByString"> <property name="length">512</property> <!-- zero-based --> <property name="count">2</property> <property name="hashSlice">0:2</property> </function> -
  public class PartitionByStringTest {
  	@Test
  	public void test() {
  		PartitionByString rule = new PartitionByString();
  		String idVal=null;
  		rule.setPartitionLength("512");
  		rule.setPartitionCount("2");
  		rule.init();
  		rule.setHashSlice("0:2");
  		// idVal = "0";
  		// Assert.assertEquals(true, 0 == rule.calculate(idVal));
  		// idVal = "45a";
  		// Assert.assertEquals(true, 1 == rule.calculate(idVal));
  		//last 4
  		rule = new PartitionByString();
  		rule.setPartitionLength("512");
  		rule.setPartitionCount("2");
  		rule.init();
  		//last 4 characters
  		rule.setHashSlice("-4:0");
  		idVal = "aaaabbb0000";
  		Assert.assertEquals(true, 0 == rule.calculate(idVal));
  		idVal = "aaaabbb2359";
  		Assert.assertEquals(true, 0 == rule.calculate(idVal));
  	}
四、固定分片hash算法
- 配置说明:
- tableRule标签:
- columns :标识将要分片的表字段
- algorithm :指定分片函数
- function标签:
- partitionCount :指定分片个数列表
- partitionLength : 分片范围列表,分区长度:默认为最大2^n=1024 ,即最大支持1024分区
- 约束 :
- count,length 两个数组的长度必须是一致的。 1024 = sum((count[i]*length[i]))
- tableRule标签:
-
<tableRule name="rule1"> <rule> <columns>user_id</columns> <algorithm>func1</algorithm> </rule> </tableRule> <function name="func1" class="io.mycat.route.function.PartitionByLong"> <property name="partitionCount">2,1</property> <property name="partitionLength">256,512</property> </function> - 用法例子:
-
@Test public void testPartition() { // 本例的分区策略:希望将数据水平分成3份,前两份各占25%,第三份占50%。(故本例非均匀分区) // |<---------------------1024------------------------>| // |<----256--->|<----256--->|<----------512---------->| // | partition0 | partition1 | partition2 | // | 共2份,故count[0]=2 | 共1份,故count[1]=1 | int[] count = new int[] { 2, 1 }; int[] length = new int[] { 256, 512 }; PartitionUtil pu = new PartitionUtil(count, length); // 下面代码演示分别以offerId字段或memberId字段根据上述分区策略拆分的分配结果 int DEFAULT_STR_HEAD_LEN = 8; // cobar默认会配置为此值 long offerId = 12345; String memberId = "qiushuo"; // 若根据offerId分配,partNo1将等于0,即按照上述分区策略,offerId为12345时将会被分配到partition0中 int partNo1 = pu.partition(offerId); // 若根据memberId分配,partNo2将等于2,即按照上述分区策略,memberId为qiushuo时将会被分到partition2中 int partNo2 = pu.partition(memberId, 0, DEFAULT_STR_HEAD_LEN); Assert.assertEquals(0, partNo1); Assert.assertEquals(2, partNo2); } - 如果需要平均分配设置:平均分为4分片,partitionCount*partitionLength=1024
<function name="func1" class="org.opencloudb.route.function.PartitionByLong">
	<property name="partitionCount">4</property>
	<property name="partitionLength">256</property>
</function>
-
五、一致性hash
-
<tableRule name="sharding-by-murmur"> <rule> <columns>user_id</columns> <algorithm>murmur</algorithm> </rule> </tableRule> <function name="murmur" class="io.mycat.route.function.PartitionByMurmurHash"> <!-- 默认是0 --> <property name="seed">0</property> <!-- 要分片的数据库节点数量,必须指定,否则没法分片 --> <property name="count">2</property> <!-- 一个实际的数据库节点被映射为这么多虚拟节点,默认是160倍, 也就是虚拟节点数是物理节点数的160倍 --> <property name="virtualBucketTimes">160</property> <!-- <property name="weightMapFile">weightMapFile</property> 节点的权重,没有指定权重的节点默认是1。 以properties文件的格式填写,以从0开始到count-1的整数值也就是节点索引为key, 以节点权重值为值。所有权重值必须是正整数,否则以1代替 --> <!-- <property name="bucketMapPath">/etc/mycat/bucketMapPath</property> 用于测试时观察各物理节点与虚拟节点的分布情况,如果指定了这个属性, 会把虚拟节点的murmurhash值与物理节点的映射按行输出到这个文件, 没有默认值,如果不指定,就不会输出任何东西 --> </function> 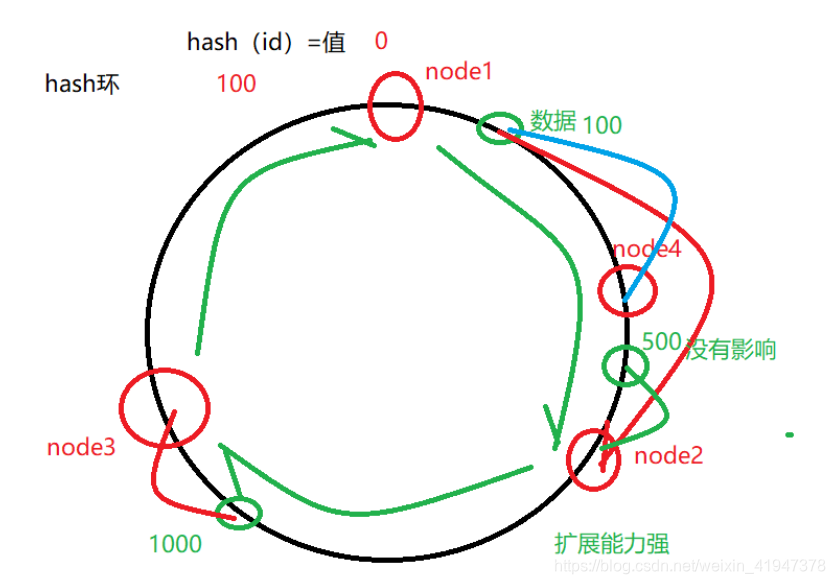
一致性hash环的范围是 0到2的32次方减1, 预算有效解决了分布式数据的扩容问题,前1-9中id规则都多少存在数据扩容难题,而10规则解决了数据扩容难点
六、编程指定
- 配置说明:
- tableRule标签:
- columns :标识将要分片的表字段
- algorithm :指定分片函数
- function标签:
- startIndex :字符串截取的起始索引位置
- size :截取的位数
- partitionCount :分区数量
- defaultPartition :默认分区
- 此方法为直接根据字符子串(
必须是数字)计算分区号(由应用传递参数,显式指定分区号)。- 例如id=05-100000002
- 在此配置中代表根据id中从startIndex=0,开始,截取siz=2位数字即05,05就是获取的分区,如果没传默认分配到defaultPartition
- tableRule标签:
-
  <tableRule name="sharding-by-substring">
  	<rule>
  		<columns>user_id</columns>
  		<algorithm>sharding-by-substring</algorithm>
  	</rule>
  </tableRule>
  <function name="sharding-by-substring" class="io.mycat.route.function.PartitionDirectBySubString">
  	<property name="startIndex">0</property> <!-- zero-based -->
  	<property name="size">2</property>
  	<property name="partitionCount">8</property>
  	<property name="defaultPartition">0</property>
  </function>
离散分片优点和缺点
- 优点:数据分布均匀,并发能力强
- 缺点:移植性差、扩容性差
综合分片
一、通配取模
- 配置说明:
- tableRule标签:
- columns :标识将要分片的表字段
- algorithm :指定分片函数
- function标签:
- patternValue :求模基数
- defaultNode :默认节点,如果不配置了默认,则默认是0即第一个结点
- mapFile :配置文件路径
- tableRule标签:
-
<tableRule name="sharding-by-pattern"> <rule> <columns>user_id</columns> <algorithm>sharding-by-pattern</algorithm> </rule> </tableRule> <function name="sharding-by-pattern" class="io.mycat.route.function.PartitionByPattern"> <property name="patternValue">256</property> <property name="defaultNode">2</property> <property name="mapFile">partition-pattern.txt</property> </function> - partition-pattern.txt文件内容:
- 配置文件中, 1-32 即代表 id%256 后分布的范围,如果在1-32则在分区1,其他类推,如果id非数字数据,则会分配在defaultNode 默认节点
-
  # id partition range start-end ,data node index
  ###### first host configuration
  1-32=0
  33-64=1
  65-96=2
  97-128=3
  ######## second host configuration
  129-160=4
  161-192=5
  193-224=6
  225-256=7
  0-0=7
二、ASCII码求模通配
- 配置说明:
- tableRule标签:
- columns :标识将要分片的表字段
- algorithm :指定分片函数
- function标签:
- patternValue :求模基数
- prefixLength :ASCII 截取的位数
- mapFile :配置文件路径
- tableRule标签:
-
<tableRule name="sharding-by-prefixpattern"> <rule> <columns>user_id</columns> <algorithm>sharding-by-prefixpattern</algorithm> </rule> </tableRule> <function name="sharding-by-pattern" class="io.mycat.route.function.PartitionByPrefixPattern"> <property name="patternValue">256</property> <property name="prefixLength">5</property> <property name="mapFile">partition-pattern.txt</property> </function> - partition-pattern.txt文件内容:
- 配置文件中, 1-32 即代表 id%256 后分布的范围,如果在1-32则在分区1,其他类推
- 此种方式类似方式6,
只不过采取的是将列中前prefixLength位所有ASCII码的和与patternValue 进行求模,即 sum%patternValue ,获取的值在通配范围内的,即分片数。 -
ASCII编码:
- 48-57=0-9阿拉伯数字
- 64、65-90=@、A-Z
- 97-122=a-z
-
  # range start-end ,data node index
  # ASCII
  # 48-57=0-9
  # 64、65-90=@、A-Z
  # 97-122=a-z
  ###### first host configuration
  1-4=0
  5-8=1
  9-12=2
  13-16=3
  ###### second host configuration
  17-20=4
  21-24=5
  25-28=6
  29-32=7
  0-0=7
MyCat读写分离
MyCat的读写分离是建立在MySQL主从复制基础之上实现的,所以必须先搭建MySQL的主从复制。
数据库读写分离对于大型系统或者访问量很高的互联网应用来说,是必不可少的一个重要功能。对于MySQL来说,标准的读写分离是主从模式,一个写节点Master后面跟着多个读节点,读节点的数量取决于系统的压力,通常是1-3个读节点的配置
![[外链图片转存失败,源站可能有防盗链机制,建议将图片保存下来直接上传(img-rVCA0imQ-1590210971076)(./1590143500394.png)]](https://img-blog.csdnimg.cn/20200523135022627.png?x-oss-process=image/watermark,type_ZmFuZ3poZW5naGVpdGk,shadow_10,text_aHR0cHM6Ly9ibG9nLmNzZG4ubmV0L3dlaXhpbl80MTk0NzM3OA==,size_16,color_FFFFFF,t_70)
Mycat实现的读写分离和自动切换机制,需要mysql的主从复制机制配合。
Mycat配置
Mycat 1.4 支持MySQL主从复制状态绑定的读写分离机制,让读更加安全可靠,配置如下:
	<dataNode name="dn1" dataHost="localhost1" database="db1" />
	<dataNode name="dn2" dataHost="localhost1" database="db2" />
	<dataNode name="dn3" dataHost="localhost1" database="db3" />
	<dataHost name="localhost1" maxCon="1000" minCon="10" balance="1"
		writeType="0" dbType="mysql" dbDriver="native" switchType="2"
		slaveThreshold="100">
		<heartbeat>show slave status</heartbeat>
		<writeHost host="hostM" url="192.168.25.134:3306" user="root" password="root">
			<readHost host="hostS" url="192.168.25.166:3306" user="root" password="root" />
		</writeHost>
	</dataHost>
(1) 设置 balance="1"与writeType=“0”
- Balance参数设置:
- 1.balance=“0”, 所有读操作都发送到当前可用的writeHost上。
- 2.balance=“1”,所有读操作都随机的发送到readHost。
- 3.balance=“2”,所有读操作都随机的在writeHost、readhost上分发
- WriteType参数设置:
- 1.writeType=“0”, 所有写操作都发送到可用的writeHost上。
- 2.writeType=“1”,所有写操作都随机的发送到readHost。
- 3.writeType=“2”,所有写操作都随机的在writeHost、readhost分上发。
- “readHost是从属于writeHost的,即意味着它从那个writeHost获取同步数据,因此,当它所属的writeHost宕机了,则它也不会再参与到读写分离中来,即“不工作了”,这是因为此时,它的数据已经“不可靠”了。基于这个考虑,目前mycat 1.3和1.4版本中,若想支持MySQL一主一从的标准配置,并且在主节点宕机的情况下,从节点还能读取数据,则需要在Mycat里配置为两个writeHost并设置banlance=1。”
- 例如下面配置
-
以上两种取模第一种当写挂了读不可用,第二种可以继续使用,事务内部的一切操作都会走写节点,<dataHost name="localhost1" maxCon="1000" minCon="10" balance="1" writeType="0" dbType="mysql" dbDriver="native"> <heartbeat>select user()</heartbeat> <!-- can have multi write hosts --> <writeHost host="hostM1" url="localhost:3306" user="root" password="123456"> <!-- can have multi read hosts --> <readHost host="hostS1" url="localhost2:3306" user="root" password="123456" weight="1" /> </writeHost> </dataHost> <!--或者 --> <dataHost name="localhost1" maxCon="1000" minCon="10" balance="1" writeType="0" dbType="mysql" dbDriver="native"> <heartbeat>select user()</heartbeat> <!-- can have multi write hosts --> <writeHost host="hostM1" url="localhost:3306" user="root" password="123456"> </writeHost> <writeHost host="hostS1" url="localhost:3307" user="root" password="123456"> </writeHost> </dataHost>所以读操作不要加事务,如果读延时较大,使用根据主从延时的读写分离,或者强制走写节点:- 一个查询SQL语句以/balance/注解来确定其是走读节点还是写节点。 1.6以后添加了强制走读走写处理:
- 强制走从:
/*!mycat:db_type=slave*/ select * from travelrecord /*#mycat:db_type=slave*/ select * from travelrecord - 强制走写:
/*#mycat:db_type=master*/ select * from travelrecord
/*!mycat:db_type=master*/ select * from travelrecord
- 强制走从:
- 一个查询SQL语句以/balance/注解来确定其是走读节点还是写节点。 1.6以后添加了强制走读走写处理:
(2) 设置 switchType=”2” 与slaveThreshold=”100”
- switchType 目前有三种选择:
- -1:表示不自动切换
- 1:默认值,自动切换
- 2:基于MySQL主从同步的状态决定是否切换
- 1.4开始支持MySQL主从复制状态绑定的读写分离机制,让读更加安全可靠,配置如下: MyCAT心跳检查语句配置为 show slave status ,dataHost 上定义两个新属性: switchType=”2” 与slaveThreshold=”100”,此时意味着开启MySQL主从复制状态绑定的读写分离与切换机制,Mycat心跳机制通过检测 show slave status 中的 “Seconds_Behind_Master”, “Slave_IO_Running”,“Slave_SQL_Running” 三个字段来确定当前主从同步的状态以及Seconds_Behind_Master主从复制时延, 当Seconds_Behind_Master>slaveThreshold时,读写分离筛选器会过滤掉此Slave机器,防止读到很久之前的旧数据,而当主节点宕机后,切换逻辑会检查Slave上的Seconds_Behind_Master是否为0,为0时则表示主从同步,可以安全切换,否则不会切换。
- 1.4.1 开始支持MySQL 集群模式,让读更加安全可靠,配置如下: MyCAT心跳检查语句配置为 show status like ‘wsrep%’ , dataHost 上定义两个新属性: switchType=”3” 此时意味着开启MySQL集群复制状态状态绑定的读写分离与切换机制,Mycat心跳机制通过检测集群复制时延时,如果延时过大或者集群出现节点问题不会负载改节点。
-
   <dataHost name="localhost1" maxCon="1000" minCon="10" balance="0" writeType="0" dbType="mysql" dbDriver="native" switchType="3" >
  		<heartbeat> show status like ‘wsrep%’</heartbeat>
    	<writeHost host="hostM1" url="localhost:3306" user="root"password="123456"></writeHost>
   		<writeHost host="hostS1"url="localhost:3316"user="root"password="123456" ></writeHost>
   </dataHost>