- 前言
- 简介
- MyBatisPlus环境搭建
- 创建表
- 代码生成器
- 测试代码
前言
昨天知道了有MyBatisPlus这个框架,今天了解了一下,发现运用其写代码真的是爽,为我们开发者省了不少的功夫,下面来分享一下MyBatisPlus对我的帮助。
简介
MyBatis-Plus(简称 MP)是一个 MyBatis 的增强工具,在 MyBatis 的基础上只做增强不做改变,为简化开发、提高效率而生。详细可见MybatisPlus管网
MyBatisPlus环境搭建
我这里是用IDEA搭建了一个web项目,然后再web目录下建立lib文件夹,导入相关jar包,之后Add as Library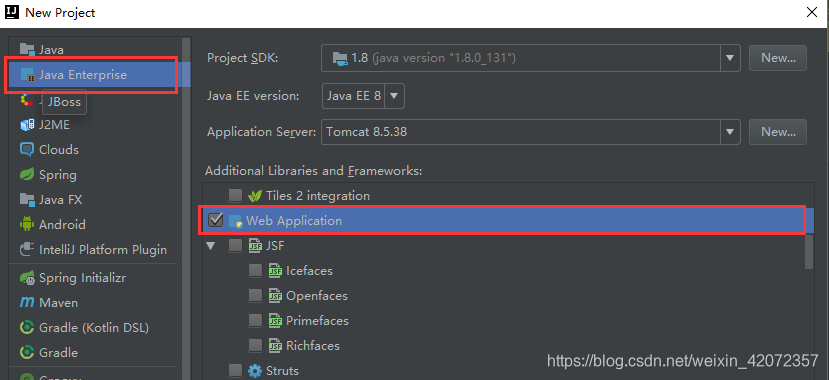
导入的jar包分别是 ssm的相关jar包、nybatis的相关jar包、代码依赖生成器的jar,最后我会把相关资源分享出来的。
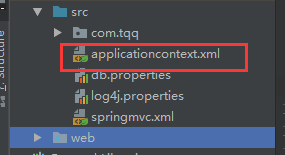
ssm相关配置,但是要将applicationcontext.xml文件中的配置工厂中的class更改
所在位置:
更改内容:
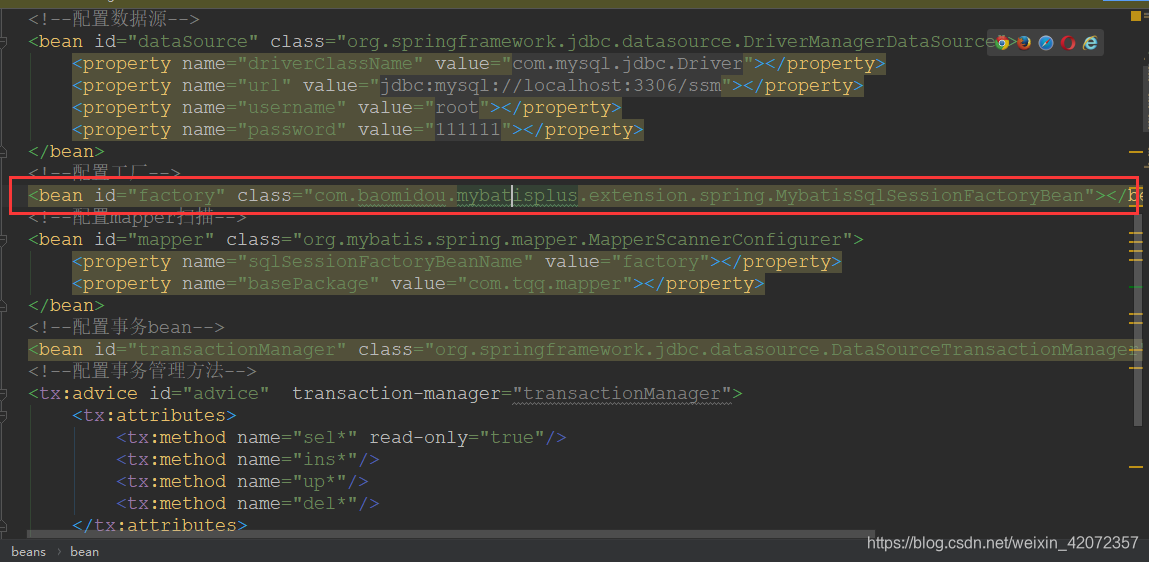
到此步就已经搭建成了ssm所需环境。
创建表

代码生成器
在src文件夹下建立一个测试包,包下建立一个测试类,测试类总代码如下:
package com.tqq.test;
import com.baomidou.mybatisplus.annotation.IdType;
import com.baomidou.mybatisplus.generator.AutoGenerator;
import com.baomidou.mybatisplus.generator.config.DataSourceConfig;
import com.baomidou.mybatisplus.generator.config.GlobalConfig;
import com.baomidou.mybatisplus.generator.config.PackageConfig;
import com.baomidou.mybatisplus.generator.config.StrategyConfig;
import com.baomidou.mybatisplus.generator.config.rules.NamingStrategy;

public class TestMP {
    public static void main(String[] args) {
        // 代码生成器
        AutoGenerator mpg = new AutoGenerator();
        //全局配置策略
        GlobalConfig gc = new GlobalConfig();
        String path = System.getProperty("user.dir");//动态获取当前项目的路径
        System.out.println(path);
        gc.setFileOverride(false);// 是否覆盖同名文件,默认是false
        gc.setActiveRecord(true);// 不需要ActiveRecord特性的请改为false
        gc.setEnableCache(false);// XML 二级缓存
        gc.setBaseResultMap(true);// XML ResultMap
        gc.setBaseColumnList(false);// XML columList
        gc.setOutputDir(path+"/src");
        gc.setIdType(IdType.AUTO);//设置主键策略

        //数据源配置
        DataSourceConfig dsc = new DataSourceConfig();
        dsc.setUrl("jdbc:mysql://localhost:3306/ssm?useUnicode=true&useSSL=false&characterEncoding=utf8");
        // dsc.setSchemaName("public");
        dsc.setDriverName("com.mysql.jdbc.Driver");
        dsc.setUsername("root");
        dsc.setPassword("111111");

        // 包配置
        PackageConfig pc = new PackageConfig();
        pc.setParent("com.tqq")
                .setMapper("mapper")
                .setService("service")
                .setController("controller")
                .setEntity("pojo")
                .setXml("mapper");
        //策略配置
        StrategyConfig stConfig = new StrategyConfig();
        stConfig.setCapitalMode(true) //全局大写命名
                .setNaming(NamingStrategy.underline_to_camel) // 数据库表映射到实体的命名策略
                .setTablePrefix("t_")
                .setInclude("t_people"); // 生成的表,多个表继续传递即可,String类型的可变参数

        //将策略配置对象集成到代码生成器中
        mpg.setGlobalConfig(gc);
        mpg.setDataSource(dsc);
        mpg.setPackageInfo(pc);
        mpg.setStrategy(stConfig);
        //执行生成
        mpg.execute();
    }
    }
1、在全局配置策略处可能需要做相应的调整,我是和视频中的有差异的,因为之前按照视频的写法生成的位置有点差异。
2、在包配置处可以修改自己想要生成的包的名称,包的名称改完之后不要忘记更改配置文件中的包的名称
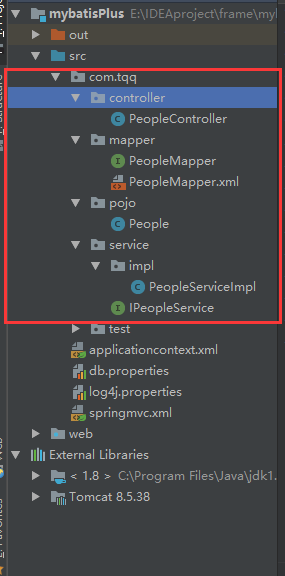
运行可得环境所需报和相关配置文件,可见其方便之处,如图:
测试代码
可在test包下建立mybatisPlus测试代码
package com.tqq.test;

import com.baomidou.mybatisplus.core.conditions.query.QueryWrapper;
import com.tqq.mapper.PeopleMapper;
import com.tqq.pojo.People;
import org.junit.Test;
import org.springframework.context.ApplicationContext;
import org.springframework.context.support.ClassPathXmlApplicationContext;

import java.util.List;

public class TestBaseMapper {
    //全部查询
    @Test
    public void testSel(){
        //获取Spring容器对象
        ApplicationContext ac = new ClassPathXmlApplicationContext("applicationcontext.xml");
        //获取PeopleMapper接口的实例化对象
        PeopleMapper peopleMapper = (PeopleMapper) ac.getBean("peopleMapper");
        List<People> people = peopleMapper.selectList(null);
        System.out.println(people);

    }
    //根据id查询
    @Test
    public void testSleById(){
        //获取Spring容器对象
        ApplicationContext ac = new ClassPathXmlApplicationContext("applicationcontext.xml");
        //获取PeopleMapper接口的实例化对象
        PeopleMapper peopleMapper = (PeopleMapper) ac.getBean("peopleMapper");
        People people1 = peopleMapper.selectById(4);
        System.out.println(people1);


    }
    //插入
    @Test
    public void testIns(){
        //获取Spring容器对象
        ApplicationContext ac = new ClassPathXmlApplicationContext("applicationcontext.xml");
        //获取PeopleMapper接口的实例化对象
        PeopleMapper peopleMapper = (PeopleMapper) ac.getBean("peopleMapper");
        People people = new People();
        people.setName("小胖子");
        people.setAge(22);
        int insert = peopleMapper.insert(people);
        System.out.println("输出结果"+insert);
    }
    //更新
    @Test
    public void testUp(){
        //获取Spring容器对象
        ApplicationContext ac = new ClassPathXmlApplicationContext("applicationcontext.xml");
        //获取PeopleMapper接口的实例化对象
        PeopleMapper peopleMapper = (PeopleMapper) ac.getBean("peopleMapper");
        People people = new People();
        people.setId(1);
        people.setName("小胖子");
        people.setAge(22);
        int insert = peopleMapper.updateById(people);
        System.out.println("输出结果"+insert);
    }
    //删除
    @Test
    public void testDel(){
        //获取Spring容器对象
        ApplicationContext ac = new ClassPathXmlApplicationContext("applicationcontext.xml");
        //获取PeopleMapper接口的实例化对象
        PeopleMapper peopleMapper = (PeopleMapper) ac.getBean("peopleMapper");

        int insert = peopleMapper.deleteById(2);
        System.out.println("输出结果"+insert);
    }
    //条件构造器的使用
    @Test
    public void testParm(){
        //获取Spring容器对象
        ApplicationContext ac = new ClassPathXmlApplicationContext("applicationcontext.xml");
        //获取PeopleMapper接口的实例化对象
        PeopleMapper peopleMapper = (PeopleMapper) ac.getBean("peopleMapper");
        //创建条件构造器
        QueryWrapper<People> queryWrapper = new QueryWrapper<>();
        queryWrapper.eq("name", "小胖子").ge("age",21);
        List<People> people = peopleMapper.selectList(queryWrapper);
        System.out.println(people);
    }

  //MP的AR模式的增加
    @Test
  public void testAR(){
      //获取Spring容器对象
      ApplicationContext ac = new ClassPathXmlApplicationContext("applicationcontext.xml");
      //获取PeopleMapper接口的实例化对象
      PeopleMapper peopleMapper = (PeopleMapper) ac.getBean("peopleMapper");
      People people = new People();
      people.setName("左朱斌");
      people.setAge(20);
      boolean insert = people.insert();
      System.out.println("插入结果:"+insert);
  }

}
由于是刚了解mybatisplus,就先写这么多了,但是发现了它的好用的地方和对我们开发的好处,之后会多加学习的。
注:
本篇博客的主要参考源是北京尚学堂的公开课,资源如下,希望能够帮到大家。
链接:https://pan.baidu.com/s/1lMq-FcgIiLahca3desDRpw 提取码:8zx8