生成对抗网络介绍
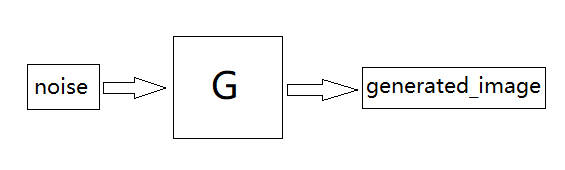
生成对抗网络可以简单地理解为用来造假的网络。其一般由两部分组成,生成器 (Generator) 和判别器 (Discriminator)。最终目的为生成器 生成的图像无法让判别器 判别真伪;判别器 可以判别那些是真正的图像,哪些是生成器 生成的假图像。训练时可简单分为四步:
一、造假
生成器接受噪声noise,输出生成的图像
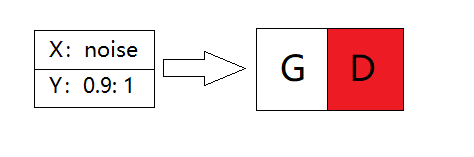
二、训练判别器
将真实的图像和第一步中的生成的图像合并为数据 X,且将真实图像的标签设置为 0.9-1 的随机数(此举为了减少出现 模式崩溃(Model Collapse) 的概率,即减少生成的图像几乎一样的概率),生成图像的标签设置为0,输入判别器中并训练。

三、训练生成器
将噪声noise作为X,将长度为batchsize的0.9至1的随机数作为Y输入G_D的联合网络中,并设置判别器为不可训练,训练整个网络即只训练生成器。
四、重复以上三步,直至生成的图像令人感到满意为止。
DCGAN介绍
DCGAN的概念最早出现在论文《Unsupervised Representation Learning With Deep Convolutional Generative Adversarial Networks》中,全称Deep Convolutional GANs,即深度卷积对抗生成网络,将生成对抗网络与卷积网络结合。论文中生成器使用了一个维的分布空间
,然后通过一系列的卷积运算将其投影到较小的空间。论文中生成器
的结构如下,将生成器反转并改变输出层即为判别器
。DCGAN的训练过程与生成对抗网络的训练过程一样。

在论文中作者提出了五点使DCGAN更加稳定的架构指南:
- Replace any pooling layers with strided convolutions (discriminator) and fractional-strided convolutions (generator).
- Use batchnorm in both the generator and the discriminator.
- Remove fully connected hidden layers for deeper architectures.
- Use ReLU activation in generator for all layers except for the output, which uses Tanh.
- Use LeakyReLU activation in the discriminator for all layers.
即
- 在判别器中用步长卷积层代替池化层,在生成器中用分数步长卷积层代替池化层。
- 在生成器与判别器中使用batchnorm。
- 为更深的架构中移除全连接层。
- 生成器中除了输出层使用Tanh激活函数外的所有层均使用ReLU激活函数。
- 判别器的所有层均使用LeakyReLU激活函数。
搭建DCGAN
数据来源
数据来自于Kaggle的tagged-anime-illustrations数据集,在这里仅取了其中一部分的数据,感觉麻烦的可以直接关注公众号回复动漫头像获取压缩包文件。
必要工作
引入必要的库
from tensorflow.keras.models import Sequential
from tensorflow.keras.layers import Dense, Dropout, Flatten, BatchNormalization, Activation
from tensorflow.keras.layers import Conv2DTranspose, Conv2D, Reshape, LeakyReLU
from tensorflow.keras.optimizers import SGD, Adam, RMSprop
import matplotlib.pyplot as plt
from PIL import Image
import os
import math
import numpy as np
设置图片的尺寸,方便以后拓展应用
image_size = 64
查看其中一张图片,路径填写自己保存的图片路径。
im = Image.open('D:/Users/YonminMa/anime-faces/1.png')
im = im.resize((image_size,image_size),Image.ANTIALIAS)
plt.imshow(im)
plt.show()
输出如下:

读取数据
注意:千万不要用下面的方法读取太多的图片,读取5000张大概需要5分钟左右,10000张需要20分钟甚至更长。
我的思路为先读取一张图片,然后使用concatenate函数使其与其他的图片拼接在一起。
读取一张图片:
X_train = Image.open('D:/Users/YonminMa/anime-faces/1.png')
X_train = X_train.resize((image_size,image_size),Image.ANTIALIAS)
X_train = np.asanyarray(X_train)
X_train = np.expand_dims(X_train, axis=0) # 将(64,64,3)维拓展为(1,64,64,3)
print(X_train.shape)
输出为(1, 64, 64, 3),然后通过循环使用concatenate函数拼接其他的图片:
for dirname, _, filenames in os.walk('D:/Users/YonminMa/anime-faces/'):
    for filename in filenames:
        if X_train.shape[0] > 5000:
            break
        try:
            im = Image.open(os.path.join(dirname, filename))
            im = im.resize((image_size,image_size),Image.ANTIALIAS)
            image_array = np.asanyarray(im)
            image_array = np.expand_dims(image_array, axis=0)
            X_train = np.concatenate((X_train, image_array), axis=0)
        except:
            pass
print(str(X_train.shape[0]))
得到的输出为:5001。
实践中发现此方法读取数据的时间随读取的数量呈指数级上升,如果有更好的方法,望在评论区告知,非常感谢。
构建生成器
根据论文搭建生成器 ,除了最后一层使用Tanh激活函数外其他层均使用ReLU激活函数。
character = 300 # 特征数

# 生成器
def generator_model():
    model = Sequential()
    model.add(Dense(int(image_size/8)*int(image_size/8)*256, input_shape=(character,)))

    model.add(BatchNormalization())
    model.add(Activation('relu'))
    model.add(Reshape((int(image_size/8),int(image_size/8),256))) # output: 8*8*256

    model.add(Conv2DTranspose(128,5,strides=2,padding='SAME')) # output: (None,16,16,128)

    model.add(Activation('relu'))
    model.add(BatchNormalization())
    model.add(Conv2DTranspose(64,5,strides=2,padding='SAME')) # output: (None, 32, 32, 64)

    model.add(Activation('relu'))
    model.add(BatchNormalization())

    model.add(Conv2DTranspose(3,5, strides=2,padding='SAME')) # output: (None, 64, 64, 3)

    model.add(Activation('tanh'))

    return model


# 第二种生成器架构
def generator_model():
    model = Sequential()
    model.add(Dense(int(image_size/4)*int(image_size/4)*128, input_shape=(character,)))
    # output: 16*16*64
    model.add(BatchNormalization())
    model.add(Activation('tanh'))
    model.add(Reshape((int(image_size/4),int(image_size/4),128)))
    # output: (None,16,16,128)
    model.add(Conv2DTranspose(64,5,strides=2,padding='SAME'))
    # output: (None, 32, 32, 64)
    model.add(Activation('tanh'))
    model.add(BatchNormalization())
    model.add(Conv2DTranspose(3,5, strides=2,padding='SAME'))
    # (None, 64, 64, 1)
    model.add(Activation('tanh'))

    return model
查看生成器具体结构:
g = generator_model()
g.summary()
结构如下

构建判别器
根据生成器与论文构建对应的判别器即可。
def discriminator_model():
    model = Sequential()
    model.add(Conv2D(64, padding='SAME',kernel_size=5,strides=2, input_shape=(image_size, image_size, 3)))
    model.add(LeakyReLU())
    model.add(BatchNormalization())
    model.add(Conv2D(128,padding='SAME',kernel_size=5,strides=2))
    model.add(LeakyReLU())
    model.add(BatchNormalization())
    model.add(Conv2D(256,padding='SAME',kernel_size=5,strides=2))
    model.add(LeakyReLU())
    model.add(BatchNormalization())
    model.add(Flatten())
    model.add(Dense(1024))
    model.add(BatchNormalization())
    model.add(Activation('tanh'))
    model.add(Dense(1))
    model.add(Activation('sigmoid'))

    return model

# 第二种判别器架构
def discriminator_model():
    model = Sequential()
    model.add(Conv2D(64, padding='SAME',kernel_size=5,strides=2, activation='tanh', input_shape=(image_size, image_size, 3)))
    model.add(BatchNormalization())
    model.add(Conv2D(128,padding='SAME',kernel_size=5,strides=2, activation='tanh'))
    model.add(BatchNormalization())
    model.add(Flatten())
    model.add(Dense(1024))
    model.add(BatchNormalization())
    model.add(Activation('tanh'))
    model.add(Dense(1))
    model.add(Activation('sigmoid'))

    return model
查看判别器结构:
d = discriminator_model()
d.summary()

连接模型
先定义一连接模型的函数,再将生成器 与判别器 连接。
def combine(g,d):
    model = Sequential()
    model.add(g)
    d.trainable = False
    model.add(d)

    return model

g = generator_model()
d = discriminator_model()
g_d = combine(g,d)
g_d.summary()
输出如下:

连接图片
定义一个函数,使多张图片连接成一张图片。
def combine_images(images):
    num = images.shape[0]
    width = int(math.sqrt(num))
    height = int(math.ceil(float(num) / width))
    shape = images.shape[1:3]
    image = np.zeros((height*shape[0], width*shape[1], 3),
                    dtype = images.dtype)
    for index,img in enumerate(images):
        i = int(index / width)
        j = index % width
        image[i * shape[0]:(i+1) * shape[0], j * shape[1]:(j+1) * shape[1], 0:3] = img[:,:,:]

    return image
生成函数
虽然训练过程中也可以生成图片,但是那是拼接过后的图片,下面就定义一个函数,输入噪声图像后输出一张64*64的图片。
result_path = 'D:/Users/YonminMa/DeepLearning_Work/Anime_GAN/generated_image/result/'

if os.path.exists(result_path)==False:
    os.makedirs(result_path)

def generated(noise_need, name):
    g = generator_model()
    try:
        g.load_weights(model_path+"generatorA")
        print("生成器权重导入成功")
    except:
        print("无权重")
    noise_need = np.random.normal(-1,1,size=(1,character))
    generated_image_need = g.predict(noise_need, verbose=0)
    image = combine_images(generated_image_need)
    image = image * 127.5 + 127.5
    Image.fromarray(image.astype(np.uint8)).save(
        result_path+name+".png")
训练
首先我们设置保存模型权重及生成图片的位置,如果没有该路径,则会自动创建。
model_path = 'D:/Users/YonminMa/DeepLearning_Work/Anime_GAN/Model/'
generated_image_path = 'D:/Users/YonminMa/DeepLearning_Work/Anime_GAN/generated_image/'

if os.path.exists(model_path)==False:
    os.makedirs(model_path)
if os.path.exists(generated_image_path)==False:
    os.makedirs(generated_image_path)
然后根据GAN的训练方法编写训练的函数。
def train(BATCH_SIZE, X_train):
    # 生成图片的连接图片数
    generated_image_size = 36
    # 读取图片
    X_train = ((X_train.astype(np.float32)) - 127.5) / 127.5

    # 模型及其优化器
    d = discriminator_model()
    g = generator_model()
    g_d = combine(g,d)
    d_optimizer = RMSprop()
    g_optimizer = RMSprop()
    g.compile(loss='binary_crossentropy', optimizers='SGD') # 生成器
    g_d.compile(loss='binary_crossentropy',optimizers=g_optimizer) # 联合模型
    d.trainable = True
    d.compile(loss='binary_crossentropy',optimizers=d_optimizer) # 判别器

    # 导入权重
    try:
        d.load_weights(model_path+"discriminatorA")
        print("判别器权重导入成功")
        g.load_weights(model_path+"generatorA")
        print("生成器权重导入成功")
    except:
        print("无权重")

    for epoch in range(1000):
        # 每1轮打印一次当前轮数
        if epoch % 1 == 0:
            print('Epoch is ',epoch)
        for index in range(X_train.shape[0]//BATCH_SIZE):
             # 产生(-1,1)的正态分布的维度为(BATCH_SIZE, character)的矩阵
            noise = np.random.normal(-1,1,size=(BATCH_SIZE,character))
            train_batch = X_train[index*BATCH_SIZE:(index+1)*BATCH_SIZE]
            generated_image = g.predict(noise, verbose=0)

            if index % 50 == 0:
                # 每50次输出一次图片
                noise_need = np.random.normal(-1,1,size=(generated_image_size,character))
                generated_image_need = g.predict(noise_need, verbose=0)
                image = combine_images(generated_image_need)
                image = image * 127.5 + 127.5
                Image.fromarray(image.astype(np.uint8)).save(
                    generated_image_path+str(epoch)+"_"+str(index)+".png")
            # 每运行一次训练一次判别器
            if index % 1 == 0:
                X = np.concatenate((train_batch,generated_image))
                Y = list((np.random.rand(BATCH_SIZE)*10+90)/100) + [0]*BATCH_SIZE
                d_loss = d.train_on_batch(X,Y)

            noise = np.random.normal(-1,1,size=(BATCH_SIZE,character))
            d.trainable = False
            g_loss = g_d.train_on_batch(noise, list((np.random.rand(BATCH_SIZE)*10+90)/100))
            d.trainable = True
            if index % 10 == 0:
                print('batch: %d, g_loss: %f, d_loss: %f' % (index, g_loss, d_loss))

            if index % 10 == 0:
                g.save_weights(model_path+'generatorA', True)
                print('Successfully save generatorA')
                d.save_weights(model_path+'discriminatorA', True)
                print('Successfully save discriminatorA')
在函数中有X_train = ((X_train.astype(np.float32)) - 127.5) / 127.5这一行代码,目的为使输入的X_train变换到 (-1, 1) 之间,与生成器
最后一层的Tanh激活函数相匹配。
然后便开始训练:
train(BATCH_SIZE=128, X_train=X_train)
然后等待生成的图片符合预期效果即可。
下面为动漫头像整个的生成过程。