Mybatis 入门实战笔记
Mybatis 是一个实现了数据持久化的 ORM 框架,简单理解就是对 JDBC 进行了封装。
优点:
- 相比 JDBC 减少了大量代码量,简单易学。
- 使用灵活,SQL 语句写在 XML 里,从程序代码中彻底分离,降低了耦合度,便于管理。
- 提供 XML 标签,支持编写动态 SQL 语句。
- 提供映射标签,支持对象与数据库的 ORM 字段映射关系。
缺点:
- SQL 语句编写工作量较大,尤其是字段和关联表多时。
- SQL 语句依赖于数据库,导致数据库移植性差,不能随意更换数据库。
快速入门实例
环境搭建
新建一个 maven 工程,pom.xml依赖如下:
<dependencies>
    <dependency>
        <groupId>org.mybatis</groupId>
        <artifactId>mybatis</artifactId>
        <version>3.4.5</version>
    </dependency>

    <dependency>
        <groupId>mysql</groupId>
        <artifactId>mysql-connector-java</artifactId>
        <version>8.0.17</version>
    </dependency>

    <dependency>
        <groupId>org.projectlombok</groupId>
        <artifactId>lombok</artifactId>
        <version>1.16.12</version>
    </dependency>
</dependencies>

<build>
    <resources>
        <resource>
            <directory>src/main/java</directory>
            <includes>
                <include>**/*.xml</include>
            </includes>
        </resource>
    </resources>
</build>
创建数据库表:
CREATE TABLE t_user (
  id INT PRIMARY KEY AUTO_INCREMENT,
  username VARCHAR (20),
  PASSWORD VARCHAR (20),
  age INT
)
创建表对应的实体类:
@Data
@AllArgsConstructor
public class User {

    private Integer id;

    private String username;

    private String password;

    private int age;
}
创建 mybatis 的配置文件 config.xml,放在 resources 目录下:
<?xml version="1.0" encoding="UTF-8" ?>
<!DOCTYPE configuration PUBLIC "-//mybatis.org//DTD Config 3.0//EN" "http://mybatis.org/dtd/mybatis-3-config.dtd">
<configuration>
<!-- 配置 mybatis 运行环境 -->
<environments default="dev">
<environment id="dev">
<!-- 事务管理 -->
<transactionManager type="JDBC"/>
<!-- 数据源 -->
<dataSource type="POOLED">
<property name="driver" value="com.mysql.cj.jdbc.Driver"/>
<property name="url" value="jdbc:mysql:///mybatis?useUnicode=true&serverTimezone=UTC"/>
<property name="username" value="root"/>
<property name="password" value="sjh2019"/>
</dataSource>
</environment>
</environments>
</configuration>
使用原生接口
Mybatis 框架需要开发者自定义 SQL 语句,写在 xxxMapper.xml中,实际开发中会为每个实体类创建对应的 XML 文件,定义管理该对象数据的 SQL。
创建一个 User 实体类对应的 UserMapper.xml:
<?xml version="1.0" encoding="UTF-8" ?>
<!DOCTYPE mapper PUBLIC "-//mybatis.org//DTD Mapper 3.0//EN" "http://mybatis.org/dtd/mybatis-3-mapper.dtd">
<mapper namespace="com.sjh.mapper.UserMapper">

    <!-- 添加 -->
    <insert id="save" parameterType="com.sjh.entity.User">
        insert into t_user(username, password, age) values (#{username}, #{password}, #{age})
    </insert>


</mapper>
-
namespace通常设置为文件所在包+文件名的形式。 -
insert标签表示执行添加操作,select标签表示查询操作,update标签表示更新操作,delete标签表示删除操作。 -
id属性是实际调用 Mybatis 方法时需要用到的参数。 -
parameterType属性是调用对应方法时参数的数据类型。
在全局配置文件 config.xml 中配置UserMapper.xml:
<mappers>
    <mapper resource="com/sjh/mapper/UserMapper.xml"/>
</mappers>
调用 Mybatis 的原生接口执行添加操作:
public class MybatisTest {
public static void main(String[] args) {
//加载配置文件
InputStream is = MybatisTest.class.getClassLoader().getResourceAsStream("config.xml");
//创建 SqlSession 对象
SqlSessionFactoryBuilder sqlSessionFactoryBuilder = new SqlSessionFactoryBuilder();
SqlSessionFactory sessionFactory = sqlSessionFactoryBuilder.build(is);
SqlSession sqlSession = sessionFactory.openSession();
//执行添加操作
String statement = "com.sjh.mapper.UserMapper.save";//拼接配置文件的 namespace + sql标签的id
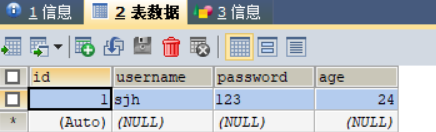
sqlSession.insert(statement, new User(1,"sjh","123",24));
sqlSession.commit();
sqlSession.close();
}
}
执行之后查看数据库:
Mapper 代理实现自定义接口
自定义接口和方法:
public interface UserRepo {

    int save(User user);

    int update(User user);

    int deleteById(Integer id);

    List<User> findAll();

    User findById(Integer id);
}
编写与方法相对应的 UserRepo.xml文件:
statement 标签可根据 SQL 执行的业务选择 insert、delete、update、select标签中的一个。
Mybatis 框架会根据规则自动创建接口的实现类的代理对象。
规则:
- XML 文件中 namespace 的值为接口的全类名。
- XML 文件中 statement 的
id为接口中对应的方法名。 - XML 文件中 statement 的
parameterType和接口中对应方法的参数类型一致。 - XML 文件中 statement 的
resultType和接口中对应方法的返回值类型一致。
<?xml version="1.0" encoding="UTF-8" ?>
<!DOCTYPE mapper PUBLIC "-//mybatis.org//DTD Mapper 3.0//EN" "http://mybatis.org/dtd/mybatis-3-mapper.dtd">
<mapper namespace="com.sjh.repository.UserRepo">

    <insert id="save" parameterType="com.sjh.entity.User">
        insert into t_user(username, password, age) values (#{username}, #{password}, #{age})
    </insert>

    <update id="update" parameterType="com.sjh.entity.User">
        update t_user set username = #{username}, password = #{password}, age = #{age})
    </update>

    <delete id="deleteById" parameterType="java.lang.Integer">
        delete from t_user where id = #{id}
    </delete>

    <select id="findAll" resultType="com.sjh.entity.User">
        select * from t_user
    </select>

    <select id="findById" parameterType="java.lang.Integer" resultType="com.sjh.entity.User">
        select * from t_user where id = #{id}
    </select>

</mapper>
在全局配置文件 config.xml 中配置UserRepo.xml:
<mapper resource="com/sjh/repository/UserRepo.xml"/>
通过接口的代理对象执行查询操作:
public static void main(String[] args) {
    //加载配置文件
    InputStream is = MybatisTest.class.getClassLoader().getResourceAsStream("config.xml");
    //创建 SqlSession 对象
    SqlSessionFactoryBuilder sqlSessionFactoryBuilder = new SqlSessionFactoryBuilder();
    SqlSessionFactory sessionFactory = sqlSessionFactoryBuilder.build(is);
    SqlSession sqlSession = sessionFactory.openSession();
    //获取实现接口的代理对象
    UserRepo userRepo = sqlSession.getMapper(UserRepo.class);
    List<User> users = userRepo.findAll();
    for(User user : users)
        System.out.println(user);
    sqlSession.close();
}
查询结果:

Mapper 配置文件
statement 标签
select、insert、update、delete 分别对应查询、添加、更新、删除操作
parameterType:参数数据类型
-
基本数据类型
<select id="findById" parameterType="int" resultType="com.sjh.entity.User"> select * from t_user where id = #{id} </select> -
String 类型
<select id="findByName" parameterType="java.lang.String" resultType="com.sjh.entity.User"> select * from t_user where username = #{username} </select> -
包装类型
<select id="findById" parameterType="java.lang.Integer" resultType="com.sjh.entity.User"> select * from t_user where id = #{id} </select> -
多个参数,使用 arg0 表示第一个参数,arg1 表示第二个参数。
<select id="findByNameAndAge" resultType="com.sjh.entity.User"> select * from t_user where username = #{arg0} and age = ${arg1} </select> -
Java Bean 类型
<update id="update" parameterType="com.sjh.entity.User">
    update t_user set username = #{username}, password = #{password}, age = #{age})
</update>
resultType :结果类型
-
基本数据类型
<select id="count" resultType="int"> select count(*) from t_user </select> -
包装类
<select id="count" resultType="java.lang.Integer"> select count(*) from t_user </select> -
String 类型
<select id="findNameById" parameterType="java.lang.Integer" resultType="java.lang.String"> select username from t_user where id = #{id} </select> -
Java Bean 类型
<select id="findById" parameterType="java.lang.Integer" resultType="com.sjh.entity.User">
    select * from t_user where id = #{id}
</select>
级联查询
一对多
以班级-学生为例,首先创建数据库表:
CREATE TABLE t_classes (
  id INT PRIMARY KEY AUTO_INCREMENT,
  NAME VARCHAR(20)
)

CREATE TABLE t_student (
  id INT PRIMARY KEY AUTO_INCREMENT,
  NAME VARCHAR(20),
  cid INT,
  CONSTRAINT fk FOREIGN KEY(cid) REFERENCES t_classes(id)
)
创建对应的实体类:
@Data
public class Classes {

    private Integer id;

    private String name;

    private List<Student> students;
}
-----
@Data
public class Student {

    private Integer id;

    private String name;

    private Classes classes;
}
创建接口 StudentRepo 及对应的 StudentRepo.xml:
public interface StudentRepo {

    //通过id查询学生的信息
    Student findById(Integer id);
}
<?xml version="1.0" encoding="UTF-8" ?>
<!DOCTYPE mapper PUBLIC "-//mybatis.org//DTD Mapper 3.0//EN" "http://mybatis.org/dtd/mybatis-3-mapper.dtd">
<mapper namespace="com.sjh.repository.ClassesRepo">

    <resultMap id="studentMap" type="com.sjh.entity.Student">
        <id property="id" column="id"/>
        <result property="name" column="name" />
        <association property="classes" javaType="com.sjh.entity.Classes">
            <id property="id" column="cid"/>
            <result property="name" column="cname"/>
        </association>
    </resultMap>

    <select id="findById" parameterType="java.lang.Integer" resultMap="studentMap">
        SELECT s.id,s.name,c.id AS cid,c.name AS cname
        FROM t_student AS s, t_classes AS c
        WHERE s.cid = c.id  AND s.id = #{id};
    </select>

</mapper>
在全局配置文件 config.xml 中配置StudentRepo.xml:
<mapper resource="com/sjh/repository/StudentRepo.xml"/>
测试代码:
    public static void main(String[] args) {
        //加载配置文件
        InputStream is = MybatisTest.class.getClassLoader().getResourceAsStream("config.xml");
        //创建 SqlSession 对象
        SqlSessionFactoryBuilder sqlSessionFactoryBuilder = new SqlSessionFactoryBuilder();
        SqlSessionFactory sessionFactory = sqlSessionFactoryBuilder.build(is);
        SqlSession sqlSession = sessionFactory.openSession();
        //获取实现接口的代理对象
        StudentRepo studentRepo = sqlSession.getMapper(StudentRepo.class);
        System.out.println(studentRepo.findById(1));
        sqlSession.close();
    }
运行结果:

多对一
创建接口 ClassesRepo 及对应的 ClassesRepo.xml :
public interface ClassesRepo {

    //通过id查询班级的信息
    Classes findById(Integer id);
}
<?xml version="1.0" encoding="UTF-8" ?>
<!DOCTYPE mapper PUBLIC "-//mybatis.org//DTD Mapper 3.0//EN" "http://mybatis.org/dtd/mybatis-3-mapper.dtd">
<mapper namespace="com.sjh.repository.ClassesRepo">

    <resultMap id="classesMap" type="com.sjh.entity.Classes">
        <id property="id" column="cid"/>
        <result property="name" column="cname" />
        <collection property="students" ofType="com.sjh.entity.Student">
            <id property="id" column="id"/>
            <result property="name" column="name"/>
        </collection>
    </resultMap>

    <select id="findById" parameterType="java.lang.Integer" resultMap="classesMap">
        SELECT s.id,s.name,c.id AS cid,c.name AS cname
        FROM t_student AS s, t_classes AS c
        WHERE s.cid = c.id  AND c.id = #{id};
    </select>

</mapper>
在全局配置文件 config.xml 中配置ClassesRepo.xml:
<mapper resource="com/sjh/repository/ClassesRepo.xml"/>
测试代码:
public static void main(String[] args) {
    //加载配置文件
    InputStream is = MybatisTest.class.getClassLoader().getResourceAsStream("config.xml");
    //创建 SqlSession 对象
    SqlSessionFactoryBuilder sqlSessionFactoryBuilder = new SqlSessionFactoryBuilder();
    SqlSessionFactory sessionFactory = sqlSessionFactoryBuilder.build(is);
    SqlSession sqlSession = sessionFactory.openSession();
    //获取实现接口的代理对象
    ClassesRepo classesRepo = sqlSession.getMapper(ClassesRepo.class);
    System.out.println(classesRepo.findById(1));
    sqlSession.close();
}
运行结果:

多对多
以客户和商品的关系为例,首先创建数据库表:
CREATE TABLE customer (
  id INT PRIMARY KEY AUTO_INCREMENT,
  NAME VARCHAR(20)
)

CREATE TABLE goods (
  id INT PRIMARY KEY AUTO_INCREMENT,
  NAME VARCHAR(20)
)

CREATE TABLE customer_goods (
  id INT PRIMARY KEY AUTO_INCREMENT,
  cid INT,
  gid INT,
  CONSTRAINT fk1 FOREIGN KEY(cid) REFERENCES customer(id),
  CONSTRAINT fk2 FOREIGN KEY(gid) REFERENCES goods(id)
)
创建对应的实体类:
@Data
public class Customer {

    private Integer id;

    private String name;

    private List<Goods> goods;
}
---
@Data
public class Goods {

    private Integer id;

    private String name;

    private List<Customer> customers;
}
创建接口 CustomerRepo 及对应的 CustomerRepo.xml 配置文件:
public interface CustomerRepo {

    Customer findById(Integer id);
}
<?xml version="1.0" encoding="UTF-8" ?>
<!DOCTYPE mapper PUBLIC "-//mybatis.org//DTD Mapper 3.0//EN" "http://mybatis.org/dtd/mybatis-3-mapper.dtd">
<mapper namespace="com.sjh.repository.CustomerRepo">

    <resultMap id="customerMap" type="com.sjh.entity.Customer">
        <id property="id" column="cid"/>
        <result property="name" column="cname" />
        <collection property="goods" ofType="com.sjh.entity.Goods">
            <id property="id" column="gid"/>
            <result property="name" column="gname"/>
        </collection>
    </resultMap>

    <select id="findById" parameterType="java.lang.Integer" resultMap="customerMap">
        SELECT c.id AS cid,c.name AS cname,g.id AS gid,g.name AS gname
        FROM customer AS c,goods AS g,customer_goods cg
        WHERE c.id = #{id} AND c.id = cg.cid AND g.id = cg.gid
    </select>

</mapper>
在全局配置文件 config.xml 中配置CustomerRepoRepo.xml:
<mapper resource="com/sjh/repository/CustomerRepo.xml"/>
测试代码:
public static void main(String[] args) {
    //加载配置文件
    InputStream is = MybatisTest.class.getClassLoader().getResourceAsStream("config.xml");
    //创建 SqlSession 对象
    SqlSessionFactoryBuilder sqlSessionFactoryBuilder = new SqlSessionFactoryBuilder();
    SqlSessionFactory sessionFactory = sqlSessionFactoryBuilder.build(is);
    SqlSession sqlSession = sessionFactory.openSession();
    //获取实现接口的代理对象
    CustomerRepo customerRepo = sqlSession.getMapper(CustomerRepo.class);
    System.out.println(customerRepo.findById(1));
    sqlSession.close();
}
运行结果:

逆向工程
Mybatis 框架需要:实体类、自定义 Mapper 接口、对应的 Mapper.xml
传统开发中上述三个组件需要开发者手动创建,逆向工程可以帮助开发者自动创建三个组件,减轻开发者的工作量。
Mybatis Generator,简称 MBG,是一个专门为 Mybatis 框架开发者定制的代码生成器,可自动生成所需的实体类,Mapper 接口和对应的 xml 文件,支持基本的 CRUD 操作。
在 pom.xml引入依赖:
<dependency>
    <groupId>org.mybatis.generator</groupId>
    <artifactId>mybatis-generator-core</artifactId>
    <version>1.3.2</version>
</dependency>
创建 MBG 配置文件 generator.xml:
-
jdbcConnection配置数据库连接信息 -
javaModelGenerator配置Java Bean 生成策略 -
sqlMapGenerator配置 SQL 映射文件生成策略 -
javaClientGenerator配置 Mapper 接口的生成策略 -
table配置目标数据表
<?xml version="1.0" encoding="UTF-8"?>
<!DOCTYPE generatorConfiguration PUBLIC "-//mybatis.org//DTD MyBatis Generator Configuration 1.0//EN" "http://mybatis.org/dtd/mybatis-generator-config_1_0.dtd">
<generatorConfiguration>
<context id="test" targetRuntime="MyBatis3">
<jdbcConnection
driverClass="com.mysql.cj.jdbc.Driver"
connectionURL="jdbc:mysql:///mybatis?useUnicode=true&serverTimezone=UTC"
userId="root"
password="sjh2019"
/>
<javaModelGenerator targetPackage="com.sjh.entity" targetProject="./src/main/java"/>
<sqlMapGenerator targetPackage="com.sjh.repository" targetProject="./src/main/java"/>
<javaClientGenerator type="XMLMAPPER" targetPackage="com.sjh.repository" targetProject="./src/main/java"/>
<table tableName="t_user" domainObjectName="User"/>
</context>
</generatorConfiguration>
创建执行类:
public class GeneratorTest {

    public static void main(String[] args) {
        List<String> warnings = new ArrayList<>();
        boolean overwrite = true;
        String generatorCig = "/generatorConfig.xml";
        File file = new File(GeneratorTest.class.getResource(generatorCig).getFile());
        ConfigurationParser configurationParser = new ConfigurationParser(warnings);
        Configuration configuration = null;
        try {
            configuration = configurationParser.parseConfiguration(file);
        } catch (IOException | XMLParserException e) {
            e.printStackTrace();
        }
        DefaultShellCallback callback = new DefaultShellCallback(overwrite);
        MyBatisGenerator myBatisGenerator = null;
        try {
            assert configuration != null;
            myBatisGenerator = new MyBatisGenerator(configuration, callback, warnings);
        } catch (InvalidConfigurationException e) {
            e.printStackTrace();
        }
        try {
            assert myBatisGenerator != null;
            myBatisGenerator.generate(null);
        } catch (SQLException | InterruptedException | IOException e) {
            e.printStackTrace();
        }
    }
}
延迟加载
延迟加载也叫懒加载,使用延迟加载可以提高程序的运行效率,针对于数据持久层,在某些特定情况下访问特定数据库,在其他情况下可以不访问某些表,从一定程度上减少了 Java 应用与数据库的交互次数。
查询班级-学生时,学生和班级是两张不同的表,如果当前需求只需要获取学生信息,那么查询学生单表即可,如果需要通过学生获取班级的信息则必须查询两张表。
不同业务需求需要查询不同的表,根据具体的业务需求来动态减少数据表查询的工作就是延迟加载。
在 StudentRepo 接口增加方法:
//通过id查询学生的信息
Student findByIdLazy(Integer id);
对应的 XML 增加配置:
<resultMap id="studentMapLazy" type="com.sjh.entity.Student">
    <id property="id" column="id"/>
    <result property="name" column="name" />
    <association property="classes" javaType="com.sjh.entity.Classes"
                 select="com.sjh.repository.ClassesRepo.findByIdLazy" column="cid"/>
</resultMap>

<select id="findByIdLazy" parameterType="java.lang.Integer" resultMap="studentMapLazy">
    SELECT * FROM t_student WHERE id = #{id};
</select>
在 ClassesRepo 接口增加方法:
//通过id查询班级的信息
Classes findByIdLazy(Integer id);
对应的 XML 增加配置:
<select id="findByIdLazy" parameterType="java.lang.Integer" resultType="com.sjh.entity.Classes">
    SELECT * FROM  t_classes WHERE id = #{id};
</select>
在 config.xml 增加配置:
<settings>
    <!-- 打印 SQL -->
    <setting name="logImpl" value="STDOUT_LOGGING"/>
    <!-- 开启延迟加载 -->
    <setting name="lazyLoadingEnabled" value="true"/>
</settings>
当输出一个学生对象时,进行了2次查询:
StudentRepo studentRepo = sqlSession.getMapper(StudentRepo.class);
System.out.println(studentRepo.findByIdLazy(1));

当只输出学生对象的姓名时,不会查询班级信息:
StudentRepo studentRepo = sqlSession.getMapper(StudentRepo.class);
System.out.println(studentRepo.findByIdLazy(1).getName());

Mybatis 缓存
使用缓存可以减少 Java 程序和数据库交互的次数,从而提高程序的运行效率。例如查询出 id = 1 的对象,第一次查询之后会自动将该对象保存到缓存中,下一次查询时直接从缓存中返回结果无需再次查询数据库。
Mybatis 缓存分类:
-
一级缓存
SqlSession 级别,默认开启且不能关闭。
操作数据库时需要创建 SqlSession 对象,在对象中有一个 HashMap 用于存储缓存数据,不同 SqlSession 之间缓存数据区域互不影响。
一级缓存的作用域是 SqlSession 范围的,在同一个 SqlSession 中执行两次相同的 SQL 语句时,第一次执行完毕会将结果保存在缓存中,第二次查询直接从缓存中获取。
如果 SqlSession 执行了 DML 操作(insert、update、delete),Mybatis 必须将缓存清空以保证数据的有效性。
-
二级缓存
Mapper 级别,默认关闭。
使用二级缓存时多个 SqlSession 使用同一个 Mapper 的 SQL 语句操作数据库,得到的数据会存在二级缓存区,同样使用 HashMap 进行数据存储,相比于一级缓存,二级缓存范围更大,多个 SqlSession 可以共用二级缓存,作用域是 Mapper 的同一个 namespace,不同 SqlSession 两次执行相同的 namespace 下的 SQL 语句,参数也相等,则第一次执行成功后会将数据保存在二级缓存中,第二次可直接从二级缓存中取出数据。
一级缓存
同一个 SqlSession 执行两次查询,只会查询一次数据库:
public static void main(String[] args) {
    //加载配置文件
    InputStream is = MybatisTest.class.getClassLoader().getResourceAsStream("config.xml");
    //创建 SqlSession 对象
    SqlSessionFactoryBuilder sqlSessionFactoryBuilder = new SqlSessionFactoryBuilder();
    SqlSessionFactory sessionFactory = sqlSessionFactoryBuilder.build(is);
    SqlSession sqlSession = sessionFactory.openSession();
    //获取实现接口的代理对象
    StudentRepo studentRepo = sqlSession.getMapper(StudentRepo.class);
    System.out.println(studentRepo.findByIdLazy(1).getName());
    System.out.println(studentRepo.findByIdLazy(1).getName());
    sqlSession.close();
}

二级缓存
Mybatis 自带的二级缓存,在 config.xml 中配置:
<!-- 开启二级缓存 -->
<setting name="cacheEnabled" value="true"/>
在对应的 Mapper.xml 中配置一个 cache 标签即可:
<cache/>
对应实体类实现序列化接口:
public class Student implements Serializable
不同 SqlSession 执行两次查询,只会查询一次数据库:
public static void main(String[] args) {
    //加载配置文件
    InputStream is = MybatisTest.class.getClassLoader().getResourceAsStream("config.xml");
    //创建 SqlSession 对象
    SqlSessionFactoryBuilder sqlSessionFactoryBuilder = new SqlSessionFactoryBuilder();
    SqlSessionFactory sessionFactory = sqlSessionFactoryBuilder.build(is);
    SqlSession sqlSession = sessionFactory.openSession();
    //获取实现接口的代理对象
    StudentRepo studentRepo = sqlSession.getMapper(StudentRepo.class);
    System.out.println(studentRepo.findByIdLazy(1).getName());
    //关闭sqlSession,测试二级缓存
    sqlSession.close();
    sqlSession = sessionFactory.openSession();
    studentRepo = sqlSession.getMapper(StudentRepo.class);
    System.out.println(studentRepo.findByIdLazy(1).getName());
    sqlSession.close();
}
 )
)
使用第三方二级缓存,在 pom.xml 添加依赖:
<dependency>
    <groupId>org.mybatis</groupId>
    <artifactId>mybatis-ehcache</artifactId>
    <version>1.0.0</version>
</dependency>

<dependency>
    <groupId>net.sf.ehcache</groupId>
    <artifactId>ehcache-core</artifactId>
    <version>2.4.3</version>
</dependency>
添加 ehcache.xml :
<ehcache>
    <diskStore/>
    <defaultCache
        eternal="false"
        overflowToDisk="false"
        timeToIdleSeconds="120"
        timeToLiveSeconds="120"
        diskExpiryThreadIntervalSeconds="120"
        memoryStoreEvictionPolicy="LRU">
    </defaultCache>
</ehcache>
在 config.xml 中配置:
<!-- 开启二级缓存 -->
<setting name="cacheEnabled" value="true"/>
在对应的 Mapper.xml 中配置:
<cache type="org.mybatis.caches.ehcache.EhcacheCache">
    <!-- 缓存创建后,最后一次访问缓存的时间至缓存失效的时间间隔 -->
    <property name="timeToIdleSeconds" value="3600"/>
    <!-- 缓存创建后自失效的时间间隔 -->
    <property name="timeToLiveSeconds" value="3600"/>
    <!-- 缓存回收策略 -->
    <property name="memoryStoreEvictionPolicy" value="LRU"/>
</cache>
Mybatis 动态 SQL
作用:简化代码开发,程序可以自动根据业务参数决定 SQL 语句的组成。
if 标签
如果 test 中表达式的结果不成立则不添加该语句到 SQL 语句。
<select id="findByUser" parameterType="com.sjh.entity.User" resultType="com.sjh.entity.User">
    select * from t_user where
    <if test="id != 0">
        id = #{id}
    </if>
    <if test="username != null">
        and username = #{username}
    </if>
    <if test="username != null">
        and password = #{password}
    </if>
    <if test="age != 0">
        and age = #{age}
    </if>
</select>
where 标签
where 可以自动判断是否需要删除 SQL 中的 and 关键字,通常与 if 结合使用。
<select id="findByUser" parameterType="com.sjh.entity.User" resultType="com.sjh.entity.User">
    select * from t_user
    <where>
        <if test="id != 0">
            id = #{id}
        </if>
        <if test="username != null">
            and username = #{username}
        </if>
        <if test="username != null">
            and password = #{password}
        </if>
        <if test="age != 0">
            and age = #{age}
        </if>
    </where>
</select>
choose、when 标签
类似 if
<select id="findByUser" parameterType="com.sjh.entity.User" resultType="com.sjh.entity.User">
    select * from t_user
    <where>
        <choose>
            <when test="id != 0">
                id = #{id}
            </when>
        </choose>
        <choose>
            <when test="username != null">
                and username = #{username}
            </when>
        </choose>
        <choose>
            <when test="password != null">
                and password = #{password}
            </when>
        </choose>
        <choose>
            <when test="age != 0">
                and age = #{age}
            </when>
        </choose>
    </where>
</select>
trim 标签
prefix 和 suffix 属性被用于生成实际的 SQL 语句,和标签内部的语句进行拼接,如果语句前后出现了 prefixOverrides 或 suffixOverrides 属性指定的值,Mybatis 会自动将其删除。
<select id="findByUser" parameterType="com.sjh.entity.User" resultType="com.sjh.entity.User">
    select * from t_user
    <trim prefix="where" prefixOverrides="and">
        <if test="id != 0">
            id = #{id}
        </if>
        <if test="username != null">
            and username = #{username}
        </if>
        <if test="username != null">
            and password = #{password}
        </if>
        <if test="age != 0">
            and age = #{age}
        </if>
    </trim>
</select>
set 标签
用于 update 操作,会自动根据参数选择生成 SQL 语句。
<update id="updateByPrimaryKeySelective" parameterType="com.sjh.entity.User">
    update t_user
    <set>
        <if test="username != null">
            username = #{username,jdbcType=VARCHAR},
        </if>
        <if test="password != null">
            password = #{password,jdbcType=VARCHAR},
        </if>
        <if test="age != null">
            age = #{age,jdbcType=INTEGER},
        </if>
    </set>
    where id = #{id,jdbcType=INTEGER}
</update>
foreach 标签
可以迭代生成一系列值,主要用于 SQL 的 in 语句。
例如通过 id 集合查询 User,先在实体类加入属性:
private List<Integer> ids;
在接口中添加方法:
List<User> findByIds(User user);
在对应的 Mapper.xml 配置:
<select id="findByIds" parameterType="com.sjh.entity.User" resultType="com.sjh.entity.User">
    select * from t_user
    <where>
        <foreach collection="ids" open="id in (" close=")" item="id" separator=",">
            #{id}
        </foreach>
    </where>
</select>
测试方法:
public static void main(String[] args) {
    //加载配置文件
    InputStream is = MybatisTest.class.getClassLoader().getResourceAsStream("config.xml");
    //创建 SqlSession 对象
    SqlSessionFactoryBuilder sqlSessionFactoryBuilder = new SqlSessionFactoryBuilder();
    SqlSessionFactory sessionFactory = sqlSessionFactoryBuilder.build(is);
    SqlSession sqlSession = sessionFactory.openSession();
    //获取Mapper代理对象
    UserMapper userMapper = sqlSession.getMapper(UserMapper.class);
    User user = new User();
    List<Integer> ids = new ArrayList<>();
    ids.add(1);
    ids.add(2);
    user.setIds(ids);
    System.out.println(userMapper.findByIds(user));
}
结果:
