零、前言
http有http的有点,但也有其不足,即只能从客户端发起请求给服务端,服务端不能推数据给客户端。而websocket就不一样了,是双工的,不仅可以由客户端向服务器发送数据,服务端也能主动像客户端推数据。这其中也就是单工跟双工的概念。
一、websocket简介
什么是WebSocket?
WebSocket协议是基于TCP的一种新的网络协议。它实现了浏览器与服务器全双工(full-duplex)通信——允许服务器主动发送信息给客户端。
为什么需要 WebSocket?
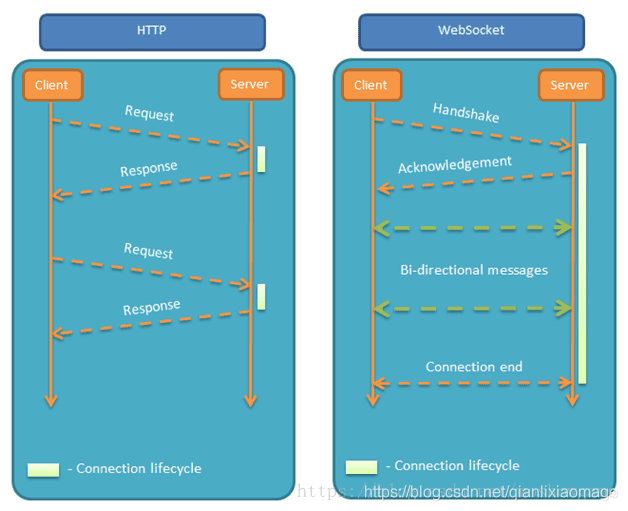
初次接触 WebSocket 的人,都会问同样的问题:我们已经有了 HTTP 协议,为什么还需要另一个协议?它能带来什么好处?答案很简单,因为 HTTP 协议有一个缺陷:通信只能由客户端发起,HTTP 协议做不到服务器主动向客户端推送信息。举例来说,我们想要查询当前的排队情况,只能是页面轮询向服务器发出请求,服务器返回查询结果。轮询的效率低,非常浪费资源(因为必须不停连接,或者 HTTP 连接始终打开)。因此WebSocket 就是这样发明的。
与http进行对比:
二、spring boot中引入websocket的步骤
创建spring boot项目,结构如下:

(1)pom.xml引入依赖
<dependency>
    <groupId>org.springframework.boot</groupId>
         <artifactId>spring-boot-starter-websocket
    </artifactId>
</dependency>
(2)websocket配置类
package com.example.utils;

import org.springframework.context.annotation.Bean;
import org.springframework.context.annotation.Configuration;
import org.springframework.web.socket.server.standard.ServerEndpointExporter;

/**
 * @Description
 * @ClassName WebSocketConfig
 * @Author User
 * @date 2020.05.31 18:45
 */
@Configuration
public class WebSocketConfig {
    @Bean
    public ServerEndpointExporter serverEndpointExporter() {
        return new ServerEndpointExporter();
    }
}
(3)允许跨域配置
由于我在springboot中放了一个websocket客户端html,访问该html时用的html与spring boot的端口号不一致,造成了跨域,因此进行了配置。
package com.example.utils;
import org.springframework.context.annotation.Bean;
import org.springframework.context.annotation.Configuration;
import org.springframework.web.cors.CorsConfiguration;
import org.springframework.web.cors.UrlBasedCorsConfigurationSource;
import org.springframework.web.filter.CorsFilter;

@Configuration
public class GlobalCorsConfig {
    @Bean
    public CorsFilter corsFilter() {
        CorsConfiguration config = new CorsConfiguration();
        config.addAllowedOrigin("*");
        config.setAllowCredentials(true);
        config.addAllowedMethod("*");
        config.addAllowedHeader("*");

        UrlBasedCorsConfigurationSource configSource = new UrlBasedCorsConfigurationSource();
        configSource.registerCorsConfiguration("/**", config);

        return new CorsFilter(configSource);
    }
}
注意,网络上有些在config的最后还有一句:
config.addExposedHeader("*");这句在我这会导致项目启动失败,不知道为什么我也没去研究,我删掉了他就可以了。
(4)websocket类
package com.example.websocket;


import javax.websocket.*;
import javax.websocket.server.PathParam;
import javax.websocket.server.ServerEndpoint;

import org.apache.log4j.Logger;
import org.springframework.stereotype.Component;

import java.io.IOException;
import java.util.concurrent.ConcurrentHashMap;

/**
 * @Description ws的server,相当于controller
 * @ClassName MyWsServer
 * @Author User
 * @date 2020.05.31 18:24
 */
@ServerEndpoint("/api/v1/websocket/{userId}")
@Component
public class MyWsServer {
    // 引入log4j日志
    static Logger logger = Logger.getLogger(MyWsServer.class);
    // 静态变量,用来记录当前在线连接数
    private static int onlineCount = 0;
    // concurrent包的线程安全Set,用来存放客户端对象
    private static ConcurrentHashMap<String, MyWsServer> clients = new ConcurrentHashMap<>();
    // 与某个客户端的连接会话,需要通过它来给客户端发送数据
    private Session session;
    // 用户唯一标识符
    private String userId = "";

    /**
     * @return
     * @Description websocket的连接函数
     * @Param {Session} session
     * @Author User
     * @Date 2020.05.31 19:13
     **/
    @OnOpen
    public void onOpen(Session session, @PathParam("userId") String userId) {
        this.session = session;
        this.userId = userId;
        logger.info("有新的客户端连接进来了,客户端id是: " + session.getId());
        if (clients.containsKey(userId)) {
            clients.remove(userId);
            clients.put(userId, this);
        } else {
            clients.put(userId, this);
            MyWsServer.addOnlineCount();
        }

        logger.info("用户:" + userId + ", 当前在线人数为:" + getOnlineCount());

        try {
            sendMessage("连接成功");
        } catch (IOException e) {
            logger.error("用户:" + userId + ",网络异常!");
        }

    }

    /**
     * @return
     * @Description 关闭事件处理函数
     * @Param
     * @Author User
     * @Date 2020.06.12 22:15
     **/
    @OnClose
    public void onClose() {
        if (clients.containsKey(userId)) {
            clients.remove(userId);
            subOnlineCount();
        }
        logger.info("用户退出:" + userId + ",当前在线人数为:" + getOnlineCount());
    }

    /**
     * @return
     * @Description 接收消息
     * @Param
     * @Author User
     * @Date 2020.06.12 22:29
     **/
    @OnMessage
    public void onMessage(String message, Session session) {
        logger.info("用户" + userId + "发来消息, 报文:" + message);
    }

    /**
     * @return
     * @Description
     * @Param
     * @Author User
     * @Date 2020.06.12 22:31
     **/
    @OnError
    public void onError(Session session, Throwable error) {
        logger.error("用户错误:" + this.userId + ",原因:" + error.getMessage());
        error.printStackTrace();
    }

    /**
     * @return {null}
     * @Description 向客户端发送消息
     * @Param {String} message 要发送的消息
     * @Author User
     * @Date 2020.05.31 19:14
     **/
    public void sendMessage(String message) throws IOException {
        this.session.getBasicRemote().sendText(message);
    }

    /**
     * @return
     * @Description 发送自定义消息到指定用户或者群发消息
     * @Param
     * @Author User
     * @Date 2020.06.12 22:55
     **/
    public static void sendInfo(String message, String fromUserId, String toUserId) {
        logger.info("推送消息给用户" + toUserId + ",推送内容:" + message);
        for (MyWsServer client : clients.values()) {
            try {
                //这里可以设定只推送给这个userId的,为null则全部推送
                if ("every".equals(toUserId) && !client.userId.equals(fromUserId)) {
                    client.sendMessage("来自" + fromUserId + "的群发消息:" + message);
                } else if (client.userId.equals(toUserId)) {
                    client.sendMessage("来自" + fromUserId + "发给" + toUserId + "的消息:" + message);
                }
            } catch (IOException e) {
                System.out.println(e.toString());
                continue;
            }
        }
    }

    /**
     * @return {null}
     * @Description 在线客户端数加一
     * @Param {null}
     * @Author User
     * @Date 2020.05.31 19:12
     **/
    public static synchronized void addOnlineCount() {
        MyWsServer.onlineCount++;
    }

    /**
     * @return {null}
     * @Description 在线客户端数减一
     * @Param {null}
     * @Author User
     * @Date 2020.05.31 19:12
     **/
    public static synchronized void subOnlineCount() {
        MyWsServer.onlineCount--;
    }

    /**
     * @return
     * @Description 获取在线连接数
     * @Param
     * @Author User
     * @Date 2020.05.31 19:12
     **/
    public static synchronized int getOnlineCount() {
        return onlineCount;
    }

}
最重要的一个文件,里面注释很详细。
(5)controller配置demo
package com.example.controller;

import com.example.websocket.MyWsServer;
import org.springframework.http.ResponseEntity;
import org.springframework.web.bind.annotation.*;

import java.io.IOException;

/**
 * @Description
 * @ClassName MyController
 * @Author User
 * @date 2020.06.12 23:05
 */
@RestController
@RequestMapping(("/api/v1"))
public class MyController {
    @GetMapping("/index")
    public ResponseEntity<String> index() {
        return ResponseEntity.ok("<h1>请求成功</h1>");
    }

    @GetMapping("/pushMessage/{fromUserId}/{toUserId}")
    public ResponseEntity<String> pushToClients(@RequestParam("message") String message, @PathVariable("fromUserId") String fromUserId, @PathVariable("toUserId") String toUserId) throws IOException {
        MyWsServer.sendInfo(message, fromUserId, toUserId);
        return ResponseEntity.ok("MSG SEND SUCCESS");
    }
}
<!DOCTYPE html>
<html>
<head>
<meta charset="utf-8">
<title>websocket测试工具</title>
</head>
<script src="./jquery.js"></script>
<script>
var socket;
function openSocket() {
if (typeof (WebSocket) == "undefined") {
console.log("您的浏览器不支持WebSocket");
} else {
if ($('#userId').val() === "") {
alert("请设置您的个性id");
return;
}
console.log("您的浏览器支持WebSocket");
//实现化WebSocket对象,指定要连接的服务器地址与端口 建立连接
var socketUrl = "ws://127.0.0.1:8000/api/v1/websocket/" + $("#userId").val();
console.log(socketUrl);
if (socket != null) {
socket.close();
socket = null;
}
socket = new WebSocket(socketUrl);
//打开事件
socket.onopen = function () {
// alert("websocket已打开");
//socket.send("这是来自客户端的消息" + location.href + new Date());
};
//获得消息事件
socket.onmessage = function (msg) {
alert(msg.data);
//发现消息进入 开始处理前端触发逻辑
};
//关闭事件
socket.onclose = function () {
console.log("websocket已关闭");
};
//发生了错误事件
socket.onerror = function () {
console.log("websocket发生了错误");
}
}
}
function disconnectSocket() {
if (typeof (WebSocket) == "undefined") {
alert("您的浏览器不支持WebSocket");
}
if (socket === undefined) {
alert("您尚未连接服务器");
} else {
socket.close();
}
}
function sendMessage() {
if (typeof (WebSocket) == "undefined") {
console.log("您的浏览器不支持WebSocket");
} else {
if ($('#userId').val() === "") {
alert("请设置您的个性id");
return;
}
if (socket === undefined) {
alert("您尚未连接服务器");
} else {
if (socket.readyState === socket.CLOSED) {
alert("您已断开与服务器的连接");
} else {
var obj = {
toUserId: $("#toUserId").val(),
message: $('#message').val()
}
// 推送数据到指定客户端,不填toUserId则认为是群发消息
var toWho = "";
$('#toUserId').val() ? toWho = $('#toUserId').val() : toWho = "every"
var url = "http://127.0.0.1:8000/api/v1/pushMessage/"+$('#userId').val() + "/" + toWho + '?message=' + $('#message').val();
// console.log(url);
$.ajax(url);
// console.log(JSON.stringify(obj));
// socket.send(JSON.stringify(obj));
}
}
}
}
</script>
<body>
<h1 align="center" style="color: red">websocket测试工具</h1>
<div align="left">
<div>【我的id】: <input id="userId" name="userId" type="text" placeholder="设置一个个性的id"> 
<button id="open" onclick="openSocket()">连接socket</button>
 
<button onclick="disconnectSocket()">断开socket</button>
</div>
<br>
<div>【发送至】: <input id="toUserId" name="toUserId" type="text" placeholder="发送给某个用户"></div>
<br>
<div>【mesgs】: <input id="message" name="message" type="text" placeholder="要发送的消息"> 
<button onclick="sendMessage()">发送消息</button>
</div>
</div>
</body>
</html>只是一个简单的页面,但是功能齐全,包括连接断开,单发消息以及群发消息

三、演示截图
(1)单发消息
启动三个客户端,
客户端1向客户端2发送消息:

只有客户端2收到了消息:

(2)user1群发消息

用户3收到消息:

用户2收到消息:

四、总结
文章简单介绍了,springboot中如何使用websocket,demo完善,方便后续参考,扩展。
五、demo下载地址
由于经常在csdn下载东西,积分不够用,这个demo就上传到csdn下载了,多多见谅。
csdn下载地址:https://download.csdn.net/download/qianlixiaomage/12520760
六、结束
再见!