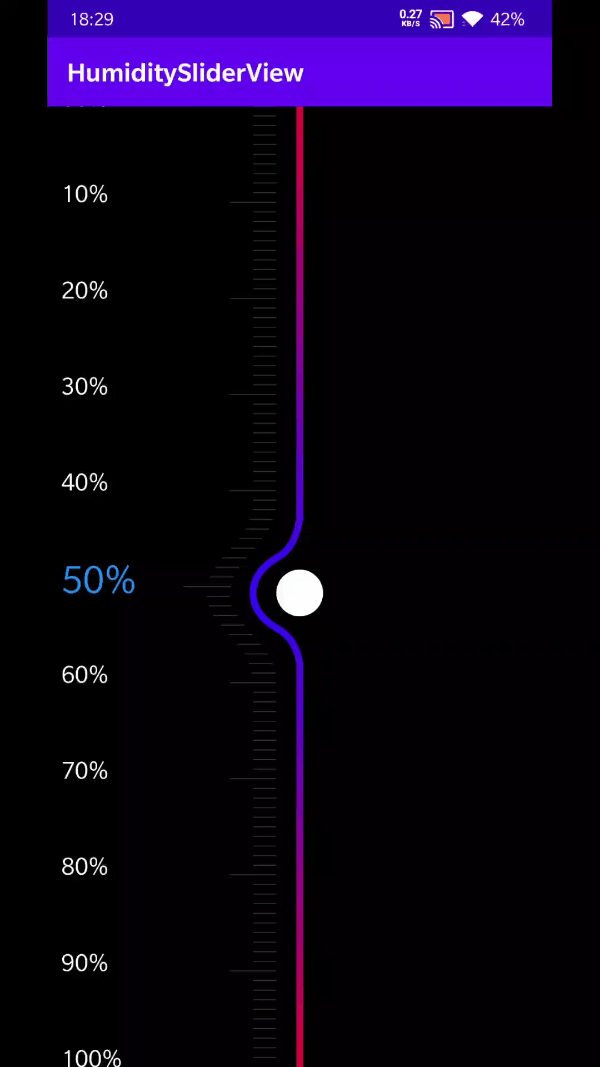
我在UI网站(https://uimovement.com/)上看到一张图片,大概是这样(https://uimovement.com/design/humidity-slider/),是一个湿度器,所以就萌生了自己做一个这个东西的想法,使用工具为Android定义View。
传送门(github)
https://github.com/GIOPPL/HumilitySlideView
目录
用法:
- xml
<?xml version="1.0" encoding="utf-8"?>
<RelativeLayout xmlns:android="http://schemas.android.com/apk/res/android"
    xmlns:app="http://schemas.android.com/apk/res-auto"
    xmlns:tools="http://schemas.android.com/tools"
    android:layout_width="match_parent"
    android:layout_height="match_parent"
    android:background="#000"
    tools:context=".MainActivity">

    <com.gioppl.humiditysliderview.SlideView
        android:id="@+id/sv_main"
        android:layout_marginTop="50dp"
        android:layout_marginBottom="50dp"
        android:layout_width="match_parent"
        android:layout_height="match_parent"
        app:buttonColor="#ffffff"
        app:lineStartColor="#ff0000"
        app:lineEndColor="#2F03F4"
        app:circleR="50"
        app:markColor="#383838"
        app:textColor="#ffffff"
        app:colorTextSelect="#2196F3"
        app:isRatio="true"
        app:normalMarkLength="50"
        app:specialMarkLength="100"
        app:markToLineMargin="50"/>

</RelativeLayout>
2.java
package com.gioppl.humiditysliderview;

import android.os.Bundle;
import android.util.Log;

import androidx.appcompat.app.AppCompatActivity;

public class MainActivity extends AppCompatActivity implements SlideView.ScrollCallBack {
    private SlideView sv_main;
    @Override
    protected void onCreate(Bundle savedInstanceState) {
        super.onCreate(savedInstanceState);
        setContentView(R.layout.activity_main);
        sv_main = findViewById(R.id.sv_main);
        sv_main.setScrollBack(this);
    }
    @Override
    public void scrollMove(int num) {

        Log.e("SLIDE_MOVE", String.valueOf(num));
    }
    @Override
    public void scrollUp(int num) {
        Log.e("SLIDE_UP", String.valueOf(num));
    }
}
自己撸代码
这个View主要包含,左边的文字显示,中间的刻度标尺,右边的可以变化的线,外加一个按钮,分开写。
1.自定义控件的参数
在编写之前,我们要确定其中的参数,包括颜色,数字,刻度大小等,新建一个attrs.xml放入values目录中,写入我们需要读取的参数。
<?xml version="1.0" encoding="utf-8"?>
<resources>
    <declare-styleable name="SlideView">
        <!--    按钮的颜色    -->
        <attr name="buttonColor" format="color"/>
        <!--   滑动线两端的颜色     -->
        <attr name="lineStartColor" format="color"/>
        <!--   滑动线中间的颜色    -->
        <attr name="lineEndColor" format="color"/>
        <!--   按钮的半径     -->
        <attr name="circleR" format="integer"/>
        <!--   刻度线的颜色     -->
        <attr name="markColor" format="color"/>
        <!--   文字的颜色     -->
        <attr name="textColor" format="color"/>
        <!--   文字被选中时候的颜色     -->
        <attr name="colorTextSelect" format="color"/>
        <!--   是否是百分比数     -->
        <attr name="isRatio" format="boolean"/>
        <!--   普通的刻度的长度     -->
        <attr name="normalMarkLength" format="float"/>
        <!--   十的倍数的刻度的长度     -->
        <attr name="specialMarkLength" format="float"/>
        <!--   刻度线和滑动线的距离     -->
        <attr name="markToLineMargin" format="float"/>
    </declare-styleable>
</resources>
2.我们要新建SlideView类,继承View
3.申明我们的属性
private float  height;//控件的高度
    private int divideNum;//文字的个数
    private int colorLineStart, colorLineEnd;//两端,中间的颜色
    private int colorMark;//刻度的颜色
    private int colorText, colorTextSelect;//文字,文字被选中之后的颜色
    private boolean isRatio;//文本是否带百分号
    private float normalMarkLength, specialMarkLength;//普通的刻度和为十的刻度的长度
    private float markToLineMargin;//刻度和滑动线之间的距离
    private int colorButton;//按钮的颜色
    private Context context;//上下文
    private Paint mPaintButton;//画按钮的画笔
    private Paint mPaintLine;//画线的画笔
    private Paint mPaintMark;//画刻度尺的画笔
    private Paint mPaintText;//画文本的画笔
    private Paint mPaintTest;//测试的画笔
    private Path mPathLine;//画滑动线的路径
    private float touchY;//本次滑动的坐标的Y值
    private float originalY;//前一次的View滑动的位置Y坐标,判断向上滑动还是向下滑动
    private String result;//返回的结果
    private int touchStatus = 0;//0为禁止,1为上滑动,2为下滑动
    private CircleBean btnCircle = new CircleBean(0, 0);//按钮的坐标位置和半径
    //定义的内部类
    public static class CircleBean {
        float x, y, r;

        public CircleBean(int x, int y) {
            this.x = x;
            this.y = y;
        }
    }
4.构造方法
用构造方法中TypedArray 来接收我们xml中定义参数的数值,这个部分很简单,就不用多说了
    public SlideView(Context context) {
        super(context);
    }

    public SlideView(Context context, @Nullable AttributeSet attrs) {
        super(context, attrs);
        this.context = context;
        initAttrs(attrs);
    }

    public SlideView(Context context, @Nullable AttributeSet attrs, int defStyleAttr) {
        super(context, attrs, defStyleAttr);
        this.context = context;
        initAttrs(attrs);
    }

    public SlideView(Context context, @Nullable AttributeSet attrs, int defStyleAttr, int defStyleRes) {
        super(context, attrs, defStyleAttr, defStyleRes);
        this.context = context;
        initAttrs(attrs);
    }

    private void initAttrs(AttributeSet attrs) {
        TypedArray typedArray = context.obtainStyledAttributes(attrs, R.styleable.SlideView);
        colorLineStart = typedArray.getColor(R.styleable.SlideView_lineStartColor, Color.WHITE);
        colorLineEnd = typedArray.getColor(R.styleable.SlideView_lineEndColor, Color.WHITE);
        colorButton = typedArray.getColor(R.styleable.SlideView_buttonColor, Color.WHITE);
        btnCircle.r = typedArray.getInt(R.styleable.SlideView_circleR, 100);
        colorMark = typedArray.getColor(R.styleable.SlideView_markColor, Color.WHITE);
        colorText = typedArray.getColor(R.styleable.SlideView_textColor, Color.WHITE);
        colorTextSelect = typedArray.getColor(R.styleable.SlideView_colorTextSelect, Color.BLUE);
        isRatio = typedArray.getBoolean(R.styleable.SlideView_isRatio, true);
        normalMarkLength = typedArray.getFloat(R.styleable.SlideView_normalMarkLength, 50);
        specialMarkLength = typedArray.getFloat(R.styleable.SlideView_specialMarkLength, 100);
        markToLineMargin = typedArray.getFloat(R.styleable.SlideView_markToLineMargin, 50);
        divideNum = 11;
        typedArray.recycle();//一定要回收
    }
5.初始化画笔
现在我们需要初始化我们的5个画笔,其中有一个是测试画笔,主要是为了画贝塞尔曲线的锚点,写完后可以删除。
private void initPaints() {
        //画按钮的画笔
        mPaintButton = new Paint();//初始化画笔
        mPaintButton.setColor(colorButton);//设置颜色,这个颜色在构造方法中已经从xml中接收
        mPaintButton.setAntiAlias(true);//设置抗锯齿
        mPaintButton.setDither(true);//设置防止抖动
        mPaintButton.setStyle(Paint.Style.FILL);//设置画笔是空心还是实心,FILL是实心,STROKE是空心
        mPaintButton.setStrokeWidth(5);//画笔的宽度
        mPaintButton.setPathEffect(new CornerPathEffect(10f));//设置path的样式,比如是实线还是虚线等
        //画滑动线的画笔
        mPaintLine = new Paint();
        mPaintLine.setColor(colorButton);
        mPaintLine.setAntiAlias(true);
        mPaintLine.setDither(true);
        mPaintLine.setStyle(Paint.Style.STROKE);
        mPaintLine.setStrokeWidth(15);
        mPaintLine.setPathEffect(new CornerPathEffect(10f));
        //设置颜色,这里设置的是镜像线性模式,两端颜色一样是colorLineStart,中间是colorLineEnd
        Shader shader = new LinearGradient(0, 0, btnCircle.x, btnCircle.y, colorLineStart, colorLineEnd, Shader.TileMode.MIRROR);
        mPaintLine.setShader(shader);
        //画测试点的画笔
        mPaintTest = new Paint();
        mPaintTest.setColor(Color.RED);//锚点我们设置红丝
        mPaintTest.setAntiAlias(true);
        mPaintTest.setDither(true);
        mPaintTest.setStyle(Paint.Style.STROKE);
        mPaintTest.setStrokeWidth(5);
        mPaintTest.setPathEffect(new CornerPathEffect(30f));
        //画刻度的画笔
        mPaintMark = new Paint();
        mPaintMark.setColor(colorMark);
        mPaintMark.setAntiAlias(true);
        mPaintMark.setDither(true);
        mPaintMark.setStyle(Paint.Style.STROKE);
        mPaintMark.setStrokeWidth(2);
        //画文本的画笔
        mPaintText = new Paint();
        mPaintText.setColor(colorText);
        mPaintText.setAntiAlias(true);
        mPaintText.setDither(true);
        mPaintText.setStyle(Paint.Style.FILL);
        mPaintText.setStrokeWidth(5);
        mPaintText.setTextSize(50);
    }
6.onLayout
这个初始化画笔在onLayout中设置,为什么呢?主要是其中的画线需要前后有颜色变化,所以要得中间的位置的Y信息,只有在这个方法中才可以得到。
    @Override
    protected void onLayout(boolean changed, int left, int top, int right, int bottom) {
        super.onLayout(changed, left, top, right, bottom);
        //初始化控件高度
        height = bottom;
        //设置按钮的xy值,默认按钮在中间
        btnCircle.x = (left + right) / 2.0f;
        btnCircle.y = (top + bottom) / 2.0f;
        //初始化画笔
        initPaints();
        //初始化按钮的Y位置为0,上一次Y位置为0
        touchY = 0;
        originalY = 0;
    }
7.onDraw
然后就是我们的主力onDraw方法了,我们在其中绘制所有的内容,下面我们会逐一讲解这些方法的使用
    @Override
    protected void onDraw(Canvas canvas) {
        super.onDraw(canvas);
        //绘制按钮
        canvas.drawCircle(btnCircle.x, btnCircle.y, btnCircle.r, mPaintButton);
        //绘制滑动的线
        drawLinePaths(canvas);
        //绘制刻度
        drawMark(canvas);
        //绘制文本
        drawText(canvas);
    }
8.绘制按钮
就很简单一行代码
//绘制按钮
canvas.drawCircle(btnCircle.x, btnCircle.y, btnCircle.r, mPaintButton);
画⚪,这里用自带的drawCircle方法,设置⚪的x,y,半径和画笔。
9.画线
在讲解画线前,我们需要知道两个概念,第一个就是安卓的坐标轴,第二个就是什么是贝塞尔曲线
安卓屏幕坐标轴(如图)

安卓的坐标轴以左上角为原点,向右为X轴,向下为Y轴,设x轴的最大值为w,y轴最大值为h,我们画的线要从坐标点(w/2,-50)开始,为什么要设置y为-50呢,可以这么考虑,如果滑倒控件的最上面的时候,那滑动线就乱了,大家可以试一下,y=-50大概如下

drawLinePaths(canvas);这是我们自定义的一个方法,作用是画滑动的线,这是其中有点复杂的部分,代码如下
private void drawLinePaths(Canvas canvas) {
mPathLine = new Path();
//将起始点移动到按钮的
mPathLine.moveTo(btnCircle.x, -50);
//在按钮前面的的3r处停下
mPathLine.lineTo(btnCircle.x, btnCircle.y - btnCircle.r * 3);
//第一条贝塞尔曲线
mPathLine.quadTo(btnCircle.x - btnCircle.r * 0.2f, btnCircle.y - btnCircle.r * 1.9f, btnCircle.x - btnCircle.r, btnCircle.y - btnCircle.r * 1.5f);
//第二条贝塞尔曲线
mPathLine.quadTo(btnCircle.x - 2 * btnCircle.r, btnCircle.y - btnCircle.r * 0.9f, btnCircle.x - btnCircle.r * 2, btnCircle.y);
//第三条贝塞尔曲线
mPathLine.quadTo(btnCircle.x - 2 * btnCircle.r, btnCircle.y + btnCircle.r * 0.9f, btnCircle.x - btnCircle.r, btnCircle.y + btnCircle.r * 1.5f);
//第四条贝塞尔曲线
mPathLine.quadTo(btnCircle.x - btnCircle.r * 0.2f, btnCircle.y + btnCircle.r * 1.9f, btnCircle.x, btnCircle.y + btnCircle.r + btnCircle.r * 2);
//把剩余的地方画直
mPathLine.lineTo(btnCircle.x, height);
//用画板画线
canvas.drawPath(mPathLine, mPaintLine);
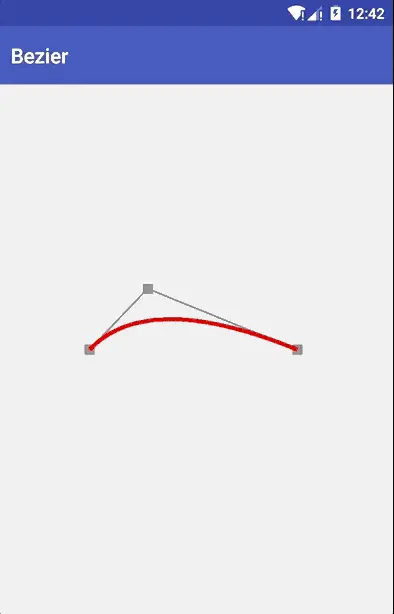
}首先我们要普及一下贝塞尔曲线的概念,贝塞尔曲线就是为了曲线更加的圆滑,看着顺眼,二阶贝塞尔曲线如图,贝塞尔曲线需要确定起始点,锚点,结束点,下图中间的可以挪动的点就是贝塞尔曲线的锚点,我们在安卓中的二阶贝塞尔曲线是用的Path类中的quadTo(float x1, float y1, float x2, float y2)方法,(x1,y1)是锚点的坐标,(x2,y2)是结束点的坐标。起始点的坐标要用其他方法设置,例如Path.moveTo(float x, float y)方法。
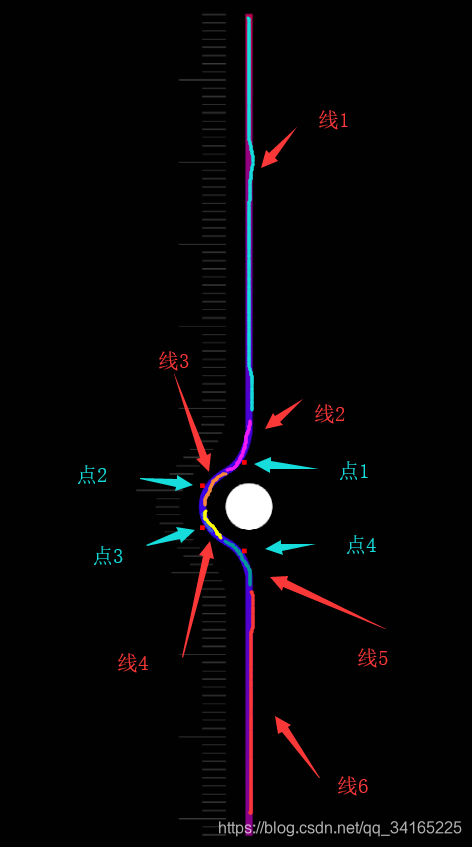
绘制可以滑动的线这个地方复杂就复杂在贝塞尔曲线的绘制,我们把曲线分成六段,如下图的不同颜色的线,第一条线和第六条线是直线,其余的是二阶贝塞尔曲线。四条贝塞尔曲线的锚点用绿色的箭头指示出来了,代码中的各种参数0.9f,1.9f,没错,这些都是我一点一点试出来的,不管怎么变化,相对位置不会变。
10.画刻度线drawMark(canvas);
先上代码
 private void drawMark(Canvas canvas) {
        int totalMarkNum = divideNum*10;//刻度总个数
        float everyMarkHeight = height / totalMarkNum;//每个的高度
        int a = 0;//计数器,计数看是否是等于10,等于5的刻度
        //Path的各种方法
        PathMeasure pathMeasure = new PathMeasure(mPathLine, false);
        float[] pos = new float[2];//位置
        float[] tan = new float[2];//正切值
        for (int i = -2; i < totalMarkNum; i++, a++) {
            pathMeasure.getPosTan(height / totalMarkNum * (i+5), pos, tan);
            float x = pos[0];//获取他的X位置
            if (a != 5 && a != 10) {//一般的刻度
                canvas.drawLine(x - markToLineMargin - normalMarkLength, i * everyMarkHeight, x -  markToLineMargin , i * everyMarkHeight, mPaintMark);
            } else if (a == 5) {//=5,没设置,和一般刻度一样
                canvas.drawLine(x - markToLineMargin - normalMarkLength, i * everyMarkHeight, x -  markToLineMargin, i * everyMarkHeight, mPaintMark);
            } else {//=10,画长一点的线
                canvas.drawLine(x - markToLineMargin - specialMarkLength, i * everyMarkHeight, x -  markToLineMargin , i * everyMarkHeight, mPaintMark);
                a = 0;
            }
        }
    }
画刻度主要的难点就是在曲线弯曲的地方,我们先把屏幕分成若干个部分,然后就循环画直线,直线很简单,canvas.drawLine方法就可以搞定,但是,现在必须要在曲线弯曲的地方刻度同时弯曲,这就要用到一个类PathMeasure.getPosTan(float distance, float pos[], float tan[])第一个参数是distance,表示曲线的距离,我们直接用每一个小刻度乘以当前的绘制进度i就可以得到了,pos是位置数组,pos[0]为该distance的x值,pos[1]是该distance的y值。tan是正切值,我们暂时用不到,对了,在PathMeasure 类初始化的时候要传入我们的滑动线的path,然后所有计算的都是该path中的数据。
11.绘制文本drawText(canvas);
在绘制文本之前,我们需要有两个处理方法,一个是文字处理方法,这个方法作用是判断在拖动到0的时候不会显示00或者00%,代码如下
    //i是我们拖动的进度,tail是尾巴,尾巴就是是否加百分号
    private String handleText(int i,String tail){
        String s=i+tail;
        if (s.equals("00")||s.equals("00%")){
            s=s.replaceFirst("00","0");
        }
        return s;
    }
第二个方法就是设置文字样式,我们在拖动的时候,选中的部分要放大处理且需要不同的颜色,代码如下
    //第一个参数是是否放大
    private void setTextPaintStyle(boolean isEnlarge){
        if (isEnlarge){//如果放大,设置颜色和文本大小
            mPaintText.setColor(colorTextSelect);
            mPaintText.setTextSize(80);
        }else {
            mPaintText.setColor(colorText);
            mPaintText.setTextSize(50);
        }
    }
接下来就是我们绘制文字的部分,先上代码
private void drawText(Canvas canvas) {
//解析率,
float resolutionRation = 100;
int totalTextNum = divideNum;//共有多少个文字
float everyTextHeight = height / totalTextNum;//每个十的整数的高度
float everyMarkHeight = everyTextHeight / 10;//每个小的刻度的高度
String normalTail;//正常的文字尾巴,尾巴的作用是是否带百分号
String enlargeTail;//放大的文字尾巴
if (isRatio) {//是否带百分号
normalTail = "0%";
enlargeTail = "%";
} else {
normalTail = "0";
enlargeTail = "";
}
for (int i = 0; i <= totalTextNum; i++) {
//这个height不是屏幕高度,是我们文字绘制的高度,就是在y的哪里绘制
//-16是我自己调出来的,别问我为什么,-16好看
float height = i * everyTextHeight - 16;
if (touchStatus == 0) {//静止
canvas.drawText(handleText(i,normalTail), 30, height, mPaintText);
} else if (touchStatus == 1) {//上滑动
if ((height) > btnCircle.y - resolutionRation && (height) < btnCircle.y + resolutionRation) {//正常绘制
//放大绘制
setTextPaintStyle(true);
int g = (int) (btnCircle.y / everyMarkHeight)+2;
result=g + enlargeTail;
canvas.drawText(g + enlargeTail, 30, btnCircle.y+20, mPaintText);
} else {
//正常绘制
setTextPaintStyle(false);
canvas.drawText(handleText(i,normalTail), 30, height, mPaintText);
}
} else {//下滑动
if ((height) > btnCircle.y - resolutionRation && (height) < btnCircle.y + resolutionRation) {//正常绘制
//放大绘制
setTextPaintStyle(true);
int g= (int) (btnCircle.y/everyMarkHeight)+2;
result=g + enlargeTail;
canvas.drawText(g + enlargeTail, 30, btnCircle.y+20, mPaintText);
} else {
//正常绘制
setTextPaintStyle(false);
canvas.drawText(handleText(i,normalTail), 30, height, mPaintText);
}
}
}
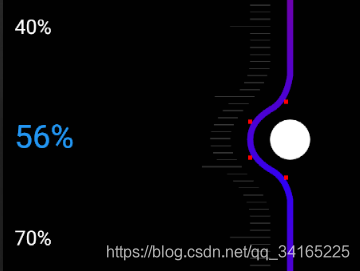
}几个名词解释,解析率resolutionRation,这个就是我们放大的文字的附近,不允许其他文字,如下图,我们在56%的时候旁边的50%,60%全都不绘制,解析率越大,说明不可绘制的范围更大。
touchStatus 这个是的作用是表示滑动状态,0为静止,1为上滑动,2为下滑动。关于这个变量的赋值,先留一个坑,后面再说。
g是个位数,在放大绘制的时候,才会有个位数的存在,一般都是10的倍数,比如10,20,30....g的赋值是我们的按钮的位置y值除以每一个刻度的高度+2,+2也是我调出来的,没有为什么,+2才是最准确的数字。
12.滑动事件onTouchEvent
先上代码
 @Override
    public boolean onTouchEvent(MotionEvent event) {
        //获取滑动的Y值,减去按钮的半径,保存
        touchY = event.getY() - btnCircle.r;
        //如果这一次的Y值比上一次的Y值大,说明是上滑动,反之下滑动
        if ((touchY - originalY) > 0) {
            touchStatus = 2;//上滑动
        } else {
            touchStatus = 1;//下滑动
        }
        //这次的Y值赋值给上一次的Y值,保存
        originalY = touchY;
        switch (event.getAction()) {
            case MotionEvent.ACTION_DOWN://按下

                break;
            case MotionEvent.ACTION_MOVE://滑动
                btnCircle.y = touchY;
                invalidate();
                //回调接口,移动回调
                if (result!=null){
                    if (result.charAt(result.length()-1)=='%'){
                        result=result.substring(0,result.length()-1);
                        scrollBack.scrollMove(Integer.parseInt(result));
                    }else {
                        scrollBack.scrollMove(Integer.parseInt(result));
                    }
                }
                break;
            case MotionEvent.ACTION_UP://松开
                //回调接口,松开回调
                if (result!=null){
                    if (result.charAt(result.length()-1)=='%'){
                        result=result.substring(0,result.length()-1);
                        scrollBack.scrollUp(Integer.parseInt(result));
                    }else {
                        scrollBack.scrollUp(Integer.parseInt(result));
                    }
                }
                break;
        }
        //返回true,说明这个控件消费了该事件
        return true;
    }
onTouchEvent是系统的滑动事件,我们复写这个方法即可,返回值是true则说明我们这个控件消费了该事件,事件不会网上层的ViewGroup传送,我们在滑动事件传过来的时候,分辨这个事件的状态,分别为按下(MotionEvent.ACTION_DOWN),滑动(MotionEvent.ACTION_MOVE),松开(MotionEvent.ACTION_UP)。在上面挖的touchStatus的坑,我们在这里补上,如果上一次事件的Y值小于这次的事件的Y值则说明我们在上滑动,反之为下滑动。我们在移动的时候给btnCircle赋值,并且通过 invalidate();方法来进行刷新界面操作。
回调接口是我们在滑动这个控件的时候得到的值信息,scrollMove是滑动回调,scrollUp是松开回调,这个是最终的结果
    //本类中的回调
    private ScrollCallBack scrollBack;
    //设置回调
    public void setScrollBack(ScrollCallBack scrollBack) {
        this.scrollBack = scrollBack;
    }
    //回调接口的类
    public interface ScrollCallBack {
        void scrollMove(int num);
        void scrollUp(int num);
    }
我们在onTouchEvent方法中设置该回调的结果,把字符串去除%然后强转成整数,回调给调用该控件的Avtivity。还记得这个result值是怎么得来的嘛?在drawText方法中,只要这个文字放大了,就认定这个就是result。

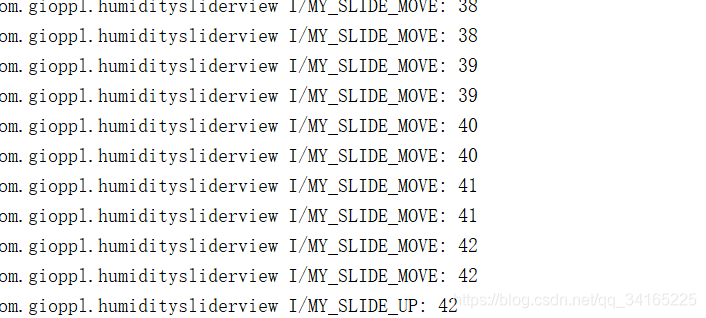
我们打印日志信息查看得到的结果,可以看到,滑动的时候在不停的打印信息,在松开的时候就打印了一个信息42。
至此,该控件已经完成,如果对你有帮助,please 一件三连。。。不是B站,那就