数据库连接池
-
概念
其实就是一个容器(集合),存放数据库连接的容器。
当系统初始化好后,容器被创建,容器中会申请一些连接对象,当用户来访问数据库时,从容器中获取连接对象,用户访问完之后,会将连接对象归还给容器。 -
好处
- 节约资源
- 用户访问高效
-
实现
- 标准接口:DataSource javax.sql包下的
方法:
获取连接:getConnection()
归还连接:Connection.close()。如果连接对象Connection是从连接池中获取的,那么调用Connection.close()方法,则不会再关闭连接了。而是归还连接 - 一般我们不去实现它,有数据库厂商来实现
- C3P0:数据库连接池技术
- Druid:数据库连接池实现技术,由阿里巴巴提供的
- 标准接口:DataSource javax.sql包下的
C3P0使用实例
步骤
1.导入jar包(两个)这里我是:c3p0-0.9.5.2.jar mchange-commons-java-0.2.12.jar(数据库驱动jar包也不要忘记)
2.定义配置文件
名称:c3p0.properties 或者 c3p0-config.xml(这里的配置文件名称是规定的,不能自定义名字)
路径:直接将文件放在src目录下
Demo
package demo_jdbcpool;

import com.mchange.v2.c3p0.ComboPooledDataSource;

import javax.sql.DataSource;
import java.sql.Connection;
import java.sql.PreparedStatement;
import java.sql.ResultSet;
import java.sql.SQLException;

public class c3p0_demo {
    public static void main(String[] args){
        Connection conn = null;
        PreparedStatement pst=null;
        ResultSet rs =null;
        try {
            //新建数据库连接池对象
            DataSource ds=new ComboPooledDataSource();
            conn = ds.getConnection();
            //定义sql语句
            String sql="SELECT * FROM account";
            //创建sql执行对象
            pst = conn.prepareStatement(sql);
            rs = pst.executeQuery();
            while(rs.next()){
                int id = rs.getInt("id");
                String name = rs.getString("NAME");
                double balance = rs.getDouble("balance");
                System.out.println("id:"+id+"name:"+name+"balance"+balance);
            }
        } catch (SQLException throwables) {
            throwables.printStackTrace();
        }finally {
            if(rs!=null){
                try {
                    rs.close();
                } catch (SQLException throwables) {
                    throwables.printStackTrace();
                }
            }
            if(pst!=null){
                try {
                    pst.close();
                } catch (SQLException throwables) {
                    throwables.printStackTrace();
                }
            }
            if(conn!=null){
                try {
                    conn.close();
                } catch (SQLException throwables) {
                    throwables.printStackTrace();
                }
            }
        }

    }
}
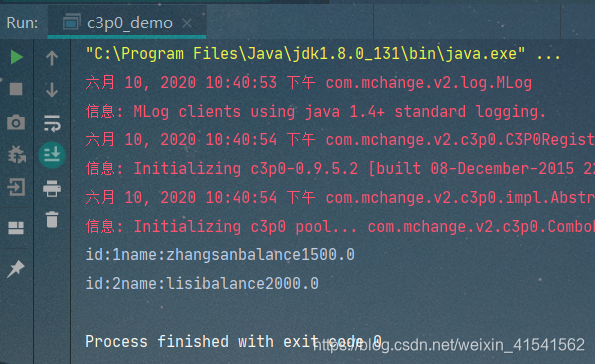
结果

Druid使用实例
步骤
1.导入jar包 这里我是:druid-1.0.9.jar
2.定义配置文件
可以叫任意名称的properties,可以放在任意目录下
demo
package demo_jdbcpool;

import com.alibaba.druid.pool.DruidDataSourceFactory;
import com.mysql.jdbc.jdbc2.optional.MysqlDataSourceFactory;

import javax.sql.DataSource;
import java.io.IOException;
import java.sql.Connection;
import java.sql.PreparedStatement;
import java.sql.ResultSet;
import java.sql.SQLException;
import java.util.Properties;

public class Druid_demo {
    public static void main(String[] args){
        Connection conn = null;
        PreparedStatement pst=null;
        ResultSet rs =null;
        try {
            Properties pro=new Properties();
            pro.load(Druid_demo.class.getClassLoader().getResourceAsStream("druid.properties"));
            //新建数据库连接池对象
            DataSource ds=DruidDataSourceFactory.createDataSource(pro);
            conn = ds.getConnection();
            //定义sql语句
            String sql="SELECT * FROM account";
            //创建sql执行对象
            pst = conn.prepareStatement(sql);
            rs = pst.executeQuery();
            while(rs.next()){
                int id = rs.getInt("id");
                String name = rs.getString("NAME");
                double balance = rs.getDouble("balance");
                System.out.println("id:"+id+"name:"+name+"balance"+balance);
            }
        } catch (Exception e) {
            e.printStackTrace();
        }finally {
            if(rs!=null){
                try {
                    rs.close();
                } catch (SQLException throwables) {
                    throwables.printStackTrace();
                }
            }
            if(pst!=null){
                try {
                    pst.close();
                } catch (SQLException throwables) {
                    throwables.printStackTrace();
                }
            }
            if(conn!=null){
                try {
                    conn.close();
                } catch (SQLException throwables) {
                    throwables.printStackTrace();
                }
            }
        }

    }
}
结果

实现Drudi的JDBCUtils工具类
package demo_jdbcpool.Utils;

import com.alibaba.druid.pool.DruidDataSourceFactory;

import javax.sql.DataSource;
import java.io.IOException;
import java.sql.Connection;
import java.sql.ResultSet;
import java.sql.SQLException;
import java.sql.Statement;
import java.util.Properties;

public class JDBCUtils {
    private static DataSource ds;
    static{
        try {
            Properties pro=new Properties();
            pro.load(JDBCUtils.class.getClassLoader().getResourceAsStream("druid.properties"));
            ds= DruidDataSourceFactory.createDataSource(pro);
        } catch (IOException e) {
            e.printStackTrace();
        } catch (Exception e) {
            e.printStackTrace();
        }
    }
    //获取数据库连接
    public static Connection getconnection() throws SQLException {
        return ds.getConnection();
    }
    //回收资源
    public static void close(Statement st,Connection conn){
        close(null,st,conn);
    }
    public static void close(ResultSet rs,Statement st,Connection conn){
        if(rs!=null){
            try {
                rs.close();
            } catch (SQLException throwables) {
                throwables.printStackTrace();
            }
        }
        if(st!=null){
            try {
                st.close();
            } catch (SQLException throwables) {
                throwables.printStackTrace();
            }
        }
        if(conn!=null){
            try {
                conn.close();
            } catch (SQLException throwables) {
                throwables.printStackTrace();
            }
        }
    }
    //获取连接池
    public static DataSource getDataSource(){
        return  ds;
    }
}
结合JDBCUtils工具类的Druid实例
package demo_jdbcpool;


import demo_jdbcpool.Utils.JDBCUtils;

import java.sql.Connection;
import java.sql.PreparedStatement;
import java.sql.ResultSet;

public class Druid_demo {
    public static void main(String[] args){
        Connection conn = null;
        PreparedStatement pst=null;
        ResultSet rs =null;
        try {
            //新建数据库连接池对象
            conn = JDBCUtils.getconnection();
            //定义sql语句
            String sql="INSERT INTO account VALUES(null,?,?)";
            //创建sql执行对象
            pst = conn.prepareStatement(sql);
            pst.setString(1,"wangwu");
            pst.setDouble(2,3000);
            int re = pst.executeUpdate();
            System.out.println(re);
        } catch (Exception e) {
            e.printStackTrace();
        }finally {
            JDBCUtils.close(pst,conn);
        }

    }
}
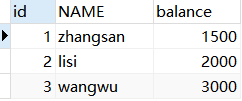
结果


Spring JDBC
Spring框架对JDBC的简单封装。提供了一个JDBCTemplate对象简化JDBC的开发
步骤
1.导入jar包
2.创建JdbcTemplate对象。依赖于数据源DataSource
JdbcTemplate template = new JdbcTemplate(ds);
3.调用JdbcTemplate的方法来完成CRUD的操作
update():执行DML语句。增、删、改语句

queryForMap():查询结果将结果集封装为map集合,将列名作为key,将值作为value 将这条记录封装为一个map集合(**注意:这个方法查询的结果集长度只能是1**)

queryForList():查询结果将结果集封装为list集合(**注意:将每一条记录封装为一个Map集合,再将Map集合装载到List集合中**)

query():查询结果,将结果封装为JavaBean对象
	query的参数:RowMapper
	一般我们使用BeanPropertyRowMapper实现类。可以完成数据到JavaBean的自动封装
	new BeanPropertyRowMapper<类型>(类型.class)

queryForObject:查询结果,将结果封装为对象
(一般用于聚合函数的查询)
练习Demo
package demo_jdbcpool;

import demo_jdbcpool.Utils.JDBCUtils;
import org.junit.Test;
import org.springframework.jdbc.core.BeanPropertyRowMapper;
import org.springframework.jdbc.core.JdbcTemplate;

import java.util.List;
import java.util.Map;

public class template_demo {
    //这里利用JDBCUtils工具类,获取datasource
    //1. 修改1号数据的 salary 为 10000
    @Test
    public void test1(){
        JdbcTemplate template=new JdbcTemplate(JDBCUtils.getDataSource());
        String sql="UPDATE emp SET salary=10000 WHERE id=?";
        int re = template.update(sql, 1001);
        System.out.println(re);
    }
    //2. 添加一条记录
    @Test
    public void test2(){
        JdbcTemplate template=new JdbcTemplate(JDBCUtils.getDataSource());
        String sql="INSERT INTO emp(id,ename,job_id) VALUES(?,?,?)";
        int re = template.update(sql, 1015, "张三", 4);
        System.out.println(re);
    }
    //3. 删除刚才添加的记录
    @Test
    public void test3(){
        JdbcTemplate template=new JdbcTemplate(JDBCUtils.getDataSource());
        String sql="DELETE FROM emp WHERE id=?";
        int re = template.update(sql, 1015);
        System.out.println(re);
    }
    //4. 查询id为1的记录,将其封装为Map集合
    @Test
    public void test4(){
        JdbcTemplate template=new JdbcTemplate(JDBCUtils.getDataSource());
        String sql="SELECT * FROM emp WHERE id=?";
        Map<String, Object> map = template.queryForMap(sql, 1001);
        System.out.println(map);
    }
    //5. 查询所有记录,将其封装为List
    @Test
    public void test5(){
        JdbcTemplate template=new JdbcTemplate(JDBCUtils.getDataSource());
        String sql="SELECT * FROM emp";
        List<Map<String, Object>> maps = template.queryForList(sql);
        for (Map<String, Object> map : maps) {
            System.out.println(map);
        }
    }
    //6. 查询所有记录,将其封装为Emp对象的List集合
    @Test
    public void test6(){
        JdbcTemplate template=new JdbcTemplate(JDBCUtils.getDataSource());
        String sql="SELECT * FROM emp";
        List<emp> query = template.query(sql, new BeanPropertyRowMapper<emp>(emp.class));
        for (emp e : query) {
            System.out.println(e);
        }
    }
    //7. 查询总记录数
    @Test
    public void test7(){
        JdbcTemplate template=new JdbcTemplate(JDBCUtils.getDataSource());
        String sql="SELECT COUNT(id) FROM emp";
        Integer re = template.queryForObject(sql, int.class);
        System.out.println(re);
    }
}