k8s部署archery1.7.9总结与详细演示
最后更新:20200415 愿祖国繁荣富强,人民安居乐业
本文总结在centos7中用k8s安装部署archery及其中间件goinception与inception的考虑与方案,这里先将archery打镜像并修改配置文件跑起来,然后将依赖中间件goinception与inception都重打镜像(覆盖修改配置文件)并调试测试好;
archery项目是一个django2的web项目,根目录下有django配置文件settings.py,里面有配置项目本身使用的mysql、redis以及ldap,这里我们将这三个的配置信息都用k8s的deployment文件的env环境变量传给配置文件,配置文件导了os库,用os.environ()方法就可以获取这些变量,这里将部分修改settings.py文件;
因为之前没有使用过k8s,踩了很多坑,可能接下来又会去做别的事情,为了记录反思,并给更多人带来方便,这里会不吝笔墨将尽可能多的细节记录下来。
文章目录
1.方案总结
现在最新的archery版本为1.7.8,因为需要自定义setting.py文件,所以需要在archery:1.7.8的基础上重新打镜像,试错的过程中发现nginx.conf给的用户是nginx用户不是root用户,部署后nginx用户没权限读取静态文件,导致前端失效,因此nginx.conf也重新修改拷贝替换。
mysql和redis库都是机子本身安装好的,生产上使用的是已经有的库,直接deployment env配置一个值就好了。
| 项目 | key | value |
|---|---|---|
| centos7 | ip | 192.168.255.133 |
| mysql | root | adqwe123 |
| redis | requirepass | adqwe123 |
| ldap | ad域ip | 192.168.255.222 |
2.mysql、redis处理
2.1.mysql
允许任意ip用root访问虚机mysql数据库,这样宿主机可以访问虚拟机mysql数据库;
 mysql>GRANT ALL PRIVILEGES ON *.* TO 'root'@'%' IDENTIFIED BY 'adqwe123' WITH GRANT OPTION;
 mysql>flush privileges;
// 其中各字符的含义:
// *.* 对任意数据库任意表有效
// "root" "adqwe123" 是数据库用户名和密码
// '%' 允许访问数据库的IP地址,%意思是任意IP,也可以指定IP
// flush privileges 刷新权限信息
数据库迁移与数据初始化,超级管理员创建
【此处需准备的操作】虚拟机数据库创建一个数据库archery_local,/opt/下放从github或gitee下载的最新的archery包,改名为archery,调整结构如下

# 先驱检查
which mysql_config #确认命令在 $PATH 中,否则安装包时报错【有问题卸载python重装】
# 根据requirements.txt文件创建项目的虚拟环境venv4archery
pip3 install virtualenv -i http://pypi.douban.com/simple/ --trusted-host pypi.douban.com
cd /opt/
virtualenv venv4archery --python=python3
source /opt/venv4archery/bin/activate
# 注释掉requirements文件pyodbc
sudo yum install epel-release
sudo yum install python-pip
sudo yum install gcc-c++
sudo yum install python-devel
sudo yum install unixODBC-devel
sudo pip install pyodbc
# 先安装以上 再单独安装yum installpyodbc
pip3 install -r /opt/archery/requirements.txt -i http://pypi.douban.com/simple/ --trusted-host pypi.douban.com
# 修改/opt/archery/arcehry/settings.py
mysql数据库那里把库名改成你创建的,连接信息改一下,下一步就利用manage.py在创建的库中生成表格和初始化数据
# 数据库迁移
python3 manage.py makemigrations sql
python3 manage.py migrate
# 数据初始化
python3 manage.py dbshell<sql/fixtures/auth_group.sql
python3 manage.py dbshell<src/init_sql/mysql_slow_query_review.sql
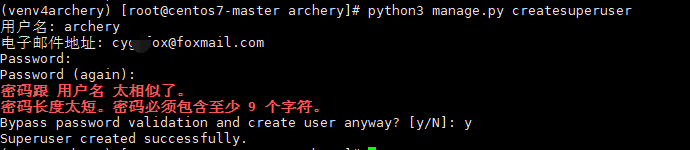
# 创建管理用户
python3 manage.py createsuperuser
数据库迁移截图

创建超管截图
[
2.2.redis
检查下/etc/redis.conf的密码与network设置,后重启redis服务systemctl restart redis;
requirepass adqwe123
bind 0.0.0.0
细节介绍:这一段说的很清楚,默认情况下,如果未指定bind配置指令,则redis将侦听服务器上所有可用网络接口的连接。或者写成bind 0.0.0.0,任意网络都可以访问redis,这样主机就可以访问虚机redis了,可以用redis-desktop测试一下能不能连接的上;
################################## NETWORK #####################################

# By default, if no "bind" configuration directive is specified, Redis listens
# for connections from all the network interfaces available on the server.
# It is possible to listen to just one or multiple selected interfaces using
# the "bind" configuration directive, followed by one or more IP addresses.
#
# Examples:
#
bind 0.0.0.0
#
# ~~~ WARNING ~~~ If the computer running Redis is directly exposed to the
# internet, binding to all the interfaces is dangerous and will expose the
# instance to everybody on the internet. So by default we uncomment the
# following bind directive, that will force Redis to listen only into
# the IPv4 lookback interface address (this means Redis will be able to
# accept connections only from clients running into the same computer it
# is running).
#
# IF YOU ARE SURE YOU WANT YOUR INSTANCE TO LISTEN TO ALL THE INTERFACES
# JUST COMMENT THE FOLLOWING LINE.
# ~~~~~~~~~~~~~~~~~~~~~~~~~~~~~~~~~~~~~~~~~~~~~~~~~~~~~~~~~~~~~~~~~~~~~~~~
宿主机用redis-desktop测试虚机的redis可以访问的到不

可以

3.archery-k8s部署
3.1.本地先拉取好镜像
docker pull hhyo/archery:1.7.8
docker pull hanchuanchuan/goinception:latest
archery自己又会去拉一个hhyo/archery-base:1.2的镜像,这个我们不用管;
如果拉取镜像速度慢,去给docker配置一个阿里源;
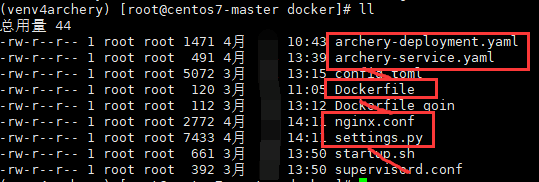
3.2.修改settings.py、nginx.conf
位置:/opt/archery/src/docker
包含文件:
archery-deployment.yaml 下面给出
archery-service.yaml 下面给出
Dockerfile 下面给出
nginx.conf 项目源文件夹下有,只修改了一行user root; # root用户
settings.py /opt/archery/archery/settings.py拷贝过来的,修改部分下面列出,其他远文件夹下问价均不需要
startup.py 默认没动,下面deployemt文件调用
settings.py 修改的部分
import json		# 导入json包,用来将deployment文件中env传进来的字符串转换为json赋值给AUTH_LDAP_USER_ATTR_MAP变量,是ldap使用的,用来从ad域中将登录的ldap用户的信息映射为archery项目数据库中sql_user表中的对应字段

SECRET_KEY = 'zzzsaf255ot#7)fkw!id6axd(cv0@opwaafx7n#9=7d%x^hpl0'		# 项目创建时候默认的key,修改下

# 该项目本身的mysql数据库地址
DATABASES = {
    'default': {
        'ENGINE': 'django.db.backends.mysql',
        'NAME': 'archery_local',
        'USER': 'root',
        'PASSWORD': os.environ['MYSQL_PWD'],
        'HOST': os.environ['MYSQL_HOST'],
        'PORT': '3306',
        'OPTIONS': {
            'init_command': "SET sql_mode='STRICT_TRANS_TABLES'",
            'charset': 'utf8mb4'
        },
        'TEST': {
            'NAME': 'test_archery',
            'CHARSET': 'utf8mb4',
        },
    }
}

# 缓存配置
CACHES = {
    "default": {
        "BACKEND": "django_redis.cache.RedisCache",
        "LOCATION": os.environ['REDIS_LOCATION1'],
        "OPTIONS": {
            "CLIENT_CLASS": "django_redis.client.DefaultClient",
            "PASSWORD": os.environ['REDIS_PWD'],
        }
    },
    "dingding": {
        "BACKEND": "django_redis.cache.RedisCache",
        "LOCATION": os.environ['REDIS_LOCATION2'],
        "OPTIONS": {
            "CLIENT_CLASS": "django_redis.client.DefaultClient",
            "PASSWORD": os.environ['REDIS_PWD'],
        }
    }
}

# LDAP配置
ENABLE_LDAP = os.environ['LDAP_FLAG']		# ENABLE_LDAP是否开启ldap由deployment传值决定
if ENABLE_LDAP:
    import ldap
    from django_auth_ldap.config import LDAPSearch

    AUTHENTICATION_BACKENDS = (
        'django_auth_ldap.backend.LDAPBackend',  # 配置为先使用LDAP认证,如通过认证则不再使用后面的认证方式
        'django.contrib.auth.backends.ModelBackend',  # django系统中手动创建的用户也可使用,优先级靠后。注意这2行的顺序
    )
    # ldap的连接基础配置
    AUTH_LDAP_SERVER_URI = os.environ['AUTH_LDAP_SERVER_URI']    # ad server address
    AUTH_LDAP_BIND_DN = os.environ['AUTH_LDAP_BIND_DN']    # dn
    AUTH_LDAP_BIND_PASSWORD = os.environ['AUTH_LDAP_BIND_PASSWORD']    # admin pwd
    # 允许认证用户的路径
    LDAP_SCBASE = os.environ['LDAP_SCBASE']    # search base
    AUTH_LDAP_USER_SEARCH = LDAPSearch(LDAP_SCBASE, ldap.SCOPE_SUBTREE, os.environ['LDAP_FILTER'])
    # 同步设置
    AUTH_LDAP_ALWAYS_UPDATE_USER = True  # 每次登录从ldap同步用户信息
    AUTH_LDAP_USER_ATTR_MAP = json.loads(os.environ['AUTH_LDAP_USER_ATTR_MAP'])
nginx.conf只修改了用户
user root; # root用户
3.3.打镜像,将修改的文件拷贝到源镜像作用位置
作用位置是怎么知道的呢? 试错:先跑起来一个原始的镜像,kubectl exec -it 容器名 sh进容器去看一下;

因此,我们的Dockerfile这么写,注意COPY命令有一个上下文的概念,如果拷贝的文件目录不正确,打包镜像的时候会一直报文件找不到
FROM hhyo/archery:1.7.8
WORKDIR /opt/archery/archery
COPY settings.py /opt/archery/archery/
COPY nginx.conf /etc/nginx/
如果打算修改相关文档,/opt/archery/docs/下有个docs.md,自定义后放到与Dockerfile同目录下,打镜像的时候会将文件拷贝进去COPY docs.md /opt/archery/docs/;
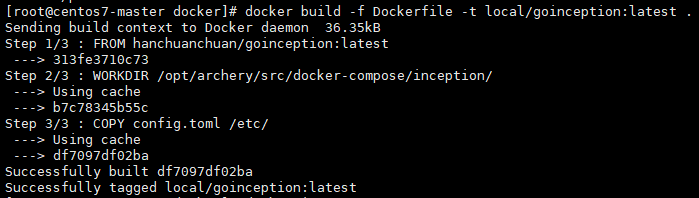
打镜像:
docker build -f Dockerfile -t local/archery:1.7.8 .

下一步写好部署文件和服务文件就可以应用部署和创建archery服务了
3.4.k8s部署文件与部署
命名空间为archery,部署文件为archery-deployment.yaml,src服务文件为archery-service.yaml
关于ldap登录的,如果不需要的话deployment也可以这么写,LDAP_FLAG传一个"False"就好了,ldap的我会单独再写文章模拟根据excel文件创建OU树、通过389非安全连接批量创建用户,而修改AD域用户初始密码会在server2019直接跑powershell脚本
archery-deployment.yaml
apiVersion: apps/v1
kind: Deployment
metadata:
  name: archery
  namespace: archery
  labels:
    app: archery
spec:
  replicas: 1
  selector:
    matchLabels:
      app: archery
  template:
    metadata:
      labels:
        app: archery
    spec:
      containers:
      - command:
        - /opt/archery/src/docker/startup.sh
        env:
        - name: NGINX_PORT
          value: "9123"
        - name: MYSQL_HOST
          value: "192.168.255.133"
        - name: MYSQL_PWD
          value: "adqwe123"
        - name: REDIS_PWD
          value: "adqwe123"
        - name: REDIS_LOCATION1
          value: "redis://192.168.255.133:6379/0"
        - name: REDIS_LOCATION2
          value: "redis://192.168.255.133:6379/1"
        - name: LDAP_FLAG
          value: "True"
        - name: AUTH_LDAP_SERVER_URI
          value: "ldap://192.168.255.222:389"
        - name: AUTH_LDAP_BIND_DN
          value: "CN=Administrator,CN=Users,DC=bilibili,DC=com"
        - name: AUTH_LDAP_BIND_PASSWORD
          value: "QQqq#123"
        - name: LDAP_SCBASE
          value: "DC=bilibili,DC=com"
        - name: LDAP_FILTER
          value: "(&(objectClass=person)(sAMAccountName=%(user)s))"
        - name: AUTH_LDAP_USER_ATTR_MAP
          value: '{"username": "sAMAccountname","display": "displayName","email": "mail","first_name": "givenName","last_name": "sn"}'
        image: local/archery:1.7.8
        name: archery
        ports:
        - containerPort: 9123
        envirment:
      restartPolicy: Always
archery-service.yaml
apiVersion: v1
kind: Service
metadata:
  name: archery
  namespace: archery
  labels:
    app: archery
spec:
  selector:
    app: archery
  ports:
  - name: archery-port
    protocol: TCP
    port: 9123          # 集群内的其他容器组可通过9123端口访问Service
    nodePort: 32600     # 通过任意节点的32600端口访问Service
    targetPort: 9123    # 将请求转发到匹配Pod的9123端口
  type: NodePort        # Serive的类型,ClusterIP/NodePort/LoaderBalancer
执行命令为
kubectl apply -f archery-deployment.yaml
kubectl get pod -n archery					# 查询命名空间archery中的容器列表
kubectl describe pod archery-56dc5b8879-wnj8v -n archery		# 查看容器是不是正常运行
kubectl exec -it archery-56dc5b8879-wnj8v -n archery sh			# 进入容器内部
kubectl logs -f archery-56dc5b8879-wnj8v -n archery				# 查看容器日志,主要在出错时候用
例如这个例子中,第一个archery实例正常运行,第二个状态是终止中(是某一次删容器出错了,一直挂在那里)

进入容器内部,我们可以看到结构
项目在/opt/目录下的archery文件夹,venv4archery是项目脚本中创建的python项目虚拟环境,里面会有python项目所需要的依赖,如果想在此处执行到dajngo的命令可以source /opt/venv4archery/bin/activate

查看容器日志,这里是前两天跑成功后没动过,在文章最后将单独留一节用来展示遇到的错误、截图、原因、如何排查。

4.goinception-k8s重打镜像与部署
先将源goinception的配置文件修改,这里主要将enable_drop_database、enable_drop_table改成false,修改了备份库信息backup_host、backup_port、backup_user、backup_password。【archery前端测试通过并不代表俩inception就配置好了,需要提交sql走一遍流程测试下】
# TiDB Configuration.

# TiDB server host.
host = "0.0.0.0"

# tidb server advertise IP.
advertise_address = ""

# TiDB server port.
port = 4000

# path = ""

[inc]
check_autoincrement_datatype            =true
check_autoincrement_init_value          =true
check_autoincrement_name                =true
check_column_comment                    =true
check_column_default_value              =true
check_column_position_change            =true
check_column_type_change                =true
check_dml_limit                         =true
check_dml_orderby                       =true
check_dml_where                         =true
check_identifier                        =true
check_index_prefix                      =true
check_insert_field                      =true
check_primary_key                       =true
check_table_comment                     =true
check_timestamp_default                 =true
check_timestamp_count                   =false
enable_autoincrement_unsigned           =true
enable_blob_type                        =true
enable_column_charset                   =true
enable_drop_database                    =false
enable_drop_table                       =false
enable_enum_set_bit                     =false
enable_fingerprint                      =true
enable_foreign_key                      =false
enable_json_type                        =true
enable_identifer_keyword                =false
enable_not_innodb                       =false
enable_nullable                         =false
enable_null_index_name                  =false
enable_orderby_rand                     =true
enable_partition_table                  =true
enable_pk_columns_only_int              =true
enable_select_star                      =false
enable_set_charset                      =true
enable_set_collation                    =false
enable_set_engine                       =false
max_char_length                         =0
max_insert_rows                         =0
max_keys                                =5
max_key_parts                           =5
max_update_rows                         =5000
max_primary_key_parts                   =1
max_allowed_packet                      =33554432
merge_alter_table                       =true
check_float_double                      =true
support_charset                         ="utf8,utf8mb4"
support_collation                       ="utf8_general_ci,utf8mb4_general_ci"


backup_host = "192.168.255.133"
backup_port = 3306
backup_user = "root"
backup_password = "adqwe123"


# 安全更新是否开启.
# -1 表示不做操作,基于远端数据库 [默认值]
# 0  表示关闭安全更新
# 1  表示开启安全更新
sql_safe_updates = 0

# lang = "en-US"
lang = "zh-CN"

# 是否记录全量日志
general_log = false

# 开启统计功能
enable_sql_statistic = true


[inc_level]
er_cant_set_engine = 2
er_cant_set_collation = 2
er_table_must_have_comment = 2
er_column_have_no_comment = 2
er_table_must_have_pk = 2
er_index_name_idx_prefix = 1
er_index_name_uniq_prefix =  1
er_autoinc_unsigned = 2
er_alter_table_once = 2
er_pk_too_many_parts = 2

[osc]
osc_on = false
osc_min_table_size = 16
osc_print_none = false
osc_bin_dir = "/usr/local/bin"

[ghost]

ghost_on = false
ghost_allow_on_master = true
ghost_assume_rbr = true
ghost_chunk_size = 1000
ghost_concurrent_rowcount = true
ghost_cut_over = "atomic"
ghost_cut_over_lock_timeout_seconds = 3
ghost_default_retries = 60
ghost_heartbeat_interval_millis = 500
ghost_max_lag_millis = 1500
ghost_approve_renamed_columns = true
ghost_exponential_backoff_max_interval = 64
ghost_dml_batch_size = 10

[log]
# Log level: debug, info, warn, error, fatal.
level = "error"
# Log format, one of json, text, console.
format = "console"
archery的docker使用完成后改名字为Docekrfile_archery,然后写goinception的Dockerfile

Dockerfile
FROM hanchuanchuan/goinception:latest
WORKDIR /opt/archery/src/docker-compose/inception/
COPY config.toml /etc/
创建镜像
docker build -f Dockerfile -t local/goinception:latest .
goinception-deployment.yaml
apiVersion: apps/v1
kind: Deployment
metadata:
  name: goinception
  namespace: archery
  labels:
    app: goinception
spec:
  replicas: 1
  selector:
    matchLabels:
      app: goinception
  strategy:
    type: Recreate
  template:
    metadata:
      labels:
        app: goinception
    spec:
      containers:
      - name: goinception
        image: local/goinception:latest
        imagePullPolicy: Never
        resources:
          limits:
            cpu: 500m
            memory: 1Gi
          requests:
            cpu: 100m
            memory: 256m
      restartPolicy: Always
goinception-service.yaml
apiVersion: v1
kind: Service
metadata:
  name: goinception      # Service的名称
  namespace: archery
  labels:                # Service 自己的标签
    app: goinception     # 为该 Service 设置 key 为 app,value 为goinception的标签
spec:                    # 关于该 Service 的定义,描述了 Service 如何选择 Pod,如何被访问
  selector:              # 标签选择器
    app: goinception     # 选择包含标签goinception的Pod
  ports:
  - name: goincption-port  #端口名
    protocol: TCP
    port: 4000             # 集群内的其他容器组可通过4000端口访问Service
    nodePort: 30040		  # 通过任意节点的30040端口访问Service
    targetPort: 4000
  type: NodePort
文件所在位置

应用部署
kubectl apply -f goinception-deployment.yaml
kubectl apply -f goinception-service.yaml
前端配置并测试,goinception端口填写30040,是service暴露出来给任意ip的端口

5.inception-k8s重打镜像与部署
5.1.修改inception配置文件、打镜像
源配置文件修改inception_remote_system_password、inception_remote_system_user、inception_remote_backup_port、inception_remote_backup_host。
inc.cnf
[inception]
general_log=1
general_log_file=inception.log
port=6669
socket=/tmp/inc.socket
character-set-client-handshake=0
character-set-server=utf8
inception_language_code=zh-CN
inception_remote_system_password=adqwe123
inception_remote_system_user=root
inception_remote_backup_port=3306
inception_remote_backup_host=192.168.255.133
inception_support_charset=utf8,utf8mb4
inception_enable_nullable=0
inception_check_primary_key=1
inception_check_column_comment=1
inception_check_table_comment=1
inception_osc_on=OFF
inception_osc_bin_dir=/usr/bin
inception_osc_min_table_size=10
inception_osc_chunk_time=0.1
inception_enable_blob_type=1
inception_check_column_default_value=1

inception_enable_select_star=ON
inception_enable_identifer_keyword=ON
inception_enable_autoincrement_unsigned=ON
inception_check_identifier=OFF
打镜像,注意将前面goinception的dockerfile改名字,工作目录和最开始archery打镜像时候一样,都是下载好的archery源码放到opt下改名字进入/opt/archery/src/docker中进行的操作,dockerfile文件有一个文件路径的问题。
Dockerfile
FROM hhyo/inception:latest
WORKDIR /opt/archery/src/docker-compose/inception/
COPY inc.cnf /etc/
打镜像
docker build -f Dockerfile -t local/inception:latest .

5.2.写inception-deployment与service
inception-deployment.yaml
apiVersion: apps/v1
kind: Deployment
metadata:
  name: inception
  namespace: archery
  labels:
    app: inception
spec:
  replicas: 1
  selector:
    matchLabels:
      app: inception
  strategy:
    type: Recreate
  template:
    metadata:
      labels:
        app: inception
    spec:
      #imagePullSecrets:
      #  - name: default-secret
      containers:
      - name: inception
        image: local/inception:latest
        imagePullPolicy: Never
      restartPolicy: Always
inception-service.yaml
apiVersion: v1
kind: Service
metadata:
  name: inception      # Service的名称
  namespace: archery
  labels:                # Service 自己的标签
    app: inception     # 为该 Service 设置 key 为 app,value 为inception的标签
spec:                    # 关于该 Service 的定义,描述了 Service 如何选择 Pod,如何被访问
  selector:              # 标签选择器
    app: inception     # 选择包含标签inception的Pod
  ports:
  - name: incption-port  #端口名
    protocol: TCP
    port: 6669
    nodePort: 30050
    targetPort: 6669
  type: NodePort
应用部署和之前一样
kubectl apply -f inception-deployement.yaml
kubectl apply -f inception-service.yaml
注意:还未做的有,配置文件里面的信息实际上我也想通过deployment的env环境变量传参进去,这里先写死了
6.LDAP登录测试
用ldap用户登录

这个是LDAP默认用户登陆进来的页面,右上角的姓名是sql_users表里面的真实姓名字段,也对应AD域用户的displayname字段。

7.错误及解决方案
7.1.因arcehry升级导致的数据库表结构发生改变
例子1

例子2

这说明archery项目数据库表缺失,注意archery版本升级后表结构可能发生改变,因为项目没上线,所以直接删库,重新迁移即可,如果项目上线,还需要谨慎操作
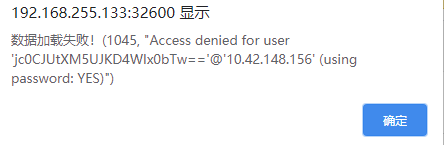
7.2.查看archery容器日志
这里是最早的k8s部署文件写的很乱的时候,数据库都没有设置正确,多注意检查启动了的archery容器的项目配置文件settings.py的数据库有没有配置正确;
若配置正确,能连上库,前端登录不了,可以尝试用redis-desktop清理一下redis缓存,之前有一次重跑项目没删除之前错误的缓存报了错误
显示mysql和redis在127.0.0.11:53,很奇怪的ip和端口

这里的原因是,之前跑项目时向redis存的的脏数据,现在重跑项目识别不了>清理缓存
7.3.俩inception相关错误
参考archery文档archery FAQ

archery中的添加的mysql数据库实例想备份sql功能的话,需要对配置的用户开启inception和goinception需要满足的权限
遇到过报错有:

原因:没给用户REPLICATION CLIENT权限,给了后又报错

还需要一个REPLICATION SLAVE权限,因为inceptionj的backup需要解析binlog,给了之后备份就成功了
综上,给的所有权限有如下:
GRANT SELECT, INSERT, CREATE, PROCESS, REPLICATION SLAVE, REPLICATION CLIENT ON *.* TO '用户'@'%' identified by '密码';
检查权限
show grants for ‘用户’@’%’;
检查binlog配置,前面给用户开好权限之后
show variables like “%binlog%”;