1. 嵌入式Linux开发的内容
- 嵌入式Linux系统,相当于一套完整的PC软件系统。
- bootloader去启动Linux内核,Linux内核去识别根文件系统,根文件系统再去启动各种应用软件。
- BootLoader一般使用u-boot
- linux内核包括内核本身和驱动
- 根文件系统包括我们自己的应用软件和自带的应用程序(例如ls等命令)
2. 嵌入式Linux应用开发基础知识
2.1 应用程序的编译和运行
交叉编译hello.c:
(1)解压工具链、设置path环境变量,确定编译器的名称,然后才可以编译。
(2)(前提必须保证板子和ubuntu之间是联通的,意味着板子可以Ping通ubuntu)要在板子上运行,使用NFS比较方便,使用NFS,将开发板挂载到服务器上,这样在服务器上编译好的文件放在该目录下(在服务器上使用开发板编译链编译之后复制到网络文件系统),开发板之后就访问该服务器的/mnt目录,可以直接执行这个文件。
2.2 GCC和Makefile的使用:
GCC工具:
- 预处理(预编译):
xxx-gcc -E -o hello.i hello.c - 编译:
xxx-gcc -S -o hello.s hello.i - 汇编:
xxx-gcc -c -o hello.o hello.s - 链接:
xxx-gcc -o hello hello.o
Makefile规则与示例:
- 编译多个文件
- 一起编译、链接:
gcc -o test main.c sub.c
- 分开编译,统一链接:
gcc -c -o main.o main.c
gcc -c -o sub.o sub.c
gcc -o test main.o sub.o
- 使用Makefile的原因:想要高效的编译程序,达到和Visual Studio一样的效果,修改源文件或者头文件,只需要重新编译牵涉到的文件,就可以重新生成APP。
- Makefile的规则:
有目标文件,依赖文件以及命令组成
#例子
test : main.c sub.c sub.h
	gcc -o test main.c sub.c
在当前目录下执行make命令就会在当前目录中寻找Makefile文件进行操作。
#上例的另一种写法
test : main.o sub.o
	gcc -o test main.o sub.o
main.o : main.c
	gcc -c -o main.o main.c
sub.o : sub.c sub.h
	gcc -c -o sub.o sub.c sub.h
#清除已解决方案
clean:
	rm *.o test -f
#使用通配符来简化上述的Makefile
test : main.o sub.o
	gcc -o test main.o sub.o
%.o : %.c
	gcc -c -o $@ $<
#下面的一行代表,
#两个规则目标是一样的,对于一个规则没有命令,另一个规则是有命令的,那么这两个规则的依赖会合并
sub.o : sub.h
clean:
	rm *.o test -f
#再次改进上面的Makefile文件
objs := main.o sub.o
test : $(objs)
	gcc -o test main.o sub.o

#需要判断是否存在依赖文件
dep_files := $(foreach f,$(objs),.$(f).d)
dep_files := $(wildcard $(dep_files))
#把依赖文件包含进来
ifneq ($(dep_files),)
  include $(dep_files)
endif

%.o :%.c
	gcc -Wp,-MD,.$@.d -c -o $@ $<
clean:
	rm *.o test -f
distclean:
	rm $(dep_files) *.o test -f
#目标文件
$@
#所有的依赖文件
$^
#第一个依赖文件
$<
- Makefile的两个函数:
(1)$(foreach var,list,text)
简单来说,就是for each var in list,change it to text
(2)$(wildcard pattern)
pattern所列出的文件是否存在,把存在的文件都列出来
通用的Makefile的使用
- 把顶层的Makefile,Makefile.build放入程序的顶层目录
在各自子目录创建一个空白的Makefile - 确定编译哪些源文件
修改顶层目录和各自子目录Makefile的obj-y:
obj-y +=xxx.o
obj-y +=yyy/
这表示要编译当前目录下的xxx.c,要编译当前目录下的yyy子目录 - 确定编译选项、链接选项
修改顶层目录Makefile的CFLAGS,这是编译所有.c文件时都要用到的编译选项
修改顶层目录Makefile的LDFLAGS,这是链接最后的应用程序时的链接选项
修改各自子目录下的Makefile:
“EXTRA_CFLAGS”, 它给当前目录下的所有文件(不含其下的子目录)设置额外的编译选项,可以不设置
“CFLAGS_xxx.o”,它给当前目录下的xxx.c设置它自己的编译选项,可以不设置 - 使用哪个编译器?
修改顶层目录Makefile的CROSS_COMPILE,用来指定工具链的前缀(比如arm-linux-) - 确定应用程序的名字:
修改顶层目录Makefile的TARGET,这是用来指定编译出来的程序的名字 - 执行“make”来编译,执行“make clean”来清除,执行“make distclean”来彻底清除
#根目录的Makefile
CROSS_COMPILE = arm-linux-  #指定交叉编译工具
AS = $(CROSS_COMPILE)as
LD = $(CROSS_COMPILE)ld
CC = $(CROSS_COMPILE)gcc
CPP = $(CC) -E
AR = $(CROSS_COMPILE)ar
NM = $(CROSS_COMPILE)nm

STRIP   = $(CROSS_COMPILE)strip
OBJCOPY = $(CROSS_COMPILE)objcopy
OBJDUMP = $(CROSS_COMPILE)objdump

export AS LD CC CPP AR NM
export STRIP OBJCOPY OBJDUMP

#编译选项
CFLAGS := -Wall -O2 -g
#编译时头文件位置
CFLAGS += -I $(shell pwd)/include

#链接选项,链接时库文件
LDFLAGS := -lm -lfreetype

export CFLAGS LDFLAGS
TOPDIR := $(shell pwd)
export TOPDIR

#编译出来的程序的名字
TARGET := show_file

#添加需要包含的子目录文件
obj-y += main.o
obj-y +=display/
obj-y +=draw/

all : start_recursive_build $(TARGET)
	@echo $(TARGET) has been built!
	#切换到-C指定的目录,使用-f指定的Makefile文件
	#这里就是递归各个子目录生成built-in.o再生成根目录的built-in.o
start_recursive_build:
	make -C ./ -f $(TOPDIR)/Makefile.build
	#顶层Makefile中把顶层目录的built-in.o链接成APP
$(TARGET) : built-in.o
	$(CC) $(LDFLAGS) -o $(TARGET) built-in.o

clean:
	rm -f $(shell find -name "*.o")
	rm -f $(TARGET)
distclean:
	rm -f $(shell find -name "*.o")
	rm -f $(shell find -name "*.d")
	rm -f $(TARGET)

######################################################################
#根目录的递归编译规则Makefile.build
	#特殊目标,PHONY的依赖是假想目标。假想目标代表的目标是,make无条件地执行命令,和目录下是否存在该文件以及它最后一次更新的时间没有关系
	PHONY := __build
	#目的就是想生成__build
	__build:

	#初始情况下都置为空,先让变量清零
	obj-y :=
	subdir-y :=
	EXTRA_CFLAGS :=

	#之后再包含当前目录下的Makefile文件
	include Makefile

	#获取根目录下的文件,如/display变成display
	__subdir-y := $(patsubst %/,%,$(filter %/,$(obj-y)))
	subdir-y   += $(__subdir-y)

	#遍历获得所有子目标下生成的built-in.o
	subdir_objs :=$(foreach f,$(subdir-y),$(f)/built-in.o)

	#获得子Makefile中添加的obj-y中所有文件名,如crt.o经过这个处理就成了crt
	cur_objs := $(filter-out %/,$(obj-y))
	#根据文件名,转换成.文件名.d的依赖文件,如.crt.d
	dep_files :=$(foreach f,$(cur_objs),.$(f).d)
	#判断这些文件是否存在
	dep_files :=$(wildcard $(dep_files))
	#如果这些依赖文件存在,说明不是第一次编译,包括进来
	ifneq ($(dep_files),)
		include $(dep_files)
	endif

	#PHONY = 子目录名
	PHONY +=$(subdir-y)

	#__build 依赖于 子目标 及built-in.o
	__build : $(subdir-y) built-in.o
	#怎么编译子目录如下,对于subdir-y这类目标文件,递归调用makefile.build的make文件处理
	$(subdir-y):
		make -C $@ -f $(TOPDIR)/Makefile.build
	#对于当前目录的目标文件built-in.o,使用当前目录下的.o文件和子目录下的built-in.o
	built-in.o : $(cur_objs) $(subdir_objs)
		$(LD) -r -o $@ $^
	#要生成的依赖文件是以所有文件名单独命令的,如.crt.d .utf-16be.d等,dep_file=这些名字
	dep_file = .$@.d
	#怎么编译当前目录中的文件:对所有的.c文件,都生成对应的.o文件
	%.o : %.c
		$(CC) $(CLAGS) -Wp,-MD,$(dep_file) -c -o $@ $<
	#依次生成各个目标.o文件以及依赖文件
	.PHONY : $(PHONY)
其他
- 制作和使用动态库
- 制作、编译:
gcc -c -o main.o main.c
gcc -c -o sub.o sub.c
gcc -shared -o libsub.so sub.o (可以使用多个.o生成动态库)
gcc -o test main.o -lsub -L/libsub.so/所在目录/
- 运行:
(1) 先把libsub.so放在PC或板子上的/lib目录,然后就可以运行test程序
3. Linux系统编程相关知识
文件的读写(文件IO)
在linux系统中,一切都是“文件”:普通文件、驱动程序、网络通信等等。所有的操作都是通过“文件IO”来操作的,所以,必须要掌握文件操作的常用接口。
- 文件的包含哪几种:
- 普通文件(真实文件),以某种格式保存在某个块设备上,要先mount
(磁盘、Flash、SD卡、U盘)
(例子:SD卡的某个分区挂载在/mnt目录下面,去读写/mnt目录下面的文件时,就是去读取SD卡上的这个分区mount /dev/sda1 /mnt) - Linux内核提供的虚拟文件系统
(也需要先挂载mount) - 特殊文件:/dev/xxx,设备节点(字符设备和块设备)
(FIFD,socket)
(这些文件操作的是硬件,它会通过设备节点去访问驱动之后访问硬件)
- 如何访问文件:
- 通用的IO模型:open/read/write/lseek/close
- 不是通用的函数:ioctl/mmap
进程和线程的概念
网络编程
4. 嵌入式Linux驱动开发基础知识
4.1 如何编写驱动程序
- 确定主设备号
- 定义自己的file_operation结构体
- 实现对应的open/read/write等函数,填入file_operation结构体
- 把file_operation结构体告诉内核:注册驱动程序
- 需要一个入口函数来注册驱动程序(就是入口函数来调用注册函数):安装驱动程序时,就会去调用这个入口函数
- 有入口函数就应该有出口函数:卸载驱动程序时,就会去调用这个出口函数
- 其他完善,提供设备信息,自动创建设备节点
//例子:helloworld驱动程序(不涉及硬件层面)
//1.驱动程序(参考misc.c这个文件来写)(进入内核目录,来编译当前目录里的该文件,把它编译为驱动程序)
//(1)包含头文件
#include <linux/module.h>
#include <linux/fs.h>
#include <linux/errno.h>
#include <linux/miscdevice.h>
#include <linux/kernel.h>
#include <linux/major.h>
#include <linux/mutex.h>
#include <linux/proc_fs.h>
#include <linux/seq_file>
#include <linux/stat.h>
#include <linux/init.h>
#include <linux/device.h>
#include <linux/tty.h>
#include <linux/kmod.h>
#include <linux/gfp.h>
//(2) 确定主设备号
static int major = 0; //让内核自动分配
//想让驱动程序能够保存应用程序下发过来的数据,需要定义一个buffer
static char kernel_buf[1024];
static struct class *hello_class;

#define MIN(a,b) (a<b?a:b)

//(4) 实现对应的open/read/write等函数,填入file_operations结构体
static ssize_t hello_drv_read (struct file *file,const char __user *buf, size_t size, loff_t *offset)
{
//举例,放入一些打印信息
	printk("%s %s line %d\n",__FILE__,__FUNCTION__,__LINE__);
	copy_to_user(buf,kernel_buf, MIN(1024,size));
	return MIN(1024,size);
}

static ssize_t hello_drv_write (struct file *file,char __user *buf, size_t size, loff_t *offset)
{
	printk("%s %s line %d\n",__FILE__,__FUNCTION__,__LINE__);
	//从buffer里面拿到应用程序下发过来的数据,拷贝到kernel——buf(驱动中的buffer)去
	copy_from_user(kernel_buf, const buf, MIN(1024,size));
	return MIN(1024,size);
}

static int hello_drv_open (struct inode *node, struct file *file)
{
	printk("%s %s line %d\n",__FILE__,__FUNCTION__,__LINE__);
	return 0;
}

static int hello_drv_close (struct inode *node, struct file *file)
{
	printk("%s %s line %d\n",__FILE__,__FUNCTION__,__LINE__);
	return 0;
}

//(3) 定义自己的file_operation结构体
static struct file_operation hello_drv = {
	.owner = THIS_MOUDLE;
	.open  = hello_drv_open;
	.read  = hello_drv_read;
	.write = hello_drv_write;
	.release= hello_drv_close;
};

//(5) 把file_operations结构体告诉内核:注册驱动程序
//(6) 谁来注册驱动程序?需要一个入口函数:安装驱动程序时,就会去调用这个入口函数(入口函数中会去调用注册函数)
static int __init hello_init(void)
{
	int err;
	//注册函数
	major = register_chrdev(0,"hello",&hello_drv);

	//创建了class
	hello_class = class_create(THIS_MOUDLE,"hello_class");
	err = PTR_ERR(hello_class);
	if(IS_ERR(hello_class)){
		unregister_chrdev(major,"hello");
		return -1;
	}
	//还需要创建一个device
	device_create(hello_class,NULL,MKDEV(major,0),NULL,"hello");

	return 0;
}

//(7) 有入口函数就应该有出口函数:卸载驱动程序时,就会去调用这个出口函数
static void __exit hello_exit(void)
{
	//销毁device
	device_destroy(hello_class,MKDEV(major,0));
	//类销毁
	class_destroy(hello_class);
	//取消注册函数
	unregister_chrdev(major,"hello");
}

//(8) 其他完善:提供设备信息,自动创建设备节点
//将hello_init修饰为入口函数
module_init(hello_init);
//将hello_exit修饰为出口函数
module_exit(hello_exit);
MODULE_LICENSE("GPL");//说明驱动程序遵守GPL协议
//2. 测试程序(应用程序)
#include <sys/types.h>
#include <sys/stat.h>
#include <fcntl.h>
#include <unistd.h>
#include <stdio.h>
#include <string.h>
/*
* ./hello_drv_test -w abc
* ./hello_drv_test -r
*/
int mian(int argc, char **argv)
{
	int fd;
	char buf[1024];
	int len;
	//1. 判断参数
	if(argc < 2)
	{
		printf("Usage: %s -w <string>\n",argv[0]);
		printf("       %s -r\n",argv[0]);
		return -1;
	}
	//2.打开文件
	fd = open("/dev/hello",O_RDWR);
	if(fd == -1)
	{
		printf("can not open file /dev/hello\n");
		return -1;
	}
	//3. 写文件或者读文件
	if((0== strcmp(argv[1],"-w"))&&(argc == 3 ))
	{
		len = strlen(argv[2])+1;
		len = len<1024? len :1024;
		write(fd, argv[2],len);
	}
	else
	{
		len = read(fd,buf,1024);
		buf[1023] = '\0';
		printf("APP read : %s\n",buf);
	}
	close(fd);
	return 0;
}
#Makefile怎么写
KERN_DIR = /home/book/roc_pc/linux-4.4

all:
	#进入内核目录,来编译当前目录里的该文件,把它编译为驱动程序
	make -C $(KERN_DIR) M='pwd' modules
	# 编译应用程序
	$(CROSS_COMPILE)gcc -o hello_drv_test hello_drv_test.c
clean:
	make -C $(KERN_DIR) M='pwd' modules clean
	rm -rf modules.order
	rm -rf hello_drv_test

obj-m +=hello_drv.o
4.2 硬件_LED原理知识(考虑包含硬件层面的驱动程序)
学习C语言时,通过简单的helloworld程序来入门,在我们学习ARM程序的时候也需要一个简单的程序来入门。
- 第一个ARM裸板程序及引申(LED驱动程序):
- 看原理图,确定控制LED(就是一个二极管)的引脚(硬件知识_LED原理图)
- 看主芯片的芯片手册,确定如何设置/控制这个引脚(硬件知识_S3C2440启动流程与GPIO操作)
(普适的GPIO引脚操作方法,见下一模块) - 写程序(编写程序点亮LED)
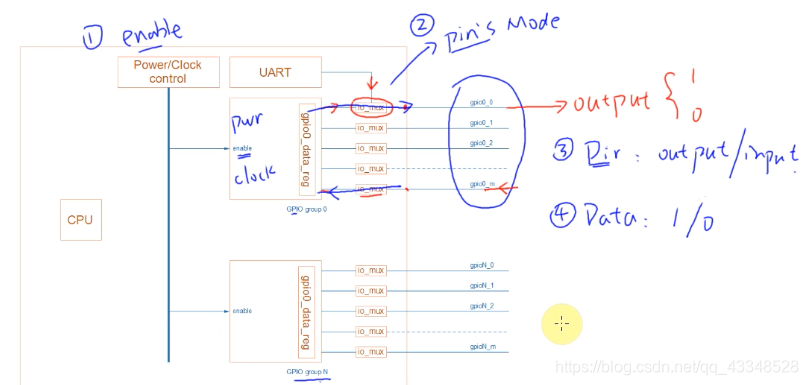
普适的GPIO引脚操作方法
GPIO: General-purpose input/output,通用的输入输出口
-
GPIO模块一般结构:
a. 有多组GPIO,每组有多个GPIO
b. 使能:电源/时钟
c. 模式(Model):引脚可用于GPIO或其他功能
d. 方向:引脚Model设置为GPIO时,可以继续设置它是输出引脚,还是输入引脚
e. 数值:对于输出引脚,可以设置寄存器让它输出高、低电平;对于输入引脚,可以读取寄存器得到引脚的当前电平 -
GPIO 寄存器操作:
a. 芯片手册一般有相关章节,用来介绍:power/clock
可以设置对应寄存器使能某个GPIO模块(Module),有些芯片的GPIO是没有使能开头的,即它总是使能的
b. 一个引脚可以用于GPIO、串口、USB或其他功能,有对应的寄存器来选择引脚的功能
c. 对于已经设置为GPIO功能的引脚,有方向寄存器用来设置它的方向:输入、输出
d. 对于已经设置为GPIO功能的引脚,有数据寄存器用来写、读引脚电平状态
(四个步骤都需要操作寄存器,操作的时候不能影响其他位) -
过程(GPIO 寄存器操作的直白说法):
- power/clock使能这个模块(GPIO Module)
- 模块需要去设置这个引脚,让它是GPIO模式
- 设置引脚的方向:是输出功能还是输入功能
- 设置数据:让引脚输出高电平还是低电平;读取来获取数据是低电平还是高电平
4.3 LED驱动程序框架
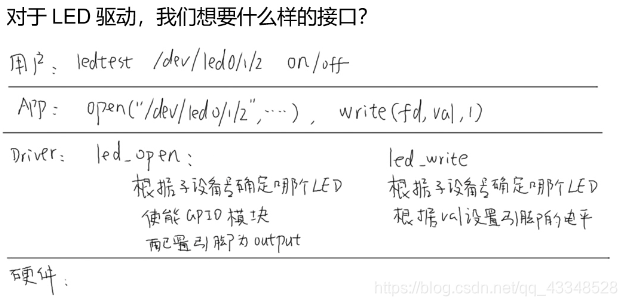
- LED驱动要怎么完成,才可以支持多个板子:
(通过分层方式)
- 把驱动拆分为通用的框架(leddrv.c)、具体的硬件操作(board_X.c):
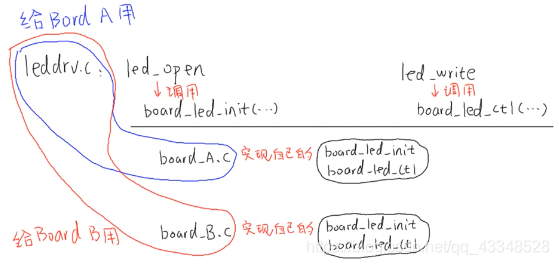
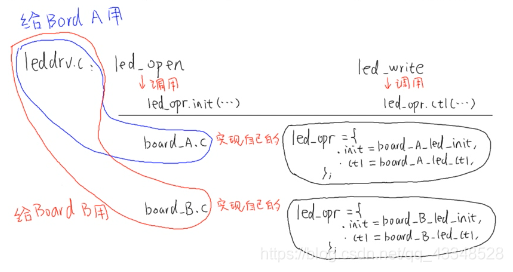
- 以面向对象的思想改进代码:
抽象出一个结构体:
struct led_operations {
	//初始化LED,which-哪个LED
	int (*init) (int which);
	//控制LED,which-哪个LED,status:1-亮,0-灭
	int (*ctl) (int which,int status);
};
每个单板相关的board_X.c实现自己的led_operations结构体,供上层的leddrv.c调用:
- 具体代码如下:
//LED驱动程序 leddrv.c文件
//1.驱动程序
//(1)包含头文件
#include <linux/module.h>
#include <linux/fs.h>
#include <linux/errno.h>
#include <linux/miscdevice.h>
#include <linux/kernel.h>
#include <linux/major.h>
#include <linux/mutex.h>
#include <linux/proc_fs.h>
#include <linux/seq_file>
#include <linux/stat.h>
#include <linux/init.h>
#include <linux/device.h>
#include <linux/tty.h>
#include <linux/kmod.h>
#include <linux/gfp.h>

#include "led_operation.h"
//(2) 确定主设备号
static int major = 0; //让内核自动分配
static struct class *led_class;
struct led_operations *p_led_opr;

#define MIN(a,b) (a<b?a:b)

//(4) 实现对应的open/read/write等函数,填入file_operations结构体
static ssize_t led_drv_read (struct file *file,const char __user *buf, size_t size, loff_t *offset)
{
//举例,放入一些打印信息
	printk("%s %s line %d\n",__FILE__,__FUNCTION__,__LINE__);
	return 0;
}

static ssize_t led_drv_write (struct file *file,char __user *buf, size_t size, loff_t *offset)
{
	char status;
	int err;
	struct inode *inode = file_inode(file);
	int minor = iminor(node);
	printk("%s %s line %d\n",__FILE__,__FUNCTION__,__LINE__);
	//从buffer里面拿到应用程序下发过来的数据,拷贝到kernel——buf(驱动中的buffer)去
	err=copy_from_user(&status, const buf, 1);
	//根据次设备号和status控制LED
	p_led_opr->ctl(minor,status);
	return 1;
}

static int led_drv_open (struct inode *node, struct file *file)
{
	int minor = iminor(inode);
	printk("%s %s line %d\n",__FILE__,__FUNCTION__,__LINE__);
	//根据次设备号初始化LED
	p_led_opr->init(minor);
	return 0;
}

static int led_drv_close (struct inode *node, struct file *file)
{
	printk("%s %s line %d\n",__FILE__,__FUNCTION__,__LINE__);
	return 0;
}

//(3) 定义自己的file_operation结构体
static struct file_operation led_drv = {
	.owner = THIS_MOUDLE;
	.open  = led_drv_open;
	.read  = led_drv_read;
	.write = led_drv_write;
	.release= led_drv_close;
};

//(5) 把file_operations结构体告诉内核:注册驱动程序
//(6) 谁来注册驱动程序?需要一个入口函数:安装驱动程序时,就会去调用这个入口函数(入口函数中会去调用注册函数)
static int __init led_init(void)
{
	int err;
	//注册函数
	major = register_chrdev(0,"led",&led_drv);

	//创建了class
	led_class = class_create(THIS_MOUDLE,"led_class");
	err = PTR_ERR(led_class);
	if(IS_ERR(led_class)){
		unregister_chrdev(major,"led");
		return -1;
	}
	//还需要创建一个device,多创建几个LED
	device_create(led_class,NULL,MKDEV(major,0),NULL,"led");
	device_create(led_class,NULL,MKDEV(major,1),NULL,"led0");

	p_led_opr = get_board_led_opr();
	return 0;
}

//(7) 有入口函数就应该有出口函数:卸载驱动程序时,就会去调用这个出口函数
static void __exit led_exit(void)
{
	//销毁device
	device_destroy(led_class,MKDEV(major,0));
	device_destroy(led_class,MKDEV(major,1));
	//类销毁
	class_destroy(led_class);
	//取消注册函数
	unregister_chrdev(major,"led");
}

//(8) 其他完善:提供设备信息,自动创建设备节点
//将led_init修饰为入口函数
module_init(led_init);
//将led_exit修饰为出口函数
module_exit(led_exit);
MODULE_LICENSE("GPL");//说明驱动程序遵守GPL协议

************************************************************************************************************
//led——operation.h文件
#ifndef _LED_OPR
#define _LED_OPR
struct led_operations {
	//初始化LED,which-哪个LED
	int (*init) (int which);
	//控制LED,which-哪个led,status:1-亮,0-灭
	int (*ctl) (int which,char status);
};

struct led_operations *get_board_led_opr(void);

#endif
**************************************************************************************************************
//单板上需要实现的程序 board.c,这里并没有做具体的硬件操作
#include <linux/gfp.h>
#include "led_operation.h"
static int board_demo_led_init (int which)
{
	printk("%s %s line %d, led %d\n",__FILE__,__FUNCTION__,__LINE__, which);
	return 0;
}
static int board_demo_led_ctl(int which, char status)
{
	printk("%s %s line %d, led %d,%s\n",__FILE__,__FUNCTION__,__LINE__,which,status?"on":"off");
	return 0;
}
static struct led_operatioms board_deemo_led_opr = {
	.init = board_demo_led_init,
	.ctl = board_demo_led_ctl,
};
strucy led_operations *get_board_led_opr(void)
{
	return &board_demo_led_opr;
}
********************************************************************************************************
//ledtest.c文件
int main(int argc, char **argv)
{
	int fd;
	char status;
	//1.判断参数
	if(argc !=3)
	{
		printf("Usage: %s <dev> <on | off>\n",argv[0]);
		return -1;
	}
	//2.打开文件
	fd = open(argv[1],O_RDWR);
	if(fd == -1)
	{
		printf("can not open file %s\n",argv[1]);
		return -1;
	}
	//3. 写文件
	if(0 == strcmp(argv[2],"on"))
	{
		status = 1;
		write(fd,&status,1);
	}
	else
	{
		status = 0;
		write(fd,&status,1);
	}
	close(fd);
	return 0;
}
# makefile内容如下:
#1.使用不同的开发板内核时,一定要修改KERN_DIR
#2. KERN_DIR中的内核要事先配置、编译,为了能够编译内核,要先设置以下环境变量:
#2.1 ARCH,   比如:export ARCH=arm64
#2.2 CROSS_COMPILE, 比如:export CROSS_COMPILE=aarch64-linux-gnu-
#2.3 PATH,    比如: export PATH=$PATH:/home/book/roc-rk3399-pc/Toolchain-6.3.1/gcc-linaro-6.3.1-x86_64_aarch64-linux-gnu/bin
#注意:不同的开发板不同的编译器上述3个环境变量不一定相同,请参考各开发板的高级用户手册

KERN_DIR = /home/book/roc-rk3399-pc/linux-4.4

all:
	make -C $(KERN_DIR) M='pwd' modules
	$(CROSS_COMPILE) gcc -o ledtest ledtest.c
clean:
	make -C $(KERN_DIR) M='pwd' modules clean
	rm -rf modules.order
	rm -rf ledtest

# 想把a.c,b.c编译成ab.ko,可以这样指定:
#ab-y :=a.o b.o
#obj-m += ab.o
led-y:= leddrv.o board_demo.o
obj-m += led.o
学习资源(韦东山视频链接):http://dev.t-firefly.com/thread-100207-1-1.html