在使用Sentinel我们发现,只要重新启动Sentinel的Java 客户端服务,Sentinel控制台配置的限流规则,就清空不存在了,下面介绍怎么持久化Sentinel规则
Sentinel 持久化规则
本例介绍Sentinel从Nacos配置中心读取应用的限流降级配置规则
1、搭建项目,参考:【SpringCloud】Spring Cloud Alibaba 之 Sentinel哨兵介绍入门(二十九)
2、修改POM文件,增加依赖sentinel数据nacos,如下:
1 <!-- sentinel-datasource-nacos -->
2 <dependency>
3     <groupId>com.alibaba.csp</groupId>
4     <artifactId>sentinel-datasource-nacos</artifactId>
5 </dependency>
完整pom,如下:


 1 <?xml version="1.0" encoding="UTF-8"?>
 2 <project xmlns="http://maven.apache.org/POM/4.0.0"
 3          xmlns:xsi="http://www.w3.org/2001/XMLSchema-instance"
 4          xsi:schemaLocation="http://maven.apache.org/POM/4.0.0 http://maven.apache.org/xsd/maven-4.0.0.xsd">
 5     <parent>
 6         <artifactId>test-springcloud</artifactId>
 7         <groupId>com.test</groupId>
 8         <version>1.0-SNAPSHOT</version>
 9     </parent>
10     <modelVersion>4.0.0</modelVersion>
11
12     <artifactId>springcloud-sentinel-service8401</artifactId>
13
14     <dependencies>
15
16         <!-- sentinel-datasource-nacos -->
17         <dependency>
18             <groupId>com.alibaba.csp</groupId>
19             <artifactId>sentinel-datasource-nacos</artifactId>
20         </dependency>
21
22         <!-- alibaba nacos sentinel -->
23         <dependency>
24             <groupId>com.alibaba.cloud</groupId>
25             <artifactId>spring-cloud-starter-alibaba-sentinel</artifactId>
26         </dependency>
27
28         <!-- alibaba nacos discovery -->
29         <dependency>
30             <groupId>com.alibaba.cloud</groupId>
31             <artifactId>spring-cloud-starter-alibaba-nacos-discovery</artifactId>
32         </dependency>
33
34         <!-- spring boot -->
35         <dependency>
36             <groupId>org.springframework.boot</groupId>
37             <artifactId>spring-boot-starter-web</artifactId>
38         </dependency>
39         <dependency>
40             <groupId>org.springframework.boot</groupId>
41             <artifactId>spring-boot-starter-actuator</artifactId>
42         </dependency>
43         <dependency>
44             <groupId>org.springframework.boot</groupId>
45             <artifactId>spring-boot-devtools</artifactId>
46             <scope>runtime</scope>
47             <optional>true</optional>
48         </dependency>
49         <dependency>
50             <groupId>org.projectlombok</groupId>
51             <artifactId>lombok</artifactId>
52             <optional>true</optional>
53         </dependency>
54         <dependency>
55             <groupId>org.springframework.boot</groupId>
56             <artifactId>spring-boot-starter-test</artifactId>
57             <scope>test</scope>
58         </dependency>
59
60     </dependencies>
61 </project>
3、修改application.yml文件,如下:
 1 # 端口
 2 server:
 3   port: 8401
 4
 5 spring:
 6   application:
 7     name: alibaba-sentinel-service
 8   cloud:
 9     nacos:
10       discovery:
11         server-addr: localhost:8848
12     sentinel:
13       transport:
14         # 配置Sentinel DashBoard地址
15         dashboard: localhost:8080
16         # 应用与Sentinel控制台交互的端口,应用本地会起一个该端口占用的HttpServer
17         # 默认8719端口,假如端口被占用,依次+1,直到找到未被占用端口
18         port: 8719
19       # 配置Sentinel 数据源
20       datasource:
21         ds1:
22           nacos:
23             server-addr: localhost:8848
24             dataId: alibaba-sentinel-service
25             groupId: DEFAULT_GROUP
26             data-type: json
27             rule-type: flow
28
29 management:
30   endpoints:
31     web:
32       exposure:
33         include: '*'
4、在Nacos配置中心,增加配置
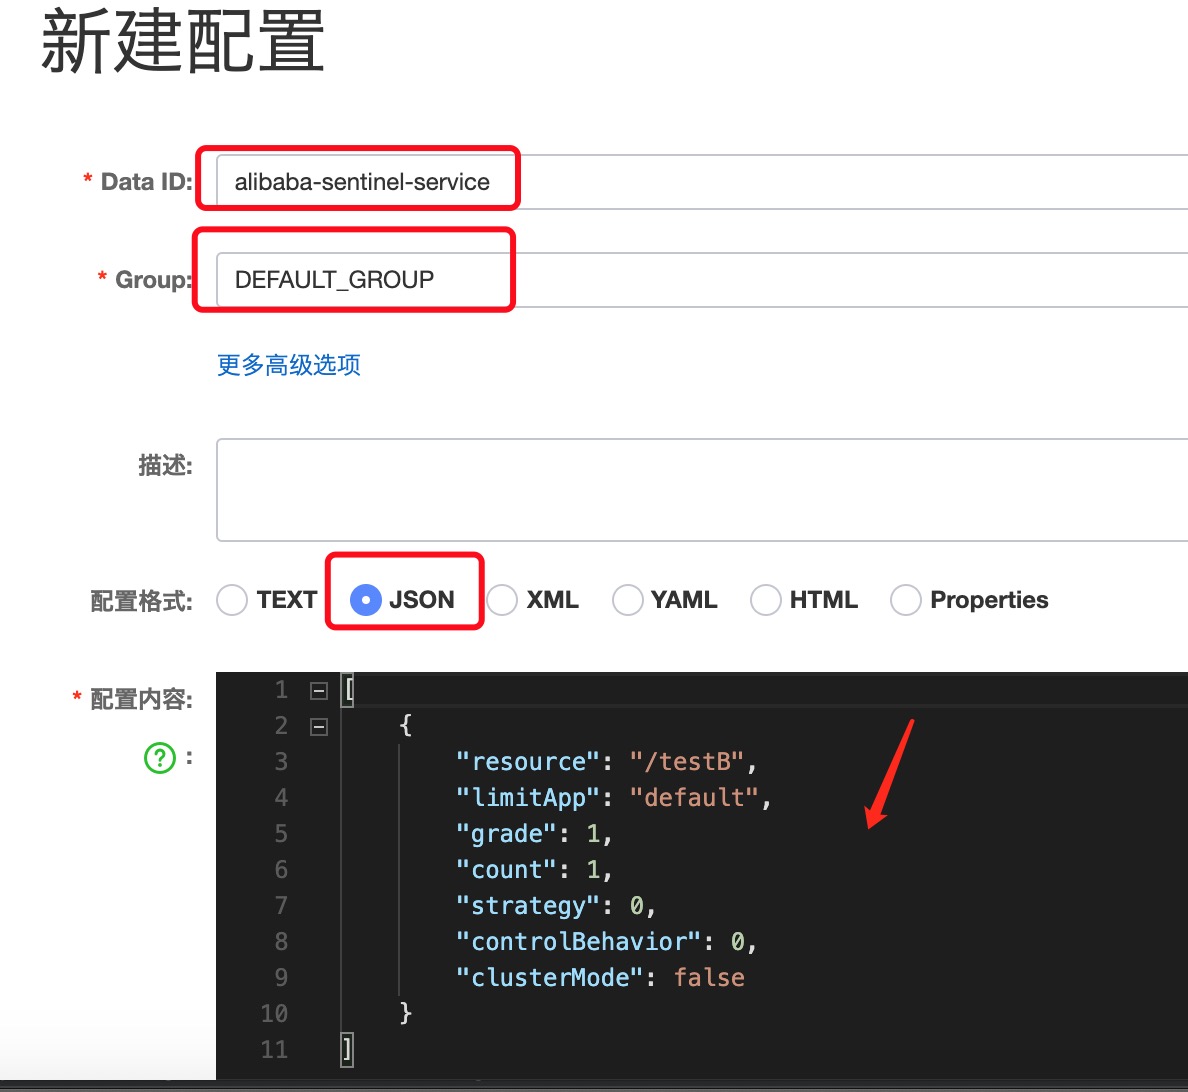
配置说明:
1)resource:资源名称;
2)limitApp:来源应用;
3)grade:阀值类型,0表示线程数,1表示QPS
4)count:单机阀值;
5)strategy:流控模式,0表示直接,1表示关联,2表示链路;
6)controlBehavior:流控效果,0表示快速失败,1表示Warm Up,2表示排队等待;
7)clusterMode:是否集群
5、启动项目测试
1)启动项目
2)快速访问地址:http://localhost:8401/testB,服务被限流,Sentinel持久化规则已生效
