1. Android 四大基本组件
1.1 活动(Activity)
- Activity是最基本的Android应用程 序组件,应用程序中,一个Activity 通常就是一个单独的屏幕。每个 Activity都被实现为一个独立的类, 并且从Activity(类)基类继承而来, Activity类会提供视图控制组件的用 户接口,并对事件作出响应,大多数 应用程序都是由多个Activity组成的
1.2. 广播消息接收器(BroadcastReceiver)
- BroadcastReceiver是Android系统中常用的一种机制, 用户让应用对一个外部的事件作出响应。例如:当电 话呼入时,数据网络可用时等。
1.3. 服务(Service)
类似acticity但是运行在后台,不对应页面
- 一个服务是具有一个较长生命周期且没有用户界面的 程序。例如:一个正在从播放列表中播放歌曲的媒体 播放器。
1.4. 内容提供者(ContentProvider)
多应用之间数据共享
- 应用程序能够将它们的数据保存到文件、 SQLite数据库中,甚至是任何有效的 设备中。当需要将当前应用数据与其它 应用共享时,ContentProvider类实现 了一组标准方法,从而能够让其它的应 用保存或读取此ContentProvider处理 的各种数据类型。
2. 用户界面工作机制
2.1 用户界面简介
-
在Android应用中,应用中每个界面对应一个 Activity,每个Activity由一个布局来决定如何显示, 这就是(User Interface)。
-
UI是人机之间传递、交换信息的接口;它实现了信 息的内部形式与用户可接受形式之间的转换。
- –UI负责捕获用户动作,在程序中处理动作。
- –UI负责显示数据给用户。
2.2. Android中UI工作机制
- Android用户界面采用MVC(Model-View-Controller) 框架来接收用户动作、显示UI界面及处理数据等工作。 –控制器:处理用户的数据。 –视图:显示用户界面,与用户交互。 –模型:数据模型。
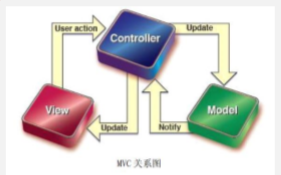
2.2.1. 模型层
•模型层 负责对数据的操作、对网络服务等的操作。
•在Android中,数据库/文件操作、 ContentProvider、网络访问等等充当模型层。
•模型层 后续会逐步介绍,在此不再赘述。
2.2.2. 控制器层
• 控制器负责接受用户动作请求(如按键动作或触摸屏动作 等),调用指定模型处理用户请求(如读取数据库、发送网 络请求等),响应用户结果(如返回视图界面等)。
• 在Android系统中,控制器的责任由Activity承担,意味着 Activity负责接收用户请求、调用模型方法、响应用户界面 等操作(Activity不应承担过多业务逻辑(应交给模型 层))。
2.2.3. 视图层
•视图层主要负责用户界面(UI)的设计(页面布局 XML文件等)。
•在Android中使用XML布局文件实现视图层和模型 层的分离。
Android中如何实现MVC分离与整合:
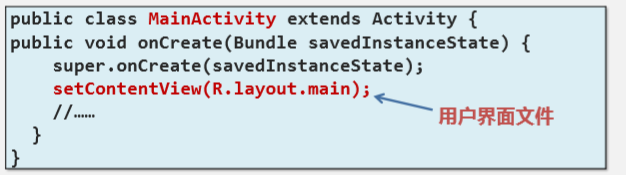
Android视图层与控制器层、模型层的整合 –在Activity文件,使用setContentView( )方法,确 定当前Activity如何显示。
Android界面原理
- 分析Activity,编写布局
- 在Activity中建立相应对象,设置属性
1. 在页面页面activity-main里面设置
2. 在MainActivity里面进行设置 - 在Activity中建立对象,设置相应监听器方法
- 设计逻辑
3. 基本视图控件使用
3.1. Android视图层简介
- 视图层采用视图树(View Tree)模型:用户界面中的 界面元素以树型结构组织在一起,整个视图界面为一 个视图树模型。
- 视图树:由View控件或ViewGroup构成。
- 视图组类似div,块块模式。

- View控件是界面的最基本的可视单元,是Android视 图界面的基类。
- • 例如:文本(TextView)、输入框(EditText)……
- iewGroup是由其它View或ViewGroup组成的显示单 元,继承自View类。
- • ViewGroup功能:提供了一种布局方法,可以按照该布局 定制视图的外观和顺序 •
- 例如:LinerLayout、FrameLayout……(这些布局方式都是)

4. 在Android中创建视图界面
-
Android中创建用户视图界面基本流程
1. –确定视图界面所采用的布局方式(暂用LinearLayout)
2. –为视图界面添加视图组件
3. (先确定view group 在在里面确定其他的视图空间) -
Android中创建视图界面有3种方法:
1.–使用可视化编辑方式,创建用户视图界面
- 最简单的布局方式,但不适合创建复杂布局

2. –使用XML代码方式,创建用户视图界面
- 最常用的布局方式,但只能创建静态界面
- 使用findViewById( )方法得到对象


3. –使用Java代码方式,动态创建用户视图界面
- 最灵活的布局方式,但复杂度较大

基础代码
package com.example.text;
import androidx.appcompat.app.AppCompatActivity;
import android.util.Log;
import android.os.Bundle;
import android.view.View;
import android.widget.Button;
import android.widget.TextView;

快捷键 alt  +  enter


public class MainActivity extends AppCompatActivity {MainActivity最终继承自Activity
打开文件自动调用此方法,程序的入口方法
    protected void onCreate(Bundle savedInstanceState) {
        super.onCreate(savedInstanceState);
        setContentView(R.layout.activity_main);
接受布局文件的ID,引用资源文件,显示布局文件内容
如果使用布局文件的话就无法使用Java代码形式进行编写,必须注视掉
R类有个静态属性成员,就是布局文件中的Layout(app--res--layout)
R。类型。名称   通过R类修改资源


      日志输出功能,导入android.util.log
      Log.e("标签","日志内容");输入时tag与bsg是自动生成的

获取布局文件中的视图控件的ID,java中获取XML文件对象
        TextView list=findViewById(R.id.btn1);int类型参数,必须先得到ID属性,通过R类访问对象
       list.setText( "1213132132");


用纯java代码方式进行创建视图界面,创建textview对象,
用纯java代码方式的话就不能用activity布局了
        TextView name2=new TextView(this);参数类型为Context,环境上下文。参数可以用当前对象this
        name2.setText("我是java创建的");
        setContentView(name2);通过调用使之呈现出来


处理按钮点击事件
1.先得到引用
        Button btn11=findViewById(R.id.btn1);
        btn11.setOnClickListener(new View.OnClickListener(){
            @Override
            public void onClick(View v){点击后自动调用
                Log.e("MainActivity","点击了按钮");

            }
        });


    }
}
<?xml version="1.0" encoding="utf-8"?>
<!--<!–版本号 编码方式 第一行永远不动–>-->
<!--<!–所有数据在的文件是布局文件–>-->
<!--此页面时布局页面,负责呈现画面-->
<!--LinearLayout类型(线性布局),后面设置属性
horizontal 视图空间水平方向排列vertical竖直排列
match_parent 填充父布局 wrap_content内容自适应 -->
<LinearLayout android:layout_width="match_parent"
android:layout_height="match_parent"
android:orientation="vertical"
xmlns:android="http://schemas.android.com/apk/res/android" ><!--确定了命名空间-->
<LinearLayout
android:layout_width="match_parent"
android:layout_height="wrap_content"
android:orientation="horizontal" >
<TextView
android:background="#008577"
android:layout_width="wrap_content"
android:layout_height="wrap_content"
android:text="用户"/>
<EditText
android:layout_width="match_parent"
android:layout_height="wrap_content"
android:hint="请输入"
/>
</LinearLayout>
<LinearLayout
android:layout_width="match_parent"
android:layout_height="wrap_content"
android:orientation="horizontal">
<TextView
android:layout_width="wrap_content"
android:layout_height="wrap_content"
android:text="密码"/>
<EditText
android:layout_width="match_parent"
android:layout_height="wrap_content"
android:inputType="phone"
android:text="jkljk"/>
</LinearLayout>
<Button
android:id="@+id/btn1"
android:layout_width="wrap_content"
android:layout_height="wrap_content"
android:layout_marginLeft="20dp"
android:layout_marginTop="20dp"
android:gravity="right"
android:text="确定按钮" />
<Button
android:layout_width="wrap_content"
android:layout_height="wrap_content"
android:layout_gravity="right"
android:layout_marginTop="-45dp"
android:text="取消按钮" />
</LinearLayout>
5. Android中常用的View


当父容器是水平布局时,layout_gravity只能选择竖直改变

gravity是里面内容的距离

    <LinearLayout
        android:layout_width="wrap_content"
        android:layout_height="wrap_content">
        <TextView
            android:layout_width="wrap_content"
            android:layout_height="wrap_content"
            android:text="性别"/>


        <RadioGroup
            android:layout_width="wrap_content"
            android:layout_height="wrap_content"
            android:orientation="horizontal">

            <RadioButton
                android:layout_width="wrap_content"
                android:layout_height="wrap_content"
                android:text="男"
                android:checked="true"/>

            <RadioButton
                android:layout_width="wrap_content"
                android:layout_height="wrap_content"
                android:text="女"/>
        </RadioGroup>
    </LinearLayout>
    <LinearLayout
        android:layout_width="wrap_content"
        android:layout_height="wrap_content">
        <TextView
            android:layout_width="wrap_content"
            android:layout_height="wrap_content"
            android:text="复选框"/>

        <CheckBox
            android:layout_width="wrap_content"
            android:layout_height="wrap_content"
            android:text="爱好1"/>
        <CheckBox
            android:layout_width="wrap_content"
            android:layout_height="wrap_content"
            android:text="爱好2"/>
        <CheckBox
            android:layout_width="wrap_content"
            android:layout_height="wrap_content"
            android:text="爱好3"/>
    </LinearLayout>


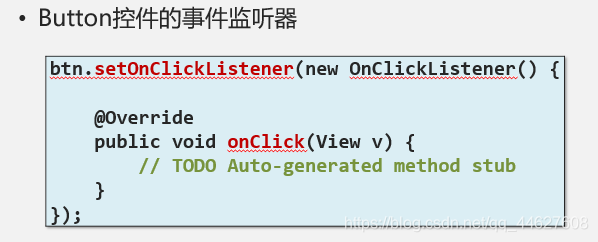
4. 事件监听器的使用

事件的处理步骤为:
- 事件源上触发一个事件。比如用户按下鼠标、按下按钮等
- 系统会自动产生对应的事件对象EventObject,并通知所有授权的事件监听者
- 事件监听者中有对应的事件处理方法来处理该事件

        //处理按钮点击事件
        //1.先得到引用
        Button btn11=findViewById(R.id.btn1);
        //2.注册监听器
        btn11.setOnClickListener(new View.OnClickListener(){
            @Override
            public void onClick(View v){//点击后自动调用
                Log.e("MainActivity","点击了按钮");

            }
        });

        //获取事件对象的引用,解决chectk按钮恒真
        RadioGroup rg=findViewById(R.id.big1);
        final RadioButton man11=findViewById(R.id.man1);
        final RadioButton woman11=findViewById(R.id.woman1);
        //注册监听器
        rg.setOnCheckedChangeListener(new RadioGroup.OnCheckedChangeListener() {
            @Override//接口一般定义在类当中
            public void onCheckedChanged(RadioGroup group, int checkedId) {
                //选中单选按钮
                switch(checkedId){
                    case R.id.man1:
                        man11.setChecked(true);
                        woman11.setChecked(false);
                        break;
                    case R.id.woman1:
                        man11.setChecked(false);
                        woman11.setChecked(true);
                        break;
                }
            }
        });
        <RadioGroup
            android:id="@+id/big1"
            android:layout_width="wrap_content"
            android:layout_height="wrap_content"
            android:orientation="horizontal">

            <RadioButton
                android:id="@+id/man1"
                android:layout_width="wrap_content"
                android:layout_height="wrap_content"
                android:text="男"
                android:checked="true"/>

            <RadioButton
                android:id="@+id/woman1"
                android:layout_width="wrap_content"
                android:layout_height="wrap_content"
                android:text="女"/>
        </RadioGroup>
    </LinearLayout>
