自定义title页面布局
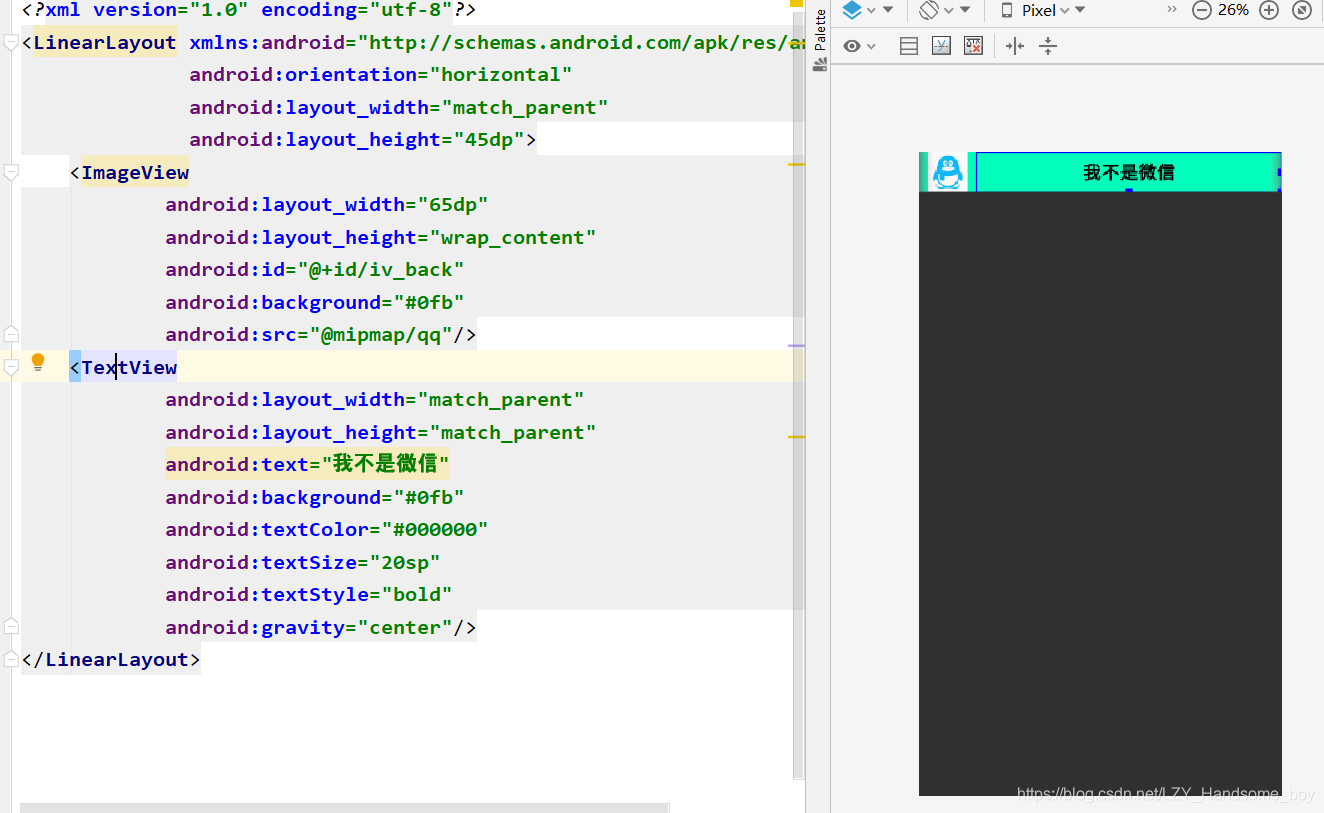
title_fragment.xml的代码如下
<?xml version="1.0" encoding="utf-8"?>
<LinearLayout xmlns:android="http://schemas.android.com/apk/res/android"
              android:orientation="horizontal"
              android:layout_width="match_parent"
              android:layout_height="45dp">
    <ImageView
            android:layout_width="65dp"
            android:layout_height="wrap_content"
            android:id="@+id/iv_back"
            android:background="#0fb"
            android:src="@mipmap/qq"/>
    <TextView
            android:layout_width="match_parent"
            android:layout_height="match_parent"
            android:text="我不是微信"
            android:background="#0fb"
            android:textColor="#000000"
            android:textSize="20sp"
            android:textStyle="bold"
            android:gravity="center"/>
</LinearLayout>
TitleFragment.java的代码
package com.example.dynamicfragment;

import android.os.Bundle;
import android.view.LayoutInflater;
import android.view.View;
import android.view.ViewGroup;
import android.widget.ImageView;
import android.widget.Toast;
import androidx.annotation.NonNull;
import androidx.annotation.Nullable;
import androidx.fragment.app.Fragment;
import com.example.dynamicfragment.R.id;


public class TitleFragment extends Fragment {
    @Nullable
    @Override
    public View onCreateView(@NonNull LayoutInflater inflater, @Nullable ViewGroup container, @Nullable Bundle savedInstanceState) {

        /**
         * 参数说明:
         * 利用inflater对象的inflat方法加载片段布局
         * 参数1:片段布局
         * 参数2:利用onCreatView方法里面的container
         * 参数3:传递为false,是否依附到根视图
         */
        View view = inflater.inflate(R.layout.title_fragment, container, false);
        ImageView backView = view.findViewById(id.iv_back);
        backView.setOnClickListener(new View.OnClickListener() {
            @Override
            public void onClick(View view) {
                Toast.makeText(getActivity(), "您点击了dynamicFragment的返回按钮", Toast.LENGTH_LONG).show();
            }
        });
        return view;
    }
}
设置了一个土司测试imageview的点击事件
设计一个相对视图页面布局dynamic_fragment.xml

dynamic_fragment.xml代码如下
<?xml version="1.0" encoding="utf-8"?>
<RelativeLayout xmlns:android="http://schemas.android.com/apk/res/android"
                android:orientation="vertical"
                android:background="#03A9F4"
                android:layout_width="match_parent"
                android:layout_height="match_parent">
    <fragment android:layout_width="match_parent"
              android:layout_height="45dp"
              android:id="@+id/id_fragment_title"
              android:name="com.example.dynamicfragment.TitleFragment"/>
    <RelativeLayout
            android:layout_width="match_parent"
            android:layout_height="match_parent"
            android:layout_below="@+id/id_fragment_title"
            android:id="@+id/rl_content" android:layout_marginTop="-4dp"/>

    <RelativeLayout
            android:layout_width="match_parent"
            android:layout_height="55dp"
            android:layout_alignParentBottom="true"
            android:id="@+id/rl_bottom_bar">

        <RadioGroup
                android:layout_width="match_parent"
                android:layout_height="match_parent"
                android:orientation="horizontal">
            <RadioButton
                    android:id="@+id/rb_weixin"
                    android:layout_width="0dp"
                    android:layout_height="match_parent"
                    android:layout_weight="1"
                    android:button="@null"
                    android:checked="true"
                    android:drawableTop="@drawable/better_selector"
                    android:text="首页"
                    android:textColor="#000"
                    android:gravity="center"/>
            <RadioButton
                    android:id="@+id/rb_address"
                    android:layout_width="0dp"
                    android:layout_height="match_parent"
                    android:layout_weight="1"
                    android:button="@null"
                    android:checked="true"
                    android:drawableTop="@drawable/channel_selector"
                    android:text="通讯录"
                    android:textColor="#000"
                    android:gravity="center"/>
            <RadioButton
                    android:id="@+id/rb_find_friend"
                    android:layout_width="0dp"
                    android:layout_height="match_parent"
                    android:layout_weight="1"
                    android:button="@null"
                    android:checked="true"
                    android:drawableTop="@drawable/message_selector"
                    android:text="发现"
                    android:textColor="#000"
                    android:gravity="center"/>
            <RadioButton
                    android:id="@+id/rb_my"
                    android:layout_width="0dp"
                    android:layout_height="match_parent"
                    android:layout_weight="1"
                    android:button="@null"
                    android:checked="true"
                    android:drawableTop="@drawable/my_selector"
                    android:text="我"
                    android:textColor="#000"
                    android:gravity="center"/>
        </RadioGroup>
    </RelativeLayout>
</RelativeLayout>
相对布局(RelativeLayout)将子视图以相对位置显示。默认显示在父视图的左上角。
    android:layout_alignParentBottom //布局在页面的最底部
    android:layout_alignParentTop  //布局在页面的最顶部
    android:layout_alignParentRight  //布局在页面的最右部
    android:layout_alignParentLeft  //布局在页面的最左部
关联fragment常用法是 给Framelayout 设置ID,然后到代码里去进行add 或者replace操作,让Fragment去处理数据。除此之外,还有一种形式就是 在布局里加入该fragment的全类名。
android:name="com.example.dynamicfragment.TitleFragment"
之后写每个按钮需要显示的页面布局
content_fragment.xml
<?xml version="1.0" encoding="utf-8"?>
<LinearLayout xmlns:android="http://schemas.android.com/apk/res/android"
              android:orientation="vertical"
              android:layout_width="match_parent"
              android:layout_height="match_parent">

    <TextView
            android:id="@+id/textView"
            android:text="这是主页面"
            android:textSize="30sp"
            android:gravity="center"
            android:layout_width="match_parent"
            android:layout_height="wrap_content"/>
</LinearLayout>
address_fragment.xml
<?xml version="1.0" encoding="utf-8"?>
<LinearLayout xmlns:android="http://schemas.android.com/apk/res/android"
              android:orientation="vertical"
              android:layout_width="match_parent"
              android:layout_height="match_parent">

    <TextView
            android:text="这是通讯录页面"
            android:textSize="30sp"
            android:layout_gravity="center"
            android:layout_width="wrap_content"
            android:layout_height="wrap_content"/>
</LinearLayout>
friend_fragment.xml
<?xml version="1.0" encoding="utf-8"?>
<LinearLayout xmlns:android="http://schemas.android.com/apk/res/android"
              android:orientation="vertical"
              android:layout_width="match_parent"
              android:layout_height="match_parent">

    <TextView
            android:text="这是发现页面"
            android:textSize="30sp"
            android:layout_gravity="center"
            android:layout_width="wrap_content"
            android:layout_height="wrap_content"/>
</LinearLayout>
my_fragment.xml
<?xml version="1.0" encoding="utf-8"?>
<LinearLayout xmlns:android="http://schemas.android.com/apk/res/android"
              android:orientation="vertical"
              android:layout_width="match_parent"
              android:layout_height="match_parent">
    <TextView
            android:text="这是我的页面"
            android:textSize="30sp"
            android:layout_gravity="center"
            android:layout_width="wrap_content"
            android:layout_height="wrap_content"/>
</LinearLayout>
相对应的也有每一个布局的类
ContentFragment.java
package com.example.dynamicfragment;

import android.os.Bundle;
import android.view.LayoutInflater;
import android.view.View;
import android.view.ViewGroup;
import android.widget.TextView;
import androidx.annotation.NonNull;
import androidx.annotation.Nullable;
import androidx.fragment.app.Fragment;

public class ContentFragment extends Fragment {
    private TextView tvMsg;

    @Nullable
    @Override
    public View onCreateView(@NonNull LayoutInflater inflater, @Nullable ViewGroup container, @Nullable Bundle savedInstanceState) {
        View view = inflater.inflate(R.layout.content_fragment, container, false);

        return view;
    }
}
AddressFragment.java
public class AddressFragment extends Fragment {
    @Nullable
    @Override
    public View onCreateView(@NonNull LayoutInflater inflater, @Nullable ViewGroup container, @Nullable Bundle savedInstanceState) {
        View view = inflater.inflate(R.layout.address_fragment,container,false);
        return view;
    }
}
FriendFragment.java
public class FriendFragment extends Fragment {
    @Nullable
    @Override
    public View onCreateView(@NonNull LayoutInflater inflater, @Nullable ViewGroup container, @Nullable Bundle savedInstanceState) {
        View view = inflater.inflate(R.layout.friend_fragment, container, false);
        return view;
    }
}
MyFragment.java
public class MyFragment extends Fragment {
    @Nullable
    @Override
    public View onCreateView(@NonNull LayoutInflater inflater, @Nullable ViewGroup container, @Nullable Bundle savedInstanceState) {
        View view = inflater.inflate(R.layout.my_fragment,container,false);
        return view;
    }
}
在MainActivity中写交互的逻辑代码,定义每一个按钮和视图类。
package com.example.dynamicfragment;

import android.os.Bundle;
import android.view.View;
import android.widget.RadioButton;
import androidx.appcompat.app.AppCompatActivity;
import androidx.fragment.app.FragmentManager;
import androidx.fragment.app.FragmentTransaction;

public class MainActivity extends AppCompatActivity implements View.OnClickListener {
    private RadioButton mTabWeixin;
    private RadioButton mTabFriend;
    private RadioButton mTabAddress;
    private RadioButton mTabMy;

    private ContentFragment mWeixin;
    private FriendFragment mFriend;
    private AddressFragment mAddress;
    private MyFragment mMy;

    @Override
    protected void onCreate(Bundle savedInstanceState) {
        super.onCreate(savedInstanceState);
        setContentView(R.layout.dynamic_fragment);
        //初始化控件
        mTabWeixin = findViewById(R.id.rb_weixin);
        mTabWeixin.setOnClickListener(this);
        mTabFriend = findViewById(R.id.rb_find_friend);
        mTabFriend.setOnClickListener(this);
        mTabAddress = findViewById(R.id.rb_address);
        mTabAddress.setOnClickListener(this);
        mTabMy = findViewById(R.id.rb_my);
        mTabMy.setOnClickListener(this);
        mWeixin = new ContentFragment();
        mFriend = new FriendFragment();
        mAddress = new AddressFragment();
        mMy = new MyFragment();

        //默认的主页
        mTabWeixin.setChecked(true);
        setDefaultFragment();
    }

    private void setDefaultFragment() {
        //1.获取fragment管理器
        FragmentManager fm = getSupportFragmentManager();
        //2.通过fragment管理器获取 fragment提交事务对象
        FragmentTransaction transaction = fm.beginTransaction();
        //3.调用replace方法  将fragment替换容器视图
        transaction.replace(R.id.rl_content, mWeixin);
        //4.提交事务
        transaction.commit();
    }

    @Override
    public void onClick(View view) {
        FragmentManager fm = getSupportFragmentManager();
        FragmentTransaction transaction = fm.beginTransaction();

        switch (view.getId()) {
            case R.id.rb_weixin:
                transaction.replace(R.id.rl_content, mWeixin);
                break;
            case R.id.rb_find_friend:
                transaction.replace(R.id.rl_content, mFriend);
                break;
            case R.id.rb_address:
                transaction.replace(R.id.rl_content,mAddress);
                break;
            case R.id.rb_my:
                transaction.replace(R.id.rl_content,mMy);
                break;
        }
        transaction.commit();
    }
}
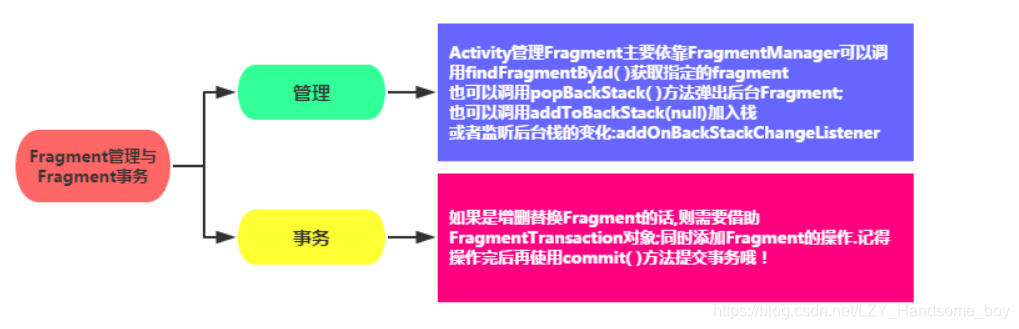
在MainActivity中用到了FragmentManager管理,我经过查阅资料了解到了其执行的原理
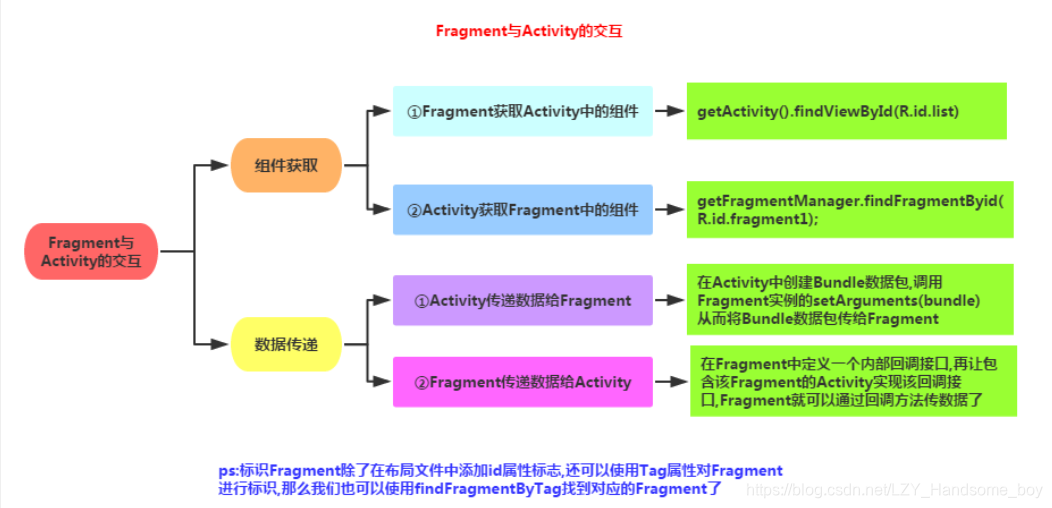
 还了解到了Fragment和Activity的交互方式。
此外,在相对布局里面的按钮也要做状态的区分。
<?xml version="1.0" encoding="utf-8"?>
<selector xmlns:android="http://schemas.android.com/apk/res/android">
    <!--
        android:state_checked如果是false表示未选中,如果是true表示为空间被选中
    -->
    <!--
        android:state_pressed 表示按的状态,如果为true表示按中显示的图片
    -->
    <item
            android:drawable="@mipmap/tab_better_normal"
            android:state_checked="false"/>
    <item
            android:drawable="@mipmap/tab_better_pressed"
            android:state_checked="true"/>

</selector>