一、背景概述
最近要做一些数据解析的操作,有部分数据需要解析为Excel,顺便在网上学了一下Python的xlwt模块,并进行了简单的封装,可以完成读写操作,代码在这里记录一下。
版权声明:本文为【欧阳鹏】原创,依据 CC BY-SA 4.0 许可证进行授权,欢迎转载,转载请附上出处链接及本声明。【博客地址 http://blog.csdn.net/ouyang_peng】
二、xlrt读取Excel封装
# -*- coding: utf-8 -*-
import xlrd
import xlwt
class ReadExcel:
    """
       此类专门用于读取Excel
    """
    # __workbook用于存放excel文件的对象
    __workbook = None
    # __sheet用于存放excel文件中一张表格的对象,文件操作时主要操作该对象
    __sheet = None
    # __print是一个调试参数,当该参数设置为True时打印读取的内容
    __print = False  # 用于开启全局打印

    def __init__(self, file_name, sheet_name):
        """
         类的初始化方法,在类初始化的时候被调用
        :param file_name:excel的文件名
        :param sheet_name:excel中需要访问的sheet名。
        """
        ReadExcel.__workbook = xlrd.open_workbook(file_name)

        # 根据sheet名称获取sheet内容
        ReadExcel.__sheet = ReadExcel.__workbook.sheet_by_name(sheet_name)

    def get_number_of_rows(self):
        """
        获取表格中内容的最大行数
        :return: __number_of_row
        """
        __rows_number = self.__sheet.nrows
        if ReadExcel.__print is True:
            print(__rows_number)
        return __rows_number

    def get_number_of_cols(self):
        """
        获取表格中内容的最大列数
        :return: __number_of_cols
        """
        __cols_number = self.__sheet.ncols
        if ReadExcel.__print is True:
            print(__cols_number)
        return __cols_number

    def get_value_of_row(self, row_index):
        """
      获取某一行的所有值构成的列表
        :param row_index: 行号
        :return: 行内容组成的列表
        """
        __row_value = self.__sheet.row_values(row_index)
        if ReadExcel.__print is True:
            print(__row_value)
        return __row_value

    def get_value_of_col(self, col_index):
        """
        获取某一列的所有值构成的列表
        :param col_index: 列号
        :return: 列中内容组成的列表
        """
        __col_value = self.__sheet.col_values(col_index)
        if ReadExcel.__print is True:
            print(__col_value)
        return __col_value

    def get_value_of_cell(self, row_index, col_index):
        """
        获取某一个单元格中的值
        :param row_index: 行号
        :param col_index: 列号
        :return: 单元格中的内容
        """
        # 第row_index行 col_index列是内容
        __cell_value = self.__sheet.cell(row_index, col_index).value
        if ReadExcel.__print is True:
            print(__cell_value)
        return __cell_value

    def get_value_of_area(self, row_start_index, row_end_index, col_start_index, col_end_index):
        """
        获取某一个区域的所有值构成的二维列表
        :param row_start_index: 该区域行号的起始值
        :param row_end_index: 该区域行号的结束值
        :param col_start_index: 该区域列号的起始值
        :param col_end_index: 该区域列号的结束值
        :return: 返回该区域的值构成的列表
        """
        __area_value = []
        __all_content = self.get_all_content()
        for row in range(row_start_index, row_end_index):
            __data_temp = []
            for col in range(col_start_index, col_end_index):
                __data_temp.append(__all_content[row][col])
            __area_value.append(__data_temp)
        return __area_value

    def get_all_content(self):
        """
        获取表格中所有的内容构成的二维列表
        :return: 返回表格中所有内容的列表
        """
        __all_content = []
        __rows_num = self.get_number_of_rows()
        for temp in range(__rows_num):
            __value_of_row = self.get_value_of_row(temp)
            __all_content.append(__value_of_row)
        if ReadExcel.__print is True:
            print(__all_content)
        return __all_content

    def get_title_of_row(self, row_index, col_start_index, col_end_index):
        """
        获取行标题构成的列表
        :param row_index: 标题所在的行号
        :param col_start_index: 标题所在的列起始号
        :param col_end_index: 标题所在的列终止号
        :return: 返回行标题的列表
        """
        __row_value = self.get_value_of_row(row_index)
        __row_title = __row_value[col_start_index:col_end_index]
        if ReadExcel.__print is True:
            print(__row_title)
        return __row_title

    def get_title_of_col(self, col_index, row_start_index, row_end_index):
        """
        获取列标题构成的列表
        :param col_index: 标题所在的列号
        :param row_start_index: 标题所在的行起始号
        :param row_end_index: 标题所在的行终止号
        :return: 返回列标题的列表
        """
        __col_value = self.get_value_of_col(col_index)
        __col_title = __col_value[row_start_index:row_end_index]
        if ReadExcel.__print is True:
            print(__col_title)
        return __col_title
三、xlwt读取Excel封装
# -*- coding: utf-8 -*-
import xlrd
import xlwt


class WriteExcel:
    """
    此类专门用于写入Excel
    """
    # __workbook用于存放excel文件的对象
    __workbook = None
    # __sheet用于存放excel文件中一张表格的对象,文件操作时主要操作该对象
    __sheets = {}
    # __style表示的是python写入excel中的格式。
    __style = None

    def __init__(self):
        WriteExcel.__workbook = xlwt.Workbook(encoding='utf-8')
        WriteExcel.__style = xlwt.XFStyle()  # 初始化样式

    def addSheet(self, sheet_name):
        """
        添加单元格
        :param sheet_name: 单元格名称
        """
        self.__sheets[sheet_name] = WriteExcel.__workbook.add_sheet(sheet_name)

    @staticmethod
    def set_col_width(col_index, one_row_font_num, sheet_name):
        """
        设置列宽和自动换行       256是以0字符作为衡量单位,一行存放one_row_font_num个字符
        :param col_index:          列的索引值
        :param one_row_font_num:   一列包含的字符数
        :param sheet_name:         单元格名称
        :return:
        """
        WriteExcel.__sheets[sheet_name].col(col_index).width = 256 * one_row_font_num
        WriteExcel.__style.alignment.wrap = 1

    @staticmethod
    def set_style(name='Arial', height=200, colour_index=0x7FFF, bold=False, underline=False, italic=False,
                  borders=True, borders_colour_index=0x40,
                  backgroud_color=0x01, alignment=None):
        """
        设置单元格格式
        :param name:  字体名
        :param height: 字体高度
        :param colour_index: 字体颜色
        :param bold: 字体是否加粗
        :param borders: 是否有边框
        :param borders_colour_index:边框颜色
        :param backgroud_color: 单元格背景颜色
        :param alignment:单元格对齐方式
        :return: 单元格格式
        """
        # 初始化样式
        __style = xlwt.XFStyle()

        #  字体设置
        __font = xlwt.Font()  # 为样式创建字体
        # 字体
        __font.name = name
        __font.height = height
        # 颜色索引
        __font.colour_index = colour_index
        # 颜色也可以从定义好的map中去取
        # __font.colour_index = xlwt.Style.colour_map['red']

        # 加粗
        __font.bold = bold
        # 下划线
        __font.underline = underline
        # 斜体
        __font.italic = italic
        __style.font = __font

        # 设置单元格背景颜色
        pattern = xlwt.Pattern()
        # 设置背景颜色的模式
        pattern.pattern = xlwt.Pattern.SOLID_PATTERN
        # 背景颜色
        pattern.pattern_fore_colour = backgroud_color
        __style.pattern = pattern

        # 设置单元格的对齐方式,默认水平垂直居中
        if alignment is None:
            __alignment = xlwt.Alignment()
            # 水平居中
            __alignment.horz = xlwt.Alignment.HORZ_CENTER
            # 垂直居中
            __alignment.vert = xlwt.Alignment.VERT_CENTER
            __style.alignment = __alignment
        else:
            __style.alignment = alignment

        #  边框设置
        if borders is True:
            __borders = xlwt.Borders()
            __borders.left = xlwt.Borders.MEDIUM
            __borders.right = xlwt.Borders.MEDIUM
            __borders.top = xlwt.Borders.MEDIUM
            __borders.bottom = xlwt.Borders.MEDIUM
            __borders.left_colour = borders_colour_index
            __borders.right_colour = borders_colour_index
            __borders.top_colour = borders_colour_index
            __borders.bottom_colour = borders_colour_index
            __style.borders = __borders

        WriteExcel.__style = __style  # 修改字体格式
        return __style

    def save_excel(self, path):
        """
        保存表格
        :param path: 保存的路径
        """
        self.__workbook.save(path)

    def put_value_in_cell(self, value, row_index, col_index, sheet_name):
        """
        把字符串填入表格的单元格
        :param value:要填入的值
        :param row_index:要填入值所在的行号
        :param col_index:要填入值所在的列号
        :param sheet_name 单元格名称
        """
        self.__sheets[sheet_name].write(row_index, col_index, value, WriteExcel.__style)

    def put_value_in_row(self, value, row_index, col_index, sheet_name):
        """
        把列表横向填入表格
        :param value: 需要填入的列表
        :param row_index: 填入列表所在的起始行
        :param col_index: 填入列表所在的起始列
        :param sheet_name: sheet名
        """
        __row = row_index
        __col = col_index
        for __value in value:
            self.put_value_in_cell(__value, __row, __col, sheet_name)
            __col = __col + 1

    def put_value_in_col(self, value, row_index, col_index, sheet_name):
        """
        把列表纵向填入表格
        :param value: 需要填入的列表
        :param row_index: 填入列表所在的起始行
        :param col_index: 填入列表所在的起始列
        :param sheet_name: sheet名
        :return:
        """
        __row = row_index
        __col = col_index
        for __value in value:
            self.put_value_in_cell(__value, __row, __col, sheet_name)
            __row = __row + 1

    def put_value_in_area(self, area_value, row_index, col_index, sheet_name, one_row_font_num=30):
        """
        把一个数组按顺序填入表格
        :param area_value: 需要填入的数组   (某一个区域的所有值构成的二维列表)
        :param row_index: 填入数组所在的起始行
        :param col_index: 填入数组所在的起始列
        :param sheet_name: sheet名
        :param one_row_font_num 单元格的宽度
        :return:
        """
        __row = row_index
        __col = col_index
        # 遍历传入进来的某一个区域的所有值构成的二维列表,每次遍历得到一行的数据
        for __row_list in area_value:
            # 遍历每一行数据 然后依次一个单元格一个单元格的写入数据 ,每次遍历得到一行中的某一列的数据
            for cell_value in __row_list:
                self.set_col_width(__col, one_row_font_num, sheet_name)
                self.put_value_in_cell(cell_value, __row, __col, sheet_name)
                __col = __col + 1
            __col = col_index  # 换行
            __row = __row + 1
四、简单测试一下
完整代码如下所示,简单的封装了读取Excel和写入Excel的两个对象,分别是ReadExcel和WriteExcel类。
4.1 完整源代码
# -*- coding: utf-8 -*-
"""
参考博客地址:
https://github.com/python-excel/xlwt
https://pypi.org/project/xlwt/
https://xlwt.readthedocs.io/en/latest/
https://xlwt.readthedocs.io/en/latest/api.html

https://blog.csdn.net/hh199203/article/details/86309110
https://www.jb51.net/article/154535.htm
https://www.cnblogs.com/hushaojun/p/7792550.html
https://www.crifan.com/python_xlwt_set_cell_background_color/
https://www.cnblogs.com/xiaodingdong/p/8012282.html
https://blog.csdn.net/weixin_44065501/article/details/88874643
https://www.cnblogs.com/xiao-apple36/p/9603499.html
"""
import xlrd
import xlwt


class ReadExcel:
    """
       此类专门用于读取Excel
    """
    # __workbook用于存放excel文件的对象
    __workbook = None
    # __sheet用于存放excel文件中一张表格的对象,文件操作时主要操作该对象
    __sheet = None
    # __print是一个调试参数,当该参数设置为True时打印读取的内容
    __print = False  # 用于开启全局打印

    def __init__(self, file_name, sheet_name):
        """
         类的初始化方法,在类初始化的时候被调用
        :param file_name:excel的文件名
        :param sheet_name:excel中需要访问的sheet名。
        """
        ReadExcel.__workbook = xlrd.open_workbook(file_name)

        # 根据sheet名称获取sheet内容
        ReadExcel.__sheet = ReadExcel.__workbook.sheet_by_name(sheet_name)

    def get_number_of_rows(self):
        """
        获取表格中内容的最大行数
        :return: __number_of_row
        """
        __rows_number = self.__sheet.nrows
        if ReadExcel.__print is True:
            print(__rows_number)
        return __rows_number

    def get_number_of_cols(self):
        """
        获取表格中内容的最大列数
        :return: __number_of_cols
        """
        __cols_number = self.__sheet.ncols
        if ReadExcel.__print is True:
            print(__cols_number)
        return __cols_number

    def get_value_of_row(self, row_index):
        """
      获取某一行的所有值构成的列表
        :param row_index: 行号
        :return: 行内容组成的列表
        """
        __row_value = self.__sheet.row_values(row_index)
        if ReadExcel.__print is True:
            print(__row_value)
        return __row_value

    def get_value_of_col(self, col_index):
        """
        获取某一列的所有值构成的列表
        :param col_index: 列号
        :return: 列中内容组成的列表
        """
        __col_value = self.__sheet.col_values(col_index)
        if ReadExcel.__print is True:
            print(__col_value)
        return __col_value

    def get_value_of_cell(self, row_index, col_index):
        """
        获取某一个单元格中的值
        :param row_index: 行号
        :param col_index: 列号
        :return: 单元格中的内容
        """
        # 第row_index行 col_index列是内容
        __cell_value = self.__sheet.cell(row_index, col_index).value
        if ReadExcel.__print is True:
            print(__cell_value)
        return __cell_value

    def get_value_of_area(self, row_start_index, row_end_index, col_start_index, col_end_index):
        """
        获取某一个区域的所有值构成的二维列表
        :param row_start_index: 该区域行号的起始值
        :param row_end_index: 该区域行号的结束值
        :param col_start_index: 该区域列号的起始值
        :param col_end_index: 该区域列号的结束值
        :return: 返回该区域的值构成的列表
        """
        __area_value = []
        __all_content = self.get_all_content()
        for row in range(row_start_index, row_end_index):
            __data_temp = []
            for col in range(col_start_index, col_end_index):
                __data_temp.append(__all_content[row][col])
            __area_value.append(__data_temp)
        return __area_value

    def get_all_content(self):
        """
        获取表格中所有的内容构成的二维列表
        :return: 返回表格中所有内容的列表
        """
        __all_content = []
        __rows_num = self.get_number_of_rows()
        for temp in range(__rows_num):
            __value_of_row = self.get_value_of_row(temp)
            __all_content.append(__value_of_row)
        if ReadExcel.__print is True:
            print(__all_content)
        return __all_content

    def get_title_of_row(self, row_index, col_start_index, col_end_index):
        """
        获取行标题构成的列表
        :param row_index: 标题所在的行号
        :param col_start_index: 标题所在的列起始号
        :param col_end_index: 标题所在的列终止号
        :return: 返回行标题的列表
        """
        __row_value = self.get_value_of_row(row_index)
        __row_title = __row_value[col_start_index:col_end_index]
        if ReadExcel.__print is True:
            print(__row_title)
        return __row_title

    def get_title_of_col(self, col_index, row_start_index, row_end_index):
        """
        获取列标题构成的列表
        :param col_index: 标题所在的列号
        :param row_start_index: 标题所在的行起始号
        :param row_end_index: 标题所在的行终止号
        :return: 返回列标题的列表
        """
        __col_value = self.get_value_of_col(col_index)
        __col_title = __col_value[row_start_index:row_end_index]
        if ReadExcel.__print is True:
            print(__col_title)
        return __col_title


class WriteExcel:
    """
    此类专门用于写入Excel
    """
    # __workbook用于存放excel文件的对象
    __workbook = None
    # __sheet用于存放excel文件中一张表格的对象,文件操作时主要操作该对象
    __sheets = {}
    # __style表示的是python写入excel中的格式。
    __style = None

    def __init__(self):
        WriteExcel.__workbook = xlwt.Workbook(encoding='utf-8')
        WriteExcel.__style = xlwt.XFStyle()  # 初始化样式

    def addSheet(self, sheet_name):
        """
        添加单元格
        :param sheet_name: 单元格名称
        """
        self.__sheets[sheet_name] = WriteExcel.__workbook.add_sheet(sheet_name)

    @staticmethod
    def set_col_width(col_index, one_row_font_num, sheet_name):
        """
        设置列宽和自动换行       256是以0字符作为衡量单位,一行存放one_row_font_num个字符
        :param col_index:          列的索引值
        :param one_row_font_num:   一列包含的字符数
        :param sheet_name:         单元格名称
        :return:
        """
        WriteExcel.__sheets[sheet_name].col(col_index).width = 256 * one_row_font_num
        WriteExcel.__style.alignment.wrap = 1

    @staticmethod
    def set_style(name='Arial', height=200, colour_index=0x7FFF, bold=False, underline=False, italic=False,
                  borders=True, borders_colour_index=0x40,
                  backgroud_color=0x01, alignment=None):
        """
        设置单元格格式
        :param name:  字体名
        :param height: 字体高度
        :param colour_index: 字体颜色
        :param bold: 字体是否加粗
        :param borders: 是否有边框
        :param borders_colour_index:边框颜色
        :param backgroud_color: 单元格背景颜色
        :param alignment:单元格对齐方式
        :return: 单元格格式
        """
        # 初始化样式
        __style = xlwt.XFStyle()

        #  字体设置
        __font = xlwt.Font()  # 为样式创建字体
        # 字体
        __font.name = name
        __font.height = height
        # 颜色索引
        __font.colour_index = colour_index
        # 颜色也可以从定义好的map中去取
        # __font.colour_index = xlwt.Style.colour_map['red']

        # 加粗
        __font.bold = bold
        # 下划线
        __font.underline = underline
        # 斜体
        __font.italic = italic
        __style.font = __font

        # 设置单元格背景颜色
        pattern = xlwt.Pattern()
        # 设置背景颜色的模式
        pattern.pattern = xlwt.Pattern.SOLID_PATTERN
        # 背景颜色
        pattern.pattern_fore_colour = backgroud_color
        __style.pattern = pattern

        # 设置单元格的对齐方式,默认水平垂直居中
        if alignment is None:
            __alignment = xlwt.Alignment()
            # 水平居中
            __alignment.horz = xlwt.Alignment.HORZ_CENTER
            # 垂直居中
            __alignment.vert = xlwt.Alignment.VERT_CENTER
            __style.alignment = __alignment
        else:
            __style.alignment = alignment

        #  边框设置
        if borders is True:
            __borders = xlwt.Borders()
            __borders.left = xlwt.Borders.MEDIUM
            __borders.right = xlwt.Borders.MEDIUM
            __borders.top = xlwt.Borders.MEDIUM
            __borders.bottom = xlwt.Borders.MEDIUM
            __borders.left_colour = borders_colour_index
            __borders.right_colour = borders_colour_index
            __borders.top_colour = borders_colour_index
            __borders.bottom_colour = borders_colour_index
            __style.borders = __borders

        WriteExcel.__style = __style  # 修改字体格式
        return __style

    def save_excel(self, path):
        """
        保存表格
        :param path: 保存的路径
        """
        self.__workbook.save(path)

    def put_value_in_cell(self, value, row_index, col_index, sheet_name):
        """
        把字符串填入表格的单元格
        :param value:要填入的值
        :param row_index:要填入值所在的行号
        :param col_index:要填入值所在的列号
        :param sheet_name 单元格名称
        """
        self.__sheets[sheet_name].write(row_index, col_index, value, WriteExcel.__style)

    def put_value_in_row(self, value, row_index, col_index, sheet_name):
        """
        把列表横向填入表格
        :param value: 需要填入的列表
        :param row_index: 填入列表所在的起始行
        :param col_index: 填入列表所在的起始列
        :param sheet_name: sheet名
        """
        __row = row_index
        __col = col_index
        for __value in value:
            self.put_value_in_cell(__value, __row, __col, sheet_name)
            __col = __col + 1

    def put_value_in_col(self, value, row_index, col_index, sheet_name):
        """
        把列表纵向填入表格
        :param value: 需要填入的列表
        :param row_index: 填入列表所在的起始行
        :param col_index: 填入列表所在的起始列
        :param sheet_name: sheet名
        :return:
        """
        __row = row_index
        __col = col_index
        for __value in value:
            self.put_value_in_cell(__value, __row, __col, sheet_name)
            __row = __row + 1

    def put_value_in_area(self, area_value, row_index, col_index, sheet_name, one_row_font_num=30):
        """
        把一个数组按顺序填入表格
        :param area_value: 需要填入的数组   (某一个区域的所有值构成的二维列表)
        :param row_index: 填入数组所在的起始行
        :param col_index: 填入数组所在的起始列
        :param sheet_name: sheet名
        :param one_row_font_num 单元格的宽度
        :return:
        """
        __row = row_index
        __col = col_index
        # 遍历传入进来的某一个区域的所有值构成的二维列表,每次遍历得到一行的数据
        for __row_list in area_value:
            # 遍历每一行数据 然后依次一个单元格一个单元格的写入数据 ,每次遍历得到一行中的某一列的数据
            for cell_value in __row_list:
                self.set_col_width(__col, one_row_font_num, sheet_name)
                self.put_value_in_cell(cell_value, __row, __col, sheet_name)
                __col = __col + 1
            __col = col_index  # 换行
            __row = __row + 1


if __name__ == "__main__":
    # 读取 test_r.xlsx 的数据并打印
    sheet_r = ReadExcel("test_r.xlsx", "Sheet1")

    # 读取第一行,从第一个读取到第六个
    row_title = sheet_r.get_title_of_row(0, 0, 6)
    print(row_title)

    # 读取第二列,从第二个读取到第六个
    col_title = sheet_r.get_title_of_col(1, 1, 6)
    print(col_title)

    # 从第1行读取到第11行,从第1列读取到第7列
    data = sheet_r.get_value_of_area(0, 11, 0, 7)
    print(data)

    # 将 读取到的 test_r.xlsx 数据 写入 test_w.xls 中
    sheet_w = WriteExcel()
    sheet_name = "测试".decode("utf-8")
    sheet_w.addSheet(sheet_name)

    # 字体不加粗
    WriteExcel.set_style(bold=False)
    # 从第一行 第二列开始写数据
    sheet_w.put_value_in_row(row_title, 0, 1, sheet_name)

    # 从第二行 第一列开始写数据
    sheet_w.put_value_in_col(col_title, 1, 0, sheet_name)

    __alignment = xlwt.Alignment()
    # 水平左对齐
    __alignment.horz = xlwt.Alignment.HORZ_LEFT
    # 垂直居中
    __alignment.vert = xlwt.Alignment.VERT_CENTER

    # 取出两个颜色索引
    colour_index_font = xlwt.Style.colour_map['red']  # 红色
    # colour_index_backgroud = xlwt.Style.colour_map['black']  # 黑色
    colour_index_backgroud = xlwt.Style.colour_map['ivory']  # 乳白色
    # 字体加粗,斜体,字体颜色为红色,单元格背景为黑色
    WriteExcel.set_style(bold=True, italic=True, colour_index=colour_index_font, backgroud_color=colour_index_backgroud,
                         alignment=__alignment)
    # 从第二行 第二列开始写数据,每个单元格宽度为15
    sheet_w.put_value_in_area(data, 2, 2, sheet_name, 15)
    sheet_w.save_excel("test_w.xls")
如上代码所示:读取test_r.xlsx的Excel数据,并且写入到一个新的Excel文档test_w.xls中。
4.2 运行效果
- test_r.xlsx
test_r.xlsx文档内容如下所示:

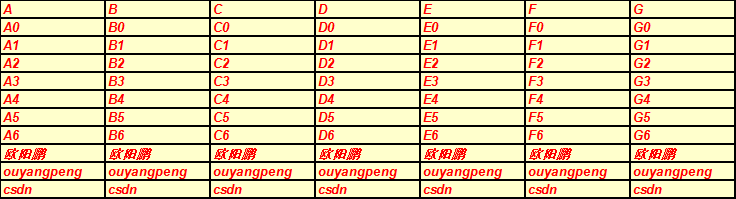
- test_w.xls
生成出来的test_w.xls文档内容如下所示:

4.3 运行结果分析一下
4.3.1 分析读Excel操作
运行完之后,读取Excel打印出来的日志如下所示:
C:\Python27\python.exe "C:/Code Python/xxx/excelUtils.py"
[u'A', u'B', u'C', u'D', u'E', u'F']
[u'B0', u'B1', u'B2', u'B3', u'B4']
[[u'A', u'B', u'C', u'D', u'E', u'F', u'G'], [u'A0', u'B0', u'C0', u'D0', u'E0', u'F0', u'G0'], [u'A1', u'B1', u'C1', u'D1', u'E1', u'F1', u'G1'], [u'A2', u'B2', u'C2', u'D2', u'E2', u'F2', u'G2'], [u'A3', u'B3', u'C3', u'D3', u'E3', u'F3', u'G3'], [u'A4', u'B4', u'C4', u'D4', u'E4', u'F4', u'G4'], [u'A5', u'B5', u'C5', u'D5', u'E5', u'F5', u'G5'], [u'A6', u'B6', u'C6', u'D6', u'E6', u'F6', u'G6'], [u'\u6b27\u9633\u9e4f', u'\u6b27\u9633\u9e4f', u'\u6b27\u9633\u9e4f', u'\u6b27\u9633\u9e4f', u'\u6b27\u9633\u9e4f', u'\u6b27\u9633\u9e4f', u'\u6b27\u9633\u9e4f'], [u'ouyangpeng', u'ouyangpeng', u'ouyangpeng', u'ouyangpeng', u'ouyangpeng', u'ouyangpeng', u'ouyangpeng'], [u'csdn', u'csdn', u'csdn', u'csdn', u'csdn', u'csdn', u'csdn']]

Process finished with exit code 0
第一条打印: 读取第一行,从第一个读取到第六个
读取出来的数据是
[u'A', u'B', u'C', u'D', u'E', u'F']

第二条打印: 读取第二列,从第二个读取到第六个
读取出来的数据是
[u'B0', u'B1', u'B2', u'B3', u'B4']

第三条打印: 从第1行读取到第11行,从第1列读取到第7列
读取出来的数据是
[[u'A', u'B', u'C', u'D', u'E', u'F', u'G'], [u'A0', u'B0', u'C0', u'D0', u'E0', u'F0', u'G0'], [u'A1', u'B1', u'C1', u'D1', u'E1', u'F1', u'G1'], [u'A2', u'B2', u'C2', u'D2', u'E2', u'F2', u'G2'], [u'A3', u'B3', u'C3', u'D3', u'E3', u'F3', u'G3'], [u'A4', u'B4', u'C4', u'D4', u'E4', u'F4', u'G4'], [u'A5', u'B5', u'C5', u'D5', u'E5', u'F5', u'G5'], [u'A6', u'B6', u'C6', u'D6', u'E6', u'F6', u'G6'], [u'\u6b27\u9633\u9e4f', u'\u6b27\u9633\u9e4f', u'\u6b27\u9633\u9e4f', u'\u6b27\u9633\u9e4f', u'\u6b27\u9633\u9e4f', u'\u6b27\u9633\u9e4f', u'\u6b27\u9633\u9e4f'], [u'ouyangpeng', u'ouyangpeng', u'ouyangpeng', u'ouyangpeng', u'ouyangpeng', u'ouyangpeng', u'ouyangpeng'], [u'csdn', u'csdn', u'csdn', u'csdn', u'csdn', u'csdn', u'csdn']]

4.3.2 分析写Excel操作

文件名为:test_w.xls
sheet名为:测试
从第一行 第二列开始写数据:
从第二行 第一列开始写数据:

从第二行 第二列开始写数据,每个单元格宽度为15:
水平左对齐,垂直居中,字体加粗,斜体,字体颜色为红色,单元格背景为黑色
就这样基本的操作封装好了,如果有其他的操作可以另外再添加功能。
五、参考链接
-
https://www.crifan.com/python_xlwt_set_cell_background_color/
-
https://blog.csdn.net/weixin_44065501/article/details/88874643

作者:欧阳鹏 欢迎转载,与人分享是进步的源泉!
转载请保留原文地址:https://ouyangpeng.blog.csdn.net/article/details/100925405
☞ 本人QQ: 3024665621
☞ QQ交流群: 123133153
☞ github.com/ouyangpeng
☞ [email protected]
————————————————
版权声明:本文为CSDN博主「欧阳鹏」的原创文章,遵循 CC 4.0 BY-SA 版权协议,转载请附上原文出处链接及本声明。
原文链接:https://ouyangpeng.blog.csdn.net/article/details/100700954
————————————————