网上很多大佬对VVC的代码进行过分析,基本都是从编码端入手。
考虑到从解码端分析代码,一是更加简单(解码流程无需编码工具和编码参数的择优),二是可以配合Draft文本更好地理解视频编解码的流程(解码端也都包含预测、量化、环路滤波、熵解码等流程),所以我想从解码端入手分析一下VVC大致的流程。等到解码端代码分析完后,可以再从编码端深入分析一下。
本文是本系列的第一篇博客,内容是分析解码端将收到的二进制码流bin文件提取成一个个NALU的过程。
注:
- 本文分析的bin文件是利用VTM8.0的编码器,以All Intra配置(IBC 打开)编码100帧得到的二进制码流(TemporalSubsampleRatio: 8,实际编码 ⌈100 / 8⌉ = 13帧)。
- 解码用最简单的:-b str.bin -o dec.yuv
1. 入口函数是decmain.cpp 中的main()函数
(1) main函数先会打印若干信息,比如设备信息。
(2) 调用 DecAppCfg::parseCfg() 解析输入参数,如本文所用的bin文件的名字、重建YUV文件的名字等信息。
(3) 调用 DecApp::decode() 开启解码流程。
2. DecApp::decode()函数
(1) 首先构造了名为nalu的 InputNALUnit 类。
InputNALUnit nalu;
① InputNALUnit是NALUnit的子类,NALUnit类中包含NalUnitType、temporalId等相关信息、还含有判断当前NALU是不是VCLU和SliceNALU的成员函数isVcl() 、isSlice()。
② 此外,InputNALUnit多包含了名为m_Bitstream数据成员(InputBitstream类)。
③ InputBitstream类中的m_fifo数据成员以FIFO顺序存储当前NALU的Bytes数据。
class InputNALUnit : public NALUnit
{
  private:
    InputBitstream m_Bitstream;
  ……
};
struct NALUnit
{
  NalUnitType     m_nalUnitType; ///< nal_unit_type
  uint32_t        m_temporalId;  ///< temporal_id
  uint32_t        m_nuhLayerId;  ///< nuh_layer_id
  uint32_t        m_forbiddenZeroBit;
  uint32_t        m_nuhReservedZeroBit;
  ……
}
(2) 然后判断下一个NALU是不是新图像/AU的第一个NALU。
check if next NAL unit will be the first NAL unit from a new picture or access unit
bool bNewPicture = isNewPicture(&bitstreamFile, &bytestream);
bool bNewAccessUnit = bNewPicture && isNewAccessUnit( bNewPicture, &bitstreamFile, &bytestream );
bool DecApp::isNewPicture(ifstream *bitstreamFile, class InputByteStream *bytestream)
{
  // cannot be a new picture if there haven't been any slices yet、
  //该函数检查Declib::m_bFirstSliceInPicture变量,见下段代码。
  if(m_cDecLib.getFirstSliceInPicture())
  {
    return false;
  }
  ……
bool  getFirstSliceInPicture () const
{ return m_bFirstSliceInPicture; }
Declib::m_bFirstSliceInPicture是一个bool值,该bool值默认为true。在DecSlice::decompressSlice()之后,该值会被设置为false,表示一个slice编码完毕。然后isNewPicture()函数会预先读取下一个NALU的NalUnitType,例如,如果下一个NALU是SPS、PPS等参数集,那就说明是新的图像的新NALU,返回True。
3. bNewPicture == false,进入NALU的提取环节,为本文的分析重点。否则进入第4步,完成该帧的后续处理和输出环节。
(1) 调用byteStreamNALUnit() 解析当前NALU。该函数核心调用_byteStreamNALUnit()。
// find next NAL unit in stream
byteStreamNALUnit(bytestream, nalu.getBitstream().getFifo(), stats);
(2) 根据Draft中B.2.1的语义去提取NALU。
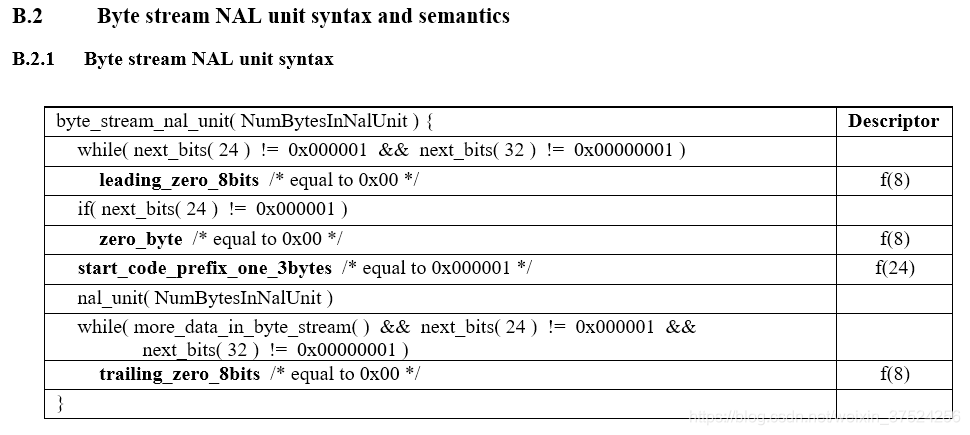
具体步骤为:
① 首先,检查连续 3 / 4 个Bytes 是不是 0x000001 / 0x00000001。如果不是,去掉前缀1个Bytes的0x00。
② 然后,检查连续 3 个Bytes 是不是 0x000001。如果不是,去掉前缀1个Bytes的0x00。
③ 接着,读取接下来连续3个Bytes,应该为起始码0x000001。
④ 核心步骤,依次连续读取接下来连续3个Bytes,每次后移一个Bytes。
如果不是0x000000 或 0x000001 说明还是在该NALU的内容里面,塞进当前NALU。
否则,该3个Bytes是新的NALU的内容,退出该步骤。
⑤ 最后,检查接下来连续 3 / 4 个Bytes 是不是 0x000001 / 0x00000001。如果不是,去掉尾缀1个Bytes的0x00。

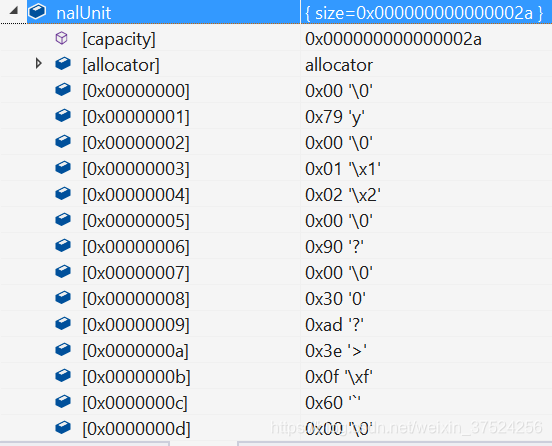
比如上面从00 00 00 01开始到DC 0D 56 81是一个NALU的内容。
- 首先,进入第①步,读取4个Bytes为0x00000001,所以无需去掉前缀0x00。
- 然后,进入第②步,前3个Bytes为0x000000,不是 0x000001,去掉最前面的0x00。
- 接着,进入第③步,读取起始码0x000001。
- 后面是核心步骤,依次连续读取接下来连续3个Bytes,每次后移一个Bytes。上面的数据就应该是依次读取“00 79 00”、“79 00 01”、“00 01 02”、……。如果不是0x000000 或 0x000001 说明还是在该NALU的内容里面,将第一个Bytes (0x00 0x79 0x01 0x02 ……) 塞进当前NALU。否则,该3个Bytes是新的NALU的内容,退出该步骤。
- 最后,检查接下来连续 3 / 4 个Bytes 是不是 0x000001 / 0x00000001。该数据后面4个Bytes就是0x00000001,无需去除尾缀0x00。
最后,该NALU的有效信息为:
代码分析如下(代码过长,删减部分):
static void _byteStreamNALUnit(
  InputByteStream& bs,
  vector<uint8_t>& nalUnit,
  AnnexBStats& stats)
{
//检查连续 3 / 4 个Bytes 是不是 0x000001 / 0x00000001
//如果不是,去掉前缀1个Bytes的0x00
  while ((bs.eofBeforeNBytes(24/8) || bs.peekBytes(24/8) != 0x000001)
  &&     (bs.eofBeforeNBytes(32/8) || bs.peekBytes(32/8) != 0x00000001))
  {
    uint8_t leading_zero_8bits = bs.readByte();
    statBits.bits+=8;
    if(leading_zero_8bits != 0) { THROW( "Leading zero bits not zero" ); }
    stats.m_numLeadingZero8BitsBytes++;
  }

//检查连续 3 个Bytes 是不是 0x000001
//如果不是,去掉前缀1个Bytes的0x00
  if (bs.peekBytes(24/8) != 0x000001)
  {
    uint8_t zero_byte = bs.readByte();
    statBits.bits+=8;
    CHECK( zero_byte != 0, "Zero byte not '0'" );
    stats.m_numZeroByteBytes++;
  }

//读取接下来连续3个Bytes,应该为起始码0x000001
  uint32_t start_code_prefix_one_3bytes = bs.readBytes(24/8);
  statBits.bits+=24;
  if(start_code_prefix_one_3bytes != 0x000001) { THROW( "Invalid code prefix" );}
  stats.m_numStartCodePrefixBytes += 3;

//依次连续读取接下来连续3个Bytes,每次后移一个Bytes。
//比如“00 79 00 01 02 ……”,依次读取“00 79 00”、“79 00 01”、“00 01 02”、……
//如果不是0x000000 或 0x000001 说明还是在该NALU的内容里面,塞进当前NALU。
//否则,该3个Bytes是新的NALU的内容,退出该步骤。
  while (bs.eofBeforeNBytes(24/8) || bs.peekBytes(24/8) > 2)
  {
    nalUnit.push_back(bs.readByte());
  }

//检查接下来连续 3 / 4 个Bytes 是不是 0x000001 / 0x00000001
//如果不是,去掉尾缀1个Bytes的0x00
  while ((bs.eofBeforeNBytes(24/8) || bs.peekBytes(24/8) != 0x000001)
  &&     (bs.eofBeforeNBytes(32/8) || bs.peekBytes(32/8) != 0x00000001))
  {
    uint8_t trailing_zero_8bits = bs.readByte();
    statBits.bits+=8;
    CHECK( trailing_zero_8bits != 0, "Trailing zero bits not '0'" );
    stats.m_numTrailingZero8BitsBytes++;
  }
}
(3) 读完当前NALU信息后,调用read()、readNalUnitHeader()将EBSP转为RBSP去掉防止竞争的0x03、读取NALU的头部有关信息。
// read NAL unit header
read(nalu);
void read(InputNALUnit& nalu)
{
  InputBitstream &bitstream = nalu.getBitstream();
  vector<uint8_t>& nalUnitBuf=bitstream.getFifo();
  // perform anti-emulation prevention
  convertPayloadToRBSP(nalUnitBuf, &bitstream, (nalUnitBuf[0] & 64) == 0);
  bitstream.resetToStart();
  readNalUnitHeader(nalu);
}
void readNalUnitHeader(InputNALUnit& nalu)
{
  InputBitstream& bs = nalu.getBitstream();

  nalu.m_forbiddenZeroBit   = bs.read(1);                 // forbidden zero bit
  nalu.m_nuhReservedZeroBit = bs.read(1);                 // nuh_reserved_zero_bit
  nalu.m_nuhLayerId         = bs.read(6);                 // nuh_layer_id
  CHECK(nalu.m_nuhLayerId > 55, "The value of nuh_layer_id shall be in the range of 0 to 55, inclusive");
  nalu.m_nalUnitType        = (NalUnitType) bs.read(5);   // nal_unit_type
  nalu.m_temporalId         = bs.read(3) - 1;             // nuh_temporal_id_plus1
}
(4) 最后,调用DecLib::decode()进行当前NALU的核心解码流程。该函数内,会根据当前NALU的类型进行针对性地解码。该部分的分析之后博客会展开介绍。
#if JVET_P0288_PIC_OUTPUT
          m_cDecLib.decode(nalu, m_iSkipFrame, m_iPOCLastDisplay, m_targetOlsIdx);
#else
          m_cDecLib.decode(nalu, m_iSkipFrame, m_iPOCLastDisplay);
4. bNewPicture == true,进入环路滤波处理、输出等流程。该部分的分析之后博客会展开介绍。
if ((bNewPicture || !bitstreamFile || nalu.m_nalUnitType == NAL_UNIT_EOS) && !m_cDecLib.getFirstSliceInSequence() && !bPicSkipped)
    {
      if (!loopFiltered || bitstreamFile)
      {
        m_cDecLib.executeLoopFilters();
        m_cDecLib.finishPicture( poc, pcListPic );
      }
      loopFiltered = (nalu.m_nalUnitType == NAL_UNIT_EOS);
      if (nalu.m_nalUnitType == NAL_UNIT_EOS)
      {
        m_cDecLib.setFirstSliceInSequence(true);
      }

    }
    else if ( (bNewPicture || !bitstreamFile || nalu.m_nalUnitType == NAL_UNIT_EOS ) &&
              m_cDecLib.getFirstSliceInSequence () )
    {
      m_cDecLib.setFirstSliceInPicture (true);
    }
