目录
CMake及NDK简介
CMake是一个开源的跨平台自动化建构工具,它使用CMakeLists.txt来描述构建过程,可以产生标准的构建文件。Android平台上使用 CMake进行动态库(C和C++代码)的编译和使用。
NDK(native development kit)是一种基于原生程序接口的软件开发工具。通过此工具开发的程序直接以本地语言运行,而非虚拟机。因此只有java等基于虚拟机运行的语言的程序才会有原生开发工具包。Android中的NDK提供了一系列的工具,帮助开发者快速开发C或C++的动态库,并能自动将so和java应用一起打包成apk。
NDK常使用于:对某些代码进行保护(由于Java代码容易被反编译,而C/C++不容易);为了便于平台的移植;在程序中常常需要调用一些第三方的C/C++库;位了提升某些情况下代码的性能;提高利用某些现存的代码库文件。
- 交叉编译?就是在一个平台上生成另外一个平台的可执行代码。
- JNI是什么?JNI是Java Native Interface的缩写,即Java本地接口,JNI是Java调用Native语言的一种特性。通过JNI可以使得Java与C/C++机型交互。
- 链接库?静态链接库:在编译的链接阶段将所有依赖的代码嵌入到应用程序的内部成为一个文件,运行时能在任何地方执行而不需要单独查找依赖资源,代码体积大。动态链接库:只将地址信息告诉了链接器,运行时才查找依赖资源,不能单独运行,代码体积小。
1. CMake使用
NDK通过工具链文件支持CMake。工具链文件是用于自定义交叉编译工具链行为的CMake文件。用于NDK的工具链文件位于NDK中的 /build/cmake/android.toolchain.cmake。如果安装了Android SDK,则NDK安装在的SDK目录的ndk/version/或ndk-bundle/中。
- 警告1:CMake 拥有自身的内置 NDK 支持。此工作流程不受 Android 支持,并且在使用新的 NDK 版本或使用旧版本的 CMake 时经常损坏。强烈建议不要使用此工作流程,它也不能与 Gradle 配合使用。
Android Gradle 插件会将用于为每个 ABI 和编译类型对执行 CMake 编译的编译参数保存至 cmake_build_command.txt。这些文件位于:<project-root>/<module-root>/.cxx/cmake/<build-type>/<ABI>/。较旧版本的 Android Gradle 插件会将这些文件放入 .externalNativeBuild 目录而不是 .cxx 目录。
1.1 创建NDK项目
- 安装JDK1.8,Android studio3.6.1(2.3版本以后开始支持CMake编译),默认采用的gradle版本为5.6.4。
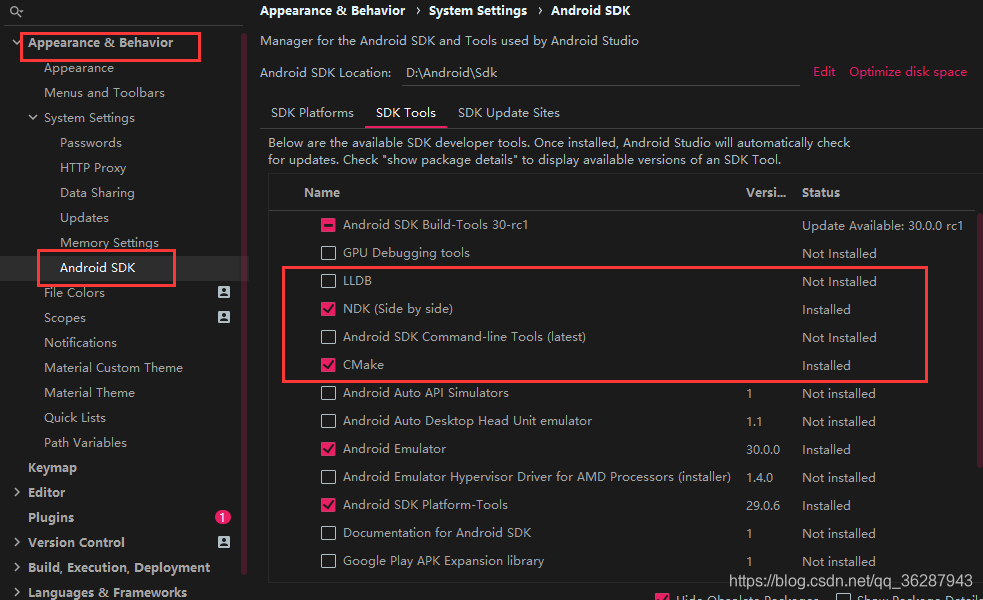
- 在Android studio中下载NDK和CMake,也可在官网:https://developer.android.google.cn/ndk/downloads/下载之后在Android studio中设置其路径。
- 警告2:NDK 库无法在 API 级别低于编译代码所用的 ANDROID_PLATFORM 值的设备上运行。
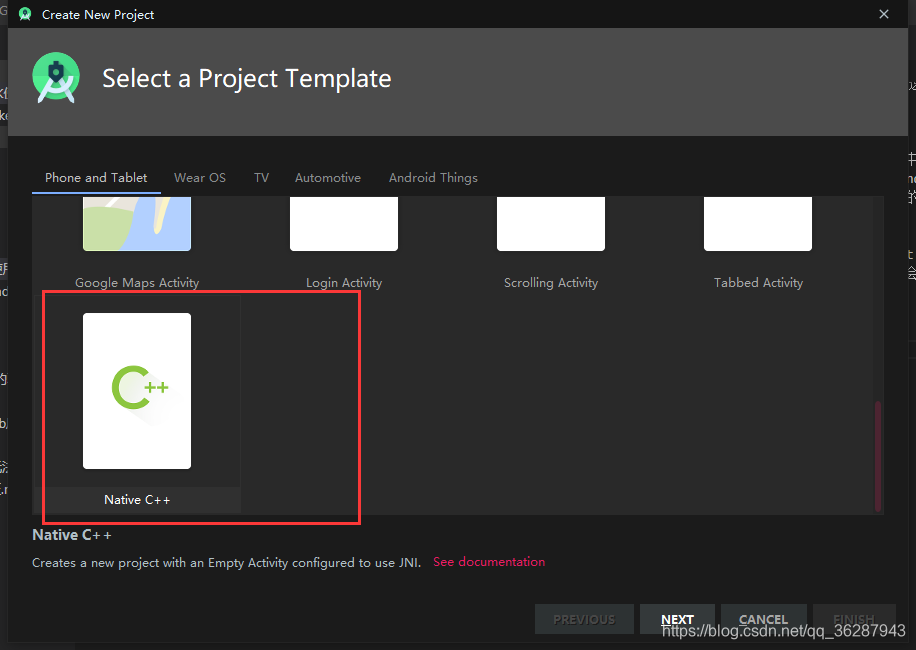
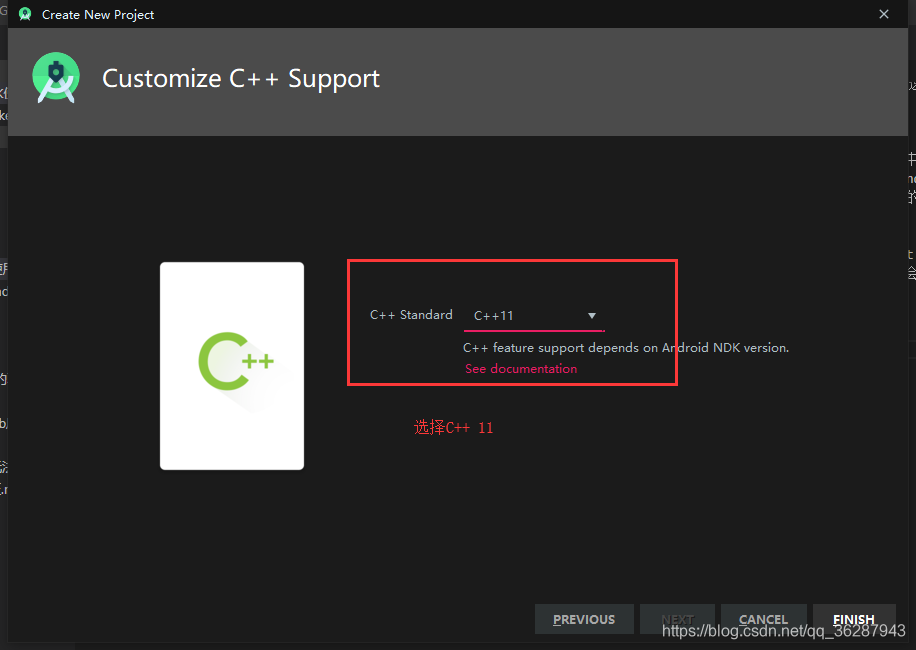
- 创建项目如同所示:
- 通过native打印字符串
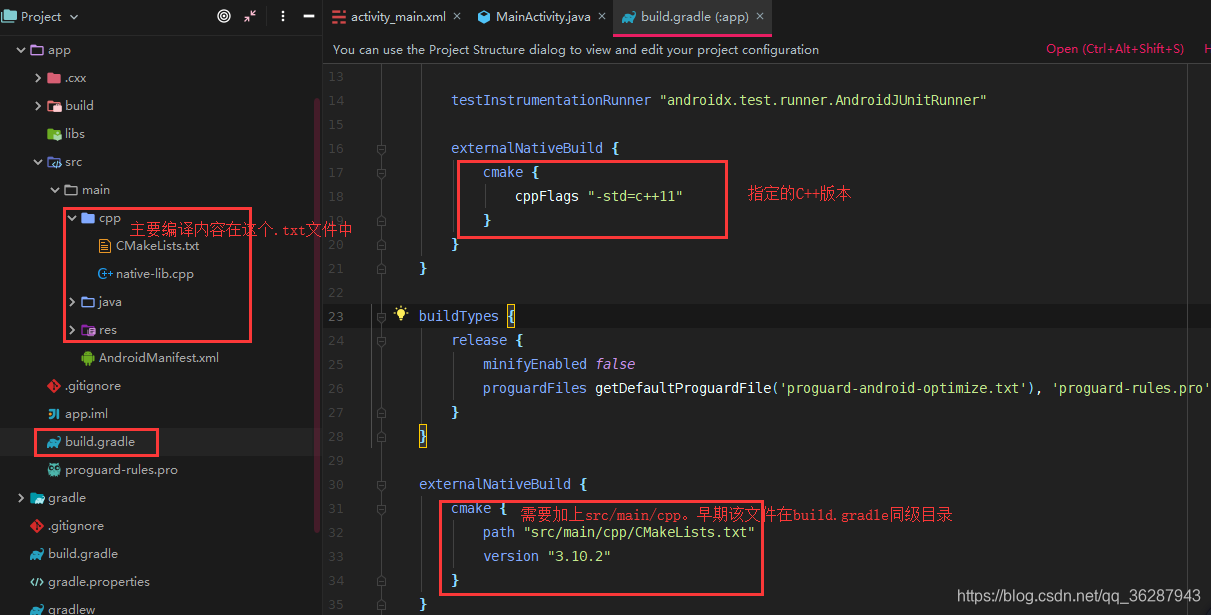
与普通Android项目不同的是,CMake编译的项目在src下面增加了一个cpp目录,在app\build.gradle中增加externalNativeBuild。即把普通工程添加CMake编译选项只需要修改这些地方。得到目录结构如下:
得到的CMakeLists文件:
cmake_minimum_required(VERSION 3.4.1)

# Creates and names a library, sets it as either STATIC
# or SHARED, and provides the relative paths to its source code.
# You can define multiple libraries, and CMake builds them for you.
# Gradle automatically packages shared libraries with your APK.

add_library( # Sets the name of the library.
             native-lib
             # Sets the library as a shared library.
             SHARED
             # Provides a relative path to your source file(s).
             native-lib.cpp )

# Searches for a specified prebuilt library and stores the path as a
# variable. Because CMake includes system libraries in the search path by
# default, you only need to specify the name of the public NDK library
# you want to add. CMake verifies that the library exists before
# completing its build.

find_library( # Sets the name of the path variable.
              log-lib
              # Specifies the name of the NDK library that
              # you want CMake to locate.
              log )

# Specifies libraries CMake should link to your target library. You
# can link multiple libraries, such as libraries you define in this
# build script, prebuilt third-party libraries, or system libraries.

target_link_libraries( # Specifies the target library.
                       native-lib
                       # Links the target library to the log library
                       # included in the NDK.
                       ${log-lib} )
native-lib.cpp代码如下:
#include <jni.h>
#include <string>

extern "C" JNIEXPORT jstring JNICALL
Java_com_example_myapplication_MainActivity_stringFromJNI(
        JNIEnv* env,
        jobject /* this */) {
    std::string hello = "Hello from C++";
    return env->NewStringUTF(hello.c_str());
}
在Android机器上运行之后屏幕将会打印:Hello from C++
1.2 常用语法
# 打印变量
set(var test)
message(${test)
# 打印cmake及文件夹路径
message(${CMAKE_CURRENT_LIST_FILE})
MESSAGE(${CMAKE_CURRENT_LIST_DIR})
# 逻辑判断
IF(TRUE)
    MESSAGE("This is TRUE")
ENDIF()
# 循环
FOREACH(lib ${LIBRARY_OUTPUT_PATH})
    MESSAGE(${lib})
ENDFOREACH()
# 文件操作
FILE(APPEND file_name "123")
FILE(READ file_name test)
FILE(WRITE file_name "321")
1.3 cmake编译动态库
这里简单实现动态库之间的关联示例,新建一个C++ class,在CMakeLists中通过add_library把C++文件变成库,再通过target_link_libraries进行关联
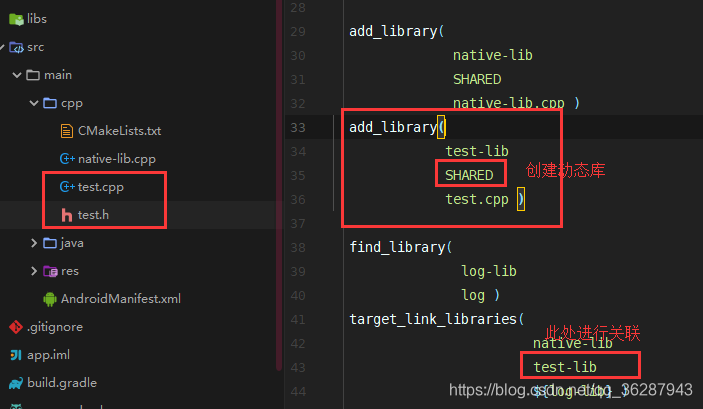
测试代码如下:
// test.h文件
#ifndef MY_APPLICATION_TEST_H
#define MY_APPLICATION_TEST_H
#include <string>
class test {
public:
    std::string getString();
};
#endif //MY_APPLICATION_TEST_H

// test.cpp文件
#include "test.h"
std::string test::getString() {
    return "This is a string message from test";
}

// native-lib.cpp文件
// 引入头文件
#include "test.h"
extern "C" JNIEXPORT jstring JNICALL
Java_com_example_myapplication_MainActivity_stringFromJNI(
        JNIEnv *env,
        jobject /* this */) {
        test test;
    return env->NewStringUTF(test.getString().c_str());
}
在Android机器上运行之后屏幕将会打印:This is a string message from test
2. JNI交互
2.1 静态注册实现Java调用JNI方法
// MainActivity中新增一个native方法
public native String getStringFun();
// AS能自动生成在native-lib.cpp中生成一个方法
extern "C" //与c代码兼容
JNIEXPORT jstring JNICALL
Java_com_example_myapplication_MainActivity_getStringFun(JNIEnv *env, jobject thiz) {
    // TODO: implement getStringFun()
}
2.2 动态注册实现Java调用JNI方法
关于方法签名的生成:
当创建了java class,并在其中声明了许多native方法,需要获取每个方法的签名的话,首先在Android studio中打开terminal,然后进入到该class所在位置:cd app/build/intermediates,在intermediates目录下面将会有很多不同的目录,需要找到javac目录:cd javac/debug/classes,在一层层的包名下面就是你的.class文件。在目录下面执行javap -s 包名.类名,将生成方法签名,如下所示:
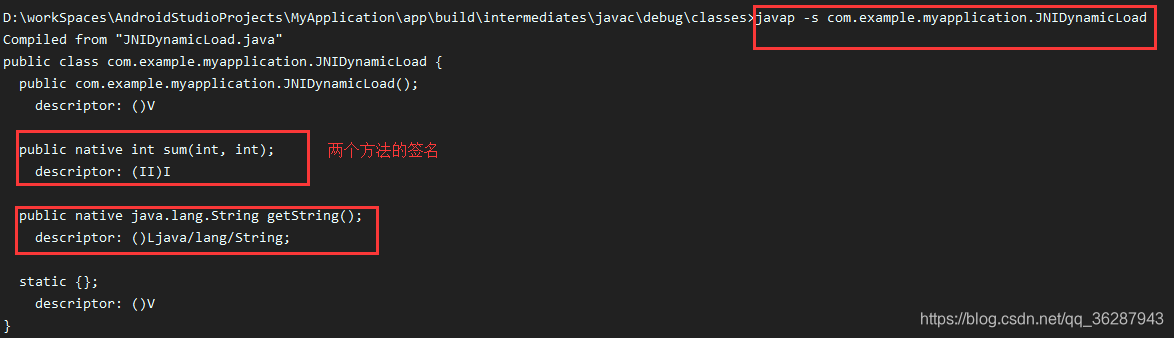
在说明了方法签名如何生成之后,开始给出示例代码:
// 在MainActivity.java中
 JNIDynamicLoad load = new JNIDynamicLoad();
 TextView tv = findViewById(R.id.sample_text);
tv.setText(load.getString());

// 1. 新建JNIDynamicLoad.java并加载动态库文件,并创建两个测试方法
public class JNIDynamicLoad {
    static {
        System.loadLibrary("dynamic-lib");
    }
    public native int sum(int x, int y);

    public native String getString();
}

// 2. 在CMakeLists.txt中添加lib
add_library(
        dynamic-lib
        SHARED
        jni/JniLoad.cpp
)

// 3. 创建JniLoad.cpp来进行动态加载
#include <jni.h>
#define JAVA_CLASS "com/example/myapplication/JNIDynamicLoad"  //定义类名字符串宏

extern "C"
JNIEXPORT jint JNICALL
Java_com_example_myapplication_JNIDynamicLoad_sum(JNIEnv *env, jobject thiz, jint x, jint y) {
    return x + y;
}

extern "C"
JNIEXPORT jstring JNICALL
Java_com_example_myapplication_JNIDynamicLoad_getString(JNIEnv *env, jobject thiz) {
    return env->NewStringUTF("This is a string from JNI_Load -> getString method");
}

/**
 * 得到结构体JNINativeMethod指针,按以下方式进行参数传递
 * typedef struct {
 *  const char* name;
 *  const char* signature;
 *  void*       fnPtr;
 * } JNINativeMethod;
 */
static JNINativeMethod gMethods[] = {
        //构成:函数名称,方法签名,函数指针
        {"getString", " ()Ljava/lang/String", (void *) Java_com_example_myapplication_JNIDynamicLoad_getString,
        {"sum",       " (II)I",               (void *) Java_com_example_myapplication_JNIDynamicLoad_sum}
};

/**
 * 封装RegisterNatives注册方法,方便以后调用
 * @param env      JNIEnv指针
 * @param name     类名称
 * @param method   JNINativeMethod指针
 * @param nMethods 方法个数
 * @return
 */
int registerNativeMethods(JNIEnv *env, const char *name, JNINativeMethod *method, jint nMethods) {
    jclass pJclass = env->FindClass(name);
    if (pJclass == nullptr) return JNI_FALSE;
    //返回小于0则失败
    if (env->RegisterNatives(pJclass, method, nMethods) < 0) return JNI_FALSE;
    return JNI_TRUE;
}

/**
 * 执行加载操作
 * @param javaVm
 * @param reserved
 * @return
 */
JNIEXPORT int JNICALL JNI_Load(JavaVM *javaVm, void *reserved) {
    JNIEnv *env;
    if (javaVm->GetEnv(reinterpret_cast<void **>(&env), JNI_VERSION_1_6) != JNI_OK) {
        return JNI_FALSE;
    }
    registerNativeMethods(env, JAVA_CLASS, gMethods, 2);
    //返回使用的版本信息
    return JNI_VERSION_1_6;
}
在Android机器上运行之后屏幕将会打印:This is a string from JNI_Load -> getString method
2.3 JNI访问Java构造方法
// 在MainActivity.java中
JniConstructorClass constructorClass = new JniConstructorClass();
TextView tv = findViewById(R.id.sample_text);
tv.setText(constructorClass.allocConstructotrs().getName() + "   " + constructorClass.allocConstructotrs().getAge() + "\n" +constructorClass.invokeConstructotrs().getName() + "  " + constructorClass.invokeConstructotrs().getAge());

// 1. 新建JniConstructorClass.java并添加
public class JniConstructorClass {
    static {
        System.loadLibrary("constructor-lib");
    }

    public native People invokeConstructotrs();
    public native People allocConstructotrs();
}

// 2. 在CMakeLists.txt中添加lib
add_library(
        constructor-lib
        SHARED
        jni/JniConstructor.cpp
)

// 3. 新建JniConstructor.cpp执行两种方式创建java类
#include <jni.h>

extern "C"
JNIEXPORT jobject JNICALL
Java_com_example_myapplication_JniConstructorClass_invokeConstructotrs(JNIEnv *env, jobject thiz) {
    jclass jcl = env->FindClass("com/example/myapplication/People");
    //找到构造方法,时使用<init>
    jmethodID jmethodId = env->GetMethodID(jcl, "<init>", "(Ljava/lang/String;I)V");
    jstring jstr = env->NewStringUTF("This is people name from people.invokeConstructotrs method");
    jobject jobj = env->NewObject(jcl, jmethodId, jstr,23);

    return jobj;
}

extern "C"
JNIEXPORT jobject JNICALL
Java_com_example_myapplication_JniConstructorClass_allocConstructotrs(JNIEnv *env, jobject thiz) {
    jclass jcl = env->FindClass("com/example/myapplication/People");
    //找到构造方法,时使用<init>
    jmethodID jmethodId = env->GetMethodID(jcl, "<init>", "(Ljava/lang/String;I)V");
    jstring jstr = env->NewStringUTF("This is people name from people.allocConstructotrs method");
    jobject jobj = env->AllocObject(jcl);

    env->CallNonvirtualVoidMethod(jobj, jcl, jmethodId, jstr,33);
    return jobj;
}
在Android机器上运行之后屏幕将会打印:This is people name from people.allocConstructotrs method 33
This is people name from people.invokeConstructotrs method 23
3. JNI引用类型管理
JNI中共有三种引用类型:全局引用、局部引用、弱引用。掌握合理使用会使程序性能得到提升
// 1.新建JniReference.java
public class JniReference {
    static {
        System.loadLibrary("reference-lib");
    }

    public native String localReference();//局部引用
    public native String cacheWithGlobalReference();//全局引用
    public native void weakGlobalReference();//弱引用
}

// 2.在CMakeLists.txt中添加lib
add_library(
        reference-lib
        SHARED
        jni/JniReference.cpp
)

// 3.创建JniReference.cpp
#include <jni.h>

extern "C"
JNIEXPORT jstring JNICALL
Java_com_example_myapplication_JniReference_localReference(JNIEnv *env, jobject thiz) {
    jclass local = env->FindClass("java/lang/String");
    jmethodID jmethod = env->GetMethodID(local, "<init>", "(Ljava/lang/String;)V");
    jstring str = env->NewStringUTF("string");
    //删除部分局部引用,避免过多造成危险
    for (int i = 0; i < 1000; ++i) {
        jclass local = env->FindClass("java/lang/String");
        env->DeleteLocalRef(local);
    }
    return static_cast<jstring>(env->NewObject(local, jmethod, str));
}

extern "C"
JNIEXPORT jstring JNICALL
Java_com_example_myapplication_JniReference_cacheWithGlobalReference(JNIEnv *env, jobject thiz) {
    //使用一个缓存
    static jclass jcl = nullptr;
    if (jcl == nullptr) {
        jclass cls = env->FindClass("java/lang/String");
        jcl = static_cast<jclass>(env->NewGlobalRef(cls));
        //变量释放
        env->DeleteLocalRef(cls);
    } else {
        // use cached
    }
    jmethodID jmethod = env->GetMethodID(jcl, "<init>", "(Ljava/lang/String;)V");
    jstring str = env->NewStringUTF("string");

    return static_cast<jstring>(env->NewObject(jcl, jmethod, str));
}

extern "C"
JNIEXPORT void JNICALL
Java_com_example_myapplication_JniReference_weakGlobalReference(JNIEnv *env, jobject thiz) {
    //使用一个缓存
    static jclass jcl = nullptr;
    if (jcl == nullptr) {
        jclass cls = env->FindClass("java/lang/String");
        jcl = static_cast<jclass>(env->NewWeakGlobalRef(cls));
        //变量释放
        env->DeleteLocalRef(cls);
    } else {
        // use cached
    }
    jmethodID jmethod = env->GetMethodID(jcl, "<init>", "(Ljava/lang/String;)V");
    //判断弱引用是否被回收
    jboolean isGc = env->IsSameObject(jcl, nullptr);
    // 。。。。。其他操作
}
4. 常见异常处理
- 可使用ExceptionOccurred(),出现异常就清理掉,让程序不终止
jthrowable err = env->ExceptionOccurred();
    if(err){
        env->ExceptionDescribe();
        env->ExceptionClear();
    }
- 使用ThrowNew抛出异常
//调用该方法的try,catch就能捕获到该异常信息
jclass jcl = env->FindClass("java/lang/IllegalArgumentException");
env->ThrowNew(jcl,"native throw exception");
通常两种方法合在一起使用能让程序更健壮。
References:
- https://developer.android.google.cn/ndk/guides/cmake?hl=zh-cn
- https://www.imooc.com/learn/1212
