Java实现对图片的锐化处理:
处理的原图:

一、基础知识
1、 获取图片的像素,将像素按RGB提取
像素显示是按照三色原理进行混合显示,RGB,R:红,G:绿,B:蓝。
这三者进行组合成其他所有的颜色,表示为RGB(45,34,54),也可以表示为十六进制的,其二进制的表示为(11111111 11111111 11111111),其中的数值大小表示该颜色的灰度大小(准确来说是相反关系),灰度越小越亮。

2、 分别提取像素三原色
对其三中原色进行取值,可以进行位移然后进行掩码取值。提取红色:(rgb >> 16) & 0xff ,提取绿色为:(rgb >> 8) & 0xff,提取蓝色为:rgb > & 0xff。提取颜色的代码为:
import javax.imageio.ImageIO;
import java.awt.*;
import java.awt.image.BufferedImage;
import java.io.File;
import java.io.FileOutputStream;

public class ImageDemo1 {
    public static void main(String[] args) throws Exception {
        String path ="E:\\workspace\\OCR_EXAMPLE\\poiUntil\\src\\main\\resources\\timg05.jpg";
        String   tarImgPath="E:\\workspace\\OCR_EXAMPLE\\poiUntil\\src\\main\\resources\\timg-5.jpg";
        File file = new File(path);
        File file1 = new File(tarImgPath);
        BufferedImage read = ImageIO.read(file);
        int[][] imageBuffer=new int[read.getWidth()][read.getHeight()];
        BufferedImage bufferedImage = new BufferedImage(read.getWidth(), read.getHeight(), BufferedImage.TYPE_3BYTE_BGR);
        for(int i=0;i<read.getWidth();i++){
            for(int j=0;j<read.getHeight();j++){
                imageBuffer[i][j]=read.getRGB(i,j)&0xff;
            }
        }
        for(int i=0;i<read.getWidth();i++){
            for(int j=0;j<read.getHeight();j++){
                bufferedImage.setRGB(i,j,read.getRGB(i,j)&0xff);
            }
        }
        FileOutputStream outImgStream = new FileOutputStream(tarImgPath);
        ImageIO.write(bufferedImage, "jpg", outImgStream);
        outImgStream.close();
    }

}
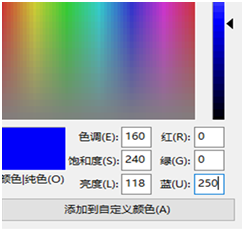
蓝色图片:

二、进行锐化处理
1、理解什么叫锐化
图像锐化(image sharpening)是补偿图像的轮廓,增强图像的边缘及灰度跳变的部分,使图像变得清晰,分为空间域处理和频域处理两类。图像锐化是为了突出图像上地物的边缘、轮廓,或某些线性目标要素的特征。这种滤波方法提高了地物边缘与周围像元之间的反差,因此也被称为边缘增强。
2、拉普拉斯锐化
核心是增强灰度跳变部分,下面给出对该处理的一种实现:拉普拉斯锐化:
拉普拉斯是使用二阶微分锐化图像,以3*3滤波器中心像素与上下左右像素计算差值,计算公式为:

如何理解该公式呢?
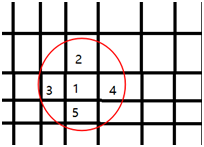
如下图,以1像素为中心点,与周围的像素点进行灰度比较,即(2(灰度)-1(灰度))+(3(灰度)-1(灰度))+(4(灰度)-1(灰度))+(5(灰度)-1(灰度))的到灰度差和,用灰度差和来表示中心像素与周围的差异大小。然后用该差和进行对中心点的灰度进行修改,以达到增强灰度跳变部分。具体代码如下:
import javax.imageio.ImageIO;
import java.awt.image.BufferedImage;
import java.io.File;
import java.io.FileOutputStream;

public class ImageDemo02 {
    public static void main(String[] args) throws Exception {
        String path ="E:\\workspace\\OCR_EXAMPLE\\poiUntil\\src\\main\\resources\\timg05.jpg";
        String   tarImgPath="E:\\workspace\\OCR_EXAMPLE\\poiUntil\\src\\main\\resources\\timg-6.jpg";
        File file = new File(path);
        //读取图片
        BufferedImage read = ImageIO.read(file);
        //进行拉普拉斯锐化
        BufferedImage bufferedImage = lapLaceSharpDeal(read);
        FileOutputStream outImgStream = new FileOutputStream(tarImgPath);
        //输出图片
        ImageIO.write(bufferedImage, "jpg", outImgStream);
        outImgStream.close();
    }
    public static BufferedImage lapLaceSharpDeal(BufferedImage image) {
        //新建一个BufferedImage
        BufferedImage tempImage = new BufferedImage(image.getWidth(), image.getHeight(), image.getType());
        for (int i = 1; i < image.getWidth() - 1; i++) {
            for (int j = 1; j < image.getHeight() - 1; j++) {
                //获取(i,j)中心像素,及其周围的像素值
                int rgb = image.getRGB(i, j);
                int rgb1 = image.getRGB(i - 1, j);
                int rgb2 = image.getRGB(i + 1, j);
                int rgb3 = image.getRGB(i, j - 1);
                int rgb4 = image.getRGB(i, j + 1);
                //进行RGB三原色的拆分
                int[] R = new int[] { (rgb1 >> 16) & 0xff, (rgb2 >> 16) & 0xff, (rgb3 >> 16) & 0xff,
                        (rgb4 >> 16) & 0xff, (rgb >> 16) & 0xff };
                int[] G = new int[] { (rgb1 >> 8) & 0xff, (rgb2 >> 8) & 0xff, (rgb3 >> 8) & 0xff, (rgb4 >> 8) & 0xff,
                        (rgb >> 8) & 0xff };
                int[] B = new int[] { rgb1 & 0xff, rgb2 & 0xff, rgb3 & 0xff, rgb4 & 0xff, rgb & 0xff };
                //分别计算三原色的的差和,来表示和周围的灰度差异
                double dR = R[0] + R[1] + R[2] + R[3] - 4 * R[4];
                double dG = G[0] + G[1] + G[2] + G[3] - 4 * G[4];
                double dB = B[0] + B[1] + B[2] + B[3] - 4 * B[4];
                //以计算得到的差和对中心点原值进行修改,比周围的亮,即差和为负,相减则更大,即更亮,反之亦然。
                double r = R[4] - dR;
                double g = G[4] - dG;
                double b = B[4] - dB;
                //将三原色进行合并,二进制为:(11111111 11111111 11111111)->十进制为:(255 255 255)->十六进制为:(ff ff ff)
                rgb = (255 & 0xff) << 24 | (clamp((int) r) & 0xff) << 16 | (clamp((int) g) & 0xff) << 8
                        | (clamp((int) b) & 0xff);
                tempImage.setRGB(i, j, rgb);
            }
        }
        return tempImage;
    }
    //判断a,r,g,b值,大于256返回256,小于0则返回0,0到256之间则直接返回原始值
    private static int clamp(int rgb) {
        if (rgb > 255)
            return 255;
        if (rgb < 0)
            return 0;
        return rgb;

    }
}
锐化后为:

