(一)嵌入式的Servlet容器(Jar)
优点:简单,便携
缺点:默认不支持JSP、优化定制比较复杂(使用定制器ServerProperties、自定义EmdeddedServletContainerCustomizer 或者 自己编写嵌入式Servlet容器的创建工厂EmbeddedServletContainerFactory)
(二)外置Servlet容器
好处:可以使用JSP(嵌入式的也可以通过配置使用JSP)、优化定制(可以优化Tomcat容器,修改tomcat的配置文件,优化容器处理,比如修改其中的tomcat配置文件)
外置的Servlet容器:外面安装Tomcat,应用war包的方式打包
步骤:
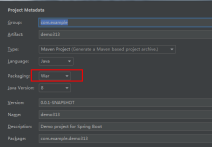
1:必须创建一个war项目,方式还是选择web
2:将嵌入式的tomcat指定为provided,表示启动的时候不用这个启动(默认已经配置好了)
 <dependency>
            <groupId>org.springframework.boot</groupId>
            <artifactId>spring-boot-starter-tomcat</artifactId>
            <scope>provided</scope>
 </dependency>
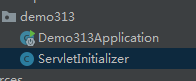
3:必须编写一个SpringBootServletInitializer的子类,系统默认已经生成,和启动类同级
4:生成webapp文件夹和web.xml文件
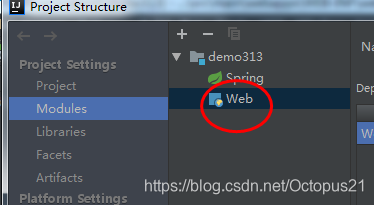
点击以下按钮

选择web标签
下面选框A表示创建webapps目录,选框b表示创建web.xml文件,路径参考(前面项目路径\src\main\webapps\WEB-INF\web.xml)
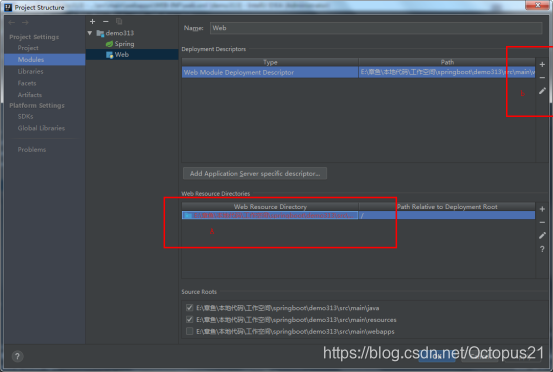
创建完成之后结构如下(注意:创建完成后的webapps目录应该为:一个蓝色的圆形图标标记的目录)不然的项目无法识别对应的JSP文件,如果不是请重新设置)
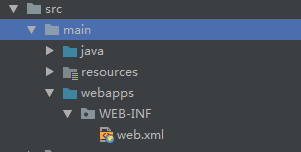
备注:也可以自行手动创建
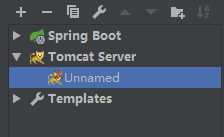
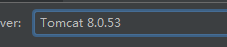
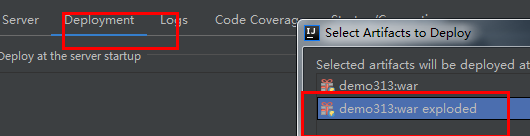
5:配置tomcat服务器
添加服务器容器
指定本地tomcat路径
添加部署项目
在webapps目录创建hello.jsp文件测试, JSP内写入任意内容,此时启动项目访问:
http://localhost:8080/hello.jsp
现在在创建一个链接,实现请求转发,在hello.jsp中创建请求链接
用户访问
创建控制器
@Controller
public class UserController {
    @RequestMapping("/user")
    public String hello() {

        return "user";
    }
}
设置配置文件application.properties
spring.mvc.view.prefix=/WEB-INF/
spring.mvc.view.suffix=.jsp
在WEB-INF中创建user.jsp页面,并启动服务器
http://localhost:8080/hello.jsp ,点击用户访问

请求转发到use.jsp中
总结:
1:必须创建一个war项目
2:将嵌入式的tomcat设置为provided
3:必须编写一个SpringBootServletInitializer子类,并调用configure方法
4:启动服务器即可
(三)外置servlet容器原理
jar包:执行springboot主类的main方法,启动ioc容器,创建嵌入式的Servlet容器
war包:启动服务器,服务器启动SpringBoot应用,主要类SpringBootServletInitializer,启动IOC容器
通过war包方式部署服务器原理:
其中主要原因来源于Servlet 3.0(Spring注解版)规范
规则:
1:服务器启动时会创建当前web应用里面每一个jar包里面
ServletInitializer实例
2:ServletInitializer的实现放在jar包META-INF/services文件夹下,在该路径下必须要有个javax.servlet.ServletContainerInitializer的文件,文件的内容就是ServletInitializer的实现类的全类名
3:还可以使用@HandlesTypes,在应用启动的时候加载我们需要的类
流程:
1:启动tomcat
2:web模板中的
org\springframework\spring-web\4.3.13.RELEASE\spring-web-4.3.13.RELEASE.jar!\META-INF\services\javax.servlet.ServletContainerInitializer
中保存了ServletInitializer的实现类的全类名:
org.springframework.web.SpringServletContainerInitializer
3:SpringServletContainerInitializer将
@HandlesTypes(WebApplicationInitializer.class)标注的所有这个类型的类都传入onStarup方法的set集合,在这里会将所有的非接口非抽象类进行实例化,创建对象
4:对上述创建的所有对象,调用各自的onStartup方法
5:上述操作也会处理到代码中我们创建的继承SpringBootServletInitializer类的子类对象,并且调用对应的onStartup
6:我们自己创建ServletInitializer会去调用父类SpringBootServletInitializer的onStartup方法
7:在该父类中就会去完成IOC容器的创建和启动过程,它会去找到SpringBoot的启动类,然后启动项目createRootApplicationContext
8:createRootApplicationContext详细方法内容
protected WebApplicationContext createRootApplicationContext(
			ServletContext servletContext) {
		SpringApplicationBuilder builder = createSpringApplicationBuilder();
		StandardServletEnvironment environment = new StandardServletEnvironment();
		environment.initPropertySources(servletContext, null);
		builder.environment(environment);
		builder.main(getClass());
		ApplicationContext parent = getExistingRootWebApplicationContext(servletContext);
		if (parent != null) {
			this.logger.info("Root context already created (using as parent).");
			servletContext.setAttribute(
					WebApplicationContext.ROOT_WEB_APPLICATION_CONTEXT_ATTRIBUTE, null);
			builder.initializers(new ParentContextApplicationContextInitializer(parent));
		}
		builder.initializers(
				new ServletContextApplicationContextInitializer(servletContext));
		builder.contextClass(AnnotationConfigEmbeddedWebApplicationContext.class);
		builder = configure(builder);
		SpringApplication application = builder.build();
		if (application.getSources().isEmpty() && AnnotationUtils
				.findAnnotation(getClass(), Configuration.class) != null) {
			application.getSources().add(getClass());
		}
		Assert.state(!application.getSources().isEmpty(),
				"No SpringApplication sources have been defined. Either override the "
						+ "configure method or add an @Configuration annotation");
		// Ensure error pages are registered
		if (this.registerErrorPageFilter) {
			application.getSources().add(ErrorPageFilterConfiguration.class);
		}
		return run(application);
	}
上述方法中完成了属性、主类、环境等配置,其中有一个方法调用builder = configure(builder);
因为我们是子类重写了,因此该方法调用的子类即我们创建的类的方法,方法实现如下:
 @Override
    protected SpringApplicationBuilder configure(SpringApplicationBuilder application) {
        return application.sources(Demo313Application.class);
    }
上述流程会构建SpringApplication应用,最后run应用,最终也回归到了常规的启动步骤
protected WebApplicationContext run(SpringApplication application) {
		return (WebApplicationContext) application.run();
	}
总结:根据servlet3.0的标准项目启动会去扫描所有jar包META-INF/services/
javax.servlet.ServletContainerInitializer,加载spring web包下的SpringServletContainerInitializer,然后在根据
@HandlesTypes(WebApplicationInitializer.class)标注的类去实例化相对应的对象,运行onStartUp方法,最后加载@SpringBootApplication主类,启动容器
