Spring Cloud Bus介绍
总线,在微服务架构的系统中,通常会使用轻量级的消息代理来构建一个共用的消息主题,并让系统中所有微服务实例都连接上来,由于该主题中产生的消息会被所有实例监听和消费,所以称他为消息总线。在总线上的各个实例,都可以方便地广播一些需要让他连接,在该主题上的实例都知道的消息
Spring Cloud Bus用轻量级消息代理链接分布式系统的节点。然后可以使用此代理来广播状态更改(例如配置更改)或其他管理指令。一个关键的想法是,该总线就像用于Spring Boot应用的分布式致动器,可以横向扩展。但是,它也可以用作应用之间的通信渠道。
基本原理
ConfigClient实例监听MQ中同一个topic(默认是springCloudBus)。当一个服务刷新数据的时候,它会把这个消息放入到Topic中,这样同一Topic的服务就能得到通知,然后去更新自身的配置
Spring Cloud Bus使用
本章使用RabbitMQ,RabbitMQ知识参考:【RabbitMQ】 RabbitMQ 基本概念及测试
项目准备
使用项目,搭建参考上一章:【SpringCloud】Spring Cloud Config 客户端(二十一)
一个Eureka注册中心8761,一个配置中心8888,两个配置客户端8889、8890
其中配置中心和客户端,都需要引入Spring Cloud Bus依赖
1 <!-- 添加消息总线RabbitMQ支持 -->
2 <dependency>
3     <groupId>org.springframework.cloud</groupId>
4     <artifactId>spring-cloud-starter-bus-amqp</artifactId>
5 </dependency>
客户端8890与客户端8889内容相同
客户端pom依赖如下:


 1 <?xml version="1.0" encoding="UTF-8"?>
 2 <project xmlns="http://maven.apache.org/POM/4.0.0"
 3          xmlns:xsi="http://www.w3.org/2001/XMLSchema-instance"
 4          xsi:schemaLocation="http://maven.apache.org/POM/4.0.0 http://maven.apache.org/xsd/maven-4.0.0.xsd">
 5     <parent>
 6         <artifactId>test-springcloud</artifactId>
 7         <groupId>com.test</groupId>
 8         <version>1.0-SNAPSHOT</version>
 9     </parent>
10     <modelVersion>4.0.0</modelVersion>
11
12     <artifactId>springcloud-config-client8890</artifactId>
13
14     <dependencies>
15
16         <!-- 添加消息总线RabbitMQ支持 -->
17         <dependency>
18             <groupId>org.springframework.cloud</groupId>
19             <artifactId>spring-cloud-starter-bus-amqp</artifactId>
20         </dependency>
21
22         <!-- spring cloud config client-->
23         <dependency>
24             <groupId>org.springframework.cloud</groupId>
25             <artifactId>spring-cloud-starter-config</artifactId>
26         </dependency>
27
28         <!-- eureka client -->
29         <dependency>
30             <groupId>org.springframework.cloud</groupId>
31             <artifactId>spring-cloud-starter-netflix-eureka-client</artifactId>
32         </dependency>
33
34         <!-- spring boot -->
35         <dependency>
36             <groupId>org.springframework.boot</groupId>
37             <artifactId>spring-boot-starter-web</artifactId>
38         </dependency>
39         <dependency>
40             <groupId>org.springframework.boot</groupId>
41             <artifactId>spring-boot-starter-actuator</artifactId>
42         </dependency>
43         <dependency>
44             <groupId>org.springframework.boot</groupId>
45             <artifactId>spring-boot-devtools</artifactId>
46             <scope>runtime</scope>
47             <optional>true</optional>
48         </dependency>
49         <dependency>
50             <groupId>org.projectlombok</groupId>
51             <artifactId>lombok</artifactId>
52             <optional>true</optional>
53         </dependency>
54         <dependency>
55             <groupId>org.springframework.boot</groupId>
56             <artifactId>spring-boot-starter-test</artifactId>
57             <scope>test</scope>
58         </dependency>
59
60     </dependencies>
61 </project>
客户端配置文件bootstrap.xml如下:
 1 spring:
 2   application:
 3     name: cloud-config-client
 4   cloud:
 5     # Config客户端配置
 6     config:
 7       # 分支名称
 8       label: master
 9       # 配置文件名称
10       name: config
11       # 读取后缀名称
12       profile: dev
13       # 上述3个综合:master分支上config-dev.yml配置文件
14       # 读取http://localhost:8888/master/config-dev.yml
15       # 配置中心地址
16       uri: http://localhost:8888
客户端配置文件application.yml如下:
 1 # 端口
 2 server:
 3   port: 8890
 4
 5 spring:
 6   # RabbitMQ相关配置
 7   rabbitmq:
 8     host: 127.0.0.1
 9     port: 5672
10     username: xxx
11     password: xxxx
12
13 eureka:
14   client:
15     service-url:
16       defaultZone: http://localhost:8761/eureka
17
18 management:
19   endpoints:
20     web:
21       exposure:
22         # 暴露刷新端点
23         include: "*"
客户端主启动类如下:
1 @EnableEurekaClient
2 @SpringBootApplication
3 public class ConfigClientMain8890 {
4     public static void main(String[] args) {
5         SpringApplication.run(ConfigClientMain8890.class, args);
6     }
7 }
controller如下,增加了@RefreshScope注解:
 1 @RestController
 2 //配置文件自动刷新
 3 @RefreshScope
 4 public class ConfigClientController {
 5
 6     @Value("${server.port}")
 7     private String serverPort;
 8
 9     @Value("${config.info}")
10     private String configInfo;
11
12     @GetMapping("/configInfo")
13     public String getConfigInfo(){
14         return  "serverPort:" + serverPort + "\t\nconfigInfo:" + configInfo;
15     }
16 }
问题:
要刷新所有客户端节点,难道要一个一个请求客户端刷新?有没有什么办法通知所有客户端节点刷新配置?
动态刷新全局广播
方法一、通过配置中心节点刷新所有客户端配置
1、启动注册中心Eureka,和配置中心8888,注意配置中心的配置文件需要增加配置如下,暴露刷新端点bus-refresh
1 management:
2   endpoints:
3     web:
4       exposure:
5         # 暴露刷新端点bus-refresh
6         include: "*"
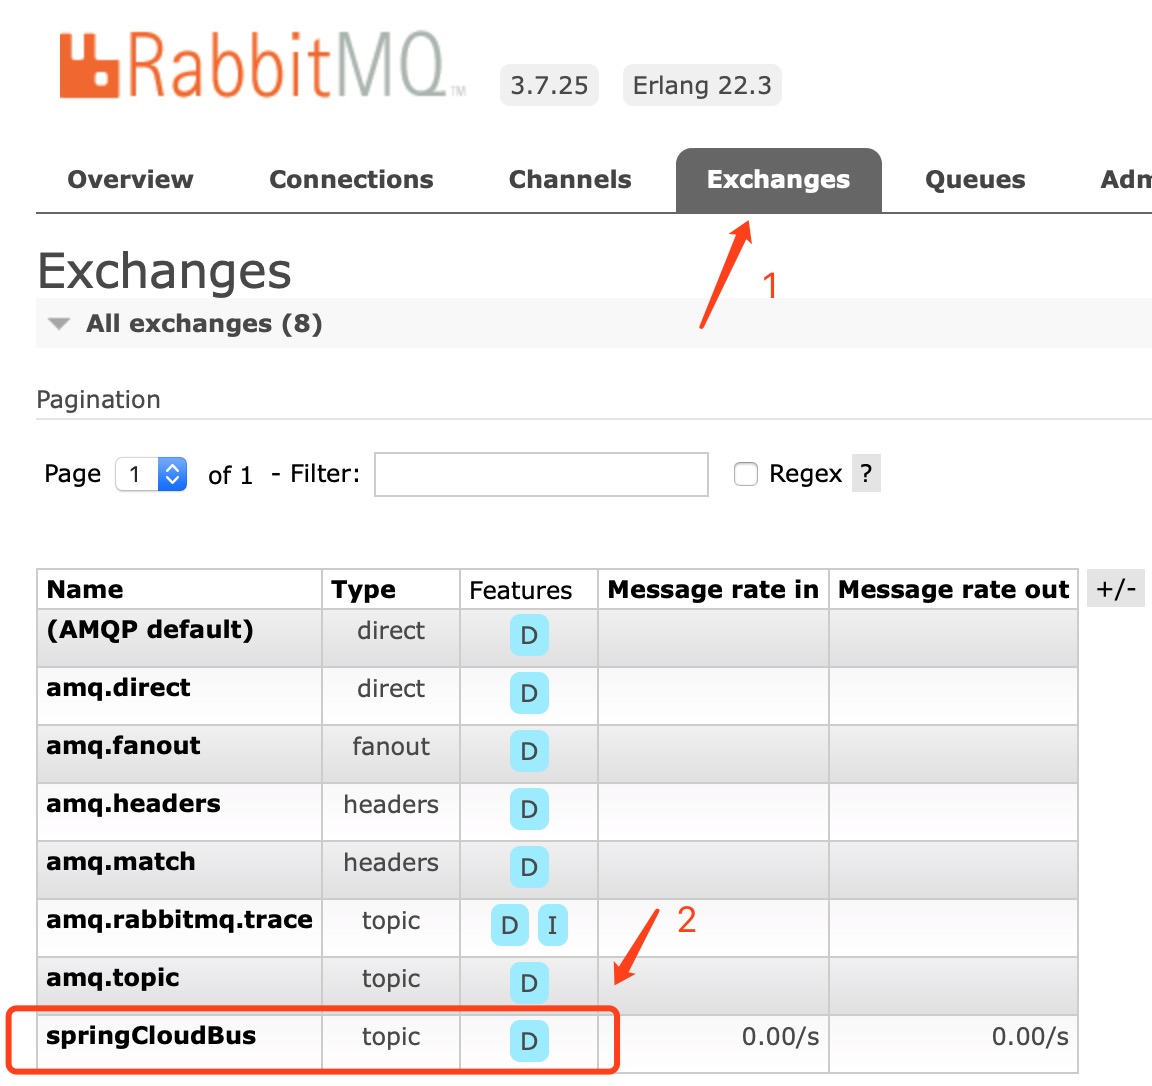
2、登录RabbitMQ的Web后台界面
查看Exchanges,配置中心默认在RabbitMQ中,创建一个名 springCloudBus 的Exchanges
springCloudBus 的类型是topic模式,用来发布订阅
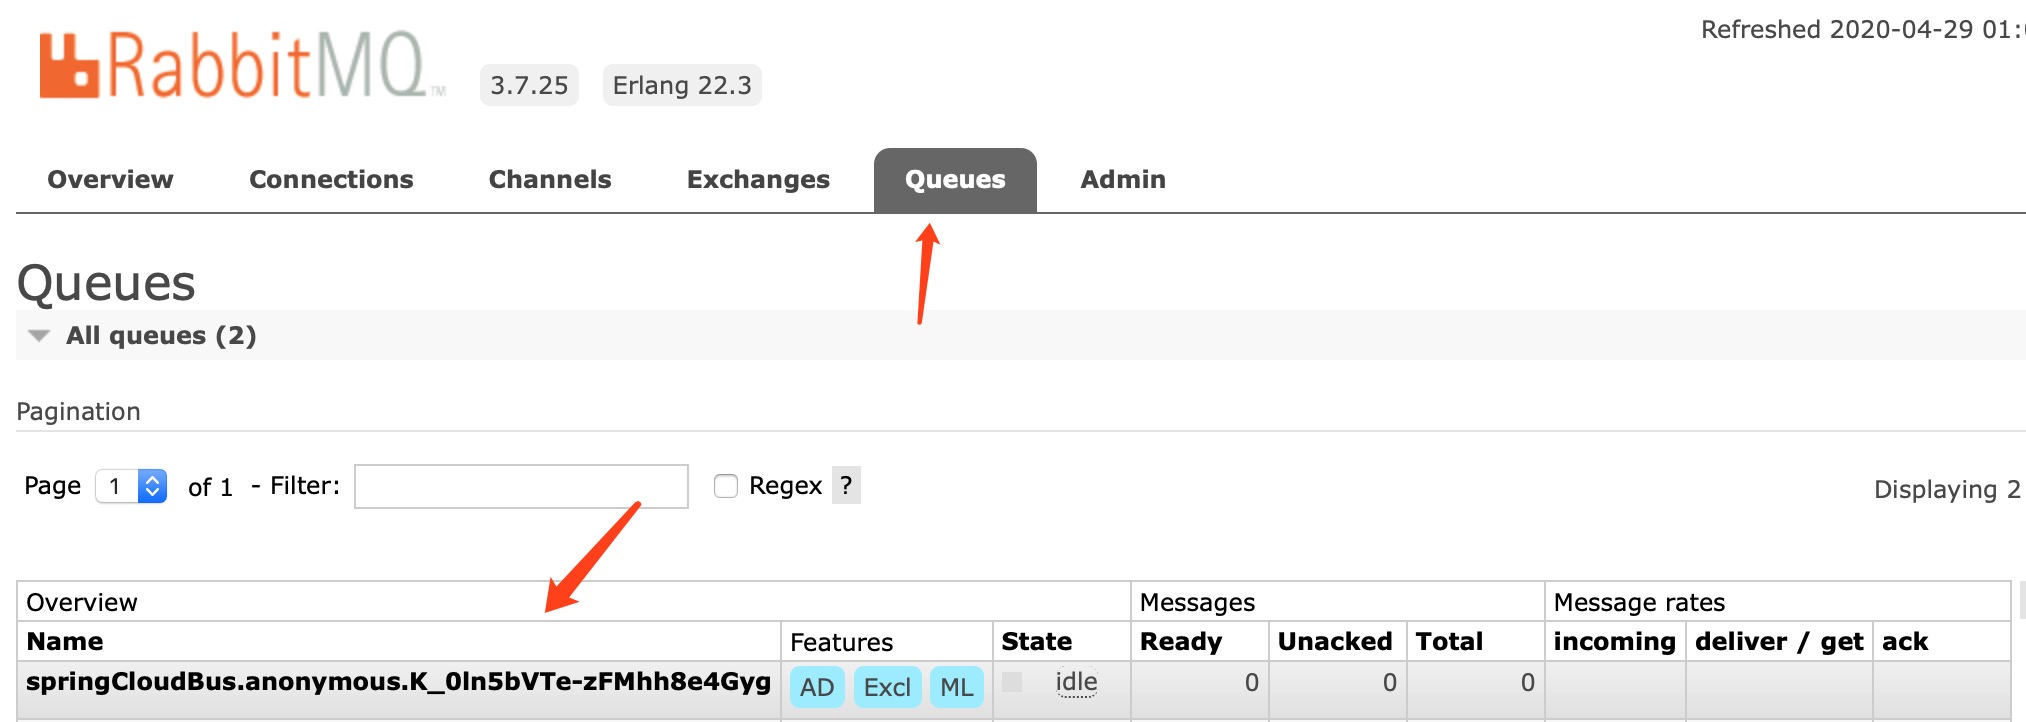
查看Queues,配置中心默认在RabbitMQ中,创建一个名 springCloudBus.anonymous.K_0ln5bVTe-zFMhh8e4Gyg 的Queues
3、在RabbitMQ的Web后台界面上,创建一个Queues,名为test.news,并且绑定 springCloudBus 这个交换器
4、启动配置客户端8889,同样查看RabbitMQ的Web后台界面,发现新增了一个Queues,绑定了 springCloudBus 这个交换器
5、同理启动配置客户端8890,同样查看RabbitMQ的Web后台界面,发现新增了一个Queues,绑定了 springCloudBus 这个交换器
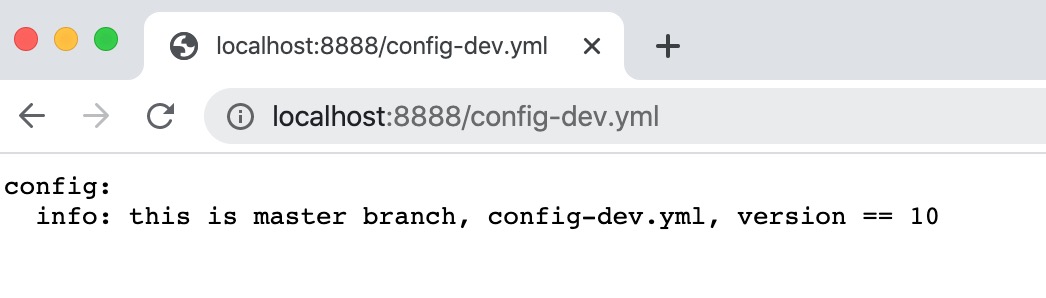
6、访问配置中心地址:http://localhost:8888/config-dev.yml,正常访问获取内容
7、分别访问配置客户端地址:http://localhost:8890/configInfo,http://localhost:8890/configInfo,正常访问获取内容同上
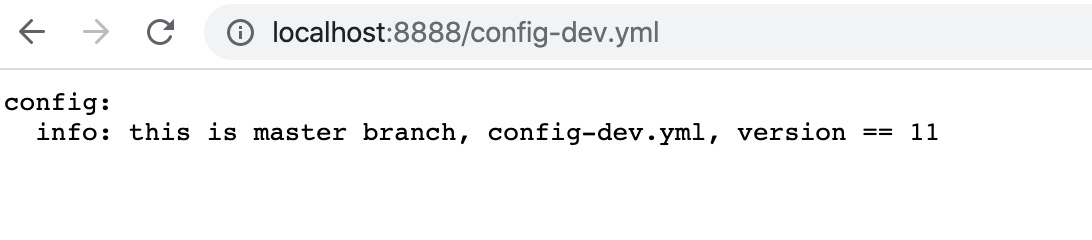
8、修改github仓库配置信息,将version改为 11
9、访问配置中心地址:http://localhost:8888/config-dev.yml,正常访问获取更新内容
10、分别访问配置客户端地址:http://localhost:8890/configInfo,http://localhost:8890/configInfo,正常访问,内容为更新
version == 10
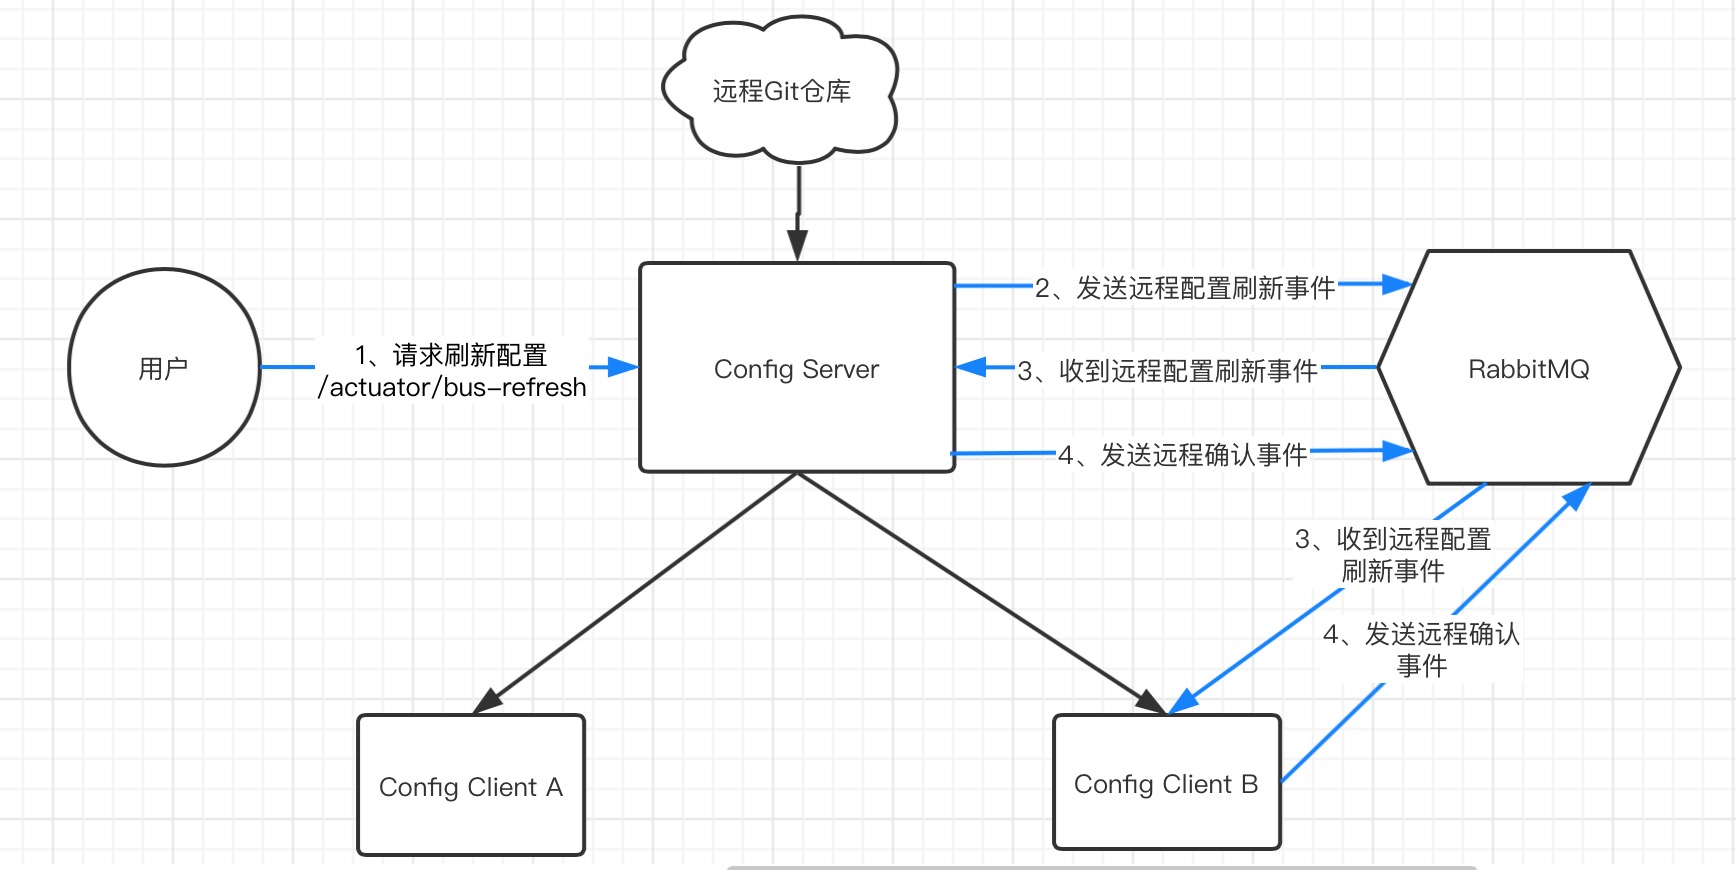
11、通过配置中心暴露的端点bus-refresh,请求刷新配置,使用如下命令,发送post请求
请求命令:curl -X POST http://localhost:8888/actuator/bus-refresh
12、分别访问配置客户端地址:http://localhost:8890/configInfo,http://localhost:8890/configInfo,正常访问,内容为更新
version == 11,内容配置已刷新
配置更新流程分析
1、在RabbitMQ的Web后台界面上,Queues,名为test.news,you如下
1 {"type":"RefreshRemoteApplicationEvent","timestamp":1588005088488,"originService":"cloud-config-conter:8888:832ba2cb48de978a1a2f18cafceaa487","destinationService":"**","id":"39b2a14a-d33f-467b-afce-d8f6df114480"}
2
3 {"type":"AckRemoteApplicationEvent","timestamp":1588005088510,"originService":"cloud-config-conter:8888:832ba2cb48de978a1a2f18cafceaa487","destinationService":"**","id":"2c978df5-16d1-470f-89f9-3b7e6d6c8761","ackId":"39b2a14a-d33f-467b-afce-d8f6df114480","ackDestinationService":"**","event":"org.springframework.cloud.bus.event.RefreshRemoteApplicationEvent"}
4
5 {"type":"AckRemoteApplicationEvent","timestamp":1588005095313,"originService":"cloud-config-client:8889:445a5639525ab336961c83b89ca99e5d","destinationService":"**","id":"bf42cd5a-c8f8-4f22-bff2-0dbb93622606","ackId":"39b2a14a-d33f-467b-afce-d8f6df114480","ackDestinationService":"**","event":"org.springframework.cloud.bus.event.RefreshRemoteApplicationEvent"}
6
7 {"type":"AckRemoteApplicationEvent","timestamp":1588005094238,"originService":"cloud-config-client:8890:3dff8a206f30a8e4ab9236eb915b8471","destinationService":"**","id":"9cbf695b-bbd9-4867-94f6-e983feae6d14","ackId":"39b2a14a-d33f-467b-afce-d8f6df114480","ackDestinationService":"**","event":"org.springframework.cloud.bus.event.RefreshRemoteApplicationEvent"}
事件介绍
Bus 中定义了远程事件 RemoteApplicationEvent,该事件继承了 Spring 的事件 ApplicationEvent,而且它目前有 4 个具体的实现:
-
- EnvironmentChangeRemoteApplicationEvent: 远程环境变更事件。 主要用于接收一个
Map<String, String>类型的数据并更新到 Spring 上下文中Environment中的事件。文中的实例就是使用这个事件并配合EnvironmentBusEndpoint和EnvironmentChangeListener完成的。 - AckRemoteApplicationEvent: 远程确认事件。 Bus 内部成功接收到远程事件后会发送回
AckRemoteApplicationEvent确认事件进行确认。 - RefreshRemoteApplicationEvent: 远程配置刷新事件。 配合
@RefreshScope以及所有的@ConfigurationProperties注解修饰的配置类的动态刷新。 - UnknownRemoteApplicationEvent:远程未知事件。 Bus 内部消息体进行转换远程事件的时候如果发生异常会统一包装成该事件。
- EnvironmentChangeRemoteApplicationEvent: 远程环境变更事件。 主要用于接收一个
2、分析,配置刷新过程先由配置中心,发送一个刷新配置事件的消息,一个配置中心和两个配置客户端收到刷新配置事件的消息后,进行逻辑处理,然后分别发送远程确认事件消息进行确认
方法二、通过配置中心节点刷新所有客户端配置
1、同上可以在一个配置中心客户端暴露端点bus-refresh
2、通过配置客户端暴露的端点bus-refresh,请求刷新配置,使用如下命令,发送post请求
请求命令:curl -X POST http://localhost:8889/actuator/bus-refresh
3、查看各个客户端配置文件,发现配置内容已更新
注意:不推荐此方案,在微服务中配置客户端往往是业务服务,节点可能经常变动
而且不能即做业务功能,又做配置功能,应该保持服务功能的单一性,推荐使用方法一处理更新配置
动态刷新定点通知
1、方法一、通过配置中心节点刷新所有客户端配置的基础上
2、通过执行命令:curl -X POST http://localhost:8888/actuator/bus-refresh/cloud-config-client:8890
其中:cloud-config-client为应用名称
8890为某一节点端口
3、访问8890配置客户端,发现配置已更新