Android P适配以太网功能开发指南
前言
此时的我吃着火锅唱着歌,进行着Android P(此P非彼P,Android 9)的适配工作。我真的只能说每次Android版本的迭代更新,都是对我们的一次炼狱般的摧残啊,各种适配啊,我真的想说fuck the coding。但是吐槽归吐槽,为了我热爱的coding事业,让我们愉快的适配起来。
注意:本文演示的代码是Android P高通msm8953平台。
一.具体需求和成果展示
1.1 具体需求
具体需求说多不多,说少不少就三个如下:
- 设置中增加以太网开/关设置
- 设置中增加以太网静态设置
- 设置中增加代理设置
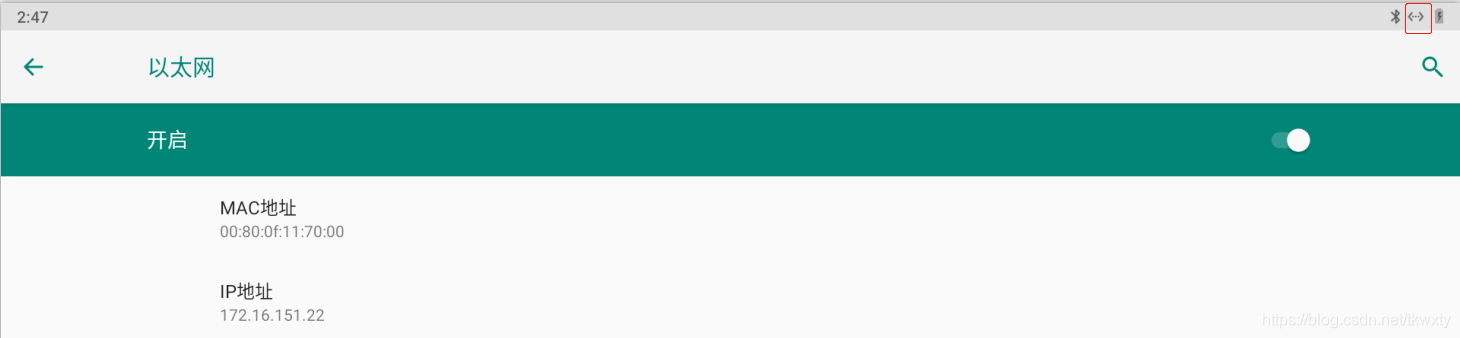
1.2 成果展示
好了需求前面明确了,在正式开始Android P以太网适配的开发指南前,得先让大伙看看最终的成果演示这样大伙才有动力和我一起干不是。
二.需求实施
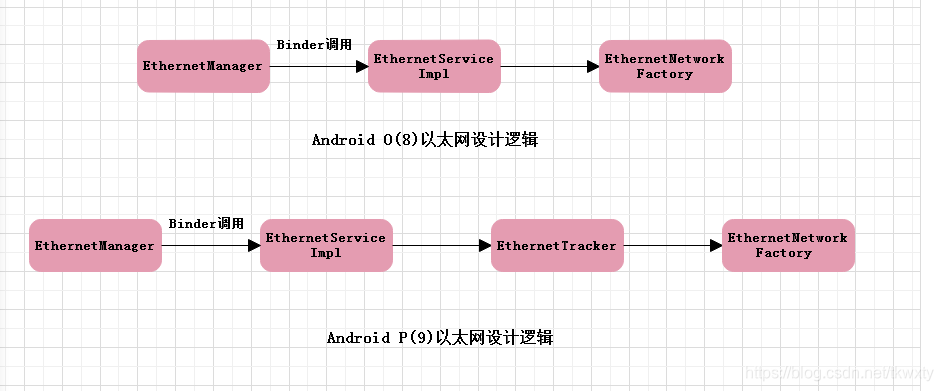
好了前面说了一大把了,也该正式开干了,不然大伙就要说我是光说不干的花架子了。先放上Android O和Android P的以太网逻辑架构图,有了这个读者心里因该就大概有谱了。不会迷路瞎逛了。
2.1 Android P以太网部分变动
2.1.1 源码文件的增添
在正式开发前,我们一般都应该了解Android新版本对当前实施的需求的改动,Android原生已经对以太网部分有很好的支持了,具体的源码路径在frameworks/opt/net/ethernet/java/com/android/server/ethernet,下面让我们看看Android O和Android P该目录下文件的变化!
- Android O(Android 8)此目录下的文件为:
[arm-msm8909-user] tangkw@pd:~/ssd/A50/ap/idh.code/frameworks/opt/net/ethernet/java/com/android/server/ethernet$ ls
EthernetConfigStore.java  EthernetNetworkFactory.java  EthernetServiceImpl.java  EthernetService.java
- Android P(Android 9)此目录下的文件为:
tangkw@Ubuntu16-Model:~/ssd/qcom_64/msm8953-9/frameworks/opt/net/ethernet/java/com/android/server/ethernet$ ls
EthernetConfigStore.java  EthernetNetworkFactory.java  EthernetServiceImpl.java  EthernetService.java  EthernetTracker.java
这里发现Android P(Android 9)多了EthernetTracker.java区别其他版本,Google新增的类,这个是比较大的改动。
2.1.1 接口参数的变动
有过Android 6/7/8版本开发经验的老司机都知道,Android对以太网的操作主要是依靠EthernetManager这个类来执行,而这个类中最重要的设置以太网信息的方法就是setConfiguration了,让我们来分别看看Android不同版本对这个方法定义的差别!
- Android O(Android 8)此方法定义如下:
    /**
     * Set Ethernet configuration.
     */
    public void setConfiguration(IpConfiguration config) {
        try {
            mService.setConfiguration(config);
        } catch (RemoteException e) {
            throw e.rethrowFromSystemServer();
        }
    }
- Android P(Android 9)此方法定义如下:
```java
    /**
     * Set Ethernet configuration.
     */
    public void setConfiguration(String iface, IpConfiguration config) {
        try {
            mService.setConfiguration(iface, config);
        } catch (RemoteException e) {
            throw e.rethrowFromSystemServer();
        }
    }
对比发现了什么,多了一个参数String iface,这个参数的意思是什么呢,即我们通常看到的设备网口名称,譬如eth0,我们可以通过命令 ifconfig 可以看到你设备下的所有网口名称,这个eth0怎么来的我们后续会讲解。
130|console:/ # ifconfig
dummy0    Link encap:Ethernet  HWaddr 62:df:e7:bb:49:0f
          inet6 addr: fe80::60df:e7ff:febb:490f/64 Scope: Link
          UP BROADCAST RUNNING NOARP  MTU:1500  Metric:1
          RX packets:0 errors:0 dropped:0 overruns:0 frame:0
          TX packets:8 errors:0 dropped:0 overruns:0 carrier:0
          collisions:0 txqueuelen:1000
          RX bytes:0 TX bytes:560

rmnet_ipa0 Link encap:UNSPEC
          UP RUNNING  MTU:2000  Metric:1
          RX packets:8 errors:0 dropped:0 overruns:0 frame:0
          TX packets:17 errors:0 dropped:0 overruns:0 carrier:0
          collisions:0 txqueuelen:1000
          RX bytes:3196 TX bytes:1268

rmnet_data0 Link encap:UNSPEC
          inet6 addr: fe80::f265:e5b9:fecd:242c/64 Scope: Link
          UP RUNNING  MTU:2000  Metric:1
          RX packets:19 errors:0 dropped:0 overruns:0 frame:0
          TX packets:17 errors:0 dropped:0 overruns:0 carrier:0
          collisions:0 txqueuelen:1000
          RX bytes:2968 TX bytes:1132

lo        Link encap:Local Loopback
          inet addr:127.0.0.1  Mask:255.0.0.0
          inet6 addr: ::1/128 Scope: Host
          UP LOOPBACK RUNNING  MTU:65536  Metric:1
          RX packets:0 errors:0 dropped:0 overruns:0 frame:0
          TX packets:0 errors:0 dropped:0 overruns:0 carrier:0
          collisions:0 txqueuelen:1
          RX bytes:0 TX bytes:0

eth0      Link encap:Ethernet  HWaddr 00:80:0f:11:70:00  Driver smsc9500
          inet addr:172.16.151.22  Bcast:172.16.151.255  Mask:255.255.255.0
          inet6 addr: fe80::56e0:5755:28c3:6270/64 Scope: Link
          UP BROADCAST RUNNING MULTICAST  MTU:1500  Metric:1
          RX packets:7812 errors:0 dropped:0 overruns:0 frame:0
          TX packets:0 errors:0 dropped:0 overruns:0 carrier:0
          collisions:0 txqueuelen:1000
          RX bytes:507092 TX bytes:0
2.2 App层Settings修改
Settings中的修改不是本文的重点,这个和以前的逻辑Android版本的添加几乎可以保持不变,只是对所有的相关接口多添加一个String iface参数即可,可以参见如下代码,实际UI效果如下 :

2.3 Framework的适配
这个是本文的重点,当然前提得驱动的同事已经将有线网络的驱动加载OK了。怎么判断驱动OK了呢,一般就是插上网线然后状态栏上会有如下截图一个小角图标显示,并且在终端下面能发现/sys/class/net/eth0的节点。
2.3.1 EthernetService加入SystemServiceManager并启动
参见framework/base/services/java/com/android/server/SystemServer.java的代码,将EthernetService加入SystemServiceManager管理,并启动。这里不做过多介绍,因为这个篇章的重点不是这个。
    private static final String ETHERNET_SERVICE_CLASS =
            "com.android.server.ethernet.EthernetService";

            if (mPackageManager.hasSystemFeature(PackageManager.FEATURE_ETHERNET) ||
                mPackageManager.hasSystemFeature(PackageManager.FEATURE_USB_HOST)) {
                traceBeginAndSlog("StartEthernet");
                mSystemServiceManager.startService(ETHERNET_SERVICE_CLASS);
                traceEnd();
            }
2.3.2 EthernetService介绍
先来看下核心服务frameworks\opt\net\ethernet\java\com\android\server\ethernet\EthernetService.java,代码如下所示:
public final class EthernetService extends SystemService {

    private static final String TAG = "EthernetService";
    final EthernetServiceImpl mImpl;

    public EthernetService(Context context) {
        super(context);
        mImpl = new EthernetServiceImpl(context);
    }

    @Override
    public void onStart() {
        Log.i(TAG, "Registering service " + Context.ETHERNET_SERVICE);
        publishBinderService(Context.ETHERNET_SERVICE, mImpl);
    }

    @Override
    public void onBootPhase(int phase) {
        if (phase == SystemService.PHASE_SYSTEM_SERVICES_READY) {
            mImpl.start();
        }
    }
}
这段代码非常简单,EthernetService 继承了系统服务,那自然也就是系统服务,这个会加载在system_server中启动,在该类中调用 EthernetServiceImpl 的 start(),我们继续接着看看。
2.3.3 EthernetServiceImpl 介绍
该文件所在源码目录为frameworks/opt/net/ethernet/java/com/android/server/ethernet/EthernetServiceImpl.java,让我们看看主要做了些啥。
    public void start() {
        Log.i(TAG, "Starting Ethernet service");

        HandlerThread handlerThread = new HandlerThread("EthernetServiceThread");
        handlerThread.start();
        mHandler = new Handler(handlerThread.getLooper());

        mTracker = new EthernetTracker(mContext, mHandler);
        mTracker.start();

        mStarted.set(true);
    }
主要创建了 EthernetTracker,这个类是 9.0 中新增出来的,用于监听以太网的切换、以太网判断当前网络是否可用等一系列操作。之前 8.1 中都集成在 EthernetNetworkFactory 中,这个是Android P的主要差别,继续跟进。
2.3.3 EthernetTracker介绍
关于以太网初始化和基本操作基本集中在这个类里面了,取代了Android P之前EthernetNetworkFactory的部分功能。该文件的源码位置为frameworks\opt\net\ethernet\java\com\android\server\ethernet\EthernetTracker.java。
    void start() {
        mConfigStore.read();

        // Default interface is just the first one we want to track.
        mIpConfigForDefaultInterface = mConfigStore.getIpConfigurationForDefaultInterface();
        final ArrayMap<String, IpConfiguration> configs = mConfigStore.getIpConfigurations();
        for (int i = 0; i < configs.size(); i++) {
            mIpConfigurations.put(configs.keyAt(i), configs.valueAt(i));
        }

        try {
            mNMService.registerObserver(new InterfaceObserver());
        } catch (RemoteException e) {
            Log.e(TAG, "Could not register InterfaceObserver " + e);
        }

        mHandler.post(this::trackAvailableInterfaces);
    }
在EthernetTracker通过ConcurrentHashMap<String, IpConfiguration> mIpConfigurations这个表来管理保存的 IpConfigStore 信息,那么这个Map的初识值从那里来的呢,主要如下两个地方:
- EthernetConfigStore 中存储的信息,EthernetConfigStore 中通过读取 /misc/ethernet/ipconfig.txt
- 获取interfaceConfigs 的信息,在 EthernetTracker 的构造方法中通过解析 config_ethernet_interfaces 字符串也可向 Map 中添加初始信息。
    EthernetTracker(Context context, Handler handler) {
        mHandler = handler;
        mContext = context;
        // The services we use.
        IBinder b = ServiceManager.getService(Context.NETWORKMANAGEMENT_SERVICE);
        mNMService = INetworkManagementService.Stub.asInterface(b);

        // Interface match regex.
        mIfaceMatch = context.getResources().getString(
                com.android.internal.R.string.config_ethernet_iface_regex);

        // Read default Ethernet interface configuration from resources
        final String[] interfaceConfigs = context.getResources().getStringArray(
                com.android.internal.R.array.config_ethernet_interfaces);
        for (String strConfig : interfaceConfigs) {
            parseEthernetConfig(strConfig);
        }

        mConfigStore = new EthernetConfigStore();

        NetworkCapabilities nc = createNetworkCapabilities(true /* clear default capabilities */);
        mFactory = new EthernetNetworkFactory(handler, context, nc);
        mFactory.register();
    }

    private void parseEthernetConfig(String configString) {
        String[] tokens = configString.split(";");
        String name = tokens[0];
        String capabilities = tokens.length > 1 ? tokens[1] : null;
        NetworkCapabilities nc = createNetworkCapabilities(
                !TextUtils.isEmpty(capabilities)  /* clear default capabilities */, capabilities);
        mNetworkCapabilities.put(name, nc);

        if (tokens.length > 2 && !TextUtils.isEmpty(tokens[2])) {
            IpConfiguration ipConfig = parseStaticIpConfiguration(tokens[2]);
            mIpConfigurations.put(name, ipConfig);
        }
    }
让我们看看config_ethernet_interfaces的取值从哪里看,具体位置如下frameworks/base/core/res/res/values/config.xml具体代码如下:
    <string-array translatable="false" name="config_ethernet_interfaces">
        <!--
        <item>eth1;12,13,14,15;ip=192.168.0.10/24 gateway=192.168.0.1 dns=4.4.4.4,8.8.8.8</item>
        <item>eth2;;ip=192.168.0.11/24</item>
        -->
    </string-array>
这里就给各位解释了iface这个参数的由来了。
2.3.4 增加以太网打开/关闭接口
在EthernetTracker.文件中添加如下两个接口如下所示,即打开和关闭以太网接口,至于怎么从EthernetManager调用到EthernetTracker的逻辑就不细说了,各位可以看我最后上传的patch包即可。
/**
	state
	true 开启以太网
	false 关闭以太网
**/
    public boolean setInterfaceStatus(String iface, boolean state){
         try {
            if(!TextUtils.isEmpty(iface)) {
                if(!state)
                    mNMService.setInterfaceDown(iface);
                else
                    mNMService.setInterfaceUp(iface);
                return true;
            } else {
                Log.e(TAG,"iface is null");
            }
        } catch (Exception e) {
            Log.e(TAG, "Error setInterfaceStatus : " + iface + " state : " + state + " exception : " + e);
        }
        return false;

    }
2.3.5 增加以太网状态判断和Mac接口
    public String getEthMacAddress(String iface){
        InterfaceConfiguration config = null;
        // Bring up the interface so we get link status indications.
        try {
            config = mNMService.getInterfaceConfig(iface);
        } catch (RemoteException | IllegalStateException e) {
            // Either the system is crashing or the interface has disappeared. Just ignore the
            // error; we haven't modified any state because we only do that if our calls succeed.
            Log.e(TAG, "Error upping interface " + iface, e);
        }
        if (config == null) {
            Log.e(TAG, "Null interface config for " + iface + ". Bailing out.");
            return "";
        }

        final String hwAddress = config.getHardwareAddress();
        return hwAddress;
    }


    public int getEthIfaceState(String mIface) {
        //return mTracker.getEthIfaceState(iface);
        try{
            File file = new File("/sys/class/net/"+mIface+"/flags");
            if(!file.exists())
                return EthernetManager.ETH_IFACE_STATE_DOWN;
            FileInputStream fin= new FileInputStream(file);
            BufferedReader reader= new BufferedReader(new InputStreamReader(fin));
            String flag = reader.readLine();
            Log.e(TAG,"mIface : " + mIface);
            fin.close();
            flag = flag.substring(2);
            int flag_int = Integer.parseInt(flag, 16);
            if ((flag_int & 0x1) > 0) {
                return EthernetManager.ETH_IFACE_STATE_UP;
            } else {
                return EthernetManager.ETH_IFACE_STATE_DOWN;
            }
        }catch(Exception e){
            e.printStackTrace();
        }
        return EthernetManager.ETH_IFACE_STATE_DOWN;
    }
2.3.5 增加以太网静态IP设置接口,并解决拔插后才能更改ip地址
以太网静态接口设置,主要是调用EthernetManager类里面的setConfiguration方法进行参数配置。我们看一下这个方法具体做了什么操作。
 /**
     * Set Ethernet configuration.
     */
    public void setConfiguration(String iface, IpConfiguration config) {
        try {
            mService.setConfiguration(iface, config);
        } catch (RemoteException e) {
            throw e.rethrowFromSystemServer();
        }
    }
发现是通过mService.setConfiguration()方法。那么这个mService是哪里传来的呢,都是老司机就不买弄了,这里的mService是EthernetServiceImpl ,让我们看看该代码:
    public void setConfiguration(String iface, IpConfiguration config) {
        if (!mStarted.get()) {
            Log.w(TAG, "System isn't ready enough to change ethernet configuration");
        }

        enforceConnectivityInternalPermission();

        if (mTracker.isRestrictedInterface(iface)) {
            enforceUseRestrictedNetworksPermission();
        }

        // TODO: this does not check proxy settings, gateways, etc.
        // Fix this by making IpConfiguration a complete representation of static configuration.
        mTracker.updateIpConfiguration(iface, new IpConfiguration(config));
}
上面是Android 9.0中的方法实现。这里就是我花了一段时间解决的为什么Android P设置了静态IP不立即生效的地方。我们看一下Android 8.0之前的版本是这个方法是怎么写的,这个地方是关键。
    public void setConfiguration(IpConfiguration config) {
        if (!mStarted.get()) {
            Log.w(TAG, "System isn't ready enough to change ethernet configuration");
        }

        enforceConnectivityInternalPermission();

        synchronized (mIpConfiguration) {
            mEthernetConfigStore.writeIpAndProxyConfigurations(config);

            // TODO: this does not check proxy settings, gateways, etc.
            // Fix this by making IpConfiguration a complete representation of static configuration.
            if (!config.equals(mIpConfiguration)) {
                mIpConfiguration = new IpConfiguration(config);
                mTracker.stop();
                mTracker.start(mContext, mHandler);
            }
        }
    }
我们也是看着都是mTracker对象调用方法进行设置。其实这两个mTracker是不同的对象。在Android 9.0之前的版本,这个mTracker对象都是EthernetNetworkFactory的实例对象。因为后续的设置参数进行连接网络判断端口等一系列操作都在这个EthernetNetworkFactory类中完成。而在Android9.0及以后后,Google将他们抽离出来了,对于监听以太网切换、以太网判断当前网络是否可用等一些列操作抽离到一个EthernetTracker类中。那么9.0的EthernetNetworkFactory只需要关心拿到参数进行连接上网操作就可以了。
我们现在只关心9.0是怎么走的。找到EthernetTracker类的具体实现,可以看到调用了EthernetNetworkFactory中的方法
    void updateIpConfiguration(String iface, IpConfiguration ipConfiguration) {
        if (DBG) {
            Log.i(TAG, "updateIpConfiguration, iface: " + iface + ", cfg: " + ipConfiguration);
        }

        mConfigStore.write(iface, ipConfiguration);
        mIpConfigurations.put(iface, ipConfiguration);

        mHandler.post(() -> mFactory.updateIpConfiguration(iface, ipConfiguration));
    }
而其实这个方法并没有做任何上网的操作,这就是为什么设置静态IP后,没有变动的原因。
    void updateIpConfiguration(String iface, IpConfiguration ipConfiguration) {
        NetworkInterfaceState network = mTrackingInterfaces.get(iface);
        if (network != null) {
            network.setIpConfig(ipConfiguration);//仅仅是将ip地址等以太网参数保存下来。
        }
    }
这里设置下去仅仅是将参数保存下来,显示是不符合我们的需求的。此时已经可以通过拔插网线实现设置静态ip上网。那么接下来,我们看看正常流程怎么走。
还是继续看EthernetTracker类。因为判断能不能连接网络的条件都在这里实现。这里要怎么才能做到设置静态IP后能动态的上网呢,这个可以参见EthernetTracker类,因为一般的正常上网都是从这个类开始的。这里我也不过多讲述其中的过程了,可以参见这篇博客Android 9.0 以太网上网设置静态ip,解决拔插后才能更改ip地址的问题
有比较详细的讲解,最后我们的解决方法是EthernetServiceImpl中添加如下逻辑即可代码如下所示:
    public void setConfiguration(String iface, IpConfiguration config) {
        if (!mStarted.get()) {
            Log.w(TAG, "System isn't ready enough to change ethernet configuration");
        }

        enforceConnectivityInternalPermission();

        if (mTracker.isRestrictedInterface(iface)) {
            enforceUseRestrictedNetworksPermission();
        }

        // TODO: this does not check proxy settings, gateways, etc.
        // Fix this by making IpConfiguration a complete representation of static configuration.
        mTracker.updateIpConfiguration(iface, new IpConfiguration(config));

        //Add by paxsz 2020.04.23
        if (mTracker.isRestrictedInterface(iface)) {
            enforceUseRestrictedNetworksPermission();
        }

        // TODO: this does not check proxy settings, gateways, etc.
        // Fix this by making IpConfiguration a complete representation of static configuration.

        mTracker.updateIpConfiguration(iface, new IpConfiguration(config));
        mTracker.removeInterface(iface);//清除当前端口
        mTracker.start();

    }
收工,over!
结语
各位乡亲们,Android 9的适配以太网就结束了,整的我腰酸背痛啊。Android版本升级之时就是我等受苦之时啊。
写在最后
好了如上就是Android P适配以太网功能开发指南的所有,如有问题或者有任何疑问请及时沟通或者交流,也可点个赞或者吐槽一番也是可以的。so goodbye。
当然得最后附上终极patch包不是,不然你们又得在背后diss我了。
Android P Settings Framework以太网适配path包
