Docker-docker-compose
- 简介
- 1.安装
- 2.入门
- 3.docker-compose模板
- 1.build
- 2.cap_add, cap_drop
- 3.cgroup_parent
- 4.command
- 5.container_name
- 6.depends_on
- 7.devices
- 8.DNS
- 9.image
- 10.volumes
- 11.ports
- 12.network_mode
- 13.networks
- 14.restart
- 15.secrets
- 16.expose
- 17.environment
- 18.env_file
- 4.docker-compose常用命令
- 获取帮助
- 1.config
- 2.down
- 3.up
- 4.ps
- 5.start
- 6.stop
- 7.rm
- 8.images
- 9.pull
- 10.port
- 11.logs
- 12.exec
- 13.network
- 5.实践
docker-compose是一种docker容器的任务编排工具。
任务编排:就是对多个子任务执行顺序进行确定的过程
常见的任务编排工具:
| 任务编排工具 | 类型 | 所属 |
|---|---|---|
| docker-compose | 单机版 | Docker |
| Docker Swarm | 集群版 | Docker |
| Mesos | Apache | |
| Kubernetes(k8s) |
https://docs.docker.com/compose/
https://docs.docker.com/compose/compose-file/
https://blog.csdn.net/weixin_42366378/article/details/105655421
简介
Compose是用于定义和运行多容器Docker应用程序的工具。通过Compose,可以使用YAML文件来配置应用程序的服务。然后,使用一个命令,就可以从配置中创建并启动所有服务。
Compose可在所有环境中工作:生产,登台,开发,测试以及CI工作流。
使用Compose基本上是一个三步过程:
- 使用定义应用环境,Dockerfile以便可以在任何地方复制。
- 定义组成应用程序的服务,docker-compose.yml 以便它们可以在隔离的环境中一起运行。
- Run docker-compose upand Compose启动并运行整个应用程序。
docker-compose的特点
本质:docker 工具
对象:应用服务
配置:YAML 格式配置文件
命令:简单
执行:定义和运行容器
docker-compose的配置文件
docker-compose.yml
文件后缀是yml
文件内容遵循 ymal格式
Docker和docker-compose
https://docs.docker.com/compose/compose-file/
1.安装
pip
设置pip源
mkdir -p ~/.pip && cd $_ && tee ~/.pip/pip.conf <<-'EOF'
[global]
trusted-host=mirrors.aliyun.com
index-url=http://mirrors.aliyun.com/pypi/simple/
EOF
安装pip
sudo apt install -y python-pip
python-dev
sudo apt install -y python-dev
libffi-dev
sudo apt install -y libffi-dev
openssl-dev
sudo apt install -y openssl-dev
gcc
sudo apt install -y gcc
libc-dev
sudo apt install -y libc-dev
make
sudo apt install -y make
安装docker-compose
sudo pip install docker-compose
查看版本
docker-compose version

2.入门
1.获取docker版本
docker --version

对应

2.编辑docker-compose.yml文件
https://blog.csdn.net/weixin_42366378/article/details/105655421
mkdir -p ~/docker/compose/ && cd $_ && vim docker-compose.yml
内容如下:
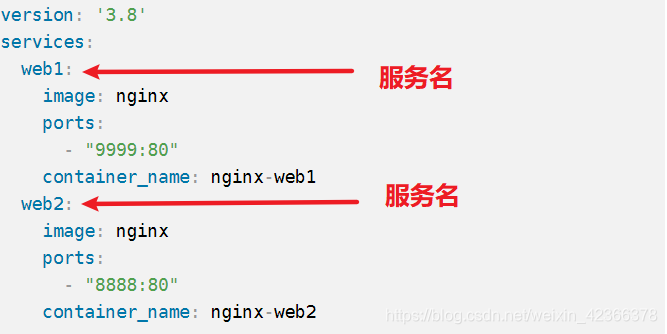
version: '3.8'
services:
  web1:
    image: nginx
    ports:
      - "9999:80"
    container_name: nginx-web1
  web2:
    image: nginx
    ports:
      - "8888:80"
    container_name: nginx-web2
3.启动
docker-compose up -d
#如果不加-d,那么界面就会卡在前台
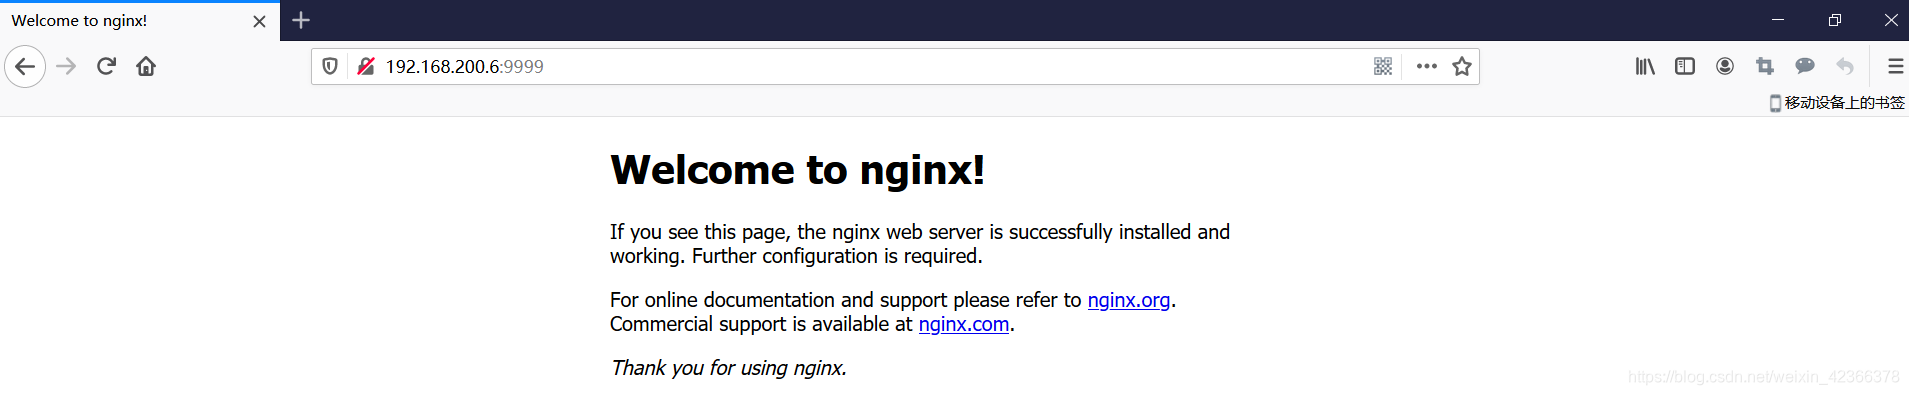
4.验证
1.查看容器信息
docker-compose ps

2.浏览器访问
ifconfig
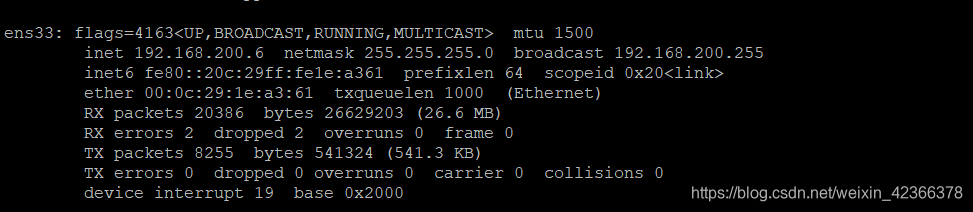
http://192.168.200.6:8888
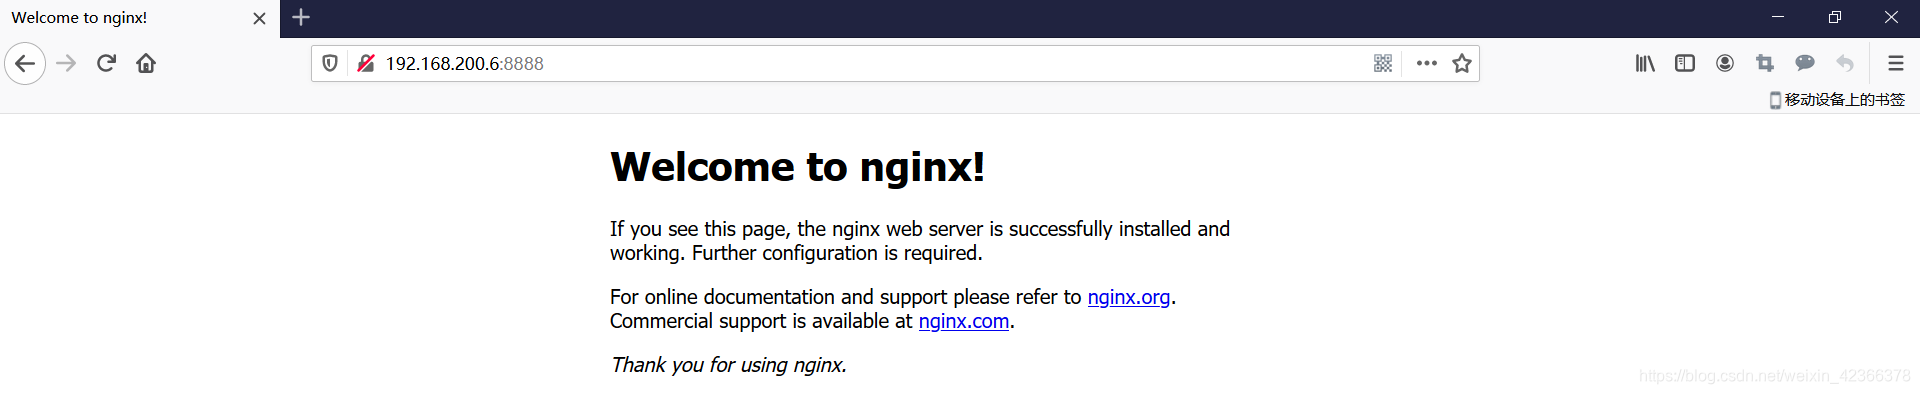
http://192.168.200.6:8888
3.docker-compose模板
https://docs.docker.com/compose/compose-file/
列举常用的属性
version: "3.8"
services:

  redis:
    image: redis:alpine
    ports:
      - "6379"
    networks:
      - frontend
    deploy:
      replicas: 2
      update_config:
        parallelism: 2
        delay: 10s
      restart_policy:
        condition: on-failure

  db:
    image: postgres:9.4
    volumes:
      - db-data:/var/lib/postgresql/data
    networks:
      - backend
    deploy:
      placement:
        constraints:
          - "node.role==manager"

  vote:
    image: dockersamples/examplevotingapp_vote:before
    ports:
      - "5000:80"
    networks:
      - frontend
    depends_on:
      - redis
    deploy:
      replicas: 2
      update_config:
        parallelism: 2
      restart_policy:
        condition: on-failure

  result:
    image: dockersamples/examplevotingapp_result:before
    ports:
      - "5001:80"
    networks:
      - backend
    depends_on:
      - db
    deploy:
      replicas: 1
      update_config:
        parallelism: 2
        delay: 10s
      restart_policy:
        condition: on-failure

  worker:
    image: dockersamples/examplevotingapp_worker
    networks:
      - frontend
      - backend
    deploy:
      mode: replicated
      replicas: 1
      labels: [APP=VOTING]
      restart_policy:
        condition: on-failure
        delay: 10s
        max_attempts: 3
        window: 120s
      placement:
        constraints:
          - "node.role==manager"

  visualizer:
    image: dockersamples/visualizer:stable
    ports:
      - "8080:8080"
    stop_grace_period: 1m30s
    volumes:
      - "/var/run/docker.sock:/var/run/docker.sock"
    deploy:
      placement:
        constraints:
          - "node.role==manager"

networks:
  frontend:
  backend:

volumes:
  db-data:
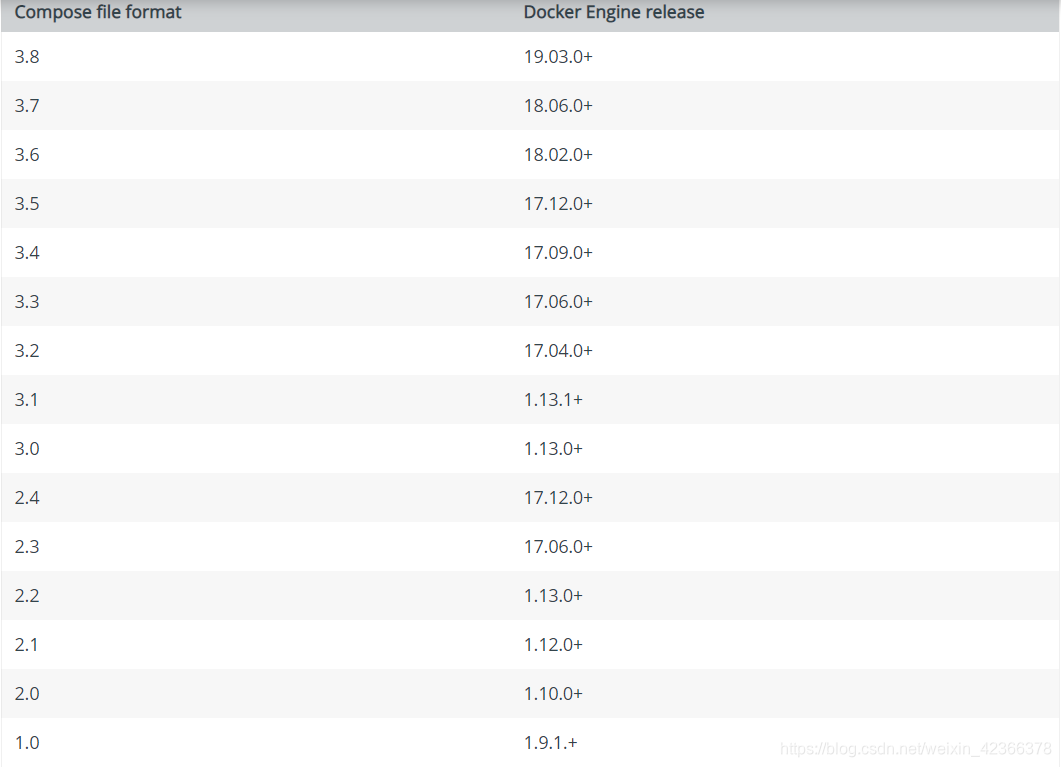
version:
docker-compose模板文件的版本号
根据:
docker version
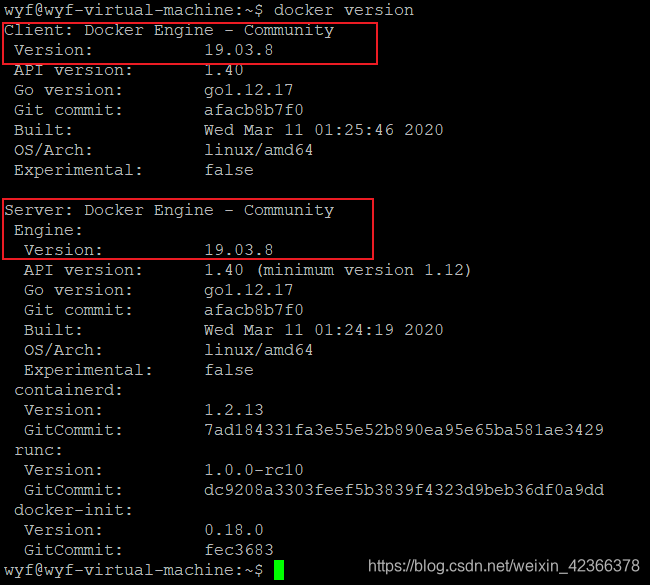
或者
docker --version

获取docker engine的版本号来确定
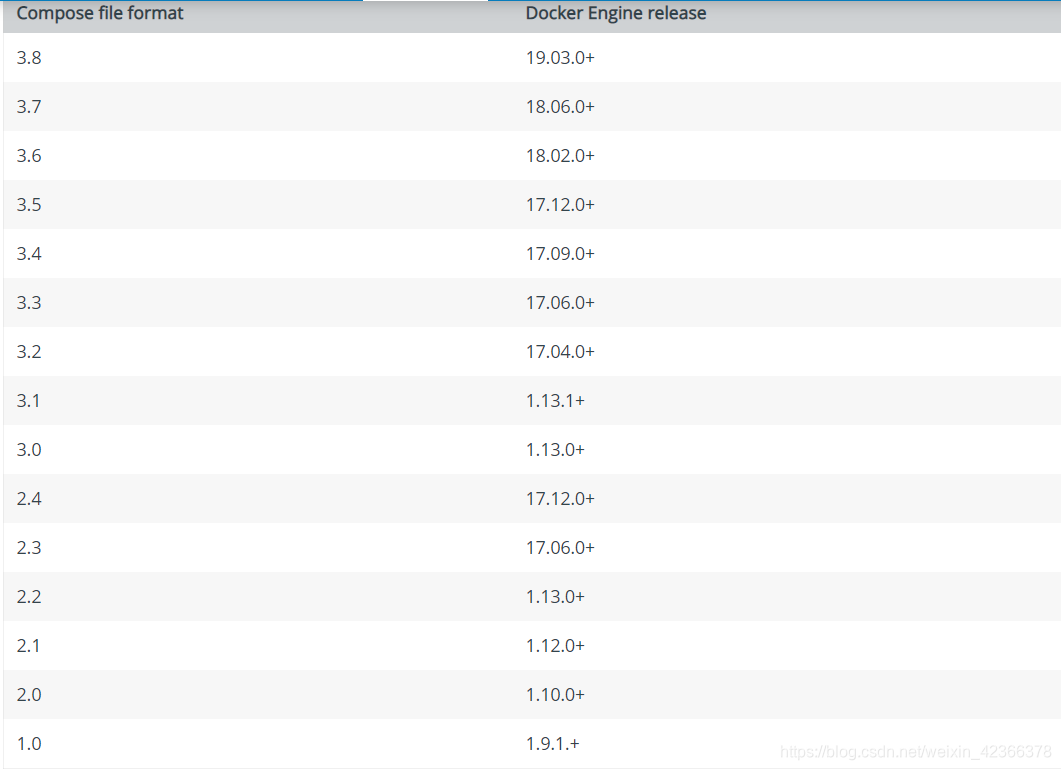
docker-compose 文件与docker engine 版本对照
services:
服务标识符,作为compose的yaml文件的第一级,后面的应用服务作为其数组的子集。
每个服务都必须通过 image 指令指定镜像或 build 指令(需要 Dockerfile)等来自动构建生成镜像。
1.build
如果使用 build 指令,在 Dockerfile 中设置的选项(例如:CMD, EXPOSE, VOLUME, ENV 等) 将会自动被获取,无需在 docker-compose.yml 中重复设置。
指定 Dockerfile 所在文件夹的路径(可以是绝对路径,或者相对 docker-compose.yml 文件的路径)。 Compose 将会利用它自动构建这个镜像,然后使用这个镜像。
version: '3.8'
services: # 服务标识符
  webapp: # 子服务应用名
    build: dir  # Dockerfile 所在目录[绝对或者相对路径目录,当前使用.号]
context
也可以使用 context 指令指定 Dockerfile 所在文件夹的路径
包含Dockerfile的目录的路径,或者git存储库的URL。
当提供的值是相对路径时,它将被解释为相对于Compose文件的位置。该目录还是发送到Docker守护程序的构建上下文,Compose用生成的名称构建并标记它,然后使用该镜像。
version: '3.8'
services: # 服务标识符
  webapp: # 子服务应用名
    build:
      context: dir # Dockerfile 所在目录[绝对或者相对路径目录,当前使用.号]
dockerfile
备用Dockerfile。
Compose使用一个替代文件进行构建。还必须指定一个构建路径。
也可以使用此来指定Dockerfile文件
version: '3.8'
services: # 服务标识符
  webapp: # 子服务应用名
    build:
      context: dir # Dockerfile 所在目录[绝对或者相对路径目录,当前使用.号]
      dockerfile: Dockerfile-alternate # 备用Dockerfile文件名
args
添加构建参数,这是只能在构建过程中访问的环境变量。
首先,在Dockerfile中指定参数:
ARG buildno
ARG gitcommithash

RUN echo "Build number: $buildno"
RUN echo "Based on commit: $gitcommithash"
然后在build键下指定参数。
可以传递键值对map:
version: '3.8'
services: # 服务标识符
  webapp: # 子服务应用名
    build:
      context: dir  # Dockerfile 所在目录[绝对或者相对路径目录,当前使用.号]
      args: # 将参数以键值对的map形式传递
        buildno: 1
        gitcommithash: cdc3b19
或者数组列表形式list:
version: '3.8'
services: # 服务标识符
  webapp: # 子服务应用名
    build:
      context: dir  # Dockerfile 所在目录[绝对或者相对路径目录,当前使用.号]
      args: # 将参数以数组列表的list形式传递
        - buildno=1
        - gitcommithash=cdc3b199
cache_from
引擎用于缓存解析的镜像列表。
指定构建镜像的缓存。
version: '3.8'
services: # 服务标识符
  webapp: # 子服务应用名
    build:
      context: dir # Dockerfile 所在目录[绝对或者相对路径目录,当前使用.号]
      cache_from: # 指定构建镜像时的缓存解析镜像列表
        - alpine:latest
        - corp/web_app:3.14
labels
设置构建镜像的标签信息【元数据】。
使用Docker labels将元数据添加到生成的镜像中。
建议使用反向DNS【反向解析:通过ip查找域名】表示法,以防止标签与其他软件使用的标签冲突。
可以使用键值对map:
version: '3.8'
services: # 服务标识符
  webapp: # 子服务应用名
    build:
      context: dir # Dockerfile 所在目录[绝对或者相对路径目录,当前使用.号]
      labels: # 将元数据以键值对的map形式添加
        com.example.description: "Accounting webapp"
        com.example.department: "Finance"
        com.example.label-with-empty-value: ""
或者数组列表形式list:
version: '3.8'
services: # 服务标识符
  webapp: # 子服务应用名
    build:
      context: dir # Dockerfile 所在目录[绝对或者相对路径目录,当前使用.号]
      labels: # 将元数据以数组列表的list形式添加
        - "com.example.description=Accounting webapp"
        - "com.example.department=Finance"
        - "com.example.label-with-empty-value"
shm_size
设置/dev/shm此构建容器的分区大小。指定为表示字节数的整数值或表示字节值的字符串。
version: '3.8'
services: # 服务标识符
  webapp: # 子服务应用名
    build:
      context: dir # Dockerfile 所在目录[绝对或者相对路径目录,当前使用.号]
      shm_size: '2gb' # 设置/dev/shm此构建容器的分区大小,或者使用 shm_size: 2147483648
target
多层构建,根据Dockerfile中的定义构建指定的层级。
version: '3.8'
services: # 服务标识符
  webapp: # 子服务应用名
    build:
      context: dir # Dockerfile 所在目录[绝对或者相对路径目录,当前使用.号]
      target: prod # 多层构建,定义production阶段
2.cap_add, cap_drop
添加或删除容器功能。
指定容器的内核能力(capacity)分配。
version: '3.8'
services: # 服务标识符
  webapp: # 子服务应用名
    build: dir  # Dockerfile 所在目录[绝对或者相对路径目录,当前使用.号]
    cap_add:
      - ALL  # 让容器拥有所有能力
version: '3.8'
services: # 服务标识符
  webapp: # 子服务应用名
    build: dir  # Dockerfile 所在目录[绝对或者相对路径目录,当前使用.号]
    cap_drop:
      - NET_ADMIN # 去掉 NET_ADMIN 能力
      - SYS_ADMIN # 去掉 SYS_ADMIN 能力
3.cgroup_parent
为容器指定一个可选的父cgroup。
指定父 cgroup 组,意味着将继承该组的资源限制。
version: '3.8'
services: # 服务标识符
  webapp: # 子服务应用名
    build: dir  # Dockerfile 所在目录[绝对或者相对路径目录,当前使用.号]
    cgroup_parent: cgroups_abcd # 指定父cgroups_abcd 组
4.command
覆盖默认命令。
覆盖容器启动后默认执行的命令。
version: '3.8'
services: # 服务标识符
  webapp: # 子服务应用名
    build: dir  # Dockerfile 所在目录[绝对或者相对路径目录,当前使用.号]
    command: bundle exec thin -p 3000 # 覆盖容器启动的默认命令,也可以使用Dockerfile中的形式:command: ["bundle", "exec", "thin", "-p", "3000"]
5.container_name
指定自定义容器名称,而不是生成的默认名称,默认将会使用 【项目名称_服务名称_序号】。
由于Docker容器名称必须唯一,因此如果指定了自定义名称,则不能将服务扩展到1个以上的容器。尝试这样做会导致错误。
version: '3.8'
services: # 服务标识符
  webapp: # 子服务应用名
    build: dir  # Dockerfile 所在目录[绝对或者相对路径目录,当前使用.号]
    container_name: my-web-container-1 # 自定义容器名称
6.depends_on
解决容器的依赖、启动先后的问题。
解决服务之间的依赖性。服务依赖性导致以下行为:
- docker-compose up以依赖性顺序启动服务。
- docker-compose up SERVICE自动包含SERVICE的依赖项。
- docker-compose stop按依赖关系顺序停止服务。
version: '3.8'
services: # 服务标识符
  web: # 子服务应用名
    build: dir  # Dockerfile 所在目录[绝对或者相对路径目录,当前使用.号]
    depends_on:
      - db
      - redis

  redis: # 子服务应用名
    image: redis # 服务依赖镜像属性,默认为latest

  db: # 子服务应用名
    image: mysql # 服务依赖镜像属性,默认为latest
db和redis在web服务之前启动。
docker-compose up web还将创建并启动db和redis。
web在db和之前redis停止。
使用时需要注意以下几点depends_on:
注意:
- web 服务不会等待 redis 服务和 db 服务 [完全启动] 之后才启动
- Version 3不再支持的condition形式depends_on。
- Version 3的集群swarm mode Compose文件部署depends_on时,将忽略该选项 。
7.devices
指定设备映射关系。
设备映射列表。使用与–devicedocker client create选项相同的格式。
devices:
  - "/dev/ttyUSB0:/dev/ttyUSB0"
8.DNS
自定义DNS服务器。可以是单个值或列表。
单个值:
dns: 114.114.114.114
列表:
dns:
  - 223.5.5.5
  - 223.6.6.6
  - 114.114.114.114
  - 114.114.114.115
  - 119.29.29.29
  - 182.254.116.116
9.image
指定用于启动容器的镜像。可以是镜像名称 / 镜像ID/完整镜像ID【sha sha256完整的镜像ID】。
如果镜像不存在本地,除非指定了build,否则Compose会尝试拉出它,在这种情况下,它将使用指定的选项来构建它并使用指定的标签对其进行标记。
本机存在的如下:
REPOSITORY          TAG                 IMAGE ID                                                                  CREATED             SIZE
ubuntu              latest              sha256:4e5021d210f65ebe915670c7089120120bc0a303b90208592851708c1b8c04bd   4 weeks ago         64.2MB
REPOSITORY          TAG                 IMAGE ID            CREATED             SIZE
ubuntu              latest              4e5021d210f6        4 weeks ago         64.2MB

image: ubuntu
image: ubuntu:latest
# 简短镜像ID
image: 4e5021d210f6
# 完整镜像ID
image: 4e5021d210f65ebe915670c7089120120bc0a303b90208592851708c1b8c04bd
image: ubuntu:18.04
10.volumes
数据卷所挂载路径设置。可以设置为宿主机路径(HOST:CONTAINER)或者数据卷名称(VOLUME:CONTAINER),并且可以设置访问模式 (HOST:CONTAINER:ro)
挂载主机路径或命名数据卷,指定为服务的子选项。
可以将主机路径安装为单个服务的定义的一部分,而无需在顶级volumes Key【键】进行定义。
如果要在多个服务之间重用数据卷,请在顶级volumes Key【键】定义一个命名卷。将命名卷与服务,集群和堆栈文件一起使用。
volumes:
  - 宿主机文件:容器文件
1.短语法
简短语法使用通用[SOURCE:]TARGET[:MODE]格式,其中 SOURCE可以是主机路径或卷名。TARGET是安装卷的容器路径。标准模式适用ro于只读和rw读写(默认)。
可以在主机上安装相对路径,该相对路径相对于正在使用的Compose配置文件的目录进行扩展。相对路径应始终以.或开头…。
1.docker engine自定义数据卷
定义容器的数据卷,不指定宿主机的数据卷,docker engine自行创建宿主机的数据卷
默认访问模式:rw读写
volumes:
  - /var/lib/mysql
2.绝对路径
默认访问模式:rw读写
volumes:
  - /opt/data:/var/lib/mysql
3.相对路径
1.用户相对路径
自定义标准访问模式:ro只读
volumes:
  - ~/configs:/etc/configs/:ro
2.主机上的路径,相对于Compose文件
默认访问模式:rw读写
volumes:
  - ./cache:/tmp/cache
4.命名卷
常用于多个服务之间重用数据卷,或者宿主机路径为数据卷名称
	volumes
      - datavolume:/var/lib/mysql
volumes:
  datavolume:
version: '3.8'
services: # 服务标识符
  redis: # 子服务应用名
    image: redis # 服务依赖镜像属性,默认为latest
    volumes:
     - dbdata:/root/data # 宿主机路径设置为命名卷[路径为名称]

  db: # 子服务应用名
    image: mysql:8.0 # 服务依赖镜像
    volumes:
      - mysql_data:/var/lib/mysql # 宿主机路径设置为命名卷[路径为名称]
      - dbdata:/root/data # 宿主机路径设置为命名卷[路径为名称]
      - ~/count.sql:/root/count.sql

volumes: # 定义命名数据卷
  mysql_data: /var/lib/mysql
  dbdata: ~/dbdata
2.长语法
长格式语法允许配置其他不能以短格式表示的字段。
- type:所述安装型volume,bind,tmpfs或npipe
- source:挂载的源,主机上用于绑定挂载的路径或顶级volumes Key【键】定义的卷的名称 。不适用于tmpfs挂载。
- target:安装了卷的容器中的路径
- read_only:将卷设置为只读的标志
- bind:配置其他绑定选项
- propagation:用于绑定的传播模式
- volume:配置其他音量选项
- nocopy:创建卷时禁用从容器复制数据的标志
- tmpfs:配置其他tmpfs选项
- size:tmpfs挂载的大小(以字节为单位)
- consistency:装载的一致性要求,consistent (主机和容器具有相同的视图),cached(读缓存,主机视图具有权威性)或delegated(读写缓存,容器的视图具有权威性)之一
version: '3.8'
services: # 服务标识符
  db: # 子服务应用名
    image: mysql:8.0 # 服务依赖镜像
    volumes:
      - type: volume
        source: mysql_data # 宿主机路径设置为命名卷[路径为名称]
        target: /var/lib/mysql
        volume:
          nocopy: true
      - type: bind
        source: ./static
        target: /opt/app/static

volumes: # 定义命名数据卷
  mysql_data: /var/lib/mysql
11.ports
暴露端口信息。
注意:
端口映射与’network_mode:host’不兼容
ports:
  - "宿主机端口:容器端口"
1.短语法
要么指定两个端口(HOST:CONTAINER),要么仅指定容器端口(选择了临时主机端口)。
注意:
当以该HOST:CONTAINER格式映射端口时,使用小于60的容器端口可能会遇到错误的结果,因为 YAML 会自动解析 xx:yy 这种数字格式为 60 进制。因此,建议始终将端口映射显式指定为字符串。
ports:
  - "3000"
  - "3000-3005"
  - "8000:8000"
  - "9090-9091:8080-8081"
  - "49100:22"
  - "127.0.0.1:8001:8001"
  - "127.0.0.1:5000-5010:5000-5010"
  - "6060:6060/udp"
  - "12400-12500:1240"
2.长语法
长格式语法允许配置其他不能以短格式表示的字段。
- target:容器内的端口
- published:公开端口【映射的宿主机端口】
- protocol:端口协议(tcp或udp)
- mode:host-用于在每个节点上发布主机端口,ingress-使swarm mode port达到负载均衡。
ports:
  - target: 80
    published: 8080
    protocol: tcp
    mode: host
12.network_mode
网络模式。使用与docker client --network参数相同的值,以及特殊形式service:[service name]。
network_mode: "bridge"
network_mode: "host"
network_mode: "none"
network_mode: "service:[service name]"
network_mode: "container:[container name/id]"
13.networks
要加入的网络,引用顶级networks KEY【键】下的列表。
配置容器连接的网络。
version: '3.8'
services: # 服务标识符
  web: # 子服务应用名
    image: nginx # 服务依赖镜像
    networks:
      - some-network
      - other-network

networks:
  some-network:
  other-network:
14.restart
no是默认的重启策略,在任何情况下都不会重启容器。如果指定了always,则容器将始终重新启动。如果退出代码指示失败时错误,该 on-failure策略将重新启动容器。该命令对保持服务始终运行十分有效,在生产环境中推荐配置为 always 或者 unless-stopped。
restart: "no"
restart: always
restart: on-failure
restart: unless-stopped
15.secrets
使用按服务secrets 配置,按服务授予对机密的访问权限。支持两种不同的语法变体。
可以授予服务访问多个机密的权限,并且可以混合长短语法。定义密码并不意味着授予服务对其的访问权限。
1.短语法
简短的语法变体仅指定密码名称。 这将授予容器访问密钥的权限,并将其安装在容器内的/ run / secrets / <secret_name>处。 源名称和目标安装点都设置为密码名称。
version: "3.8"
services:
  redis:
    image: redis:latest
    deploy:
      replicas: 1
    secrets:
      - my_secret
      - my_other_secret
secrets:
  my_secret:
    file: ./my_secret.txt
  my_other_secret:
    external: true
示例使用短语法向redis服务授予对my_secret和my_other_secret密码的访问权限。 my_secret的值设置为文件./my_secret.txt的内容,并且my_other_secret定义为外部资源,这意味着它已经在Docker中定义,可以通过运行docker secret create命令或其他堆栈进行定义 部署。 如果外部机密不存在,则堆栈部署将失败,并显示“ secret not found”错误。
2.长语法
长语法提供了在服务的任务容器中如何创建机密的更细粒度。
- source:密码的名称,因为它存在于Docker中。
- target:要/run/secrets/在服务的任务容器中挂载的文件的名称。如果未指定,则默认为source。
- uid和gid:/run/secrets/在服务的任务容器中拥有文件的数字UID或GID 。0如果未指定,则两者都默认为。
- mode:文件的权限以/run/secrets/ 八进制表示法装入服务的任务容器中。
version: "3.8"
services:
  redis:
    image: redis:latest
    deploy:
      replicas: 1
    secrets:
      - source: my_secret
        target: redis_secret
        uid: '103'
        gid: '103'
        mode: 0440
secrets:
  my_secret:
    file: ./my_secret.txt
  my_other_secret:
    external: true
16.expose
公开端口而不映射主机上,只有链接的服务才能访问它们。只能指定内部端口。
expose:
  - "3000"
  - "8000"
17.environment
添加环境变量。可以使用数组或字典。任何布尔值(true,false,yes,no)都需要用引号引起来,以确保YML解析器不会将其转换为True或False。
仅具有KEY的环境变量在运行Compose的计算机上解析为它们的值,这对于密码或特定于主机的值很有用。
如果服务指定了build选项,environment则在构建过程中不会自动显示中定义的变量 。使用的 args子选项build来定义构建时环境变量。
environment:
  RACK_ENV: development
  SHOW: 'true'
  SESSION_SECRET:
environment:
  - RACK_ENV=development
  - SHOW=true
  - SESSION_SECRET
18.env_file
从文件添加环境变量。可以是单个值或列表。
如果使用指定了Compose文件docker-compose -f FILE,则env_file的路径相对于该文件所在的目录。
在environment部分中 声明的环境变量将覆盖这些值–即使这些值为空或未定义,也是如此。如果有变量名称与 environment 指令冲突,则按照惯例,以后者为准。
env_file: .env
env_file:
  - ./common.env
  - ./apps/web.env
  - /opt/runtime_opts.env
Compose期望环境文件中的每一行都采用VAR=VAL格式。以开头的行#被视为注释,并被忽略。空行也将被忽略
# Set Rails/Rack environment
RACK_ENV=development
4.docker-compose常用命令
所有命令尽量都在docker compose项目目录【docker-compose.yml所在目录】下面进行操作
获取帮助
docker-compose --help
Define and run multi-container applications with Docker.

Usage:
  docker-compose [-f <arg>...] [options] [COMMAND] [ARGS...]
  docker-compose -h|--help

Options:
  -f, --file FILE             Specify an alternate compose file
                              (default: docker-compose.yml)
  -p, --project-name NAME     Specify an alternate project name
                              (default: directory name)
  --verbose                   Show more output
  --log-level LEVEL           Set log level (DEBUG, INFO, WARNING, ERROR, CRITICAL)
  --no-ansi                   Do not print ANSI control characters
  -v, --version               Print version and exit
  -H, --host HOST             Daemon socket to connect to

  --tls                       Use TLS; implied by --tlsverify
  --tlscacert CA_PATH         Trust certs signed only by this CA
  --tlscert CLIENT_CERT_PATH  Path to TLS certificate file
  --tlskey TLS_KEY_PATH       Path to TLS key file
  --tlsverify                 Use TLS and verify the remote
  --skip-hostname-check       Don't check the daemon's hostname against the
                              name specified in the client certificate
  --project-directory PATH    Specify an alternate working directory
                              (default: the path of the Compose file)
  --compatibility             If set, Compose will attempt to convert keys
                              in v3 files to their non-Swarm equivalent
  --env-file PATH             Specify an alternate environment file

Commands:
  build              Build or rebuild services
  config             Validate and view the Compose file
  create             Create services
  down               Stop and remove containers, networks, images, and volumes
  events             Receive real time events from containers
  exec               Execute a command in a running container
  help               Get help on a command
  images             List images
  kill               Kill containers
  logs               View output from containers
  pause              Pause services
  port               Print the public port for a port binding
  ps                 List containers
  pull               Pull service images
  push               Push service images
  restart            Restart services
  rm                 Remove stopped containers
  run                Run a one-off command
  scale              Set number of containers for a service
  start              Start services
  stop               Stop services
  top                Display the running processes
  unpause            Unpause services
  up                 Create and start containers
  version            Show the Docker-Compose version information
https://docs.docker.com/compose/
1.config
查看compose文件配置的信息
执行此命令必须在compose配置文件所在的目录下
docker-compose config

–help
docker-compose config --help
Validate and view the Compose file.

Usage: config [options]

Options:
    --resolve-image-digests  Pin image tags to digests.
    --no-interpolate         Don't interpolate environment variables
    -q, --quiet              Only validate the configuration, don't print
                             anything.
    --services               Print the service names, one per line.
    --volumes                Print the volume names, one per line.
    --hash="*"               Print the service config hash, one per line.
                             Set "service1,service2" for a list of specified services
                             or use the wildcard symbol to display all services
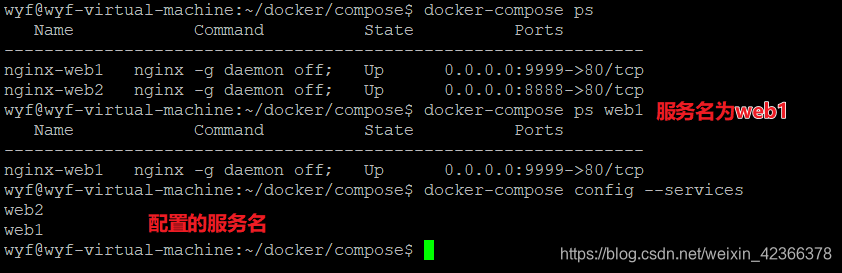
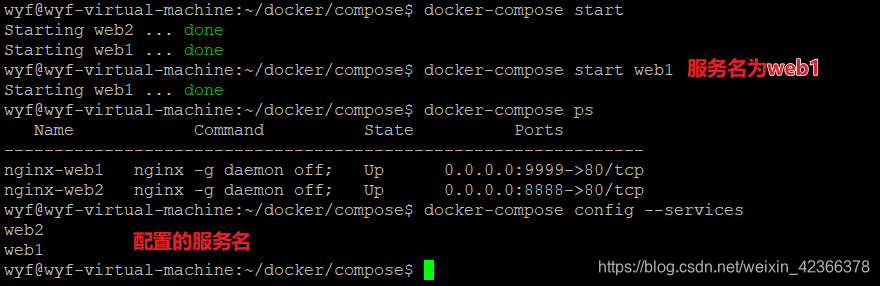
–services
查看配置的服务名列表
docker-compose config --services

–volumes
按行打印配置的数据卷名
docker-compose config --volumes

2.down
停止并删除容器【意味着服务也停止】,网络,镜像和数据卷【默认操作compose文件中配置的所有】
docker-compose down

–help
docker-compose down --help
Stops containers and removes containers, networks, volumes, and images
created by `up`.

By default, the only things removed are:

- Containers for services defined in the Compose file
- Networks defined in the `networks` section of the Compose file
- The default network, if one is used

Networks and volumes defined as `external` are never removed.

Usage: down [options]

Options:
    --rmi type              Remove images. Type must be one of:
                              'all': Remove all images used by any service.
                              'local': Remove only images that don't have a
                              custom tag set by the `image` field.
    -v, --volumes           Remove named volumes declared in the `volumes`
                            section of the Compose file and anonymous volumes
                            attached to containers.
    --remove-orphans        Remove containers for services not defined in the
                            Compose file
    -t, --timeout TIMEOUT   Specify a shutdown timeout in seconds.
                            (default: 10)
–remove-orphans
删除服务中没有在compose中定义的容器
docker-compose down --remove-orphans
3.up
构建、创建、重新创建、启动,连接服务的相关容器。所有连接的服务都会启动,除非它们已经运行。
docker-compose up 命令会聚合所有容器的输出,当命令退出时,所有容器都会停止。
docker-compose up

–help
docker-compose up --help
Builds, (re)creates, starts, and attaches to containers for a service.

Unless they are already running, this command also starts any linked services.

The `docker-compose up` command aggregates the output of each container. When
the command exits, all containers are stopped. Running `docker-compose up -d`
starts the containers in the background and leaves them running.

If there are existing containers for a service, and the service's configuration
or image was changed after the container's creation, `docker-compose up` picks
up the changes by stopping and recreating the containers (preserving mounted
volumes). To prevent Compose from picking up changes, use the `--no-recreate`
flag.

If you want to force Compose to stop and recreate all containers, use the
`--force-recreate` flag.

Usage: up [options] [--scale SERVICE=NUM...] [SERVICE...]

Options:
    -d, --detach               Detached mode: Run containers in the background,
                               print new container names. Incompatible with
                               --abort-on-container-exit.
    --no-color                 Produce monochrome output.
    --quiet-pull               Pull without printing progress information
    --no-deps                  Don't start linked services.
    --force-recreate           Recreate containers even if their configuration
                               and image haven't changed.
    --always-recreate-deps     Recreate dependent containers.
                               Incompatible with --no-recreate.
    --no-recreate              If containers already exist, don't recreate
                               them. Incompatible with --force-recreate and -V.
    --no-build                 Don't build an image, even if it's missing.
    --no-start                 Don't start the services after creating them.
    --build                    Build images before starting containers.
    --abort-on-container-exit  Stops all containers if any container was
                               stopped. Incompatible with -d.
    --attach-dependencies      Attach to dependent containers
    -t, --timeout TIMEOUT      Use this timeout in seconds for container
                               shutdown when attached or when containers are
                               already running. (default: 10)
    -V, --renew-anon-volumes   Recreate anonymous volumes instead of retrieving
                               data from the previous containers.
    --remove-orphans           Remove containers for services not defined
                               in the Compose file.
    --exit-code-from SERVICE   Return the exit code of the selected service
                               container. Implies --abort-on-container-exit.
    --scale SERVICE=NUM        Scale SERVICE to NUM instances. Overrides the
                               `scale` setting in the Compose file if present.
-d, --detach
分离模式:
在后台运行容器【默认运行compose文件中配置的所有】,打印新的容器名称。
docker-compose up -d

4.ps
列出所有compose中配置的容器
docker-compose ps

–help
docker-compose ps --help
List containers.

Usage: ps [options] [SERVICE...]

Options:
    -q, --quiet          Only display IDs
    --services           Display services
    --filter KEY=VAL     Filter services by a property
    -a, --all            Show all stopped containers (including those created by the run command)
service-name
列出指定服务的容器
docker-compose ps web2
5.start
默认启动所有在compose中配置的已经存在的容器
docker-compose start

–help
docker-compose start --help
Start existing containers.

Usage: start [SERVICE...]
service-name
启动指定服务已存在的容器
docker-compose start web1
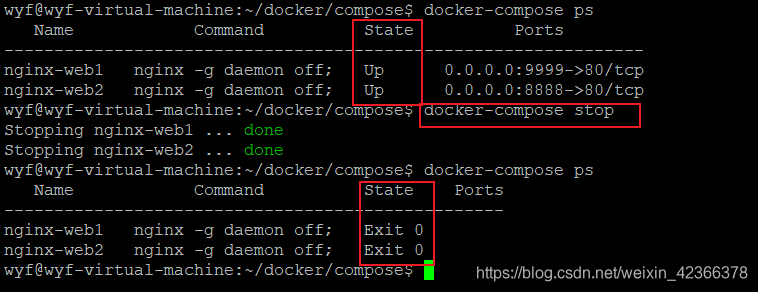
6.stop
默认停止所有的已运行的容器,不进行删除操作。停止后,可使用docker-compose start 再次启动这些容器
docker-compose start
–help
docker-compose stop --help
Stop running containers without removing them.

They can be started again with `docker-compose start`.

Usage: stop [options] [SERVICE...]

Options:
  -t, --timeout TIMEOUT      Specify a shutdown timeout in seconds.
                             (default: 10)
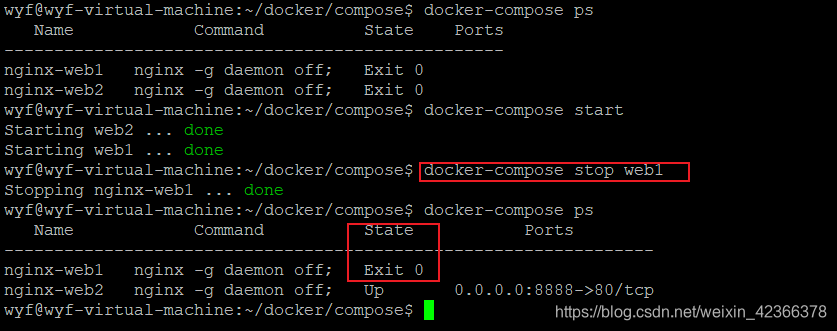
service-name
停止指定服务的容器
docker-compose stop web1
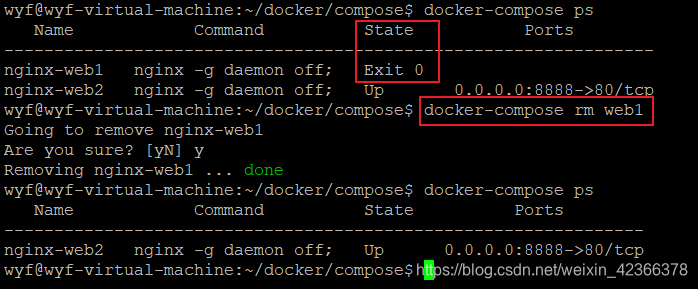
7.rm
默认交互式【询问】删除所有的compose文件中配置的服务已经stop的容器,该命令不会删除应用的网络和数据卷。工作中尽量不要用rm进行删除
docker-compose rm


–help
docker-compose rm --help
Removes stopped service containers.

By default, anonymous volumes attached to containers will not be removed. You
can override this with `-v`. To list all volumes, use `docker volume ls`.

Any data which is not in a volume will be lost.

Usage: rm [options] [SERVICE...]

Options:
    -f, --force   Don't ask to confirm removal
    -s, --stop    Stop the containers, if required, before removing
    -v            Remove any anonymous volumes attached to containers
    -a, --all     Deprecated - no effect.
service-name
docker-compose rm web1
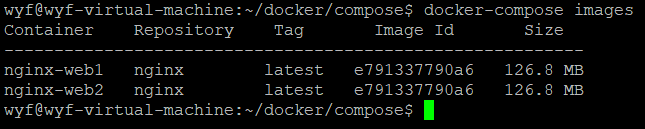
8.images
查看服务依赖的镜像【默认查看在compose配置中的所有的服务的依赖的镜像】
docker-compose images
–help
docker-compose images --help
List images used by the created containers.
Usage: images [options] [SERVICE...]

Options:
    -q, --quiet  Only display IDs
service
查看指定服务依赖的镜像
docker-compose images web1

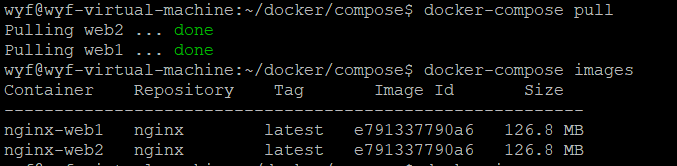
9.pull
默认下载所有的服务依赖的镜像
docker-compose pull
–help
docker-compose pull --help
Pulls images for services defined in a Compose file, but does not start the containers.

Usage: pull [options] [SERVICE...]

Options:
    --ignore-pull-failures  Pull what it can and ignores images with pull failures.
    --parallel              Deprecated, pull multiple images in parallel (enabled by default).
    --no-parallel           Disable parallel pulling.
    -q, --quiet             Pull without printing progress information
    --include-deps          Also pull services declared as dependencies
service-name
下载指定服务依赖的镜像
docker-compose pull web1

10.port
–help
docker-compose port --help
Print the public port for a port binding.

Usage: port [options] SERVICE PRIVATE_PORT

Options:
    --protocol=proto  tcp or udp [default: tcp]
    --index=index     index of the container if there are multiple
                      instances of a service [default: 1]
service-name container-port
查看指定服务绑定的公共端口
docker-compose port web1 80

11.logs
默认查看所有服务容器的历史日志,不自动跟踪,打印完自动退出
docker-compose logs

–help
docker-compose logs --help
View output from containers.

Usage: logs [options] [SERVICE...]

Options:
    --no-color          Produce monochrome output.
    -f, --follow        Follow log output.
    -t, --timestamps    Show timestamps.
    --tail="all"        Number of lines to show from the end of the logs
                        for each container.
-f
持续跟踪服务产生的日志,不会自动退出,需要执行Ctrl +C 来退出
docker-compose logs -f

12.exec
进入指定服务正在运行的容器
–help
docker-compose exec --help
Execute a command in a running container

Usage: exec [options] [-e KEY=VAL...] SERVICE COMMAND [ARGS...]

Options:
    -d, --detach      Detached mode: Run command in the background.
    --privileged      Give extended privileges to the process.
    -u, --user USER   Run the command as this user.
    -T                Disable pseudo-tty allocation. By default `docker-compose exec`
                      allocates a TTY.
    --index=index     index of the container if there are multiple
                      instances of a service [default: 1]
    -e, --env KEY=VAL Set environment variables (can be used multiple times,
                      not supported in API < 1.25)
    -w, --workdir DIR Path to workdir directory for this command.
service-name command
进入指定服务正在运行的容器
docker-compose exec web1 /bin/bash

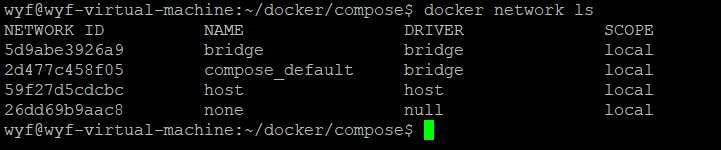
13.network
查看网络
注意:查看网络和docker是一样的,不是执行docker-compose
–help
docker network --help
Usage:  docker network COMMAND

Manage networks

Commands:
  connect     Connect a container to a network
  create      Create a network
  disconnect  Disconnect a container from a network
  inspect     Display detailed information on one or more networks
  ls          List networks
  prune       Remove all unused networks
  rm          Remove one or more networks

Run 'docker network COMMAND --help' for more information on a command.
ls
查看网络服务
docker network ls
5.实践
自动部署一个集群,使用nginx代理两个go项目
1.Nginx配置
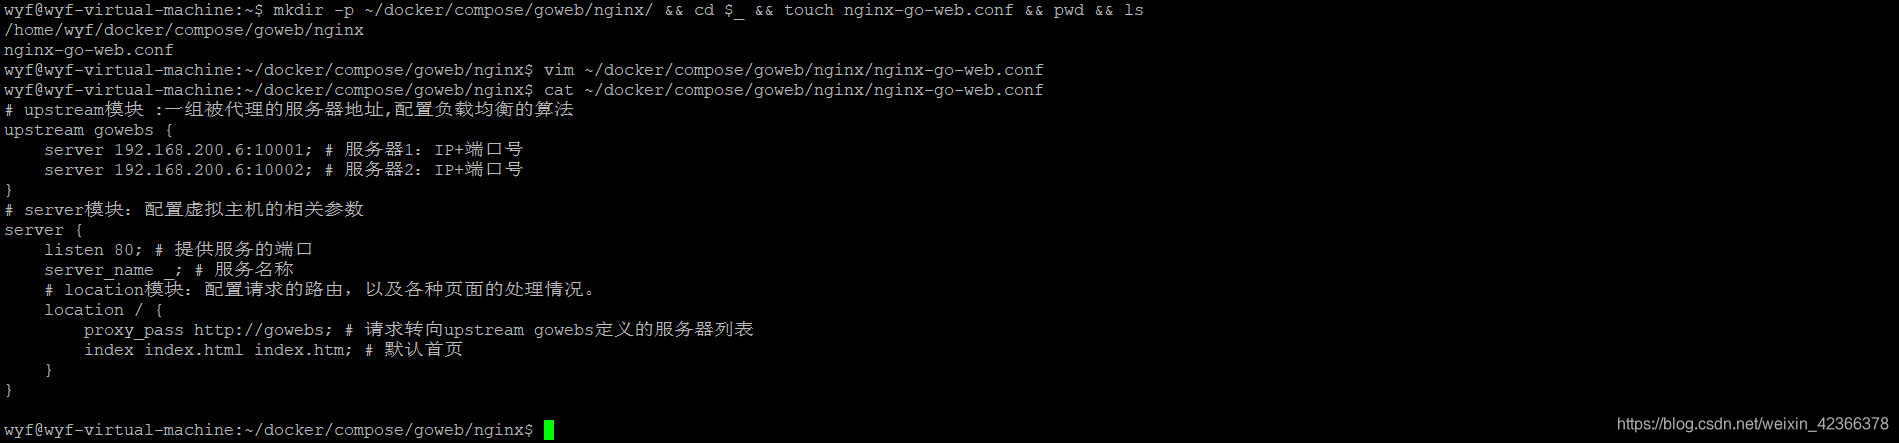
1.创建Nginx专用目录及负载均衡配置文件
mkdir -p ~/docker/compose/goweb/nginx/ && cd $_ && touch nginx-go-web.conf && pwd && ls

2.编辑负载均衡配置文件内容
vim ~/docker/compose/goweb/nginx/nginx-go-web.conf
内容如下:
# upstream模块 :一组被代理的服务器地址,配置负载均衡的算法
upstream gowebs {
    server 192.168.200.6:10001; # 服务器1:IP+端口号
    server 192.168.200.6:10002; # 服务器2:IP+端口号
}
# server模块:配置虚拟主机的相关参数
server {
    listen 80; # 提供服务的端口
    server_name _; # 服务名称
    # location模块:配置请求的路由,以及各种页面的处理情况。
    location / {
        proxy_pass http://gowebs; # 请求转向upstream gowebs定义的服务器列表
        index index.html index.htm; # 默认首页
    }
}
2.go代码
mkdir -p ~/docker/compose/goweb/goweb1 ~/docker/compose/goweb/goweb2 ~/docker/compose/goweb/go-base
1.test.go
vim ~/docker/compose/goweb/go-base/test.go
package main

import (
	"io"
	"log"
	"net/http"
)

func main() {
	http.HandleFunc("/", func(w http.ResponseWriter, r *http.Request) {
		io.WriteString(w, "hello, world!\n")
	})
	if err := http.ListenAndServe(":8080", nil); err != nil {
		log.Fatal(err)
	}
}
2.goweb1/test1.go
vim ~/docker/compose/goweb/goweb1/test1.go
package main

import (
	"io"
	"log"
	"net/http"
)

func main() {
	http.HandleFunc("/", func(w http.ResponseWriter, r *http.Request) {
		io.WriteString(w, "hello, go web 1!\n")
	})
	if err := http.ListenAndServe(":8080", nil); err != nil {
		log.Fatal(err)
	}
}
3.goweb2/test2.go
vim ~/docker/compose/goweb/goweb2/test2.go
package main

import (
	"io"
	"log"
	"net/http"
)

func main() {
	http.HandleFunc("/", func(w http.ResponseWriter, r *http.Request) {
		io.WriteString(w, "hello, go web 2!\n")
	})
	if err := http.ListenAndServe(":8080", nil); err != nil {
		log.Fatal(err)
	}
}
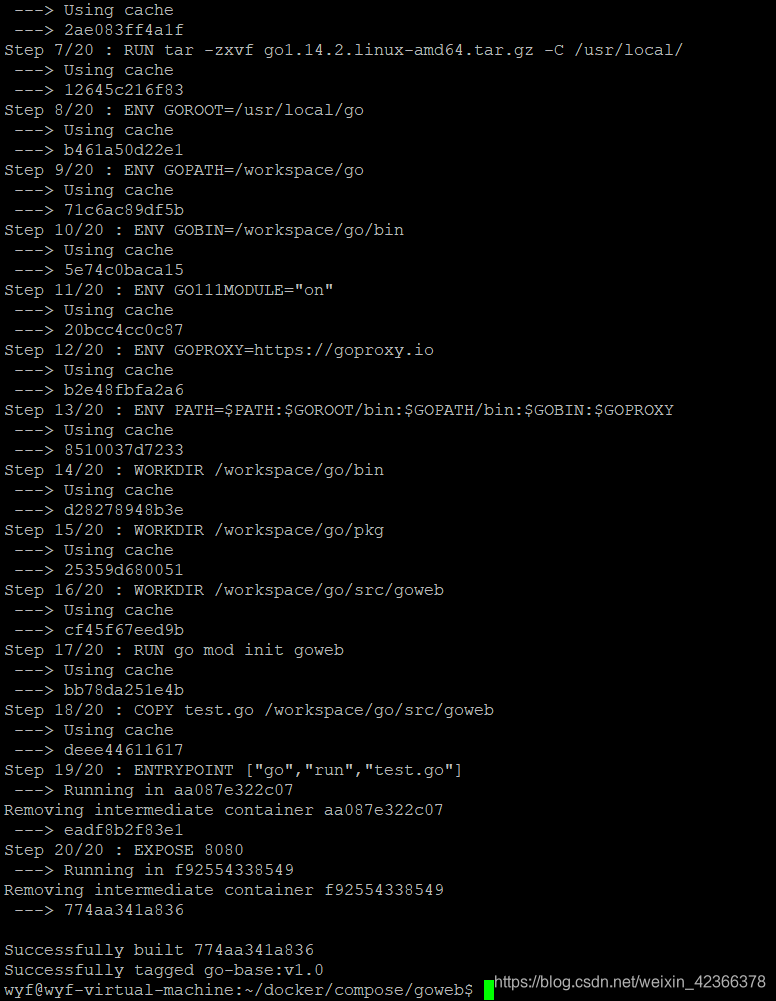
3.Dockerfile
mkdir -p ~/docker/compose/goweb/go-base && cd $_ && vim Dockerfile
内容如下:
# 构建一个基于ubuntu 的docker 定制镜像
# 基础镜像
FROM ubuntu:latest

# 维护者信息
MAINTAINER wyf [email protected]

# 执行命令
# 1.修改软件源信息为阿里云的镜像仓库
RUN sed -i 's/archive.ubuntu.com/mirrors.aliyun.com/g' /etc/apt/sources.list && sed -i 's/security.ubuntu.com/mirrors.aliyun.com/g' /etc/apt/sources.list
# 2.更新升级
RUN apt-get clean && apt-get upgrade -y && apt-get update
# 3.安装软件
RUN apt-get install -y vim && apt-get install -y git && apt-get install -y wget
# 4.安装go
RUN wget https://dl.google.com/go/go1.14.2.linux-amd64.tar.gz
RUN tar -zxvf go1.14.2.linux-amd64.tar.gz -C /usr/local/

# 定制环境变量
ENV GOROOT=/usr/local/go
ENV GOPATH=/workspace/go
ENV GOBIN=/workspace/go/bin
ENV GO111MODULE="on"
ENV GOPROXY=https://goproxy.io
ENV PATH=$PATH:$GOROOT/bin:$GOPATH/bin:$GOBIN:$GOPROXY

# 定制工作目录
WORKDIR /workspace/go/bin
WORKDIR /workspace/go/pkg
WORKDIR /workspace/go/src/goweb

# go mod 初始化
RUN go mod init goweb

# 增加文件
COPY test.go /workspace/go/src/goweb

# 运行项目
ENTRYPOINT ["go","run","test.go"]

# 开放端口
EXPOSE 8080
4.docker-compose
mkdir -p ~/docker/compose/goweb/ && cd $_ && vim ~/docker/compose/goweb/docker-compose.yml
内容如下:
version: '3.8'
services:
  web1:
    image: nginx
    ports:
      - "9999:80"
    volumes:
      - ./nginx/nginx-go-web.conf:/etc/nginx/conf.d/default.conf # 将配置文件映射到nginx的配置文件位置
    container_name: nginx-web1

  go-base:
    build: ./go-base/
    image: go-base:v1.0

  go-web1:
    image: go-base:v1.0
    volumes:
      - ./goweb1/test1.go:/workspace/go/src/goweb/test.go
    ports:
      - "10001:8080"
    container_name: go-web1
    depends_on:
    - go-base

  go-web2:
    image: go-base:v1.0
    volumes:
      - ./goweb2/test2.go:/workspace/go/src/goweb/test.go
    ports:
      - "10002:8080"
    container_name: go-web2
    depends_on:
      - go-base
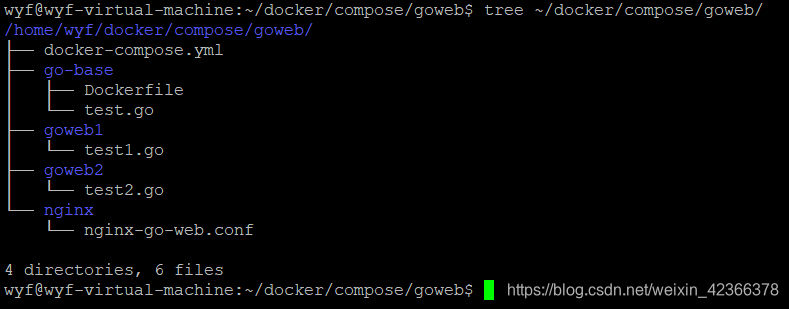
5.文件树
tree ~/docker/compose/goweb/
/home/wyf/docker/compose/goweb/
├── docker-compose.yml
├── go-base
│   ├── Dockerfile
│   └── test.go
├── goweb1
│   └── test1.go
├── goweb2
│   └── test2.go
└── nginx
    └── nginx-go-web.conf

4 directories, 6 files
6.测试
cd ~/docker/compose/goweb/
1.构建镜像
docker-compose build
2.启动任务
docker-compose up -d

3.查看效果
docker-compose ps

4.浏览器访问
ifconfig
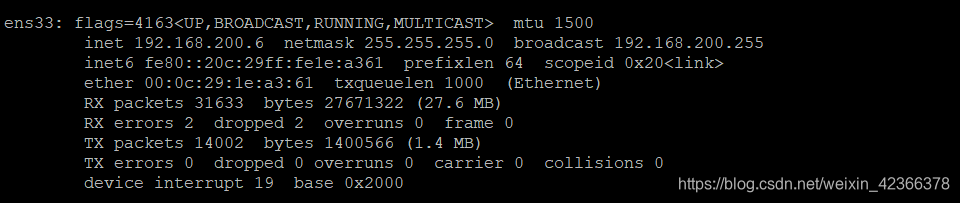
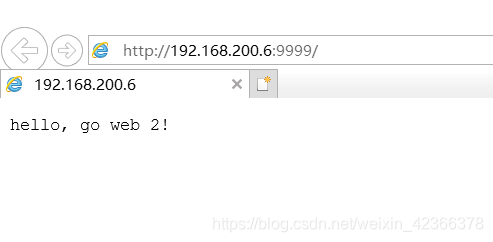
http://192.168.200.6:9999
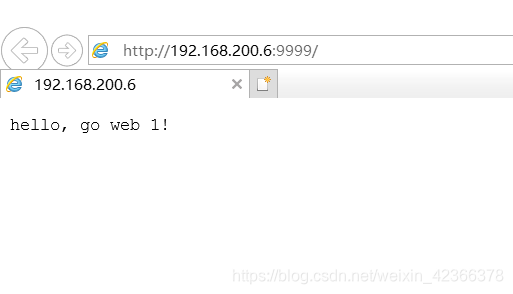
不停的刷新从而实现变化。