一、添加pom依赖
<dependency>
<groupId>org.springframework.boot</groupId>
<artifactId>spring-boot-starter-amqp</artifactId>
</dependency>
二、添加配置信息
#rabbitmq
spring.rabbitmq.host=192.168.64.129
spring.rabbitmq.port=5672
spring.rabbitmq.username=guest
spring.rabbitmq.password=guest
spring.rabbitmq.virtual-host=/
# Minimum number of consumers.
spring.rabbitmq.listener.simple.concurrency= 10
# Maximum number of consumers.
spring.rabbitmq.listener.simple.max-concurrency= 10
# Number of messages to be handled in a single request.
spring.rabbitmq.listener.simple.prefetch= 1
# Start the container automatically on startup.
spring.rabbitmq.listener.simple.auto-startup=true
# Whether or not to requeue delivery failures; default `true`.
spring.rabbitmq.listener.simple.default-requeue-rejected= true
# Whether or not publishing retries are enabled.
spring.rabbitmq.listener.simple.retry.enabled=true
# Interval between the first and second attempt to deliver a message.
spring.rabbitmq.listener.simple.retry.initial-interval=1000
#Maximum number of attempts to deliver a message.
spring.rabbitmq.listener.simple.retry.max-attempts=3
# Maximum interval between attempts.
spring.rabbitmq.listener.simple.retry.max-interval=10000
# A multiplier to apply to the previous delivery retry interval.
spring.rabbitmq.listener.simple.retry.multiplier=1.0
# Whether or not retry is stateless or stateful.
spring.rabbitmq.listener.simple.retry.stateless=true
三、新建包com.mydre.miaosha.rabbitmq ,定义类
package com.mydre.miaosha.rabbitmq;
import org.springframework.amqp.core.Queue;
import org.springframework.context.annotation.Bean;
import org.springframework.context.annotation.Configuration;
@Configuration
public class MQConfig {//把一些bean配置进来
public static final String QUEUE = "queue";
//首先配置一个队列
@Bean
public Queue queue(){
//队列名称和是否要做初始化
return new Queue(QUEUE, true);
}
}
package com.mydre.miaosha.rabbitmq;
import org.slf4j.Logger;
import org.slf4j.LoggerFactory;
import org.springframework.amqp.core.AmqpTemplate;
import org.springframework.beans.factory.annotation.Autowired;
import org.springframework.stereotype.Service;
import com.mydre.miaosha.redis.RedisService;
@Service
public class MQSender {
private static Logger logger = LoggerFactory.getLogger(MQReceiver.class);
//引入了注解之后,系统后帮我们创建一个操作queue的工具类
@Autowired
AmqpTemplate amqpTemplate;
public void sender(Object message){//发送的是一个对象
String msg = RedisService.beanToString(message);
logger.info("send message: " + msg);
amqpTemplate.convertAndSend(MQConfig.QUEUE,msg);
//发送完之后,即可以接收了
}
}
package com.mydre.miaosha.rabbitmq;
import org.slf4j.Logger;
import org.slf4j.LoggerFactory;
import org.springframework.amqp.rabbit.annotation.RabbitListener;
import org.springframework.stereotype.Service;
@Service
public class MQReceiver {
private static Logger logger = LoggerFactory.getLogger(MQReceiver.class);
//接收的时候需要进行监听
@RabbitListener(queues=MQConfig.QUEUE)
public void receiver(String message){
logger.info("receiver message: " + message);
}
}
四、定义controller
@Autowired
MQSender sender;
@RequestMapping("/mq")
@ResponseBody
public Result<String> hello() {
sender.sender("hello,imooc");;
return Result.success("这是成功页面");
//类调用静态方法的时候不需要再类名之后加上泛型,即不需要Result<String>.success......
}
五、处理报错
ACCESS_REFUSED- Login was refused using authentication mechanism PLAIN. For details see thebroker logfile.
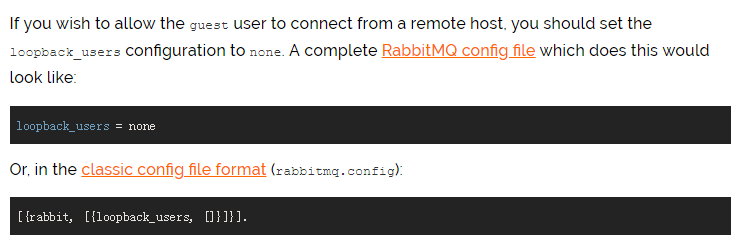
原来,用户guest默认不被rabbitmq允许远程访问,但是可以在配置文件rabbitmq.config中加入代码:
[{rabbit, [{loopback_users, []}]}].
[root@localhost etc]# cd rabbitmq
[root@localhost rabbitmq]# ls
rabbitmq.config
[root@localhost rabbitmq]# pwd
/etc/rabbitmq
[root@localhost rabbitmq]# [root@localhost etc]# service rabbitmq-server stop
Stopping rabbitmq-server (via systemctl): [ 确定 ]
[root@localhost etc]# service rabbitmq-server start
Starting rabbitmq-server (via systemctl): [ 确定 ]