一 、缓存
说到缓存就得提存储
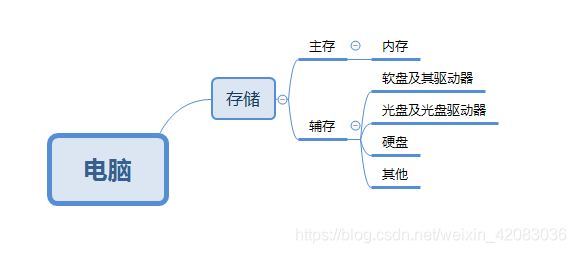
电脑存储分为主存和辅存 一般来说主存就是内存 辅存就是硬盘。虽然都可以存储但是这两者的读写速度可以说是云泥之别。
内存速度
DDR3传输带宽 :8.5 GB/s——14.9 G MB/s
硬盘速度(市面上的大部分机械+固态)
80M/s——3400M/s
可以看出 不管硬盘再快都不可能超过内存的速度 他们之间的差距可以达到上百倍 而我们通常数据库操作都是在硬盘中,为了获取更快的速度我们用到了缓存
二、boot+mybatis结合Redis开启二级缓存
原理:
从3.1开始,Spring引入了对Cache的支持。其使用方法和原理都类似于Spring对事务管理的支持。Spring Cache是作用在方法上的,其核心思想是这样的:当我们在调用一个缓存方法时会把该方法参数和返回结果作为一个键值对存放在缓存中,等到下次利用同样的参数来调用该方法时将不再执行该方法,而是直接从缓存中获取结果进行返回。所以在使用Spring Cache的时候我们要保证我们缓存的方法对于相同的方法参数要有相同的返回结果。
三:Spring缓存抽象
Spring从3.1开始定义了org.springframework.cache.Cache和org.springframework.cache.CacheManager接口来统一不同的缓存技术;并支持使用JCache(JSR-107)注解简化我们开发;
- Cache接口为缓存的组件规范定义,包含缓存的各种操作集合;
- Cache接口下Spring提供了各种xxxCache的实现;如RedisCache,EhCacheCache
,ConcurrentMapCache等; - 每次调用需要缓存功能的方法时,Spring会检查检查指定参数的指定的目标方法是否已经被调用过;如果有就直接从缓存中获取方法调用后的结果,如果没有就调用方法并缓存结果后返回给用户。下次调用直接从缓存中获取。
- 使用Spring缓存抽象时我们需要关注以下两点;
1、确定方法需要被缓存以及他们的缓存策略
2、从缓存中读取之前缓存存储的数据
四:几个重要概念&缓存注解
名称 解释
Cache 缓存接口,定义缓存操作。实现有:RedisCache、EhCacheCache、ConcurrentMapCache等
CacheManager 缓存管理器,管理各种缓存(cache)组件
@Cacheable 主要针对方法配置,能够根据方法的请求参数对其进行缓存
@CacheEvict 清空缓存
@CachePut 保证方法被调用,又希望结果被缓存。与@Cacheable区别在于是否每次都调用方法,常用于更新
@EnableCaching 开启基于注解的缓存
keyGenerator 缓存数据时key生成策略
serialize 缓存数据时value序列化策略
@CacheConfig 统一配置本类的缓存注解的属性
@Cacheable/@CachePut/@CacheEvict 主要的参数
名称 解释
value  缓存的名称,在 spring 配置文件中定义,必须指定至少一个例如:@Cacheable(value=”mycache”) 或者@Cacheable(value={”cache1”,”cache2”}
key  缓存的 key,可以为空,如果指定要按照 SpEL 表达式编写,如果不指定,则缺省按照方法的所有参数进行组合例如:@Cacheable(value=”testcache”,key=”#id”)
condition  缓存的条件,可以为空,使用 SpEL 编写,返回 true 或者 false,只有为 true 才进行缓存/清除缓存例如:@Cacheable(value=”testcache”,condition=”#userName.length()>2”)
unless  否定缓存。当条件结果为TRUE时,就不会缓存。@Cacheable(value=”testcache”,unless=”#userName.length()>2”)
allEntries(@CacheEvict )   是否清空所有缓存内容,缺省为 false,如果指定为 true,则方法调用后将立即清空所有缓存例如:@CachEvict(value=”testcache”,allEntries=true)
beforeInvocation(@CacheEvict)  是否在方法执行前就清空,缺省为 false,如果指定为 true,则在方法还没有执行的时候就清空缓存,缺省情况下,如果方法执行抛出异常,则不会清空缓存例如:@CachEvict(value=”testcache”,beforeInvocation=true)
五:SpEL上下文数据
Spring Cache提供了一些供我们使用的SpEL上下文数据,下表直接摘自Spring官方文档:
名称 位置 描述
methodName root对象 当前被调用的方法名
method root对象 当前被调用的方法
target root对象 当前被调用的目标对象实例
targetClass root对象 当前被调用的目标对象的类
args root对象 当前被调用的方法的参数列表
caches root对象 当前方法调用使用的缓存列表
Argument Name 执行上下文 当前被调用的方法的参数,如findArtisan(Artisan artisan),可以通过#artsian.id获得参数
result 执行上下文 方法执行后的返回值(仅当方法执行后的判断有效,如 unless cacheEvict的beforeInvocation=false)
注意:
1.当我们要使用root对象的属性作为key时我们也可以将“#root”省略,因为Spring默认使用的就是root对象的属性。 如
@Cacheable(key = “targetClass + methodName +#p0”)
2.使用方法参数时我们可以直接使用“#参数名”或者“#p参数index”。 如:
@Cacheable(value=“users”, key="#id")
@Cacheable(value=“users”, key="#p0")
SpEL提供了多种运算符
类型 运算符
关系 <,>,<=,>=,==,!=,lt,gt,le,ge,eq,ne
算术 +,- ,* ,/,%,^
逻辑 &&,||,!,and,or,not,between,instanceof
条件 ?: (ternary),?: (elvis)
正则表达式 matches
其他类型 ?.,?[…],![…],1,$[…]
以上的知识点适合你遗忘的时候来查阅,下面正式进入学习!
六、快速部署

1、引入依赖
<dependency>
            <groupId>org.springframework.boot</groupId>
            <artifactId>spring-boot-starter-cache</artifactId>
        </dependency>
2、启动类加 @EnableCaching //开启缓存
3、开启使用

@CacheConfig(cacheNames = {“myCache”})注解来统一指定value的值,这时可省略value,如果你在你的方法依旧写上了value,那么依然以方法的value值为准。
注:cacheName 值是唯一的
当然你也可以每一个方法的上面添加value 属性 规定缓存在哪
配置 @CacheConfig:
示例:
@CacheConfig(cacheNames = {"myCache"})
public class BotRelationServiceImpl implements BotRelationService {
    @Override
    @Cacheable(key = "targetClass + methodName +#p0")//此处没写value
    public List<BotRelation> findAllLimit(int num) {
        return botRelationRepository.findAllLimit(num);
    }

}
其他属性
String[] cacheNames() default {}; //和value注解差不多,二选一
String keyGenerator() default ""; //key的生成器。key/keyGenerator二选一使用
String cacheManager() default ""; //指定缓存管理器
String cacheResolver() default ""; //或者指定获取解析器
String condition() default ""; //条件符合则缓存
String unless() default ""; //条件符合则不缓存
boolean sync() default false; //是否使用异步模式
查询/更新 @Cacheable:
示例:
 @Cacheable(value = "emp" ,key = "targetClass + methodName +#p0")
    public List<NewJob> queryAll(User uid) {
        return newJobDao.findAllByUid(uid);
    }
其他属性
String keyGenerator() default "";  //key的生成器。key/keyGenerator二选一使用
String cacheManager() default "";  //指定缓存管理器
String cacheResolver() default ""; //或者指定获取解析器
更新 @CachePut:
示例:
    @CachePut(value = "emp", key = "targetClass + #p0")
    public NewJob updata(NewJob job) {
        NewJob newJob = newJobDao.findAllById(job.getId());
        newJob.updata(job);
        return job;
    }

    @Cacheable(value = "emp", key = "targetClass +#p0")//清空缓存
    public NewJob save(NewJob job) {
        newJobDao.save(job);
        return job;
    }
其他属性
 String[] cacheNames() default {}; //与value二选一
String keyGenerator() default "";  //key的生成器。key/keyGenerator二选一使用
String cacheManager() default "";  //指定缓存管理器
String cacheResolver() default ""; //或者指定获取解析器
String condition() default ""; //条件符合则缓存
String unless() default ""; //条件符合则不缓存
清除 @CacheEvict:
示例:
//清除一条缓存,key为要清空的数据
    @CacheEvict(value="emp",key="#id")
    public void delect(int id) {
        newJobDao.deleteAllById(id);
    }

    //方法调用后清空所有缓存
    @CacheEvict(value="accountCache",allEntries=true)
    public void delectAll() {
        newJobDao.deleteAll();
    }

    //方法调用前清空所有缓存
    @CacheEvict(value="accountCache",beforeInvocation=true)
    public void delectAll() {
        newJobDao.deleteAll();
    }
其他属性
String[] cacheNames() default {}; //与value二选一
String keyGenerator() default "";  //key的生成器。key/keyGenerator二选一使用
String cacheManager() default "";  //指定缓存管理器
String cacheResolver() default ""; //或者指定获取解析器
String condition() default ""; //条件符合则清空
组合 @Caching:
示例:
    @Caching(cacheable = {
            @Cacheable(value = "emp",key = "#p0"),
            ...
    },
    put = {
            @CachePut(value = "emp",key = "#p0"),
            ...
    },evict = {
            @CacheEvict(value = "emp",key = "#p0"),
            ....
    })
    public User save(User user) {
        ....
    }
如何解决boot cache 遗留的问题:https://blog.csdn.net/weixin_42083036/article/details/103389596
… ↩︎
