人脸识别,人脸对比技术及案例实现方案
Git源码:https://gitee.com/AiShiYuShiJiePingXing/ArcSoftDemo 包含了百度AI人脸识别接口的调用源码,以及虹软的Java人脸识别接口。 克隆项目: ```git git clone https://gitee.com/AiShiYuShiJiePingXing/ArcSoftDemo.git ```
这两天研究研究人脸识别系统的相关内容,了解了部分开源人脸识别系统以及人脸识别系统的有关公司,对各家价格大概比对了一下,发现着实不便宜。
了解到比较不错的几家人脸识别系统公司有:
一、各个人脸识别公司、系统简介
1.1 虹软
虹软:比较推荐和喜欢的一家,有详细的Demo,文档信息等,更重要的简单容易上手,免费版即可运行Demo案例操作,以便考虑是否使用。
- 人脸检测:检测人脸位置、锁定人脸坐标。
- 人脸跟踪:精确定位并跟踪面部区域位置。
- 人脸比对:比较两张人脸的相似度。
- 人脸查询:在人脸库中查询相似的人脸。
- 人脸属性:检测人脸性别、年龄等属性。
- 活体检测:检测是否真人,预防恶意攻击。
1.2 Face++旷视
Face++旷视-人脸识别:
- 人脸检测:检测并定位图片中的人脸,返回高精度的脸框坐标。Face++还支持存储检测到的人脸员数据,以便日后使用。
- 人脸比对:计算两张脸的相似程度,并给出相似度的评分,以便分析属于一个人的可能性。
- 人脸搜索:针对一个新的人脸,在一个已有的人脸集合中搜索相似的人脸。算法会返回一系列相似人脸,以及相似度评分。
接入方式有:
- Web API.
- Mobile SDK.
- 其他形式:如提供服务端SDK等。
1.3 云脉
云脉-OCR SDK:
OCR及人脸识别对比等,各项都有,话不多说,一图便知所有:

1.4 腾讯AI
腾讯AI-人脸与人体识别:
可直接去网站在线试试:
官方网站地址:https://ai.qq.com/
点击前往->腾讯AI开发平台->人脸识别
1.5 1MB轻量级人脸检测模型
很火的一个 (1MB轻量级人脸检测模型):
有特别专注这块的可以研究,在github和gitee上均有项目:
Gitee地址:https://gitee.com/Linzai/Ultra-Light-Fast-Generic-Face-Detector-1MB
点击前往->
1.6 SeetaFace-科院计算机所开源项目
SeetaFace:中科院计算机所开源项目
仅做了解了一些,未做深入研究。
GitHub地址:https://github.com/seetafaceengine/SeetaFace2
点击前往GitHub->
CSDN博客:
二、基于虹软的Java人脸识别
原文地址:
博客园:程序员内点事:用 Java 实现人脸识别功能(附源码)
相关优秀内容:
简书:团结wang:
- java人脸识别 虹软ArcFace 2.0,java SDK使用-进行人脸检测
- java人脸识别 虹软ArcFace 2.0,java SDK使用、人脸识别-抽取人脸特征并做比对
- java人脸识别 虹软ArcFace 2.0,java SDK使用、人脸信息识别(年龄、性别)
2.1 人脸识别SDK
基于虹软的免费SDK:
ArcSoft:,地址:https://ai.arcsoft.com.cn
官网首页 -> 右上角开发者中心 -> 选择“人脸识别” -> 添加SDK,会生成APPID、SDK KEY后续会用到,根据需要选择不同的环境(本文基于windows环境),然后下载SDK是一个压缩包。

2.2 Java项目搭建
从GitHub上clone一个ArcSoft的Java版本Demo。
2.2.1 下载Demo项目
github地址:https://github.com/xinzhfiu/ArcSoftFaceDemo,本地搭建数据库,创建表:user_face_info。这个表主要用来存人像特征,其中主要的字段 face_feature 用二进制类型 blob 存放人脸特征。
SET NAMES utf8mb4;
SET FOREIGN_KEY_CHECKS = 0;

-- ----------------------------
-- Table structure for user_face_info
-- ----------------------------
DROP TABLE IF EXISTS `user_face_info`;
CREATE TABLE `user_face_info` (
  `id` int(11) NOT NULL AUTO_INCREMENT COMMENT '主键',
  `group_id` int(11) DEFAULT NULL COMMENT '分组id',
  `face_id` varchar(31) DEFAULT NULL COMMENT '人脸唯一Id',
  `name` varchar(63) DEFAULT NULL COMMENT '名字',
  `age` int(3) DEFAULT NULL COMMENT '年纪',
  `email` varchar(255) DEFAULT NULL COMMENT '邮箱地址',
  `gender` smallint(1) DEFAULT NULL COMMENT '性别,1=男,2=女',
  `phone_number` varchar(11) DEFAULT NULL COMMENT '电话号码',
  `face_feature` blob COMMENT '人脸特征',
  `create_time` timestamp NOT NULL DEFAULT CURRENT_TIMESTAMP COMMENT '创建时间',
  `update_time` timestamp NOT NULL DEFAULT CURRENT_TIMESTAMP ON UPDATE CURRENT_TIMESTAMP COMMENT '更新时间',
  `fpath` varchar(255) COMMENT '照片路径',
  PRIMARY KEY (`id`) USING BTREE,
  KEY `GROUP_ID` (`group_id`) USING BTREE
) ENGINE=InnoDB AUTO_INCREMENT=1 DEFAULT CHARSET=utf8mb4 ROW_FORMAT=DYNAMIC;
SET FOREIGN_KEY_CHECKS = 1;
2.2.2 修改application.properties文件
整个项目还是比较完整的,只需改一些配置即可启动,但有几点注意的地方,后边会重点说明。
config.arcface-sdk.sdk-lib-path: 存放SDK压缩包中的三个.dll文件的路径
config.arcface-sdk.app-id : 开发者中心的APPID
config.arcface-sdk.sdk-key :开发者中心的SDK Key
config.arcface-sdk.sdk-lib-path=d:/arcsoft_lib
config.arcface-sdk.app-id=8XMHMu71Dmb5UtAEBpPTB1E9ZPNTw2nrvQ5bXxBobUA8
config.arcface-sdk.sdk-key=BA8TLA9vVwK7G6btJh2A2FCa8ZrC6VWZLNbBBFctCz5R

# druid  本地的数据库地址
spring.datasource.druid.url=jdbc:mysql://127.0.0.1:3306/xin-master?useUnicode=true&characterEncoding=utf-8&useSSL=false&serverTimezone=UTC
spring.datasource.druid.username=junkang
spring.datasource.druid.password=junkang
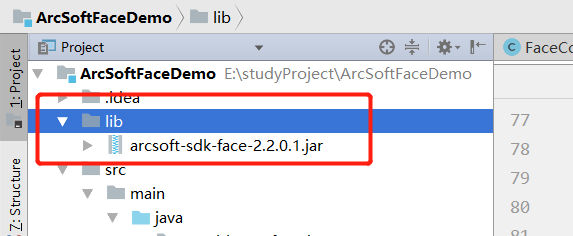
2.2.3 根目录创建lib文件夹
在项目根目录创建文件夹 lib,将下载的SDK压缩包中的arcsoft-sdk-face-2.2.0.1.jar放入项目根目录:
2.2.4 引入arcsoft依赖
 <dependency>
      <groupId>com.arcsoft.face</groupId>
      <artifactId>arcsoft-sdk-face</artifactId>
      <version>2.2.0.1</version>
      <scope>system</scope>
      <systemPath>${basedir}/lib/arcsoft-sdk-face-2.2.0.1.jar</systemPath>
</dependency>
pom.xml文件要配置includeSystemScope属性,否则可能会导致arcsoft-sdk-face-2.2.0.1.jar引用不到。
 <build>
        <plugins>
            <plugin>
                <groupId>org.springframework.boot</groupId>
                <artifactId>spring-boot-maven-plugin</artifactId>
                <configuration>
                    <includeSystemScope>true</includeSystemScope>
                    <fork>true</fork>
                </configuration>
            </plugin>
        </plugins>
    </build>
2.2.5 启动项目
run Application文件启动
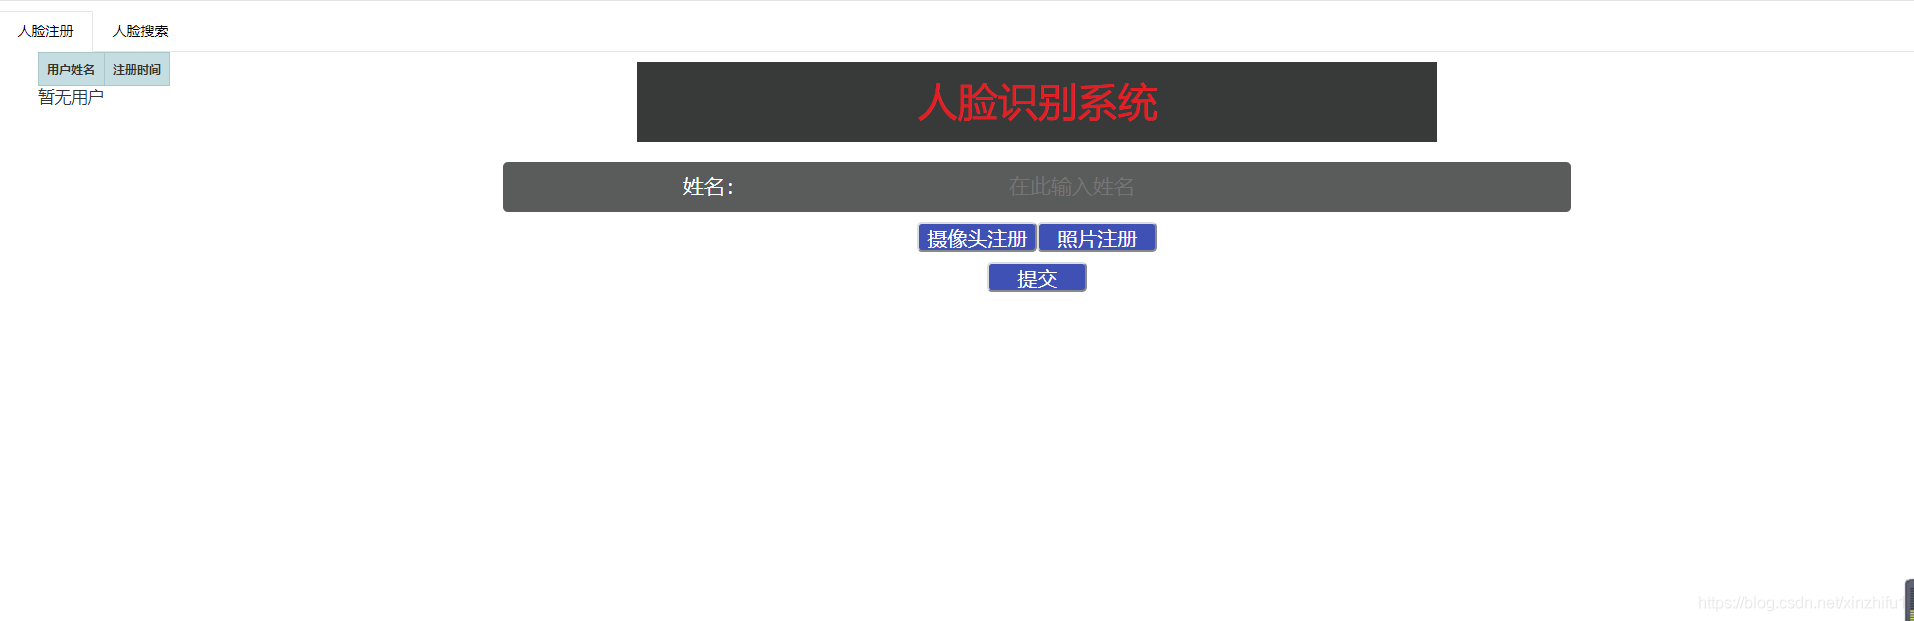
测试一下:http://127.0.0.1:8089/demo,如下页面即启动成功。
2.3 操作测试
2.3.1 录入人脸图像
页面输入名称,点击摄像头注册调起本地摄像头,提交后将当前图像传入后台,识别提取当前人脸体征,保存至数据库。
2.3.2 人脸对比
录入完人脸图像后测试一下能否识别成功,提交当前的图像,然后会出现对比结果。
2.4 源码分析
2.4.1 JS调起本地摄像头拍照,上传图片文件字符串
function getMedia() {
        $("#mainDiv").empty();
        let videoComp = " <video id='video' width='500px' height='500px' autoplay='autoplay' style='margin-top: 20px'></video><canvas id='canvas' width='500px' height='500px' style='display: none'></canvas>";
        $("#mainDiv").append(videoComp);

        let constraints = {
            video: {width: 500, height: 500},
            audio: true
        };
        //获得video摄像头区域
        let video = document.getElementById("video");
        //这里介绍新的方法,返回一个 Promise对象
        // 这个Promise对象返回成功后的回调函数带一个 MediaStream 对象作为其参数
        // then()是Promise对象里的方法
        // then()方法是异步执行,当then()前的方法执行完后再执行then()内部的程序
        // 避免数据没有获取到
        let promise = navigator.mediaDevices.getUserMedia(constraints);
        promise.then(function (MediaStream) {
            video.srcObject = MediaStream;
            video.play();
        });

        // var t1 = window.setTimeout(function() {
        //     takePhoto();
        // },2000)
    }
//拍照事件
    function takePhoto() {
        let mainComp = $("#mainDiv");
        if(mainComp.has('video').length)
        {
            let userNameInput = $("#userName").val();
            if(userNameInput == "")
            {
                alert("姓名不能为空!");
                return false;
            }
            //获得Canvas对象
            let video = document.getElementById("video");
            let canvas = document.getElementById("canvas");
            let ctx = canvas.getContext('2d');
            ctx.drawImage(video, 0, 0, 500, 500);
            var formData = new FormData();
            var base64File = canvas.toDataURL();
            var userName = $("#userName").val();
            formData.append("file", base64File);
            formData.append("name", userName);
            formData.append("groupId", "101");
            $.ajax({
                type: "post",
                url: "/faceAdd",
                data: formData,
                contentType: false,
                processData: false,
                async: false,
                success: function (text) {
                    var res = JSON.stringify(text)
                    if (text.code == 0) {
                        alert("注册成功")
                    } else {
                        alert(text.message)
                    }
                },
                error: function (error) {
                    alert(JSON.stringify(error))
                }
            });
        }
        else{
            var formData = new FormData();
            let userName = $("#userName").val();
            formData.append("groupId", "101");
            var file = $("#file0")[0].files[0];
            var reader = new FileReader();
            reader.readAsDataURL(file);
            reader.onload = function () {
            var base64 = reader.result;
            formData.append("file", base64);
            formData.append("name",userName);
                $.ajax({
                    type: "post",
                    url: "/faceAdd",
                    data: formData,
                    contentType: false,
                    processData: false,
                    async: false,
                    success: function (text) {
                        var res = JSON.stringify(text)
                        if (text.code == 0) {
                            alert("注册成功")
                        } else {
                            alert(text.message)
                        }
                    },
                    error: function (error) {
                        alert(JSON.stringify(error))
                    }
                });
                location.reload();
            }
        }

    }
2.4.2 后台解析图片,提取人像特征
台解析前端传过来的图片,提取人像特征存入数据库,人像特征的提取主要是靠FaceEngine引擎。
/*
    人脸添加
     */
    @RequestMapping(value = "/faceAdd", method = RequestMethod.POST)
    @ResponseBody
    public Result<Object> faceAdd(@RequestParam("file") String file, @RequestParam("groupId") Integer groupId, @RequestParam("name") String name) {

        try {

            //解析图片
            byte[] decode = Base64.decode(base64Process(file));
            ImageInfo imageInfo = ImageFactory.getRGBData(decode);

            //人脸特征获取
            byte[] bytes = faceEngineService.extractFaceFeature(imageInfo);
            if (bytes == null) {
                return Results.newFailedResult(ErrorCodeEnum.NO_FACE_DETECTED);
            }

            UserFaceInfo userFaceInfo = new UserFaceInfo();
            userFaceInfo.setName(name);
            userFaceInfo.setGroupId(groupId);
            userFaceInfo.setFaceFeature(bytes);
            userFaceInfo.setFaceId(RandomUtil.randomString(10));

            //人脸特征插入到数据库
            userFaceInfoService.insertSelective(userFaceInfo);

            logger.info("faceAdd:" + name);
            return Results.newSuccessResult("");
        } catch (Exception e) {
            logger.error("", e);
        }
        return Results.newFailedResult(ErrorCodeEnum.UNKNOWN);
    }
2.4.3 人像特征对比
人脸识别:将前端传入的图像经过人像特征提取后,和库中已存在的人像信息对比分析。
/*
    人脸识别
     */
    @RequestMapping(value = "/faceSearch", method = RequestMethod.POST)
    @ResponseBody
    public Result<FaceSearchResDto> faceSearch(String file, Integer groupId) throws Exception {
        byte[] decode = Base64.decode(base64Process(file));
        BufferedImage bufImage = ImageIO.read(new ByteArrayInputStream(decode));
        ImageInfo imageInfo = ImageFactory.bufferedImage2ImageInfo(bufImage);

        //人脸特征获取
        byte[] bytes = faceEngineService.extractFaceFeature(imageInfo);
        if (bytes == null) {
            return Results.newFailedResult(ErrorCodeEnum.NO_FACE_DETECTED);
        }
        //人脸比对,获取比对结果
        List<FaceUserInfo> userFaceInfoList = faceEngineService.compareFaceFeature(bytes, groupId);

        if (CollectionUtil.isNotEmpty(userFaceInfoList)) {
            FaceUserInfo faceUserInfo = userFaceInfoList.get(0);
            FaceSearchResDto faceSearchResDto = new FaceSearchResDto();
            BeanUtil.copyProperties(faceUserInfo, faceSearchResDto);
            List<ProcessInfo> processInfoList = faceEngineService.process(imageInfo);
            if (CollectionUtil.isNotEmpty(processInfoList)) {
                //人脸检测
                List<FaceInfo> faceInfoList = faceEngineService.detectFaces(imageInfo);
                int left = faceInfoList.get(0).getRect().getLeft();
                int top = faceInfoList.get(0).getRect().getTop();
                int width = faceInfoList.get(0).getRect().getRight() - left;
                int height = faceInfoList.get(0).getRect().getBottom() - top;

                Graphics2D graphics2D = bufImage.createGraphics();
                graphics2D.setColor(Color.RED);//红色
                BasicStroke stroke = new BasicStroke(5f);
                graphics2D.setStroke(stroke);
                graphics2D.drawRect(left, top, width, height);
                ByteArrayOutputStream outputStream = new ByteArrayOutputStream();
                ImageIO.write(bufImage, "jpg", outputStream);
                byte[] bytes1 = outputStream.toByteArray();
                faceSearchResDto.setImage("data:image/jpeg;base64," + Base64Utils.encodeToString(bytes1));
                faceSearchResDto.setAge(processInfoList.get(0).getAge());
                faceSearchResDto.setGender(processInfoList.get(0).getGender().equals(1) ? "女" : "男");

            }

            return Results.newSuccessResult(faceSearchResDto);
        }
        return Results.newFailedResult(ErrorCodeEnum.FACE_DOES_NOT_MATCH);
    }
整个人脸识别功能的大致流程图如下:

三、百度AI人脸识别接口调用
CSDN:朱_哲:百度AI人脸识别接口调用
CSDN:林中月下隐:JavaWeb使用百度人工智能API实现人脸识别登录,人脸注册
CSDN:周~丫丫:Web前端+Java实现人脸识别登录
CSDN:有故事的男人G:java实现人脸识别登录教程【含效果图】——前台+后台整合
3.1 百度AI人脸识别接口调用
点击此处前往百度云平台官网->
登录百度智能云平台,注册账号,并新建应用,进入管理中心,人工智能—>人脸识别:

然后就可以创建应用,如下图所示:

创建应用之后,我们会得到相应的AppID 、API Key 、Secret Key。当我们调用接口的时候是需要这些东西的。
3.2 人脸识别接口调用
接口的文档地址:https://ai.baidu.com/docs#/Face-Java-SDK/top。
maven依赖:
<!-- https://mvnrepository.com/artifact/com.baidu.aip/java-sdk -->
<dependency>
	<groupId>com.baidu.aip</groupId>
	<artifactId>java-sdk</artifactId>
	<version>4.11.3</version>
</dependency>

<!-- base64需要改依赖 -->
<!-- https://mvnrepository.com/artifact/commons-codec/commons-codec -->
<dependency>
	<groupId>commons-codec</groupId>
	<artifactId>commons-codec</artifactId>
	<version>1.12</version>
</dependency>
代码示例:
package com.example.generator.ai;

import com.baidu.aip.face.AipFace;
import org.apache.commons.codec.binary.Base64;
import org.json.JSONArray;
import org.json.JSONObject;

import java.io.FileInputStream;
import java.io.IOException;
import java.io.InputStream;
import java.util.HashMap;

/**
 * @author zhuzhe
 * @date 2019/7/15 17:40
 * @email [email protected]
 */
public class Test {

    //设置APPID/AK/SK
    public static final String APP_ID = "1681xxxx";
    public static final String API_KEY = "x1GMc0xxxxxxxxxxxxxxxrrc";
    public static final String SECRET_KEY = "SaxxxxxxxxxxxxxxxxxxxxxxxNWsL";

    public static void main(String[] args) {
//        文档地址
//        http://ai.baidu.com/docs#/Face-Java-SDK/top
        String image = base64();
        String imageType = "BASE64";

        // 初始化一个AipFace
        AipFace client = new AipFace(APP_ID, API_KEY, SECRET_KEY);

        // 可选:设置网络连接参数
        client.setConnectionTimeoutInMillis(2000);
        client.setSocketTimeoutInMillis(60000);

        // 可选:设置代理服务器地址, http和socket二选一,或者均不设置
//        client.setHttpProxy("proxy_host", proxy_port);  // 设置http代理
//        client.setSocketProxy("proxy_host", proxy_port);  // 设置socket代理

        // 传入可选参数调用接口,根据需求自行设置
        HashMap<String, String> options = new HashMap<String, String>();
        options.put("face_field", "age,beauty,expression,face_shape,gender,glasses,race,eye_status,emotion,face_type");
//        options.put("max_face_num", "2");
//        options.put("face_type", "LIVE");
//        options.put("liveness_control", "LOW");

        JSONObject res = client.detect(image, imageType, options);
        if (res.getString("error_msg") != null && res.getString("error_msg").equals("SUCCESS")) {
            JSONArray faceList = res.getJSONObject("result").getJSONArray("face_list");
            JSONObject jsonObject = faceList.getJSONObject(0);

            System.out.println("年龄:" + jsonObject.getInt("age"));
            // 美丑打分,范围0-100,越大表示越美。
            System.out.println("美丑打分:" + jsonObject.getDouble("beauty"));
            // none:不笑;smile:微笑;laugh:大笑
            System.out.println("表情:" + jsonObject.getJSONObject("expression").getString("type"));
            // square: 正方形 triangle:三角形 oval: 椭圆 heart: 心形 round: 圆形
            System.out.println("脸型:" + jsonObject.getJSONObject("face_shape").getString("type"));
            // male:男性 female:女性
            System.out.println("性别:" + jsonObject.getJSONObject("gender").getString("type"));

            // yellow: 黄种人 white: 白种人 black:黑种人 arabs: 阿拉伯人
            System.out.println("人种:" + jsonObject.getJSONObject("race").getString("type"));

            // [0,1]取值,越接近0闭合的可能性越大
            System.out.println("右眼状态(睁开/闭合):" + jsonObject.getJSONObject("eye_status").getInt("right_eye"));
            System.out.println("左眼状态(睁开/闭合):" + jsonObject.getJSONObject("eye_status").getInt("left_eye"));
            System.out.println("人脸置信度,范围【0~1】:" + jsonObject.getInt("face_probability"));
            // none:无眼镜,common:普通眼镜,sun:墨镜
            System.out.println("是否带眼镜:" + jsonObject.getJSONObject("glasses").getString("type"));
            // angry:愤怒 disgust:厌恶 fear:恐惧 happy:高兴 sad:伤心 surprise:惊讶 neutral:无情绪
            System.out.println("情绪:" + jsonObject.getJSONObject("emotion").getString("type"));
            // human: 真实人脸 cartoon: 卡通人脸
            System.out.println("真实人脸/卡通人脸:" + jsonObject.getJSONObject("face_type").getString("type"));
            System.out.println("face_token:" + jsonObject.getString("face_token"));

        } else {
            System.out.println(res.toString());
        }
    }

    public static String base64() {
        //将图片文件转化为字节数组字符串,并对其进行Base64编码处理
        InputStream in = null;
        byte[] data = null;
        //读取图片字节数组
        try {
            in = new FileInputStream("D:\\dd.jpg");
            data = new byte[in.available()];
            in.read(data);
            in.close();
        } catch (IOException e) {
            e.printStackTrace();
        }
        return new String(Base64.encodeBase64(data));
    }
}
四、SeetaFace 开源人脸识别代码
CSDN:安替-AnTi:如何安装并使用SeetaFace 开源人脸识别代码【中科院计算机所山世光老师团队研发】
五、基于mtcnn/facenet/tensorflow 实现人脸识别登录系统
点击前往GitHub->
Github:https://github.com/chenlinzhong/face-login
六、Web端人脸识别
- 前端的人脸识别,例如使用:Tensorflow.js,Tracking.js,或face-api.js
- 后端的人脸识别,使用开源或者免费的SDK,如虹软,百度,腾讯的相关SDK。
- 前后端结合,能够提高系统的安全性,以及减轻服务器负担。
博客园:阿新:使用face-api.js实现人脸识别(一)
- Face-api.js 是一个 JavaScript API,是基于 tensorflow.js 核心 API 的人脸检测和人脸识别的浏览器实现。它实现了一系列的卷积神经网络(CNN),针对网络和移动设备进行了优化。
