文章目录
IO简介
IO在计算机中指的是输入输出即Input/Output。这是针对于内存来说的。例如将一个文件读到内存里就是输入,将内存中的数据写到外部系统如文件就是输出。
IO编程中,Stream(流)是一个非常重要的概念,可以想象成水管,数据就是水管里的水,但是水只能单向流动。Input Stream就是数据从外面如磁盘、网络等流进内存,Output Stream就是数据从内存流出到外面。
这里顺便提下Java标准IO里的Stream(流),和这里的Stream(流)是一样的。只不过在Java的NIO(New IO)中有一个Channel(通道),其中Channel是支持双向传输数据的,只不过Channel必须要和Buffer结合使用。
下表是两者的区别。
| 区别 | Stream | Channel |
|---|---|---|
| 支持异步 | 不支持 | 支持 |
| 是否可双向传输数据 | 不能,只能单向 | 可以,既可以从通道读取数据,也可以向通道写入数据 |
| 是否结合Buffer使用 | 不需要 | 必须结合Buffer使用 |
| 性能 | 较低 | 较高 |
由于CPU和内存的速度是远远高于外存的,所以这也是为什么很多系统的瓶颈都在磁盘上,即IO操作相对于内存和CPU操作是很慢的。
举个例子来说,比如要把100M的数据写入磁盘,CPU输出100M的数据只需要0.01秒,可是磁盘要接收这100M数据可能需要10秒,怎么办呢?有两种办法:
- 同步IO。CPU在这里等着,即暂停执行后续代码,直到数据全部写入磁盘,CPU再往下执行。
- 异步IO。CPU不在这里等,只是告诉磁盘你慢慢写,我去干其他事情去了(执行后续代码)。
同步IO和异步IO的区别就是CPU是否等待IO执行的结果。很明显,异步IO的的程序性能高于同步IO,但是异步IO的编程复杂度相对于同步IO又高很多。
例如,程序代码总得知道什么时候数据全部写入磁盘吧。有两种方式,第一种是磁盘告诉CPU我已经接收到全部数据了,这种称为回调模式;第二种是CPU不停地去轮询数据是否全部写入磁盘,这是轮询模式。
操作IO的能力都是由操作系统提供的。Python提供了一些模块让我们去操作IO。
文件读写
读写文件其实就是请求操作系统打开一个文件对象(称之为文件描述符),然后通过操作系统提供的接口从这个文件对象读取数据(读文件),或者将数据写到该文件对象(写文件)。当然操作文件最好的还是使用with语句,下面有示例。
python通过open()函数获取一个文件对象,注意获取到文件对象后,用完后一定要记得调用close()方法来关闭该文件对象(因为操作系统资源是有限的,有最大文件打开数的限制)。
其完整的语法如下。最常用的参数就是file、mode、encoding。
file 表示文件路径(相对或绝对路径)
mode 表示文件打开模式
encoding 表示文件编码格式,一般使用utf8
open(file, mode='r', buffering=None, encoding=None, errors=None, newline=None, closefd=True)
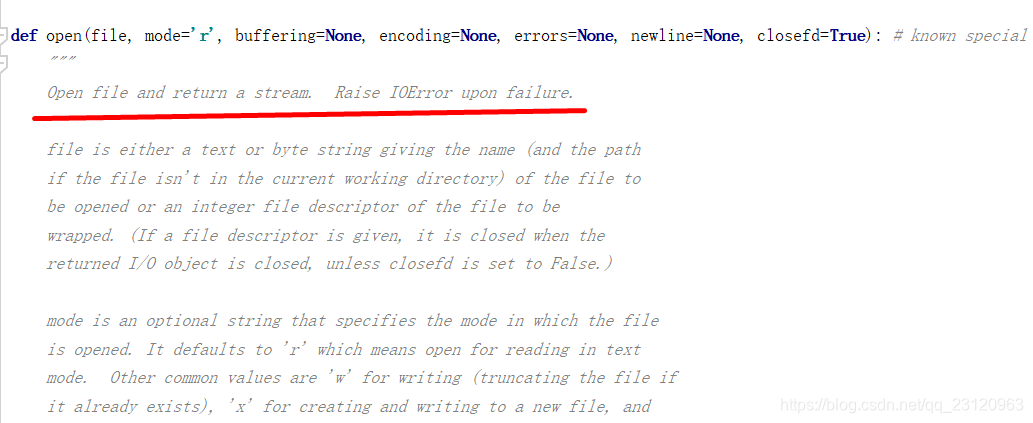
mode 支持的参数如下图所示。更详细的参数介绍可参考 python菜鸟教程----open函数。

读文件
读文件最常用的就是按行读取和读取整个文件内容。
file.read() 就是读取整个文件内容
file.readline() 就是读取文件一行内容
file.readlines() 就是读取文件所有行内容,返回列表
file.tell() 返回当前文件位置
下面有两个read_line_file方法,一个是通过with语句自动调用close方法,一个是通过try ... finally ...手动调用close方法。这两个方法都是以生成器的方式返回每一行数据和其位置,这样可以避免文件过大导致内存不够用的情况。
后面的read_content方法就是读取文件整个内容,返回一个字符串。
后面的read_lines方法就是读取文件所有行内容,返回一个列表。
注意按行读取文件内容时,最好调用strip()方法去掉末尾的回车符。
# -*- coding: UTF-8 -*-


def read_line_file(fpath):
    try:
        # with语句会自动调用close方法
        with open(fpath, 'r', encoding="utf8") as f:
            while True:
                s = f.readline()
                if s:
                    yield (f.tell(), s)
                else:
                    return
    finally:
        print("文件{} 是否已关闭 {}".format(fpath, f.closed))

def read_line_file(fpath):
    try:
        # 手动在finally里关闭
        f = open(fpath, 'r', encoding="utf8")
        while True:
            s = f.readline()
            if s:
                yield (f.tell(), s)
            else:
                return
    finally:
        print("文件{} 是否已关闭 {}".format(fpath, f.closed))
        f.close()
        print("文件{} 是否已关闭 {}".format(fpath, f.closed))

a = read_line_file("d:/a.txt")
for pos,line in a:
    print("当前位置是",pos)
    # 需要调用strip()方法去掉末尾回车符
    print(line.strip())


def read_content(fpath):
    with open(fpath, 'r', encoding="utf8") as f:
        content = f.read()
        return content

content = read_content("d:/a.txt")
print(content)

def read_lines(fpath):
    with open(fpath, 'r', encoding="utf8") as f:
        lines = f.readlines()
        return lines

for line in read_lines("d:/a.txt"):
    # 需要调用strip()方法去掉末尾回车符
    print(line.strip())
file-like Object
记得在Python面向对象那章说过,由于Python是动态语言,不要求严格的继承,一个对象只要“看起来像鸭子,走起路来像鸭子”,那它就可以被看做是鸭子。
file-like Object不要求从特定类继承,只要写个read()方法就行。如StringIO就是在内存中创建的file-like Object,常用作临时缓冲。
读取二进制文件
前面的都是读取文本文件,这也是默认的模式。如果想读取如图片等文件呢?就需要设置模式为二进制,例如open(fpath, mode="rb")
def read_img(fpath):
    with open(fpath, mode="rb") as f:
        return f.read()

img = read_img("d:/1.jpg")
print(img)

字符编码
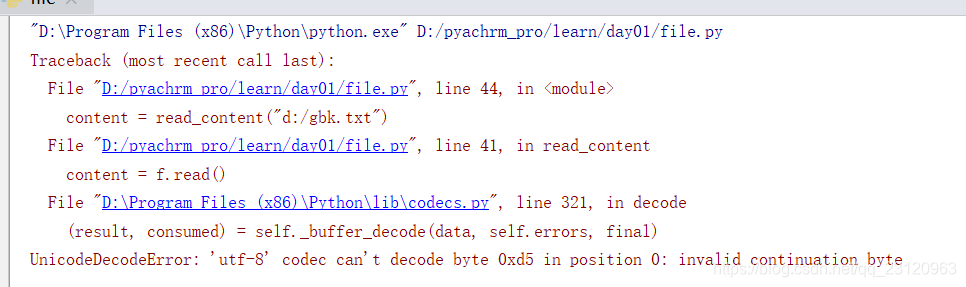
如果要读取gbk格式的文件,就应该在open()方法里设置编码格式。
def read_content(fpath):
    with open(fpath, 'r', encoding="gbk") as f:
        content = f.read()
        return content

content = read_content("d:/gbk.txt")
print(content)

当然你如果用with open(fpath, 'r', encoding="utf8") as f去打开GBK格式的文件就会报错。UnicodeDecodeError: 'utf-8' codec can't decode byte 0xd5 in position 0: invalid continuation byte
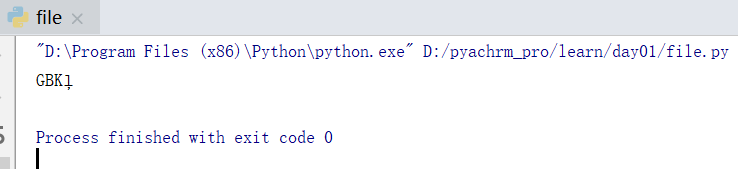
遇到错误之后如何处理呢?可以通过设置error参数如with open(fpath, 'r', encoding="utf8", errors="ignore") as f:来忽略错误。运行结果如下图。能解析出来的就直接解析了,没有解析出来的就直接忽略了。
写文件
file.write(str) 将内容写入到文件。
如将d:/1.jpg图片文件拷贝到d:/2.jpg中。其中mode="wb"
def read_img(fpath):
    with open(fpath, mode="rb") as f:
        return f.read()

img = read_img("d:/1.jpg")

with open("d:/2.jpg", mode="wb") as f:
    f.write(img)

print(read_img("d:/1.jpg") == read_img("d:/2.jpg"))

如将d:/a.txt文件拷贝到d:/b.txt中。其中mode="w"。注意最后一定要执行close()方法确保写到缓存起来的数据全部刷入到磁盘,因为操作系统是不会离开把数据写入到磁盘的。
有一点需要注意的是,要自己添加换行符。
def read_line_file(fpath):
    try:
        # with语句会自动调用close方法
        with open(fpath, 'r', encoding="utf8") as f:
            while True:
                s = f.readline()
                if s:
                    yield (f.tell(), s)
                else:
                    return
    finally:
        print("文件{} 是否已关闭 {}".format(fpath, f.closed))

rfile = read_line_file("d:/a.txt")
import os
def write_file(fpath, iter):
    with open(fpath, mode="w", encoding="utf8") as f:
        for pos, line in iter:
            # 注意如果去掉末尾换行符后 要记得添加上去
            f.write(line.strip()+"\n")
            # f.write(line)

write_file("d:/b.txt", rfile)
# repr(obj)函数将对象转化为供解释器读取的形式
print(repr(os.linesep))
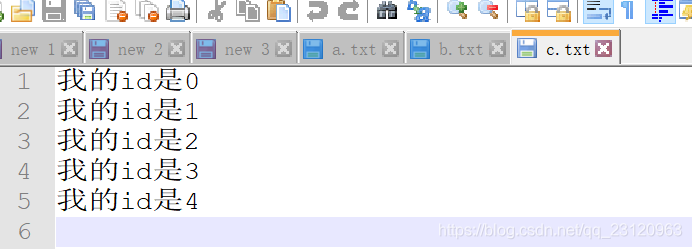
当然也可以通过f.writelines(Iterable)来写入文件,但是依旧要自己添加换行符
with open("d:/c.txt", mode="w", encoding="utf8") as f:
    # for line in ("我的id是"+str(x) for x in range(5)):
    #     f.write(line+"\n")
    f.writelines(("我的id是"+str(x)+"\n" for x in range(5)))
StringIO
内存里读写字符串。需要强调的是,StringIO和文件读写操作方法是类似的,也有stream position即读到哪个位置或者写到哪个位置。所以对同一个内存文件StringIO进行先写后读的操作时需要改变stream position即用到f.seek(0)方法。
f.writelines(["Hello World!\n","Hello Everybody\n"]) 将多行字符串写入到内存
f.getvalue() 获取内存里的内容
f.tell() 获取当前stream position的位置
f.seek(0) 改变stream position到stream的开始处
f.seek(0, 2) 改变stream position到stream的结尾处
f.readlines() 读取多行
f.read() 读取全部内容
from io import StringIO

with  StringIO() as f:
    # f.writelines(("我的id是"+str(x)+"\n" for x in range(5)))
    f.writelines(["Hello World!\n","Hello Everybody\n"])
    print(f.getvalue())
    print(f.tell())  # 返回当前stream position的位置
    f.seek(0)  # 改变stream position到stream的开始处
    for x in f.readlines():
        print(x)
    f.seek(0)
    # f.seek(0, 2)  # 改变stream position到stream的结尾处
    print(f.read())

print(f.closed)
关于更详细的内容可以参考官方文档python ---- io.StringIO
BytesIO
BytesIO和StringIO是类似的,只不过BytesIO是用来在内存里读写二进制数据的。
from io import BytesIO
def read_img(fpath):
    with open(fpath, mode="rb") as f:
        return f.read()

bio = BytesIO()
jpg = read_img("d:/1.jpg")
# 写入到内存
bio.write(jpg)
# 改变stream position位置
bio.seek(0)
# 读出数据
print(bio.read() == jpg)  # True
操作文件和目录
操作文件和目录主要是通过Python的内置os模块。
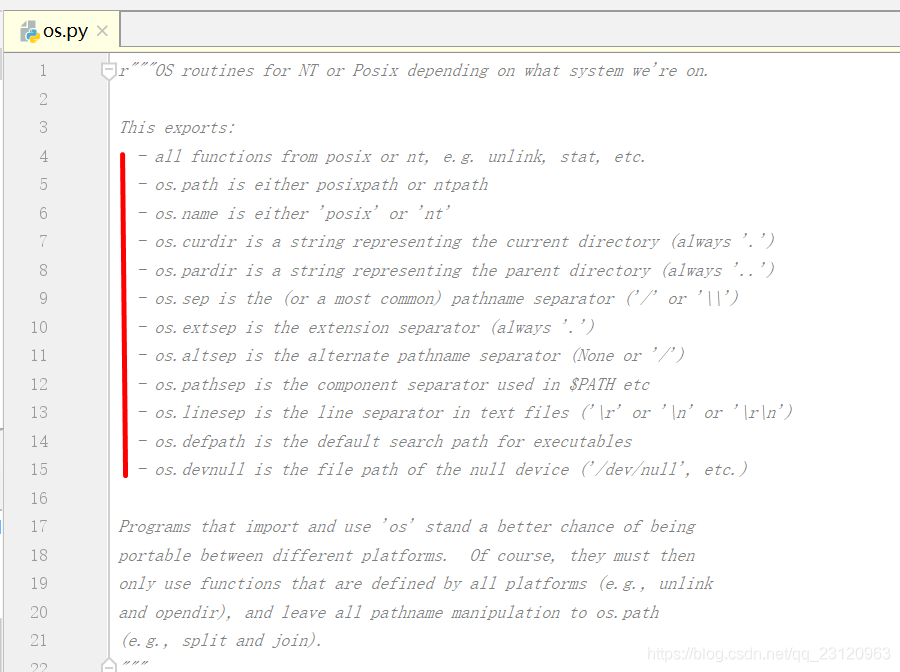
| 方法 | 描述 |
|---|---|
| os.path | either posixpath or ntpath. posix表示Linux nt表示Windows |
| os.name | either ‘posix’ or ‘nt’ |
| os.curdir | 表示当前目录的字符串,固定为’.’ |
| os.pardir | 表示父目录的字符串,固定为’…’ |
| os.sep | 路径分隔符(’/’ or ‘\’) |
| os.extsep | the extension separator (always ‘.’) |
| os.altsep | the alternate pathname separator (None or ‘/’) |
| os.pathsep | 变量如$PATH等的component separator |
| os.linesep | 文本文件的换行分隔符(’\r’ or ‘\n’ or ‘\r\n’) |
| os.defpath | 对于可执行文件的默认查找路径 |
| os.devnull | is the file path of the null device (’/dev/null’, etc.) |
| os.environ | 获取所有环境变量。遍历和取值类似于字典的操作 |
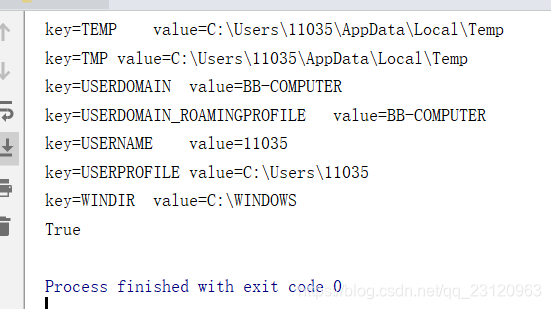
关于环境变量的遍历、更新、获取操作,和字典操作类似。
import os

for key,value in os.environ.items():
    print("key={}\tvalue={}".format(key, value))

# 添加环境变量
os.environ.update(TEST_HOME="d:/test")
# 获取环境变量
print(os.environ.get("TEST_HOME") == "d:/test")  # True
操作文件和目录的函数一部分放在os模块,还有一部分放在os.path模块。
对文件的拷贝和移动即解压缩放在shutil模块。
常用方法如下表所示
| 方法 | 说明 |
|---|---|
os.getcwd() |
获取当前工作目录 ,可理解为pwd |
os.chdir(path) |
改变当前工作目录到指定目录,可理解为cd path |
os.listdir(path) |
返回指定路径下的子路径即子文件和子目录 |
os.mkdir(path) |
创建目录 |
os.makedirs(path, exist_ok=True) |
递归创建目录,exist_ok=True表示即使目录已经存在也不会报错,如果是False就会报错OSError |
os.remove(path) |
删除path文件,如果path是目录会报错OSError |
os.rmdir(path) |
删除path空目录,如果path目录非空会报错OSError |
os.removedirs(path) |
递归删除path空目录 |
shutil.copy(src, dest) |
拷贝文件到指定目录,也可以重命名,可理解为 cp src dest |
shutil.copytree(src, dest) |
拷贝目录到指定目录,dest目录必须不存在 ,可理解为cp -r src dest |
shutil.move(src, dest) |
移动和重命名文件 ,可理解为mv |
shutil.rmtree(path) |
删除整个目录(递归删除) ,可理解为rm -r path |
shutil.make_archive(base_name, format, root_dir=None, base_dir=None) |
压缩目录 ,可理解为taz -zcPvf xx.tar.gz path 其中base_name是压缩包名字(可带路径),root_dir表示待压缩的目录,base_dir=None表示压缩时不带绝对路径 |
shutil.unpack_archive(filename, extract_dir=None) |
解压压缩包到指定目录 ,可理解为tar -zxPvf xx.tar.gz -C extract_dir |
os.path.abspath(path) |
返回path的绝对路径 |
os.path.basename(path) |
返回path对应的文件名,去掉了路径信息 |
os.path.dirname(path) |
返回文件所在路径 |
os.path.exists(path) |
判断path路径是否存在 |
os.path.getsize(path) |
返回文件大小,不适合目录 |
os.path.isfile(path) |
判断path是否为文件 |
os.path.isdir(path) |
判断path是否为目录 |
os.path.join(path1[, path2[, ...]]) |
将目录和文件名合并成一个路径 |
os.path.split(path) |
把路径分割成 dirname 和 basename,返回一个元组 |
os.path.splitext(path) |
分割路径,返回路径名和文件扩展名的元组 |
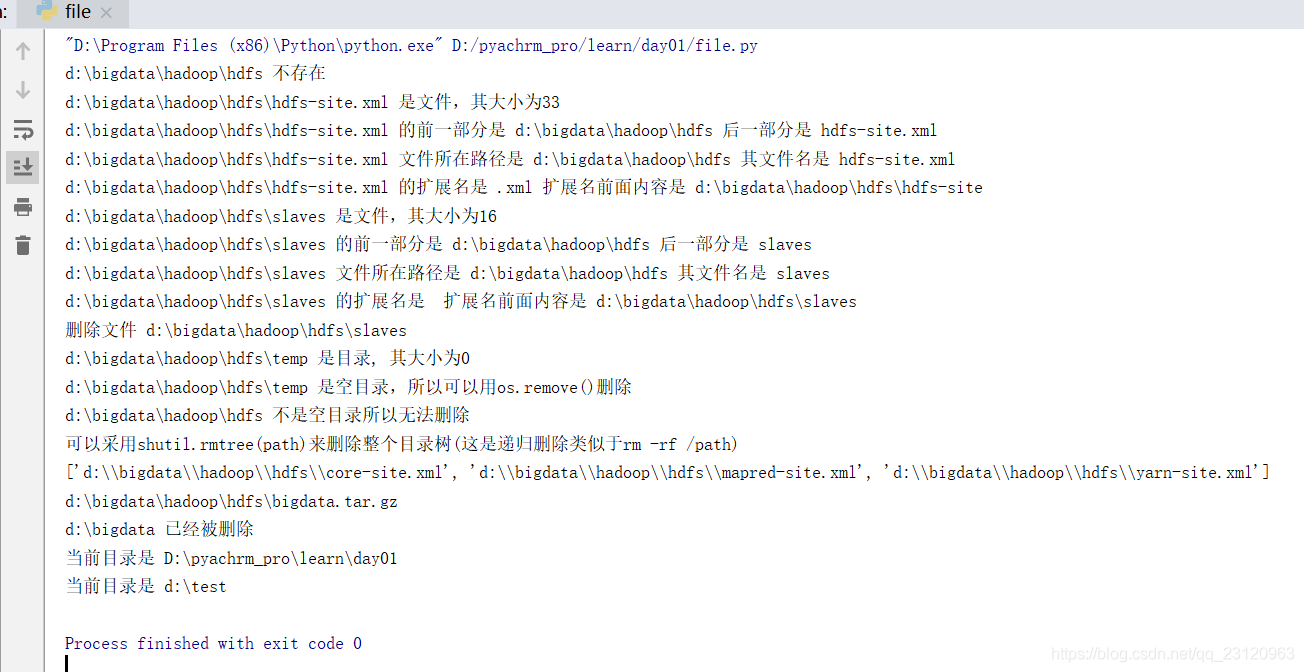
# -*- coding: UTF-8 -*-

import os.path

# 查看当前目录的绝对路径
os.path.abspath(".")
os.getcwd()

# 多个路径进行拼接,不要拼接字符串,而要通过os.path.join去拼接,这样才可以正确处理系统的路径分隔符
os.path.join("d:/test", "a", "b")
join_path = os.path.join(os.path.abspath("d:/bigdata"), "hadoop", "hdfs")

# 判断路径是否存在
print("{} 已存在".format(join_path) if os.path.exists(join_path) else "{} 不存在".format(join_path))

# 递归创建目录  exist_ok=True时在目标已经存在的情况下就不会报错 即可重复创建
os.makedirs(join_path, exist_ok=True)

# 生成hdfs-site.xml文件
hdfs_xml = os.path.join(join_path, "hdfs-site.xml")
with open(hdfs_xml, mode="w", encoding="utf8") as f:
    f.write("dfs.replicateion=3" + "\n")
    f.write("dr.who=root" + "\n")

# 生成slaves文件
slaves = os.path.join(join_path, "slaves")
with open(slaves, mode="w", encoding="utf8") as f:
    f.write("slave1" + "\n")
    f.write("slave2" + "\n")

# 生成temp目录
temp = os.path.join(join_path, "temp")
if not os.path.exists(temp):
    os.mkdir(temp)

# 列出path目录下的所有子path 并判断是文件还是目录
for path in os.listdir(join_path):
    # os.path.join拼接成绝对路径
    sub_path = os.path.join(join_path, path)
    # 判断是文件
    if os.path.isfile(sub_path):
        # os.path.getsize()只能计算文件大小 无法计算目录大小
        print("{} 是文件,其大小为{}".format(sub_path, os.path.getsize(sub_path)))
        # os.path.split分隔路径为两部分,返回一个tuple
        t = os.path.split(sub_path)
        print("{} 的前一部分是 {} 后一部分是 {}".format(sub_path, t[0], t[1]))
        print("{} 文件所在路径是 {} 其文件名是 {}".format(sub_path, os.path.dirname(sub_path), os.path.basename(sub_path)))
        t = os.path.splitext(sub_path)
        print("{} 的扩展名是 {} 扩展名前面内容是 {}".format(sub_path, t[1], t[0]))
        if path == "slaves":
            # remove删除文件
            os.remove(sub_path)
            print("删除文件 {}".format(sub_path))
    # 判断是目录
    elif os.path.isdir(sub_path):
        print("{} 是目录, 其大小为{}".format(sub_path, os.path.getsize(sub_path)))

        # 如果目录是空的就可以删除
        if not os.listdir(sub_path):
            # rmdir删除空文件夹
            # os.rmdir(sub_path)
            print("{} 是空目录,所以可以用os.remove()删除".format(sub_path))

try:
    os.rmdir(join_path)
except OSError as e:
    import traceback

    # 打印错误栈信息到控制台
    # 当然也可以用logging.exception(e)
    # traceback.print_exc()
    print("{} 不是空目录所以无法删除".format(join_path))
    print("可以采用shutil.rmtree(path)来删除整个目录树(这是递归删除类似于rm -rf /path)")

import shutil

# 拷贝文件并重命令
shutil.copy(hdfs_xml, os.path.join(join_path, "core-site.xml"))
shutil.copy(hdfs_xml, os.path.join(join_path, "yarn-site.xml"))
shutil.copy(hdfs_xml, os.path.join(join_path, "mapred-site.xml"))
shutil.copy(hdfs_xml, os.path.join(join_path, "hadoop-env.sh"))
shutil.copy(hdfs_xml, os.path.join(join_path, "yarn-env.sh"))
# 拷贝文件到其他目录
shutil.copy(hdfs_xml, os.path.abspath("d:/"))
# 拷贝目录到其他目录 dest必须不存在
if os.path.exists("d:/test12") and os.path.isdir(os.path.abspath("d:/test12")):
    shutil.rmtree(os.path.abspath("d:/test12"))
shutil.copytree(os.path.abspath("d:/test"), os.path.abspath("d:/test12"))
# 移动和重命名文件
shutil.move(hdfs_xml, os.path.join(join_path, "hdfs-site.xml.bak"))

# 寻找join_path目录下后缀是.xml的文件
sub_path_list = [os.path.join(join_path, path) for path in os.listdir(join_path)]
xml_list = [path for path in sub_path_list if os.path.isfile(path) and os.path.splitext(path)[1] == ".xml"]
print(xml_list)

# 压缩和解压缩 采用tar.gz
af_path = os.path.join(join_path, "bigdata")
# base_name是文件名(带路径) format是压缩方式 root_dir是待打包压缩的目录 base_dir是压缩打包时是否带绝对路径如果是None就不带,默认就是不带绝对路径
archive_file = shutil.make_archive(af_path, "gztar", root_dir=join_path, base_dir=join_path)
# 返回的是压缩文件路径
print(archive_file)
shutil.unpack_archive(archive_file, os.path.abspath("c:/test"))

# 完全删除
shutil.rmtree(os.path.abspath("d:/bigdata"))
if not os.path.exists(os.path.abspath("d:/bigdata")):
    print("{} 已经被删除".format(os.path.abspath("d:/bigdata")))

# 获取当前目录
print("当前目录是 {}".format(os.getcwd()))
# 进入到指定目录
os.chdir(os.path.abspath("d:/test"))
print("当前目录是 {}".format(os.getcwd()))
序列化
类比Java的序列化(Serialization),python是通过pickle模块来实现对象的序列化和反序列化的。
序列化可理解为将内存对象转换成bytes然后写入磁盘或者通过网络传输到其他机器的过程。
反序列化就是将bytes转化为内存对象的过程。
pickle.dumps(obj) 将对象转化成bytes返回。
pickle.dump(obj, f) 将对象转化成bytes并写入file-object对象。
pickle.loads(s) 将bytes转化成原来的对象并返回。
pickle.load(f) 将file-object对象里的bytes转化成原来的对象并返回。
import pickle
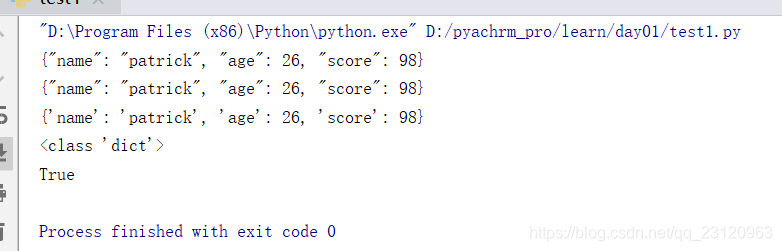
d = dict(name="patrick", age=26, score=98)
with open("d:/dump.txt", mode="wb") as f:
pickle.dump(d, f)
with open("d:/dump.txt.1", mode="wb") as f:
b = pickle.dumps(d)
f.write(b)
def read_content_binary(fpath):
with open(fpath, mode="rb") as f:
return f.read()
# True
print(read_content_binary("d:/dump.txt") == read_content_binary("d:/dump.txt.1"))
# 反序列化
with open("d:/dump.txt", mode="rb") as f:
# 从文件加载
obj1 = pickle.load(f)
print(obj1) # {'name': 'patrick', 'age': 26, 'score': 98}
bytes_obj = read_content_binary("d:/dump.txt.1")
# 从二进制字符串加载
obj2 = pickle.loads(bytes_obj)
print(obj2) # {'name': 'patrick', 'age': 26, 'score': 98}
需要注意的是,序列化和编码是不同的。编码是把数据由一种数据格式转换成另一种数据格式,序列化是把数据由内存中的对象(而不是某种具体的格式)转换成字节序列。
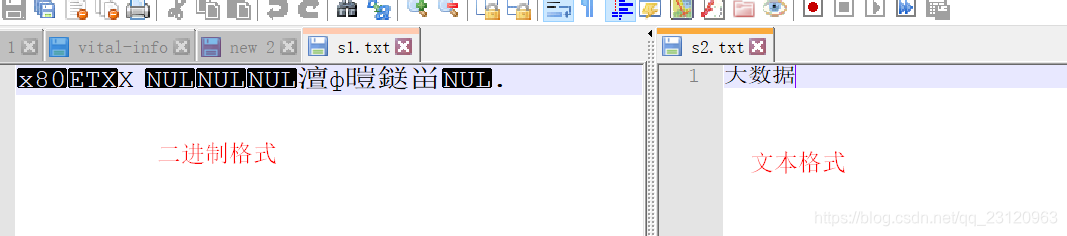
查看下面这个例子,将同一个字符串序列化后写入文件s1.txt和编码后写入另一个文件s2.txt,其内容是不同的。
import pickle

s = "大数据"
print(pickle.dumps(s) == s.encode("utf8"))  # False

# 字符串序列化写入文件s1.txt
with open("d:/s1.txt", mode="wb") as f1:
    f1.write(pickle.dumps(s))

# 字符串utf8编码后序列化写入文件s2.txt
with open("d:/s2.txt", mode="wb") as f2:
    f2.write(s.encode("utf8"))

# 读取s1.txt文件内容
with open("d:/s1.txt", mode="rb") as f1:
    content = f1.read()
    print(pickle.loads(content))  # 大数据

# 读取s2.txt文件内容
with open("d:/s2.txt", mode="rb") as f2:
    print(f2.read().decode("utf8"))  # 大数据
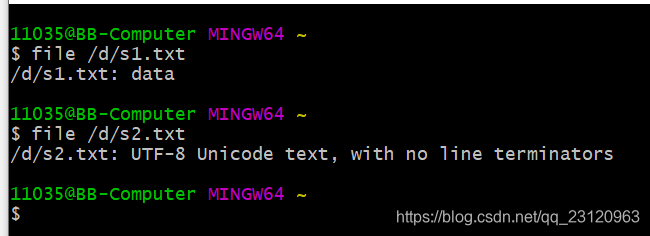
如下图所示,s1.txt存储的是二进制数据,s2.txt存储的是文本数据。
但是pickle和其他语言的通用序列化框架一样,有同一个问题就是只能在某个版本的python序列和反序列化,不能跨平台甚至可能不能跨版本。
此时我们可以考虑用JSON格式化,因为JSON格式化后是一个字符串,可以方便地被其他语言或平台所获取和解析。
但是Python的JSON格式化并没有Java的JSON格式化这么容易(Java有现成的fastjson工具)。
JSON格式化
其中类型匹配关系如下表,python内置了json模块来提供简单的json化处理。
| JSON类型 | Python类型 |
|---|---|
| {} | dict |
| [] | list |
| “string” | str |
| 1234.56 | int或float |
| true/false | True/False |
| null | None |
json.dumps(obj) 将对象转化成json字符串返回。
json.dump(obj, f) 将对象转化成json字符串并写入file-object对象。
json.loads(s) 将json字符串转化成原来的对象并返回。
json.load(f) 将file-object对象里的json字符串转化成原来的对象并返回。
import json
from io import StringIO
d = dict(name="patrick", age=26, score=98)
# 返回json字符串
json_d = json.dumps(d)
print(json_d)
f = StringIO()
# 将对象json化后写入file-object
json.dump(d, f)
print(f.getvalue())

obj = json.loads(json_d)
print(obj)
print(type(obj))  # <class 'dict'>
f.seek(0)
# 从file-obj对象加载
obj1 = json.load(f)
print(obj == obj1)  # True
JSON对自定义class进行处理
上面例子中是对一个字典进行JSON格式化,但是如果对一个自定义class对象就会报错TypeError: Object of type 'Student' is not JSON serializable,因为Python不知道如何去对一个自定义class对象进行JSON化处理。但是pickle模块是可以对内存里的自定义class对象进行正确的序列化和反序列化的。
在对自定义对象进行JSON格式化时可以在json.dumps(obj) 方法里指定default=func参数来决定如何格式化,并可以指定ensure_ascii=False来显示中文。
在对JSON字符串进行解析时可以在json.loads(s)方法里指定object_hook=func参数来决定如何解析返回自定义对象。
import json
class Student(object):
def __init__(self, name, age, score):
self.name = name
self.age = age
self.score = score
def student2dict(std):
return {
'name': std.name,
'age': std.age,
'score': std.score
}
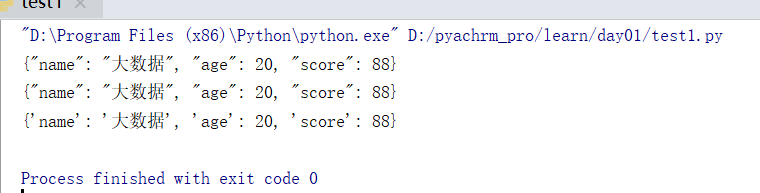
s = Student('大数据', 20, 88)
# 指定ensure_ascii=False来显示中文
# 通过default参数指定如何对Student进行JSON格式化
print(json.dumps(s, default=student2dict, ensure_ascii=False))
# 通过将任意class实例变成一个dict
# 因为通常class的实例都有一个__dict__属性,它就是一个dict,用来存储实例变量。也有少数例外,比如定义了__slots__的class。
print(json.dumps(s, default=lambda obj: obj.__dict__, ensure_ascii=False))
def dict2student(d):
return Student(d['name'], d['age'], d['score'])
json_str = '{"age": 20, "score": 88, "name": "大数据"}'
# 通过object_hook参数指定如何对json字符串进行解析转化成Student
s = json.loads(json_str, object_hook=dict2student)
print(s.__dict__)
从Python对自定义类进行JSON格式化处理可以看出,在这方面确实没有Java方便,Python还需要额外的指定参数和写函数来确定如何JSON格式化处理。
