文章目录
什么是shiro?
Apache Shiro官网上对Shiro的解释如下:
Apache Shiro (pronounced “shee-roh”, the Japanese word for ‘castle’) is a powerful and easy-to-use Java security framework that performs authentication, authorization, cryptography, and session management and can be used to secure any application - from the command line applications, mobile applications to the largest web and enterprise applications.
----Shiro provides the application security API to perform the following aspects (I like to call these the 4 cornerstones of application security):
* Authentication - proving user identity, often called user ‘login’.
* Authorization - access control
* Cryptography - protecting or hiding data from prying eyes
* Session Management - per-user time-sensitive state
大概意思就是说:
shiro是一个功能强大且易于使用的Java安全框架,它的认证,授权,加密和会话管理可以用于保护任何应用程序——来自从命令行应用程序、移动应用程序到最大的web和企业应用程序。
shiro为以下几个方面提供应用程序的安全API(应用程序安全的4大基石):
- Authentication - 提供用户身份认证,俗称登录
- Authorization - 访问权限控制
- Cryptography - 使用加密算法保护或者隐藏数据
- Session Management - 用户的会话管理
Login
这部分我会结合自己项目中的一些实例来做出分析:
我的LoginController中对登录操作所做的处理:
@RequestMapping("/doLogin")
    public String doLogin(String loginName, String password, HttpServletRequest request){
        String result = "redirect:/index";
        String fail = "/login";
        String errorMsg = "";

        // shiro认证
        Subject subject = SecurityUtils.getSubject();
        UsernamePasswordToken token = new UsernamePasswordToken(loginName, password);
        try {
            subject.login(token);
            User user = userService.getUserByLogiName(loginName);
            if(user != null){
                user.setPassword("");
                //userCache.put(user);
                redisTemplate.opsForValue().set(Constant.cacheName,user);
            }
        } catch (UnknownAccountException e) {
            result = fail;
            errorMsg = "账户不存在";
        } catch (DisabledAccountException e) {
            result = fail;
            errorMsg = "账户存在问题";
        } catch (AuthenticationException e) {
            result = fail;
            errorMsg = "密码错误";
        } catch (Exception e) {
            result = fail;
            errorMsg = "登陆异常";
            log.error(e.getMessage(),e);
        }

        request.setAttribute("error",errorMsg);
        return result;
    }
在进行登录操作的方法doLogin()里首先要做的是shiro认证这个过程。
shiro认证
这个过程主要分为三个部分:
- 1:获取客户端输入放入用户名,密码。
- 2:获取数据源中存放的数据即相应的用户名,密码。
- 3:进行两者的比对,判断是否登录操作成功。
先看一下shiro中是如何实现这个认证的过程的吧:
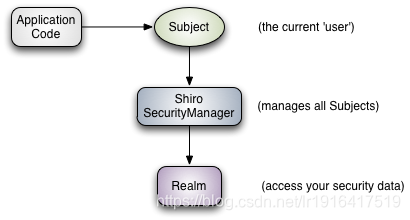
这里的意思就是说,通过当前的用户对象Subject执行login()方法将用户信息传给Shiro的SecurityManager,而这个SecurityManager会将用户信息委托给内部登录模块,由内部登录模块来调用Realm中的方法来进行数据比对进而判断是否登录成功。
那么我们就有疑问了,这里怎么有出现了三个关键词Subject,SecurityManager和Realm这又有什么用呢?
Subject,SecurityManager和Realm
Subject
对于subject官网上是这样定义的:
Subject
When you’re securing your application, probably the most relevant questions to ask yourself are, “Who is the current user?” or “Is the current user allowed to do X”? It is common for us to ask ourselves these questions as we're writing code or designing user interfaces: applications are usually built based on user stories, and you want functionality represented (and secured) based on a per-user basis. So, the most natural way for us to think about security in our application is based on the current user. Shiro’s API fundamentally represents this way of thinking in its Subject concept.

The word Subject is a security term that basically means "the currently executing user". It's just not called a 'User' because the word 'User' is usually associated with a human being. In the security world, the term 'Subject' can mean a human being, but also a 3rd party process, daemon account, or anything similar. It simply means 'the thing that is currently interacting with the software'. For most intents and purposes though, you can think of this as Shiro’s ‘User’ concept. You can easily acquire the Shiro Subject anywhere in your code as shown in Listing 1 below.
大意就是:subject指的是当前用户,因为我们人的思维更倾向于某个用户有某个角色,因此可以理解为基于当前用户。(不过在安全领域,术语“Subject”可以指一个人,也可以指第三方进程、守护进程帐户或任何类似的东西。)
它的获取方法在官方文档中定义为:相信在我上面的部分项目代码中大家也已经看到了,这块用法是固定的:
import org.apache.shiro.subject.Subject;
import org.apache.shiro.SecurityUtils;
...
Subject currentUser = SecurityUtils.getSubject();
一旦您获得了subject,就可以立即访问当前用户使用Shiro想要做的90%的事情,比如登录、注销、访问他们的会话、执行授权检查,等等.

SecurityManager
SecurityManager是shiro架构核心,协调内部安全组件(如登录,授权,数据源等),用来管理所有的subject。这块会后续进行补充说明。
Realm
官网定义如下:
Realms
The third and final core concept in Shiro is that of a Realm. A Realm acts as the ‘bridge’ or ‘connector’ between Shiro and your application’s security data. That is, when it comes time to actually interact with security-related data like user accounts to perform authentication (login) and authorization (access control), Shiro looks up many of these things from one or more Realms configured for an application.

In this sense a Realm is essentially a security-specific DAO: it encapsulates connection details for data sources and makes the associated data available to Shiro as needed. When configuring Shiro, you must specify at least one Realm to use for authentication and/or authorization. More than one Realm may be configured, but at least one is required.

Shiro provides out-of-the-box Realms to connect to a number of security data sources (aka directories) such as LDAP, relational databases (JDBC), text configuration sources like INI and properties files, and more. You can plug-in your own Realm implementations to represent custom data sources if the default Realms do not meet your needs. Listing 4 below is an example of configuring Shiro (via INI) to use an LDAP directory as one of the application’s Realms.
大意是指:Realm充当的是Shiro和应用程序安全数据之间的==“桥梁”或“连接器”==。也就是说,当实际需要与与安全相关的数据(如用户帐户)进行交互以执行身份验证(登录)和授权(访问控制)时,Shiro会从一个或多个为应用程序配置的Realm中查找这些内容。也是说Realm本质上是一个特定于安全性的DAO(逻辑处理):它封装了数据源的连接细节,并根据需要将关联的数据提供给Shiro。在配置Shiro时,必须指定至少一个用于身份验证和/或授权的领域。可以配置多个域,但至少需要一个。
Shiro提供了开箱即用的领域,可以连接到许多安全数据源(即目录),如LDAP、关系数据库(JDBC)、文本配置源(如INI)和属性文件,等等。也可以自定义Realm实现来表示自定义数据源。(下文我会贴出项目中自定义的Realm做为参考)。
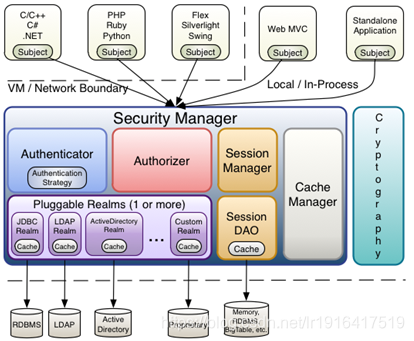
下面是详细的shiro结构图:
获取subject
首先是第一步要获取客户端传来的数据
Subject subject = SecurityUtils.getSubject();
login()
subject.login(token);
内部调用的是subject接口声明的方法:
void login(AuthenticationToken token) throws AuthenticationException;
我们来看一下login()的具体实现:
    public void login(AuthenticationToken token) throws AuthenticationException {
        clearRunAsIdentitiesInternal();

        Subject subject = securityManager.login(this, token);

        PrincipalCollection principals;
        String host = null;
        if (subject instanceof DelegatingSubject) {
            DelegatingSubject delegating = (DelegatingSubject) subject;
            //we have to do this in case there are assumed identities - we don't want to lose the 'real' principals:
            principals = delegating.principals;
            host = delegating.host;
        } else {
            principals = subject.getPrincipals();
        }
        if (principals == null || principals.isEmpty()) {
            String msg = "Principals returned from securityManager.login( token ) returned a null or " +
                    "empty value.  This value must be non null and populated with one or more elements.";
            throw new IllegalStateException(msg);
        }
        this.principals = principals;
        this.authenticated = true;
        if (token instanceof HostAuthenticationToken) {
            host = ((HostAuthenticationToken) token).getHost();
        }
        if (host != null) {
            this.host = host;
        }
        Session session = subject.getSession(false);
        if (session != null) {
            this.session = decorate(session);
        } else {
            this.session = null;
        }
    }
要注意的是内部调用的是securityManager.login(this, toke)方法。
我们再来进一步的看一下securityManager.login(this, toke)的内部实现:
首先SecurityManager中对login方法的声明:
Subject login(Subject subject, AuthenticationToken authenticationToken) throws AuthenticationException;
实现类DefaultSecurityManager中对login()的实现
public Subject login(Subject subject, AuthenticationToken token) throws AuthenticationException {
        AuthenticationInfo info;
        try {
            info = authenticate(token);
        } catch (AuthenticationException ae) {
            try {
                onFailedLogin(token, ae, subject);
            } catch (Exception e) {
                if (log.isInfoEnabled()) {
                    log.info("onFailedLogin method threw an " +
                            "exception.  Logging and propagating original AuthenticationException.", e);
                }
            }
            throw ae; //propagate
        }
        Subject loggedIn = createSubject(token, info, subject);
        onSuccessfulLogin(token, info, loggedIn);
        return loggedIn;
    }
在这里我们发现调用了authenticate(token)
这个方法是从哪里来的呢?再来看看SecurityManager接口中的方法和它所继承的类:
public interface SecurityManager extends Authenticator, Authorizer, SessionManager {
    Subject login(Subject subject, AuthenticationToken authenticationToken) throws AuthenticationException;
    void logout(Subject subject);
    Subject createSubject(SubjectContext context);

}
这里我们看到 SecurityManager 接口继承了 Authenticator 登录认证的接口比如登录(Authenticator),权限验证(Authorizer)等。
再来看一看Authenticator接口中都声明了哪些方法:
public interface Authenticator {
    public AuthenticationInfo authenticate(AuthenticationToken authenticationToken)
            throws AuthenticationException;
}
也就是我们刚才在DefaultSecurityManager中对login()的实现中调用的方法,忘了的小盆友可以回过头去看一眼哦,O(∩_∩)O哈哈~。
AbstractAuthenticator中authenticate()的实现:
public final AuthenticationInfo authenticate(AuthenticationToken token) throws AuthenticationException {
    AuthenticationInfo info;
    try {
        // 调用doAuthenticate方法
        info = doAuthenticate(token);
        if (info == null) {
            ...
        }
    } catch (Throwable t) {
        ...
    }
    ...
}
调用了doAuthenticate(token)方法。
我们再来看ModularRealmAuthenticator中doAuthenticate(token)方法的实现:
protected AuthenticationInfo doAuthenticate(AuthenticationToken authenticationToken) throws AuthenticationException {
    assertRealmsConfigured();
    Collection<Realm> realms = getRealms();
    if (realms.size() == 1) {
        // Realm唯一时
        return doSingleRealmAuthentication(realms.iterator().next(), authenticationToken);
    } else {
        return doMultiRealmAuthentication(realms, authenticationToken);
    }
}
调用了doSingleRealmAuthentication(realms.iterator().next(), authenticationToken)
再往下看:doSingleRealmAuthentication的实现:
protected AuthenticationInfo doSingleRealmAuthentication(Realm realm, AuthenticationToken token) {
    if (!realm.supports(token)) {
        ...
    }
    // 调用Realm的getAuthenticationInfo方法获取AuthenticationInfo信息
    AuthenticationInfo info = realm.getAuthenticationInfo(token);
    if (info == null) {
        ...
    }
    return info;
}
哇,我们看到了什么!!!!
realm.getAuthenticationInfo(token)
它调用Realm的getAuthenticationInfo(token)方法。
而在Realm中我们看一下用户认证方法重写:
@Service
public class MyShiroRealm extends AuthorizingRealm {

    //用于用户查询
    @Reference
    private UserService userService;
    //用户认证
    @Override
    protected AuthenticationInfo doGetAuthenticationInfo(AuthenticationToken authenticationToken) throws AuthenticationException {
        // 获取用户信息
        String name = authenticationToken.getPrincipal().toString();
        User user = userService.getUserByLogiName(name);
        if(user == null){
            return null;
        }else{
            SimpleAuthenticationInfo simpleAuthenticationInfo = new SimpleAuthenticationInfo(name, user.getPassword(), getName());
            return simpleAuthenticationInfo;
        }
    }

    //角色权限和对应权限添加
    @Override
    protected AuthorizationInfo doGetAuthorizationInfo(PrincipalCollection principalCollection) {
        //获取登录用户名
        String name= (String) principalCollection.getPrimaryPrincipal();
        //查询用户名称
        //User user = loginService.findByName(name);
        //添加角色和权限
        SimpleAuthorizationInfo simpleAuthorizationInfo = new SimpleAuthorizationInfo();
        /*for (Role role:user.getRoles()) {
            //添加角色
            simpleAuthorizationInfo.addRole(role.getRoleName());
            for (Permission permission:role.getPermissions()) {
                //添加权限
                simpleAuthorizationInfo.addStringPermission(permission.getPermission());
            }
        }*/
        return simpleAuthorizationInfo;
    }
}
主要重写了俩个方法:
doGetAuthenticationInfo()主要是进行登录认证
doGetAuthorizationInfo()主要是进行角色权限和对应权限的添加
Shiro 配置
要配置的是ShiroConfig类,Apache Shiro 核心通过 Filter 来实现(类似SpringMvc 通过DispachServlet 来主控制一样)
filter主要是通过URL规则来进行过滤和权限校验,所以我们需要定义一系列关于URL的规则和访问权限。如下:
@Configuration
public class ShiroConfiguration {
    //将自己的验证方式加入容器
    @Bean
    public MyShiroRealm myShiroRealm() {
        MyShiroRealm myShiroRealm = new MyShiroRealm();
        myShiroRealm.setCredentialsMatcher(new CredentialsMatcher());
        return myShiroRealm;
    }
    //权限管理,配置主要是Realm的管理认证
    @Bean
    public DefaultWebSecurityManager securityManager() {
        DefaultWebSecurityManager securityManager = new DefaultWebSecurityManager();
        securityManager.setRealm(myShiroRealm());
        return securityManager;
    }

    //Filter工厂,设置对应的过滤条件和跳转条件
    @Bean
    public ShiroFilterFactoryBean shiroFilterFactoryBean(DefaultWebSecurityManager securityManager) {
        ShiroFilterFactoryBean shiroFilterFactoryBean = new ShiroFilterFactoryBean();
        shiroFilterFactoryBean.setSecurityManager(securityManager);
        Map<String,String> map = new HashMap<String, String>();
        //登出
        map.put("/logout","logout");
        //对所有用户认证
        map.put("/user/**","authc");
        map.put("/org/**","authc");
        map.put("/role/**","authc");
        map.put("/menu/**","authc");
        map.put("/log/**","authc");
        map.put("/index","authc");
        //其他资源不拦截
        map.put("/**","anon");
        map.put("/doLogin","anon");
        //登录
        shiroFilterFactoryBean.setLoginUrl("/login");
        //首页
        shiroFilterFactoryBean.setSuccessUrl("/index");
        //错误页面,认证不通过跳转
        shiroFilterFactoryBean.setUnauthorizedUrl("/error");
        shiroFilterFactoryBean.setFilterChainDefinitionMap(map);
        return shiroFilterFactoryBean;
    }

}
方法一:myShiroRealm()方法
主要是将我自定义的匹配器对象当做参数传给MyShiroRealm并返回。
(也就是说把我自定义来判断规则告诉shiro让shiro来管理)
而在我自定义的密码匹配器中是这样实现的:
public class CredentialsMatcher extends SimpleCredentialsMatcher {
    @Override
    public boolean doCredentialsMatch(AuthenticationToken token, AuthenticationInfo info) {
    	UsernamePasswordToken uToken =(UsernamePasswordToken) token;
        //获得用户输入的密码:(可以采用加盐(salt)的方式去检验)
        String inPassword = new String(uToken.getPassword());
        //获得数据库中的密码
        String dbPassword = (String) info.getCredentials();
        System.err.println("inPassword:" + inPassword);
        System.err.println("dbPassword:" + dbPassword);
        //进行密码的比对
        boolean flag = PasswordHash.validatePassword(inPassword,dbPassword);
        return flag;
    }
}
这里我使用的是将客户端的密码进行加盐处理之后再和我数据库中的数据进行比对判断。
方法二:securityManager()
实例化了DefaultWebSecurityManager类,将上面myShiroRealm()的返回值当做参数,也就是配置Realm的管理认证。
方法三:shiroFilterFactoryBean(DefaultWebSecurityManager securityManager)
Filter工厂,设置对应的过滤条件和跳转条件。
异常捕获
在登录过程中可能会出现不同的异常,对于不同的异常,我们是如何处理的呢?
当然不同的异常就要分类进行处理,比如密码错误和账户不存在就不能一概而论,对于这些问题,我们能做的就是将不同的异常进行捕获进行不同页面的跳转反馈给用户,提高用户体验,比如:
try {
            subject.login(token);
            User user = userService.getUserByLogiName(loginName);
            if(user != null){
                user.setPassword("");
                //userCache.put(user);
                redisTemplate.opsForValue().set(Constant.cacheName,user);
            }
        } catch (UnknownAccountException e) {
            result = fail;
            errorMsg = "账户不存在";
        } catch (DisabledAccountException e) {
            result = fail;
            errorMsg = "账户存在问题";
        } catch (AuthenticationException e) {
            result = fail;
            errorMsg = "密码错误";
        } catch (Exception e) {
            result = fail;
            errorMsg = "登陆异常";
            log.error(e.getMessage(),e);
        }
这里要注意的是不要把父类写在前面捕获,否则所有的此类异常都会被父类捕获,子类就不会进行错误处理,无法得到错误的详细的归类处理。
哈哈哈哈哈哈哈哈嗝,今天敲开熏,一直就很疑惑shiro的实现机制,今天终于明白啦。嗷嗷嗷开心开心。
