今天面试的时候,有被问到
- vuex的五个属性,分别是什么,区别和用途说一下
这个地方回答的不是很好,思路有点混乱
所以就打算整理一下
查了一下官网,关于vuex的五个属性还是有很多知识点的
官网:https://vuex.vuejs.org/zh/guide/
01 前言
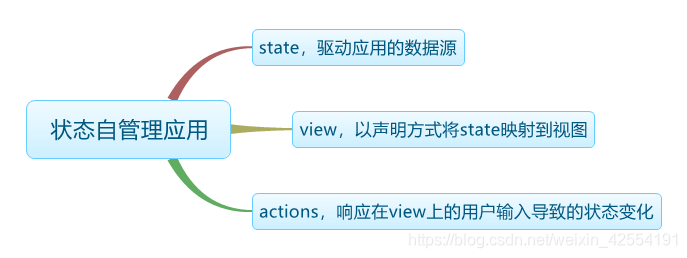
当我们用 Vue.js 开发一个中到大型的单页应用时,经常会遇到如下问题:
- 如何让多个 Vue 组件共享状态??
- Vue 组件间如何通讯??
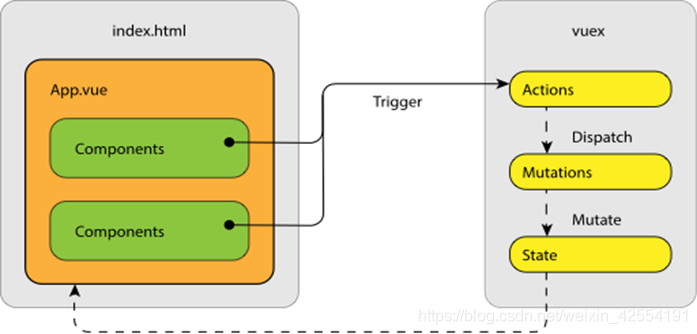
通常,在项目不是很复杂的时候,我们会利用全局事件总线 (global event bus)解决,但是随着复杂度的提升,这些代码将变的难以维护。因此,我们需要一种更加好用的解决方案,于是,Vuex 诞生了。
02 什么是vuex?
- VueX 是一个专门为 Vue.js 应用设计的
状态管理架构,统一管理和维护各个vue组件的可变化状态(你可以理解成vue 组件里的某些 data)。 - 它采用集中式存储管理应用的所有组件的状态,并以相应的规则保证状态以一种可预测的方式发生变化。
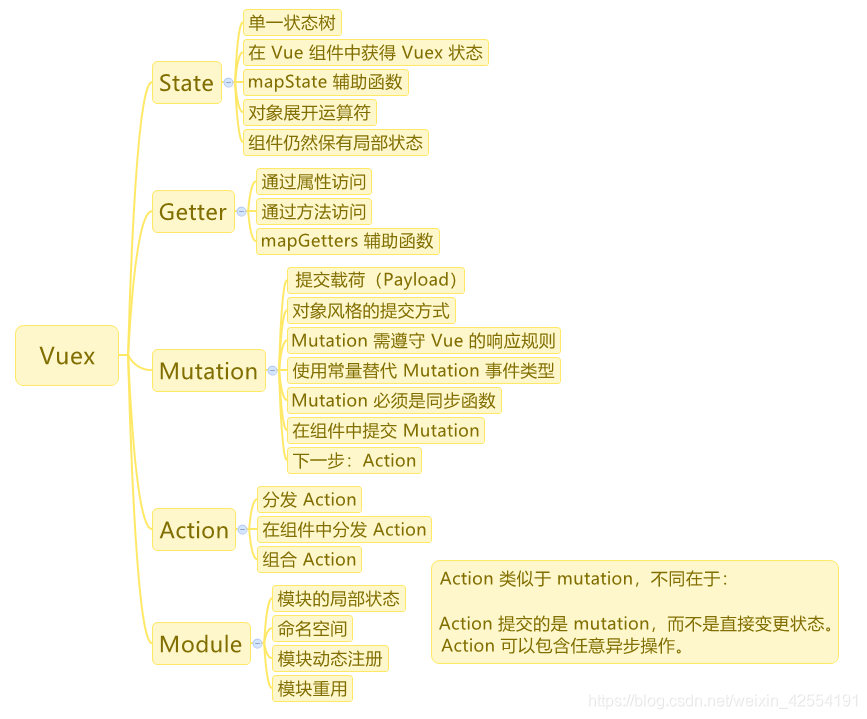
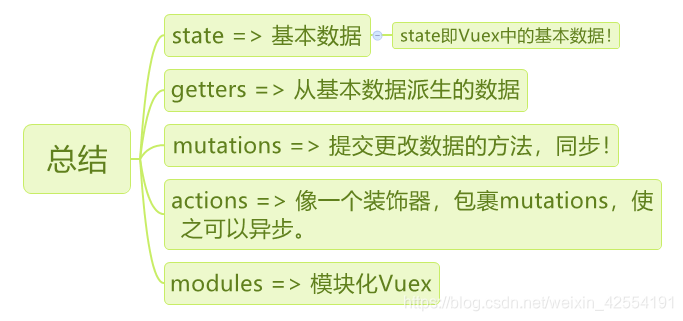
- Vue有五个核心概念,
state,getters,mutations,actions,modules。 - Vuex 也集成到 Vue 的官方调试工具 devtools extension,提供了诸如零配置的 time-travel调试、状态快照导入导出等高级调试功能。
- 状态管理: 简单理解就是统一管理和维护各个vue组件的可变化状态(你可以理解成vue组件里的某些data)
- vuex借鉴了
Flux、Redux、和The Elm Architecture。与其他模式不同的是,Vuex 是专门为 Vue.js 设计的状态管理库,以利用 Vue.js 的细粒度数据响应机制来进行高效的状态更新。
学习资料:
官网文档:http://vuex.vuejs.org/en/
中文文档:https://github.com/vuejs/vuex/tree/dev/docs/zh-cn
官网是这样说的:
每一个
Vuex应用的核心就是store(仓库)。“store”基本上就是一个容器,它包含着你的应用中大部分的状态 (state)。Vuex和单纯的全局对象有以下两点不同:
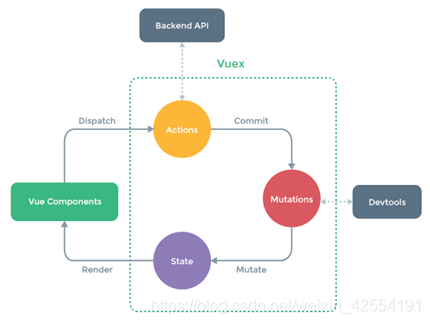
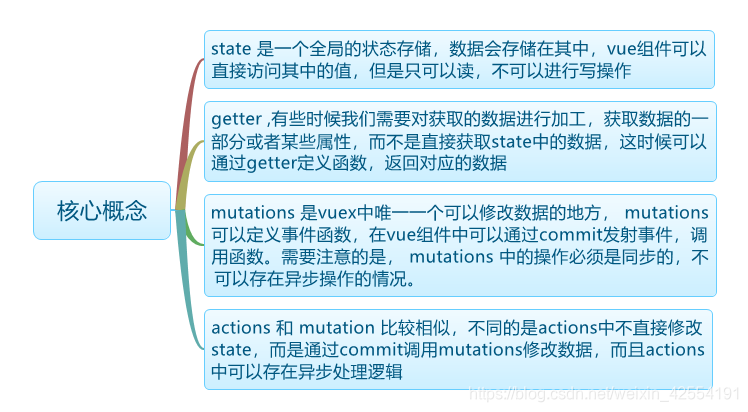
Vuex的状态存储是响应式的。当 Vue 组件从 store 中读取状态的时候,若store中的状态发生变化,那么相应的组件也会相应地得到高效更新。- 你不能直接改变 store 中的状态。改变 store 中的状态的唯一途径就是
显式地提交 (commit)mutation。这样使得我们可以方便地跟踪每一个状态的变化,从而让我们能够实现一些工具帮助我们更好地了解我们的应用。
03 什么情况下我应该使用 Vuex?
- 虽然 Vuex 可以帮助我们管理共享状态,但也附带了更多的概念和框架。这需要对短期和长期效益进行权衡。
- 如果您不打算开发大型单页应用,使用 Vuex 可能是繁琐冗余的。确实是如此——如果您的应用够简单,您最好不要使用 Vuex。一个简单的
global event bus就足够您所需了。但是,如果您需要构建是一个中大型单页应用,您很可能会考虑如何更好地在组件外部管理状态,Vuex 将会成为自然而然的选择。
04 安装
- NPM安装
npm install vuex
- 在一个模块化的打包系统中,您必须显式地通过 Vue.use() 来安装 Vuex:
import Vue from 'vue'
import Vuex from 'vuex'

Vue.use(Vuex)
05 最简单的 Store
安装 Vuex 之后,让我们来创建一个 store。创建过程直截了当——仅需要提供一个初始 state 对象和一些 mutations:
const store = new Vuex.Store({
  state: {
    count: 0
  },
  mutations: {
    increment (state) {
      state.count++
    }
  }
})
在 src 下新建文件夹 vuex,进入 vuex 新建 store.js,
在store.js中添加代码如下:
import Vue  from 'vue';
import Vuex from 'vuex';
Vue.use(Vuex)

export default new Vuex.Store({
    state: {
        count: 0
    },
    mutations: {
        increment (state) {
            state.count++
        }
    }
})
现在,你可以通过 store.state 来获取状态对象,以及通过 store.commit 方法触发状态变更:
store.commit('increment')
console.log(store.state.count) // -> 1
在App.vue文件中添加代码,在templete模板中添加一个按钮和点击事件
<button v-on:click="addClick">加</button>
在<script>中引入store及添加方法(methods与data同级)
import store from './vuex/store'
methods:
  {
    addClick:function(){
	store.commit('increment')
      	console.log(store.state.count) // -> 1
    }
  }
06 核心概念:state、 getter 、mutations 、 actions
mutations
更改 Vuex 的 store 中的状态的唯一方法是提交 mutation。Vuex 中的 mutations 非常类似于事件:每个 mutation 都有一个字符串的 事件类型 (type) 和 一个 回调函数 (handler)。这个回调函数就是我们实际进行状态更改的地方,并且它会接受 state 作为第一个参数:
const store = new Vuex.Store({
  state: {
    count: 1
  },
  mutations: {
    increment (state) {
      // 改变状态
      state.count++
    }
  }
})
你不能直接调用一个 mutation 回调函数。要唤醒一个 mutation,你调用 store.commit 方法(参数为回调函数名):
store.commit('increment')
mutation回调函数的第一个参数始终为store,你可以向 store.commit 传入额外的参数,即 mutation 的 载荷(playload):
// ...
mutations: {
  increment (state, n) {
    state.count += n
  }
}
store.commit('increment', 10)
在大多数情况下,载荷应该是一个对象,这样可以包含多个字段并且记录的 mutation 会更易读:
// ...
mutations: {
  increment (state, payload) {
    state.count += payload.amount
  }
}
store.commit('increment', {
  amount: 10
})
mutations对象风格的提交方式
提交 mutation 的另一种方式是直接使用包含 type 属性的对象:
store.commit({
  type: 'increment',
  amount: 10
})
当使用对象风格的提交方式,整个对象都作为载荷传给 mutation 函数,因此 handler 保持不变:
mutations: {
  increment (state, payload) {
    state.count += payload.amount
  }
}
你可以在组件中使用 this.$store.commit(‘xxx’) 提交 mutation,或者使用 mapMutations 辅助函数将组件中的 methods 映射为 store.commit 调用(需要在根节点注入 store)。
import { mapMutations } from 'vuex'
export default {
  // ...
  methods: {
    ...mapMutations([
      'increment' // 映射 this.increment() 为 this.$store.commit('increment')
    ]),
    ...mapMutations({
      add: 'increment' // 映射 this.add() 为 this.$store.commit('increment')
    })
  }
}
actions
action 类似于 mutation,不同在于:
- action 提交的是 mutation,而不是直接变更状态。
- action 可以包含任意异步操作。
在 vuex 里面 actions 只是一个架构性的概念,并不是必须的,本质上就是一个函数,你在里面想干嘛都可以,可以通过异步方式执行各种任务,要修改state数据还是需要通过commit触发 mutation 。
可以把mutation比作仓库的管理员,负责仓库管理,而把action比作领导,可以命令仓库管理员作操作,但不会亲自动手。
注册一个简单的 action:
const store = new Vuex.Store({
  state: {
    count: 0
  },
  mutations: {
    increment (state) {
      state.count++
    }
  },
 actions: {
    increment (context) {
	context.commit('increment')
    }
  }
})
actions 的第一个参数是 context,它向外暴露一组与 store 实例相同的方法/属性,所以可以直接调用 context.commit 或者访问 context.state 或者 context.getters 。我们通常使用 es6 的参数解构来简化我们的代码,直接写成{ commit }
actions: {
  increment ({ commit }) {
    commit('increment')
  }
}
Action 通过 store.dispatch 方法触发:
- store.dispatch(‘increment’)
乍一眼看上去感觉多此一举,我们直接分发 mutation 岂不更方便?实际上并非如此,还记得 mutation 必须同步执行这个限制么?Action 就不受约束!我们可以在 action 内部执行异步操作:
actions: {
  incrementAsync ({ commit }) {
    setTimeout(() => {
      commit('increment')
    }, 1000)
  }
}
Actions 支持同样的载荷方式和对象方式进行分发:
- 以载荷形式分发
store.dispatch('incrementAsync', {
  amount: 10
})
- 以对象形式分发
store.dispatch({
  type: 'incrementAsync',
  amount: 10
})
在组件中分发 Action
在组件中使用 this.$store.dispatch('xxx') 分发 action,或者使用 mapActions 辅助函数将组件的 methods 映射为 store.dispatch 调用(需要先在根节点注入 store):
import { mapActions } from 'vuex'
export default {
  // ...
  methods: {
    ...mapActions([
      'increment' // 映射 this.increment() 为 this.$store.dispatch('increment')
    ]),
    ...mapActions({
      add: 'increment' // 映射 this.add() 为 this.$store.dispatch('increment')
    })
  }
}
组合 Actions
Action 通常是异步的,那么如何知道 action 什么时候结束呢?更重要的是,我们如何才能组合多个 action,以处理更加复杂的异步流程?
第一件事你需要清楚的是 store.dispatch 的返回的是被触发的 action 函数的返回值,因此你可以在 action 中返回 Promise:
actions: {
  actionA ({ commit }) {
    return new Promise((resolve, reject) => {
      setTimeout(() => {
        commit('someMutation')
        resolve()
      }, 1000)
    })
  }
}
现在你可以:
store.dispatch('actionA').then(() => {
  // ...
})
在另外一个 action 中也可以:
actions: {
  // ...
  actionB ({ dispatch, commit }) {
    return dispatch('actionA').then(() => {
      commit('someOtherMutation')
    })
  }
}
最后,如果我们利用 [async / await] 这个 JavaScript 即将到来的新特性,我们可以像这样组合 action:
假设 getData() 和 getOtherData() 返回的是 Promise
actions: {
  async actionA ({ commit }) {
    commit('gotData', await getData())
  },
  async actionB ({ dispatch, commit }) {
    await dispatch('actionA') // 等待 actionA 完成
    commit('gotOtherData', await getOtherData())
  }
}
Modules
使用单一状态树,导致应用的所有状态集中到一个很大的对象。但是,当应用变得很大时,store 对象会变得臃肿不堪。
为了解决以上问题,Vuex 运行我们将 store 分割到多个模块(module)。每个模块拥有自己的 state、mutation、action、getters、甚至是嵌套子模块——从上至下进行类似的分割:
const moduleA = {
  state: { ... },
  mutations: { ... },
  actions: { ... },
  getters: { ... }
}
onst moduleB = {
  state: { ... },
  mutations: { ... },
  actions: { ... }
}
const store = new Vuex.Store({
  modules: {
    a: moduleA,
    b: moduleB
  }
})

store.state.a // -> moduleA 的状态
store.state.b // -> moduleB 的状态
模块的局部状态
对于模块内部的 mutation 和 getter,接收的第一个参数是模块的局部状态。
const moduleA = {
  state: { count: 0 },
  mutations: {
    increment: (state) {
      // state 模块的局部状态
      state.count++
    }
  },
 getters: {
    doubleCount (state) {
      return state.count * 2
    }
  }
}
同样,对于模块内部的 action,context.state 是局部状态,根节点的状态是 context.rootState:
const moduleA = {
  // ...
  actions: {
    incrementIfOdd ({ state, commit }) {
      if (state.count % 2 === 1) {
        commit('increment')
      }
    }
  }
}
对于模块内部的 getter,根节点状态会作为第三个参数:
const moduleA = {
  // ...
  getters: {
    sumWithRootCount (state, getters, rootState) {
      return state.count + rootState.count
    }
  }
}
07 项目结构
对于大型应用,我们会希望把 Vuex 相关代码分割到模块中。下面是项目结构示例:
├── index.html
├── main.js
├── api
│   └── ... # 抽取出API请求
├── components
│   ├── App.vue
│   └── ...
└── store
    ├── index.js          # 我们组装模块并导出 store 的地方
    ├── actions.js        # 根级别的 action
    ├── mutations.js      # 根级别的 mutation
    └── modules
        ├── cart.js       # 购物车模块
        └── products.js   # 产品模块
08 vuex简单应用实例
创建一个用来共享的存储,在这个例子中它将通过 vue/vuex 注入到组件当中。
定义组件可以调用的 actions,它们仍然是集中定义的。
定义实际接触存储状态的 mutations。我们这么做,actions 就可以形成不止一个 mutation,或者执行逻辑去决定调用哪一个 mutation。这意味着你再也不用担心组件当中的业务逻辑了,成功!
当状态更新时,任何拥有 getter,动态属性和映射到 store 的组件都会被立即更新。
main.js
用 Vuex 创建了一个存储并将其直接传入应用程序当中
import Vue from 'vue'
import App from './App.vue'

import store from './vuex/store'

new Vue({
  el: '#app',
  store,
  render: h => h(App)
})
store.js
export default new Vuex.Store({
  state: {
    messages: []
  },
  actions: {
    newMessage ({commit}, msg) {
      commit('NEW_MESSAGE', msg)
    }
  },
  mutations: {
    NEW_MESSAGE (state, msg) {
      state.messages.push(msg)
    }
  }
})
Client.vue
<template>
    <div>
        <h1>{{ clientid }}</h1>
        <div>
            <ul>
                <li v-for="message in messages">
                    <label>{{ message.sender }}:</label> {{ message.text }}
                </li>
            </ul>
            <div>
                <input v-model="msg" placeholder="Enter a message, then hit [enter]" @keyup.enter="trySendMessage">
            </div>
        </div>
    </div>
</template>
<script>
    import { mapState, mapActions } from 'vuex'

    export default {
        data() {
            return {
                msg: ''
            }
        },
        props: ['clientid'],
        computed:{
                ...mapState({
                  messages: state => state.messages
            })
    },
 methods: {
        trySendMessage() {
            this.newMessage({
                text: this.msg,
                sender: this.clientid
            })
            this.resetMessage()
        },
        resetMessage() {
            this.msg = ''
        },
       ...mapActions(['newMessage'])
    }
    }
</script>
<style>
</style>
App.vue
 <div>
        <client clientid="Client A"></client>
</div>
<div>
        <client clientid="Client B"></client>
</div>
<script>
  import client from './components/Client.vue'
  import store from './vuex/store'
export default {
  name: 'app',
  data () {
    return {
      msg: 'Welcome to Your Vue.js App'
    }
  },
  components:{client}
}
</script>
参考链接:
https://www.cnblogs.com/y896926473/articles/6709733.html
