简介
FTP:File transfer Protocol 文件传输协议,用于Internet上的控制文件的双向传输,是一个应用程序。工作在TCP/IP协议族的应用层,其传输层协议是TCP协议,目的在于提高文件传输的共享性和可靠性,是基于c/s模式工作的。
VSFTP是一个基于GPL发布的类Unix系统上使用的FTP软件,它的全称是Very Secure FTP 从此名称可以看出来,吹得挺牛逼的
工作原理
有两种工作模式:主动模式(PORT)和被动模式(PASV),主被动是相对于服务器端而言的,ftp的主动模式和被动模式是可以并存的
1、主动模式

要点:
(1)客户端使用随机端口(>1023)请求服务端的21端口
(2)客户端的第一步控制指令的session始终连接,数据传输连接按需创建和关闭
(3)如果把FTP服务器部署在防火墙或者NAT服务器的背后,则采用主动操作模式的客户端只能够建立命令连接而无法进行文件传输,如果部署FTP服务器后你发现只能浏览而不能上传下载文件时,一般情况下应该选择被动模式
2、被动模式

要点:
(1)服务器端的P端口以(a:b)的形式告知客户端,端口的计算方式为a*256+b
(2)防火墙的设置。服务端的21号端口需要开放,>1024的随机端口需要开放
(3)当ftp服务器位于nat后,需要设置PASV_ADDRESS=外网ip
响应码:
第一列:
1xx:信息
2xx:成功类状态吗
3xx:提示需进一步提供补充类信息的代码
4xx:客户端错误
5xx:服务器端错误
第二列:
| 响应码 | 含义 |
|---|---|
| X0X | 语法错误。 |
| X1X | 系统状态和信息。 |
| X2X | 与FTP服务器连接状态。 |
| X3X | 用户认证有关信息。 |
| X4X | 未定义。 |
| X5X | 与文件系统有关的信息。 |
常用响应码
响应码 含义 响应码 含义
110 重新启动标记应答 332 登录时需要账户信息
120 服务在指定时间内准备好 350 请求的文件操作需要进一步的口令
125 数据连接打开,开始传输 421 服务关闭
150 文件状态良好,将要打开数据连接 425 不能打开数据连接
200 命令成功 426 关闭连接,终止传输
202 命令没有执行 450 文件不可用
211 系统状态回复 451 中止请求操作,有本地错误
212 目录状态回复 452 磁盘空间不足
213 文件状态回复 500 无效命令
214 帮助信息回复 501 语法错误
215 系统类型回复 502 命令未执行
220 服务就绪 503 命令顺序错误
221 服务关闭控制连接,可以退出登录 504 无效命令参数
225 数据连接打开,无传输正在进行 530 未登录
226 关闭数据连接,请求的文件操作成功 532 存储文件需要账户信息
227 进入被动模式 550 未执行请求操作
230 用户已经登录 551 请求操作终止,页类型未知
250 请求的文件操作完成 请求文件操作终止,超过存储分配
257 创建路径名 553 为执行请求的操作,文件名不合法
原文链接:https://blog.csdn.net/ZWE7616175/java/article/details/81356015
用户认证
1、虚拟用户:仅可以访问某特定服务中的资源
nsswitch:network service switch,名称解析框架

      配置文件:/etc/nsswitch.conf

      模块位置:/lib64/libnss*         /usr/lib64/libnss*(64位操作系统)

pam:pluggable authentication module,用户认证框架

      模块:/lib64/security

      配置文件:主配置文件 /etc/pam.conf      /etc/pam.d/*
2、系统用户
3、匿名用户
安装vsftpd
1、yum安装主程序


[root@test ~]# yum install -y vsftpd
Last metadata expiration check: 0:02:45 ago on Wed 15 Apr 2020 03:27:06 PM CST.
Dependencies resolved.
=============================================================================================================
 Package                Architecture           Version                       Repository                 Size
=============================================================================================================
Installing:
 vsftpd                 x86_64                 3.0.3-28.el8                  AppStream                 180 k

Transaction Summary
=============================================================================================================
Install  1 Package

Total download size: 180 k
Installed size: 359 k
Downloading Packages:
vsftpd-3.0.3-28.el8.x86_64.rpm                                               1.0 MB/s | 180 kB     00:00
-------------------------------------------------------------------------------------------------------------
Total                                                                        1.0 MB/s | 180 kB     00:00
Running transaction check
Transaction check succeeded.
Running transaction test
Transaction test succeeded.
Running transaction
  Preparing        :                                                                                     1/1
  Installing       : vsftpd-3.0.3-28.el8.x86_64                                                          1/1
  Running scriptlet: vsftpd-3.0.3-28.el8.x86_64                                                          1/1
  Verifying        : vsftpd-3.0.3-28.el8.x86_64                                                          1/1

Installed:
  vsftpd-3.0.3-28.el8.x86_64

Complete!
2、查看安装目录结构
默认情况下,vsftpd使用系统账号验证用户,只要访问FTP的用户在操作系统的/etc/passwd中有账号密码,就可以访问。FTP传输数据的明文的,非常不安全,所以FTP提供了用户访问控制 在 /etc/vsftpd/ftpusers 和 /etc/vsftpd/user_list
[root@test ~]# rpm -ql vsftpd
/etc/logrotate.d/vsftpd               ## 日志切割
/etc/pam.d/vsftpd                     ## 用户认证配置文件
/etc/vsftpd
/etc/vsftpd/ftpusers
/etc/vsftpd/user_list
/etc/vsftpd/vsftpd.conf               ## 主配置文件
/etc/vsftpd/vsftpd_conf_migrate.sh
/usr/lib/.build-id
/usr/lib/.build-id/3a
/usr/lib/.build-id/3a/b647f552ddc98138822ffab2ce1fee1abe7997
/usr/lib/systemd/system-generators/vsftpd-generator
/usr/lib/systemd/system/vsftpd.service
/usr/lib/systemd/system/vsftpd.target
/usr/lib/systemd/system/[email protected]
/usr/sbin/vsftpd                              ## 主程序,启动脚本
/usr/share/doc/vsftpd
/usr/share/doc/vsftpd/AUDIT
/usr/share/doc/vsftpd/BENCHMARKS
/usr/share/doc/vsftpd/BUGS
/usr/share/doc/vsftpd/COPYING
/usr/share/doc/vsftpd/Changelog
/usr/share/doc/vsftpd/EXAMPLE
/usr/share/doc/vsftpd/EXAMPLE/INTERNET_SITE
/usr/share/doc/vsftpd/EXAMPLE/INTERNET_SITE/README
/usr/share/doc/vsftpd/EXAMPLE/INTERNET_SITE/vsftpd.conf
/usr/share/doc/vsftpd/EXAMPLE/INTERNET_SITE/vsftpd.xinetd
/usr/share/doc/vsftpd/EXAMPLE/INTERNET_SITE_NOINETD
/usr/share/doc/vsftpd/EXAMPLE/INTERNET_SITE_NOINETD/README
/usr/share/doc/vsftpd/EXAMPLE/INTERNET_SITE_NOINETD/vsftpd.conf
/usr/share/doc/vsftpd/EXAMPLE/PER_IP_CONFIG
/usr/share/doc/vsftpd/EXAMPLE/PER_IP_CONFIG/README
/usr/share/doc/vsftpd/EXAMPLE/PER_IP_CONFIG/hosts.allow
/usr/share/doc/vsftpd/EXAMPLE/README
/usr/share/doc/vsftpd/EXAMPLE/VIRTUAL_HOSTS
/usr/share/doc/vsftpd/EXAMPLE/VIRTUAL_HOSTS/README
/usr/share/doc/vsftpd/EXAMPLE/VIRTUAL_USERS
/usr/share/doc/vsftpd/EXAMPLE/VIRTUAL_USERS/README
/usr/share/doc/vsftpd/EXAMPLE/VIRTUAL_USERS/logins.txt
/usr/share/doc/vsftpd/EXAMPLE/VIRTUAL_USERS/vsftpd.conf
/usr/share/doc/vsftpd/EXAMPLE/VIRTUAL_USERS/vsftpd.pam
/usr/share/doc/vsftpd/EXAMPLE/VIRTUAL_USERS_2
/usr/share/doc/vsftpd/EXAMPLE/VIRTUAL_USERS_2/README
/usr/share/doc/vsftpd/FAQ
/usr/share/doc/vsftpd/INSTALL
/usr/share/doc/vsftpd/LICENSE
/usr/share/doc/vsftpd/README
/usr/share/doc/vsftpd/README.security
/usr/share/doc/vsftpd/REWARD
/usr/share/doc/vsftpd/SECURITY
/usr/share/doc/vsftpd/SECURITY/DESIGN
/usr/share/doc/vsftpd/SECURITY/IMPLEMENTATION
/usr/share/doc/vsftpd/SECURITY/OVERVIEW
/usr/share/doc/vsftpd/SECURITY/TRUST
/usr/share/doc/vsftpd/SIZE
/usr/share/doc/vsftpd/SPEED
/usr/share/doc/vsftpd/TODO
/usr/share/doc/vsftpd/TUNING
/usr/share/doc/vsftpd/vsftpd.xinetd
/usr/share/man/man5/vsftpd.conf.5.gz
/usr/share/man/man8/vsftpd.8.gz
/var/ftp              ## 匿名用户和ftp用户的 共享资源的存放位置
/var/ftp/pub
3、vsftpd中不同用户共享资源的位置
1、匿名用户:会被映射成ftp用户,共享资源位置:/var/ftp
2、系统用户:用户自己的家目录
3、虚拟用户:虚拟用户做映射指定的系统用户的家目录
4、查看vsftpd的版本
[root@test ~]# vsftpd -v
vsftpd: version 3.0.3
好像是从这个版本开始配置文件里有变动
# Allow anonymous FTP? (Beware - allowed by default if you comment this out).
anonymous_enable=NO
5、启动vsftpd
[root@test ~]# systemctl start vsftpd
[root@test ~]# ss -lntp
State  Recv-Q  Send-Q    Local Address:Port   Peer Address:Port
LISTEN 0       128             0.0.0.0:5355        0.0.0.0:*      users:(("systemd-resolve",pid=866,fd=13))
LISTEN 0       128             0.0.0.0:22          0.0.0.0:*      users:(("sshd",pid=910,fd=5))
LISTEN 0       128                [::]:5355           [::]:*      users:(("systemd-resolve",pid=866,fd=15))
LISTEN 0       32                    *:21                *:*      users:(("vsftpd",pid=1267,fd=3))

## 我这里是centos8的系统
[root@test ~]# uname -r
4.18.0-147.5.1.el8_1.x86_64

[root@test ~]# uname -a
Linux test 4.18.0-147.5.1.el8_1.x86_64 #1 SMP Wed Feb 5 02:00:39 UTC 2020 x86_64 x86_64 x86_64 GNU/Linux
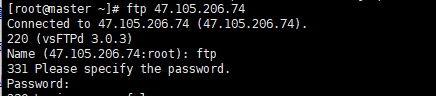
5、访问vsftpd测试
客户端安装ftp客户端工具
[root@master ~]# yum install ftp

[root@master ~]# ftp 47.105.206.74
Connected to 47.105.206.74 (47.105.206.74).
220 (vsFTPd 3.0.3)
Name (47.105.206.74:root): ftp
331 Please specify the password.
Password:
530 Login incorrect.
Login failed.

此错误是是密码验证失败了,从3.0.3版本开始,配置文件中的anonymous_enable 是否允许匿名用户登录选项是NO了,改成YES,重启vsftpd就可以访问了,但是非常不安全
[root@test ~]# vim /etc/vsftpd/vsftpd.conf
anonymous_enable=YES

[root@test ~]# systemctl restart vsftpd.service

[root@master ~]# ftp 47.105.206.74
Connected to 47.105.206.74 (47.105.206.74).
220 (vsFTPd 3.0.3)
Name (47.105.206.74:root): ftp
331 Please specify the password.
Password:
230 Login successful.
Remote system type is UNIX.
Using binary mode to transfer files.
ftp>
这时候我们尝试从ftp获取数据
ftp> ls
227 Entering Passive Mode (47,105,206,74,39,130).   ## 执行命令后会显示vsftpd的工作方式,此处为被动模式,括号里显示了ftp服务器的地址和监听的端口
## ftp被动模式下服务器端监听的端口计算方式为 a*b+c 即39*256+130,而且该端口不是一直监听的,当一次和客户端交互完成后就释放了,下次再连接就变了
ftp: connect: Connection refused                    ## 连接被拒绝了,是因为我用的阿里云服务器,安全组没有放行,下面有安全组的配置

[root@test ~]# systemctl status firewalld.service
● firewalld.service - firewalld - dynamic firewall daemon
Loaded: loaded (/usr/lib/systemd/system/firewalld.service; disabled; vendor preset: enabled)
Active: inactive (dead)
Docs: man:firewalld(1)
[root@test ~]# iptables -L n
iptables: No chain/target/match by that name.
[root@test ~]# iptables -L -n
Chain INPUT (policy ACCEPT)
target prot opt source destination

Chain FORWARD (policy ACCEPT)
target prot opt source destination

Chain OUTPUT (policy ACCEPT)
target prot opt source destination
阿里云安全组配置(大概是实时生效)
连接拒绝时,阿里云安全组的配置
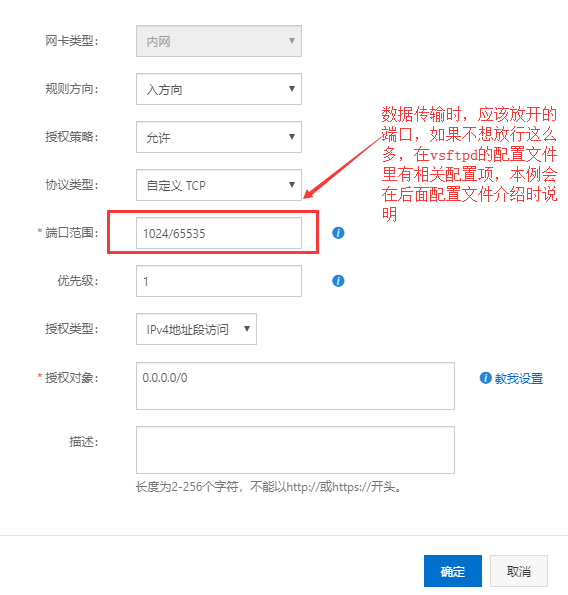
安全组里指令端口和数据传输端口的开放

安全组配置完成后访问(可以看到数据传输时,服务端的监听端口是临时的)
[root@master ~]# ftp 47.105.206.74
Connected to 47.105.206.74 (47.105.206.74).
220 (vsFTPd 3.0.3)
Name (47.105.206.74:root): ftp
331 Please specify the password.
Password:
230 Login successful.
Remote system type is UNIX.
Using binary mode to transfer files.
ftp> ls
227 Entering Passive Mode (47,105,206,74,152,89).
150 Here comes the directory listing.
drwxr-xr-x    2 0        0               6 May 14  2019 pub
226 Directory send OK.
ftp> ls
227 Entering Passive Mode (47,105,206,74,136,46).
150 Here comes the directory listing.
drwxr-xr-x    2 0        0               6 May 14  2019 pub
226 Directory send OK.
vsftpd配置文件常用配置项
[root@test ~]# egrep -v "^$|#" /etc/vsftpd/vsftpd.conf
anonymous_enable=YES        ## 是否允许匿名用户访问
local_enable=YES            ## 系统用户是否可以访问
write_enable=YES            ## 系统用户是否有写权限
local_umask=022             ## 本地文件系统的文件掩码
dirmessage_enable=YES
xferlog_enable=YES
connect_from_port_20=YES
xferlog_std_format=YES
listen=NO
listen_ipv6=YES
pam_service_name=vsftpd
userlist_enable=YES
pasv_address=47.105.206.74
测试系统用户配置项
write_enable 控制本地用户的写权限
write_enable=NO
Name (47.105.206.74:root): test1
331 Please specify the password.
Password:
230 Login successful.                         ## 系统用户是可以登录的
Remote system type is UNIX.
Using binary mode to transfer files.
ftp> ls
227 Entering Passive Mode (47,105,206,74,110,174).
150 Here comes the directory listing.
226 Directory send OK.
ftp> pwd                                     ## 系统用户登录后,在其家目录下
257 "/home/test1" is the current directory

ftp> mkdir test                               ## write_enable=NO设置为NO时,系统用户不能增、删、改文件
550 Permission denied.

## 系统用户可以自由切换目录,除了其他用户的家目录
ftp> cd /
250 Directory successfully changed.
ftp> ls
227 Entering Passive Mode (47,105,206,74,165,79).
150 Here comes the directory listing.
lrwxrwxrwx    1 0        0               7 May 11  2019 bin -> usr/bin
dr-xr-xr-x    5 0        0            4096 Feb 18 08:10 boot
drwxr-xr-x   19 0        0            2940 Apr 15 07:16 dev
drwxr-xr-x   98 0        0            8192 Apr 15 09:34 etc
drwxr-xr-x    5 0        0              48 Apr 15 09:34 home
lrwxrwxrwx    1 0        0               7 May 11  2019 lib -> usr/lib
lrwxrwxrwx    1 0        0               9 May 11  2019 lib64 -> usr/lib64
drwxr-xr-x    2 0        0               6 May 11  2019 media
drwxr-xr-x    2 0        0               6 May 11  2019 mnt
drwxr-xr-x    2 0        0               6 May 11  2019 opt
dr-xr-xr-x  104 0        0               0 Apr 15 07:16 proc
dr-xr-x---    5 0        0             190 Apr 15 11:28 root
drwxr-xr-x   30 0        0             880 Apr 15 07:17 run
lrwxrwxrwx    1 0        0               8 May 11  2019 sbin -> usr/sbin
drwxr-xr-x    2 0        0               6 May 11  2019 srv
dr-xr-xr-x   13 0        0               0 Apr 15  2020 sys
drwxrwxrwt    3 0        0             143 Apr 15 10:44 tmp
drwxr-xr-x   12 0        0             144 Feb 18 07:58 usr
drwxr-xr-x   21 0        0            4096 Feb 18 00:03 var
226 Directory send OK.
ftp> cd /root
550 Failed to change directory.
write_enable=YES
ftp> mkdir test
257 "/home/test1/test" created
ftp> ls
227 Entering Passive Mode (47,105,206,74,82,233).
150 Here comes the directory listing.
drwxr-xr-x    2 1002     1002            6 Apr 15 11:41 test
226 Directory send OK.
ftp> rmdir test
250 Remove directory operation successful.
chroot_local_user 将本地用户限制在自己的家目录下
在3.0.2版本以上的,需要用户家目录没有写权限,才可以,否则连接时,到输入密码后验证失败,一直卡在登录密码那里
有以下两种解决办法:
-
去除掉用户根目录的写权限
-
在配置文件中增加allow_writeable_chroot=YES
[root@master ~]# ftp 47.105.206.74
Connected to 47.105.206.74 (47.105.206.74).
220 (vsFTPd 3.0.3)
Name (47.105.206.74:root): test3
331 Please specify the password.
Password:
230 Login successful.
Remote system type is UNIX.
Using binary mode to transfer files.
ftp> pwd
257 "/" is the current directory
ftp> cd /etc/
550 Failed to change directory.
chroot_list_enable=YES chroot_list_file=/etc/vsftpd/chroot_list 将chroot_list文件中指定的用户锁定在其家目录中
这两个选项一样需要allow_writeable_chroot=YES
[root@test ~]# vim /etc/vsftpd/chroot_list
test1

[root@master ~]# ftp 47.105.206.74
Connected to 47.105.206.74 (47.105.206.74).
220 (vsFTPd 3.0.3)
Name (47.105.206.74:root): test1
331 Please specify the password.
Password:
230 Login successful.
Remote system type is UNIX.
Using binary mode to transfer files.
ftp> pwd
257 "/" is the current directory
ftp> cd /etc
550 Failed to change directory.
匿名用户配置项
anon_upload_enable 是否允许匿名用户上传文件
设置为NO时
[root@master ~]# ftp 47.105.206.74
Connected to 47.105.206.74 (47.105.206.74).
220 (vsFTPd 3.0.3)
Name (47.105.206.74:root): ftp
331 Please specify the password.
Password:
230 Login successful.
Remote system type is UNIX.
Using binary mode to transfer files.

ftp> lcd /etc
Local directory now /etc
ftp> put passwd
local: passwd remote: passwd
227 Entering Passive Mode (47,105,206,74,177,44).
550 Permission denied.                     ## 上传被拒绝
设置为YES时
[root@master ~]# ftp 47.105.206.74
Connected to 47.105.206.74 (47.105.206.74).
220 (vsFTPd 3.0.3)
Name (47.105.206.74:root): ftp
331 Please specify the password.
Password:
230 Login successful.
Remote system type is UNIX.
Using binary mode to transfer files.
ftp> lcd /etc
Local directory now /etc
ftp> put fstab
local: fstab remote: fstab
227 Entering Passive Mode (47,105,206,74,161,51).
553 Could not create file.            ## 可以看到,此时是可以上传的,但是由于权限问题报错了
[root@test ~]# ll -d /var/ftp/
drwxr-xr-x. 3 root root 17 Apr 15 15:29 /var/ftp/        ## 此目录是用户的根目录,不能修改权限

[root@test ~]# ll /var/ftp/
total 0
drwxr-xr-x 2 root root 6 May 14  2019 pub  ## 可以修改这个目录的权限,也可以创建个目录后setfacl -m u:ftp:rwx 目录名
修改pub目录权限
[root@test ~]# chmod 757 /var/ftp/pub/

ftp> lcd /etc
Local directory now /etc

ftp> cd pub
250 Directory successfully changed.

ftp> put passwd
local: passwd remote: passwd
227 Entering Passive Mode (47,105,206,74,254,224).
150 Ok to send data.
226 Transfer complete.
1233 bytes sent in 0.000288 secs (4281.25 Kbytes/sec)
anon_mkdir_write_enable 控制匿名用户的创建目录权限
设置YES时,匿名用户有创建目录权限
[root@master ~]# ftp 47.105.206.74
Connected to 47.105.206.74 (47.105.206.74).
220 (vsFTPd 3.0.3)
Name (47.105.206.74:root): ftp
331 Please specify the password.
Password:
230 Login successful.
Remote system type is UNIX.
Using binary mode to transfer files.
ftp> cd pub
250 Directory successfully changed.
ftp> mkdir test
257 "/pub/test" created
anon_other_write_enable 控制匿名用户是否有删除权限等
ftp> cd pub
250 Directory successfully changed.
ftp> ls
227 Entering Passive Mode (47,105,206,74,142,168).
150 Here comes the directory listing.
-rw-------    1 14       50           1233 Apr 15 14:12 passwd
drwx------    2 14       50              6 Apr 15 14:19 test
226 Directory send OK.
ftp> rmdir test
250 Remove directory operation successful.
日志配置
xferlog_enable=YES     ## 是否开启传输日志

xferlog_file=/var/log/xferlog       ## 传输日志文件路径

xferlog_std_format=YES          ## 传输日志的格式
日志格式见 我的另一篇博客 https://www.cnblogs.com/zh-dream/p/12730203.html
ftp文件系统属性
#chown_uploads=YES           ## 是否改变上传文件的属性
#chown_username=whoever
连接超时配置项
#idle_session_timeout=600           ## 空闲会话超时时间

#data_connection_timeout=120        ## 数据连接超时时间
服务的监听
listen=YES                 ## 监听IPv4地址
#listen_ipv6=YES           ## 此项需要注意,如果开启的话,需要考虑自己的网卡是否支持IPv6,不支持的话 启动会报错
用户认证配置
pam_service_name=vsftpd
userlist_enable=YES
userlist_deny=YES      ## 默认为YES,表示黑名单,设置为NO时,表示白名单。如果userlist_enable启用,除非显式的在userlist_file中指定了用户,否则用户被拒绝登录。当用户登录的被拒绝时候,不会寻求用户输入密码。也就是验证用户名的时候就拒绝了
userlist_file=/etc/vsftpd/user_list ## 默认文件/etc/vsftpd/user_list  ##在此文件中的用户才可以登录
对应的配置文件
[root@master ~]# vim /etc/pam.d/vsftpd
#%PAM-1.0
session    optional     pam_keyinit.so    force revoke
auth       required     pam_listfile.so item=user sense=deny file=/etc/vsftpd/ftpusers onerr=succeed
auth       required     pam_shells.so
auth       include      password-auth
account    include      password-auth
session    required     pam_loginuid.so
session    include      password-auth
[root@master security]# cat /etc/vsftpd/ftpusers         ## 黑名单文件
# Users that are not allowed to login via ftp
root
bin
daemon
adm
lp
sync
shutdown
halt
mail
news
uucp
operator
games
nobody
[root@master vsftpd]# cat user_list
# vsftpd userlist
# If userlist_deny=NO, only allow users in this file
# If userlist_deny=YES (default), never allow users in this file, and
# do not even prompt for a password.
# Note that the default vsftpd pam config also checks /etc/vsftpd/ftpusers
# for users that are denied.
root
bin
daemon
adm
lp
sync
shutdown
halt
mail
news
uucp
operator
games
nobody
连接相关配置
max_clients       ## 最大客户端连接数
max_per_ip       ##每IP的最大连接数
anon_max_rate     ##匿名用户的最大传输速率,单位bytes/s

local_max_rate    ##系统用户的最大传输速率
被动模式
pasv_enable=YES   ##默认YES,是否开启被动模式

pasv_min_port=NUM    ##与下面 pasv_max_port同时作用,指定了被动模式,服务器端数据传输时监听的端口范围

pasv_max_port=NUM

pasv_address=公网地址   ##位于nat后端的服务器如果不指定,会导致无法访问ftp服务器
虚拟用户配置项
虚拟用户在映射到系统用户的时候,可以具有不同的访问权限,需要通过匿名用户的控制参数进行指定,有两种方式:
第一种方式:写在文件中,然后编译成二进制格式
  其中奇数行为用户名,其下一行为密码,每添加一个用户,都需要编译一次

第二种方式:使用关系型数据库、ldap等软件进行认证
  ①对于数据库mysql,需要创建一张用户表,然后在表中插入用户名和密码。在数据库服务端进行授权ftp服务器可以访问这个认证库,需要安装pam_mysql

  ②在vsftpd端,需要在/etc/pam.d目录下建立认证文件,在文件中添加如下内容:

  auth required  /lib64/security/pam_mysql.so user=USERNAME passwd=PASSWORD host=MYSQL_HOST db=AUTH_DB table=AUTH_TABLE usercolumn=USER_COL passwdcolumn=PASSWD_COL crypy=0

  account required /lib64/security/pam_mysql.so user=USERNAME passwd=PASSWORD host=MYSQL_HOST db=AUTH_DB table=AUTH_TABLE usercolumn=USER_COL passwdcolumn=PASSWD_COL crypy=0
PS: USERNAME 为登录mysql的用户,PASSWORD 为该用户的密码,MYSQL_HOST 为mysql服务器地址,AUTH_DB 认证的库,AUTH_TABLE 认证所用的表,USER_COL 为认证的用户名,PASSWD_COL 为该认证用户的密码,crypy为加密方式
       ③添加一个虚拟用户

  ④编辑vsftpd配置文件

    anonymous_enable=YES

    local_enable=YES

    write_enable=YES
    anon_upload_enable=NO
    anon_mkdir_write_enable=NO

    chroot_local_user=YES

     pam_service_name=第二步中创建的文件名
   guest_enable=YES
   guest_username=第三步创建的用户名
其他配置项
dirmessage_enable=YES 登录后切换到某个目录,给予用户的提示
[root@master ~]# vim /var/ftp/pub/.message
hahahahahaha
[root@master ~]# systemctl restart vsftpd

[root@node03 ~]# ftp 10.0.0.50
Connected to 10.0.0.50 (10.0.0.50).
220 (vsFTPd 3.0.2)
Name (10.0.0.50:root): ftp
331 Please specify the password.
Password:
230 Login successful.
Remote system type is UNIX.
Using binary mode to transfer files.

ftp> cd pub
250-hahahahahaha
250 Directory successfully changed
ftp的常见问题
ftp所有用户的家目录权限不能更改,否则服务及时启动了,用户也登录不了,会出现下面的现象,输入完用户名,两次回车后,就卡着不动了。
[root@test ~]# chmod 777 /var/ftp
[root@test ~]# chmod 755 /home/test1

抓包可以看出

使用vsftpd命令启动服务的时候,如果重启使用systemctl的unit脚本文件,会无法重启
[root@test ~]# vsftpd
[root@test ~]# ss -lntp
State  Recv-Q  Send-Q    Local Address:Port   Peer Address:Port
LISTEN 0       128             0.0.0.0:5355        0.0.0.0:*      users:(("systemd-resolve",pid=873,fd=13))
LISTEN 0       128             0.0.0.0:22          0.0.0.0:*      users:(("sshd",pid=918,fd=5))
LISTEN 0       128                [::]:5355           [::]:*      users:(("systemd-resolve",pid=873,fd=15))
LISTEN 0       32                    *:21                *:*      users:(("vsftpd",pid=1396,fd=3))
[root@test ~]# systemctl restart vsftpd
Job for vsftpd.service failed because the control process exited with error code.
See "systemctl status vsftpd.service" and "journalctl -xe" for details.
根据提示看了一下日志
Apr 15 20:57:38 test systemd[1]: Reloading.
Apr 15 20:57:42 test systemd[1]: Starting Vsftpd ftp daemon...
-- Subject: Unit vsftpd.service has begun start-up
-- Defined-By: systemd
-- Support: https://access.redhat.com/support
--
-- Unit vsftpd.service has begun starting up.
Apr 15 20:57:45 test systemd[1]: vsftpd.service: Control process exited, code=exited status=1
Apr 15 20:57:45 test systemd[1]: vsftpd.service: Failed with result 'exit-code'.
Apr 15 20:57:45 test systemd[1]: Failed to start Vsftpd ftp daemon.
-- Subject: Unit vsftpd.service has failed
-- Defined-By: systemd
-- Support: https://access.redhat.com/support
--
-- Unit vsftpd.service has failed.
--
-- The result is RESULT.
我猜想肯定是启动脚本的问题,看了一下unit文件
[root@test ~]# vim /usr/lib/systemd/system/vsftpd.service
[Unit]
Description=Vsftpd ftp daemon
After=network.target

[Service]
Type=forking
ExecStart=/usr/sbin/vsftpd /etc/vsftpd/vsftpd.conf

[Install]
WantedBy=multi-user.target
尝试用unit中的启动方式启动
[root@test ~]# /usr/sbin/vsftpd /etc/vsftpd/vsftpd.conf
[root@test ~]# ss -lntp
State  Recv-Q  Send-Q    Local Address:Port   Peer Address:Port
LISTEN 0       128             0.0.0.0:5355        0.0.0.0:*      users:(("systemd-resolve",pid=873,fd=13))
LISTEN 0       128             0.0.0.0:22          0.0.0.0:*      users:(("sshd",pid=918,fd=5))
LISTEN 0       128                [::]:5355           [::]:*      users:(("systemd-resolve",pid=873,fd=15))
LISTEN 0       32                    *:21                *:*      users:(("vsftpd",pid=1707,fd=3))
再重启还是报错
[root@test ~]# systemctl restart vsftpd.service
Job for vsftpd.service failed because the control process exited with error code.
See "systemctl status vsftpd.service" and "journalctl -xe" for details.
用unit文件启动就好使
[root@test ~]# systemctl start vsftpd.service
[root@test ~]# ss -lntp
State  Recv-Q  Send-Q    Local Address:Port   Peer Address:Port
LISTEN 0       128             0.0.0.0:5355        0.0.0.0:*      users:(("systemd-resolve",pid=873,fd=13))
LISTEN 0       128             0.0.0.0:22          0.0.0.0:*      users:(("sshd",pid=918,fd=5))
LISTEN 0       128                [::]:5355           [::]:*      users:(("systemd-resolve",pid=873,fd=15))
LISTEN 0       32                    *:21                *:*      users:(("vsftpd",pid=1739,fd=3))
[root@test ~]# systemctl restart vsftpd.service
[root@test ~]# ss -lntp
State  Recv-Q  Send-Q    Local Address:Port   Peer Address:Port
LISTEN 0       128             0.0.0.0:5355        0.0.0.0:*      users:(("systemd-resolve",pid=873,fd=13))
LISTEN 0       128             0.0.0.0:22          0.0.0.0:*      users:(("sshd",pid=918,fd=5))
LISTEN 0       128                [::]:5355           [::]:*      users:(("systemd-resolve",pid=873,fd=15))
LISTEN 0       32                    *:21                *:*      users:(("vsftpd",pid=1767,fd=3))
与unit文件中的Type有关系
使用命令启动的时候只启动了一个进程
[root@node03 ~]# vsftpd
[root@node03 ~]# ps -ef|grep ftp
root       1732      1  0 09:58 ?        00:00:00 vsftpd
root       1734   1366  0 09:58 pts/0    00:00:00 grep --color=auto ftp
使用unit启动的时候fork了子进程
[root@test ~]# ps -ef|grep ftp
root      2210     1  0 21:51 ?        00:00:00 /usr/sbin/vsftpd /etc/vsftpd/vsftpd.conf
nobody    2211  2210  0 21:51 ?        00:00:00 /usr/sbin/vsftpd /etc/vsftpd/vsftpd.conf
ftp       2213  2211  0 21:51 ?        00:00:00 /usr/sbin/vsftpd /etc/vsftpd/vsftpd.conf