1 基础环境配置
1.1 webvirtmgr 简介
当KVM宿主机越来越多,需要对宿主机的状态进行调控,决定采用WebVirtMgr作为kvm虚拟化的web管理工具,图形化的WEB,让人能更方便的查看kvm 宿主机的情况和操作。
WebVirtMgr是非常清新的一个KVM管理平台,提供对宿主机和虚机的统一管理,它有别于kvm自带的图形管理工具(virtual machine manager),让kvm管理变得更为可视化,对中小型kvm应用场景带来了更多方便。
WebVirtMgr采用几乎纯Python开发,其前端是基于Python的Django,后端是基于Libvirt的Python接口,将日常kvm的管理操作变的更加的可视化。
webvirtmgr 特点
操作简单,易于使用
通过libvirt的API接口对kvm进行管理
提供对虚拟机生命周期管理
WebVirtMgr 功能
宿主机管理支持以下功能:
CPU利用率
内存利用率
网络资源池管理
存储资源池管理
虚拟机镜像
虚拟机克隆
快照管理
日志管理
虚机迁移
虚拟机管理支持以下功能:
CPU利用率
内存利用率
光盘管理
关/开/暂停虚拟机
安装虚拟机
VNC console连接
创建快照
1.2 操作系统环境配置
| 服务器ip |
主机名 |
用途 |
操作系统 |
配置 |
| 192.168.1.226 |
kvm1 |
Webvirtmgr节点 |
Centos7.7 |
4核8G |
| 192.168.1.227 |
kvm2 |
node1 kvm |
Centos7.7 |
16核32G |
1.关闭防火墙,selinux
#systemctl stop firewalld
#systemctl disable firewalld
#vim /etc/sysconfig/selinux
SELINUX=disabled
#setenforce 0
#getenforce
2.查看是否支持虚拟化
说明:半虚拟化是不能运行与安装KVM虚拟机的。
#egrep '(vmx|svm)' --color=always /proc/cpuinfo

3.配置本地源,阿里源
#挂载本地镜像
#mkdir -pv /mnt/dvd
#mount /dev/sr0  /mnt/dvd
#echo "mount /dev/sr0  /mnt/dvd"  >> /etc/rc.local
#chmod  +x /etc/rc.d/rc.local
#cat /etc/rc.d/rc.local

#配置本地源
#cd /etc/yum.repos.d
#mkdir -pv bak
#mv *.repo   bak/
#vim dvd.repo
[linux7]
name=centos7
baseurl=file:///mnt/dvd
gpgcheck=0
enable=1

#配置阿里源
#wget -O /etc/yum.repos.d/CentOS-Base.repo http://mirrors.aliyun.com/repo/Centos-7.repo
#wget -O /etc/yum.repos.d/epel.repo http://mirrors.aliyun.com/repo/epel-7.repo

#建立元数据缓存
#yum clean all
#yum repolist
#yum makecache
4.配置/etc/hosts
#hostnamectl set-hostname  kvm1
#hostnamectl set-hostname  kvm2
#echo -e "192.168.1.226    kvm1\n192.168.1.227    kvm2" >> /etc/hosts
5.关闭NetworkManager
#systemctl stop  NetworkManager
#systemctl disable NetworkManager
2 部署webvirtmgr
参考官网:https://github.com/retspen/webvirtmgr/wiki/Install-WebVirtMgr
2.1 安装依赖包
注意:以下都在kvm1(192.168.1.226)主机上操作;
#yum install git python-pip libvirt-python libxml2-python python-websockify supervisor nginx net-tools libvirt-client -y
2.2下载webvirtmgr代码
从git-hub中下载相关的webvirtmgr代码
#cd /usr/local/src/
#git clone git://github.com/retspen/webvirtmgr.git
#ls
2.3 安装webvirtmgr
#cd webvirtmgr/
#pip install -r requirements.txt

注意:如果上面的命令执行中报错了,超时之类的,请更换有效的DNS比如阿里的DNS1:233.5.5.5或233.6.6.6。
2.4 检查sqlite3
说明:自带不需要安装,导入模块检查一下
#python
Python 2.7.5 (default, Aug  7 2019, 00:51:29)
[GCC 4.8.5 20150623 (Red Hat 4.8.5-39)] on linux2
Type "help", "copyright", "credits" or "license" for more information.
>>> import sqlite3
>>> exit()
2.5 初始化账号
#cd /usr/local/src/webvirtmgr
#./manage.py syncdb
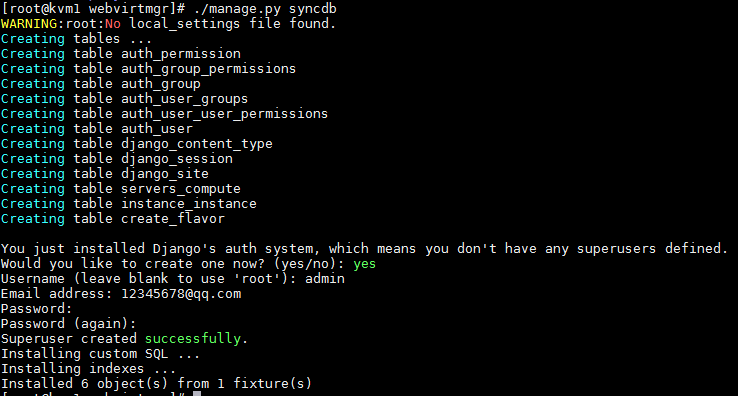
账号密码:admin/123
2.6 拷贝web到相关目录
# mkdir -pv /var/www
# cp -r /usr/local/src/webvirtmgr /var/www/webvirtmgr

#更改所属主,属组
#chown -R nginx:nginx /var/www/webvirtmgr
2.7 编辑nginx配置文件
#备份原有配置文件
#cd /etc/nginx/
#mkdir -pv bak
#cp -apr nginx.conf   bak/
#cp -apr nginx.conf.default  nginx.conf

#修改主配置文件
# vi nginx.conf
添加这行代码: include /etc/nginx/conf.d/*.conf;

#cat nginx.conf
#user  nobody;
worker_processes  1;

#error_log  logs/error.log;
#error_log  logs/error.log  notice;
#error_log  logs/error.log  info;

#pid        logs/nginx.pid;


events {
    worker_connections  1024;
}


http {
    include       mime.types;
    default_type  application/octet-stream;
    include /etc/nginx/conf.d/*.conf;

    #log_format  main  '$remote_addr - $remote_user [$time_local] "$request" '
    #                  '$status $body_bytes_sent "$http_referer" '
    #                  '"$http_user_agent" "$http_x_forwarded_for"';

    #access_log  logs/access.log  main;

    sendfile        on;
    #tcp_nopush     on;

    #keepalive_timeout  0;
    keepalive_timeout  65;

    #gzip  on;

    server {
        listen       80;
        server_name  localhost;

        #charset koi8-r;

        #access_log  logs/host.access.log  main;

        location / {
            root   html;
            index  index.html index.htm;
        }

        #error_page  404              /404.html;

        # redirect server error pages to the static page /50x.html
        #
        error_page   500 502 503 504  /50x.html;
        location = /50x.html {
            root   html;
        }

        # proxy the PHP scripts to Apache listening on 127.0.0.1:80
        #
        #location ~ \.php$ {
        #    proxy_pass   http://127.0.0.1;
        #}

        # pass the PHP scripts to FastCGI server listening on 127.0.0.1:9000
        #
        #location ~ \.php$ {
        #    root           html;
        #    fastcgi_pass   127.0.0.1:9000;
        #    fastcgi_index  index.php;
        #    fastcgi_param  SCRIPT_FILENAME  /scripts$fastcgi_script_name;
        #    include        fastcgi_params;
        #}

        # deny access to .htaccess files, if Apache's document root
        # concurs with nginx's one
        #
        #location ~ /\.ht {
        #    deny  all;
        #}
    }


    # another virtual host using mix of IP-, name-, and port-based configuration
    #
    #server {
    #    listen       8000;
    #    listen       somename:8080;
    #    server_name  somename  alias  another.alias;

    #    location / {
    #        root   html;
    #        index  index.html index.htm;
    #    }
    #}


    # HTTPS server
    #
    #server {
    #    listen       443 ssl;
    #    server_name  localhost;

    #    ssl_certificate      cert.pem;
    #    ssl_certificate_key  cert.key;

    #    ssl_session_cache    shared:SSL:1m;
    #    ssl_session_timeout  5m;

    #    ssl_ciphers  HIGH:!aNULL:!MD5;
    #    ssl_prefer_server_ciphers  on;

    #    location / {
    #        root   html;
    #        index  index.html index.htm;
    #    }
    #}

}
2.8 添加 webvirtmgr.conf 配置文件
说明:该配置文件在原有路径下没有,直接添加即可;
#vim /etc/nginx/conf.d/webvirtmgr.conf
server {
listen 80 default_server;

server_name $hostname;
#access_log /var/log/nginx/webvirtmgr_access_log;

location /static/ {
root /var/www/webvirtmgr/webvirtmgr; # or /srv instead of /var
expires max;
}

location / {
proxy_pass http://127.0.0.1:8000;
proxy_set_header X-Real-IP $remote_addr;
proxy_set_header X-Forwarded-for $proxy_add_x_forwarded_for;
proxy_set_header Host $host:$server_port;
proxy_set_header X-Forwarded-Proto $remote_addr;
proxy_connect_timeout 600;
proxy_read_timeout 600;
proxy_send_timeout 600;
client_max_body_size 1024M; # Set higher depending on your needs
}
}
2.9 启动nginx
#检测配置文件,如果发现报错,需要处理;
#nginx -t

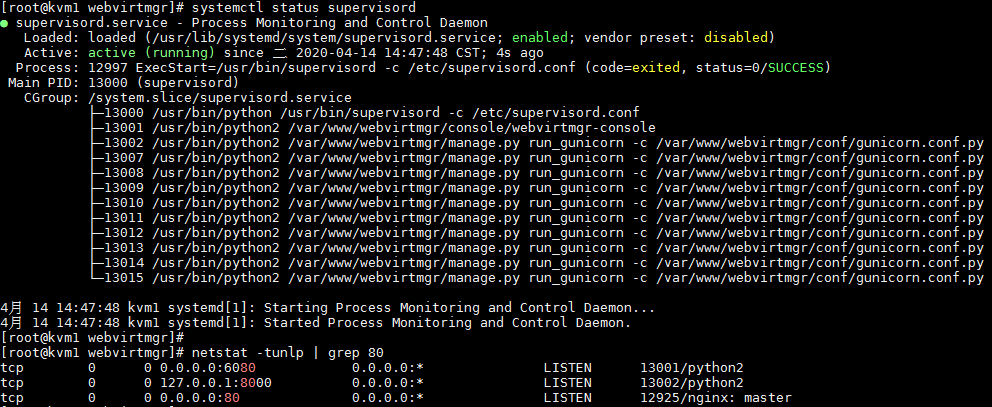
#systemctl start nginx
#systemctl  status  nginx
#netstat -tunlp | grep 80

2.10 设置supervisor
如果iptables防火墙开启的话,就必须要开通80、8000、6080端口访问。
#vim /etc/supervisord.conf
在文件末尾添加,注意将默认的python改为python2,因为上面只有用这个版本执行才不报错!
[program:webvirtmgr]
command=/usr/bin/python2 /var/www/webvirtmgr/manage.py run_gunicorn -c /var/www/webvirtmgr/conf/gunicorn.conf.py            //启动8000端口
directory=/var/www/webvirtmgr
autostart=true
autorestart=true
logfile=/var/log/supervisor/webvirtmgr.log
log_stderr=true
user=nginx

[program:webvirtmgr-console]
command=/usr/bin/python2 /var/www/webvirtmgr/console/webvirtmgr-console                               //启动6080端口(这是控制台vnc端口)
directory=/var/www/webvirtmgr
autostart=true
autorestart=true
stdout_logfile=/var/log/supervisor/webvirtmgr-console.log
redirect_stderr=true
检查配置文件
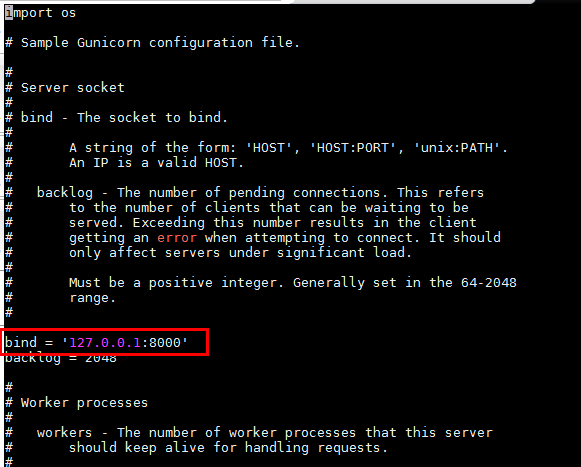
#vi /var/www/webvirtmgr/conf/gunicorn.conf.py
确保下面bind绑定的是本机的8000端口,这个在nginx配置中定义了,被代理的端口
2.11 设置开机自启
#设置开机自启
#systemctl enable supervisord.service
#systemctl enable nginx

#启动服务
#systemctl start supervisord
#systemctl status supervisord
2.12 浏览器访问
浏览器访问:
 账号密码:admin/123
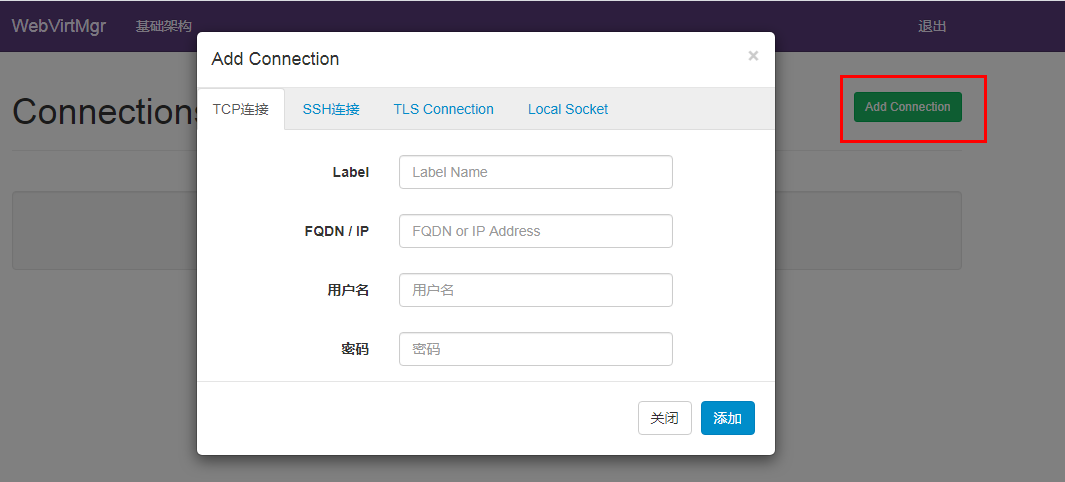
#配置连接
3 部署KVM
注意:以下都在kvm2(192.168.1.227)主机上操作
按照1.2操作,配置好基础环境;
3.1 安装kvm软件
#yum install qemu-kvm libvirt libvirt-python libguestfs-tools virt-install virt-manager python-virtinst libvirt-client virt-viewer -y

#启动libvirtd
#systemctl enable libvirtd && systemctl start libvirtd && systemctl  status libvirtd

#ln -s /usr/libexec/qemu-kvm  /usr/bin/qemu-kvm

#查看虚拟工具版本
#virsh --version
#virt-install --version

#测试
#virsh -c qemu:///system list

3.2 配置桥接网络
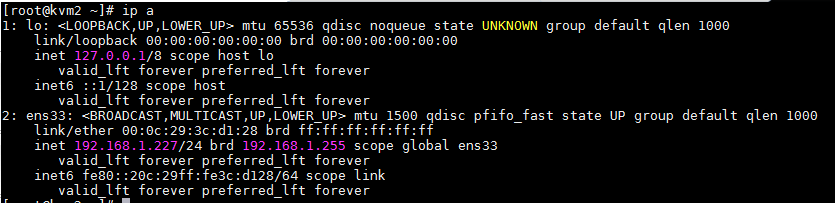
1.查看本机网络
#ip a
2.配置桥接网络
#cd /etc/sysconfig/network-scripts
#cat ifcfg-ens33
TYPE=Ethernet
PROXY_METHOD=none
BROWSER_ONLY=no
BOOTPROTO=none
DEFROUTE=yes
IPV4_FAILURE_FATAL=no
NAME=ens33
UUID=0bbd90e5-b6c2-4f9f-84ff-c7ceb961bae0
DEVICE=ens33
ONBOOT=yes
BRIDGE=br0
NM_CONTROLLED=no   //设置为no!让网卡不受networkmanager的控制

#cat ifcfg-br0
TYPE=Bridge
BOOTPROTO=none
DEVICE=br0
IPADDR=192.168.1.227
PREFIX=24
GATEWAY=192.168.1.254
DNS1=114.114.114.114
3.重启网卡
#/etc/init.d/network restart
4.查看网桥br0信息
# ifconfig
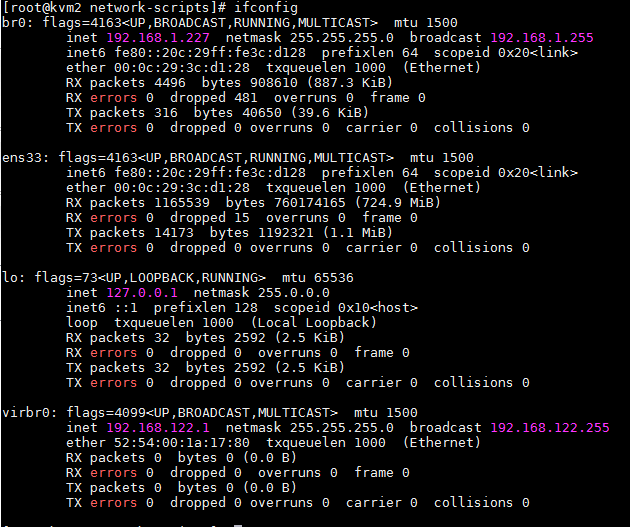
#virbr0虚拟网卡有没有都不影响虚拟机的使用,有办法可以将其删除,但是保留也不影响;
5.查看网桥
#brctl show

4 控制台和kvm节点交互配置
4.1生成密钥
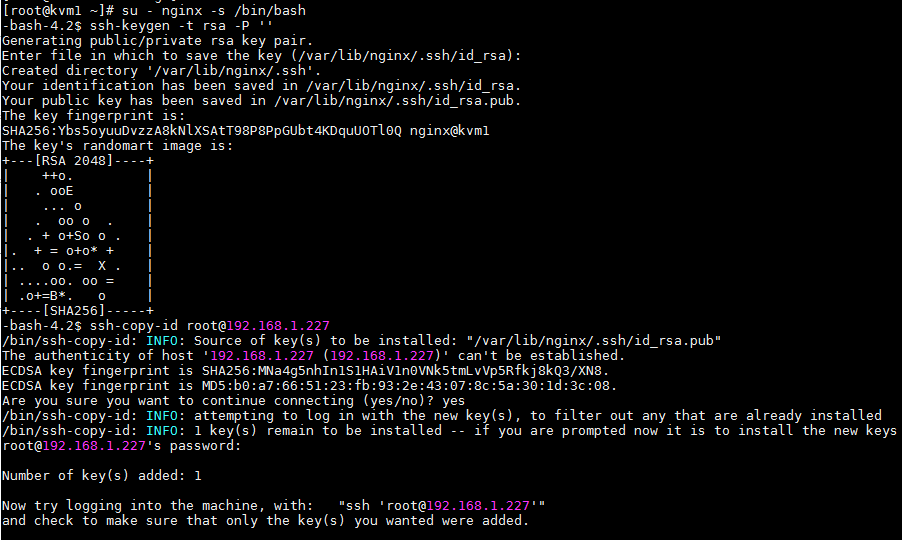
切换到 nginx 用户,生成密钥对,然后将公钥拷贝到 kvm主机节点,实现免密码登录,因为命令是通过nginx用户发送到kvm主机执行的。
Webvirtmgr(192.168.1.226)主机
#su - nginx -s /bin/bash
-bash-4.2$ ssh-keygen -t rsa -P ''   //之后按回车

#将密钥拷贝到 KVM主机,需要输入root密码
-bash-4.2$ ssh-copy-id [email protected]

注意:如果这里是非22端口则采用如下命令:
ssh-copy-id '-p [ssh端口] [email protected]'
#libvirt-client 测试访问
-bash-4.2$ virsh --connect qemu+ssh://[email protected]/system list --all

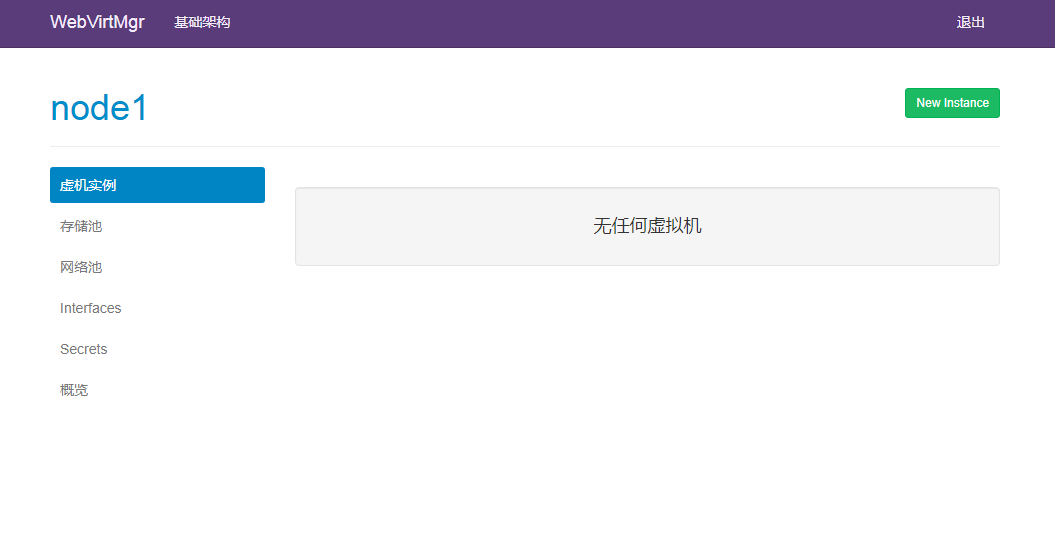
访问成功,接下来就可以在 web 页面进行操作了。
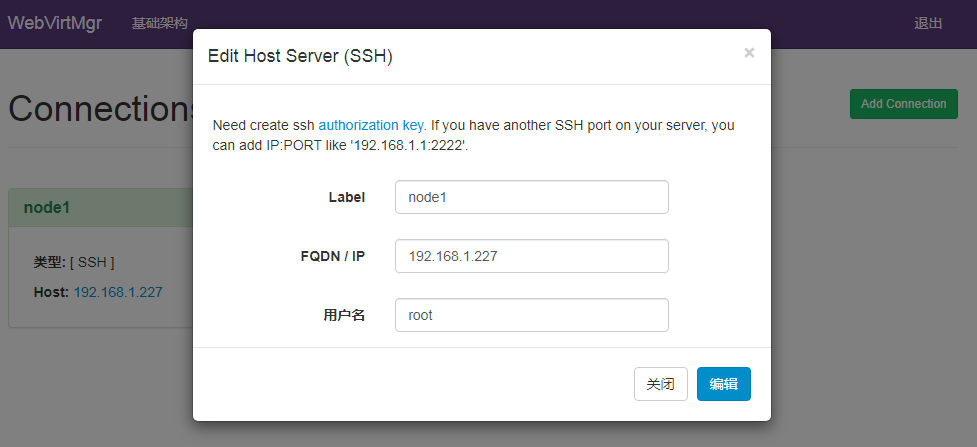
添加kvm主机192.168.1.227;
点进来如果没有任何报错,那么基本上已经添加主机成功了。
4.2创建网络池
说明:此步骤在已经创建桥接网络的基础上
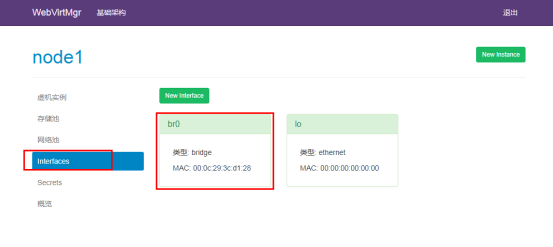
1.查看网络接口,已存在桥接网口
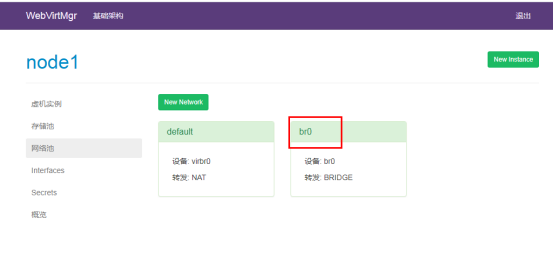
2.点击网络池--->New Network

添加新的网络

查看添加的网络
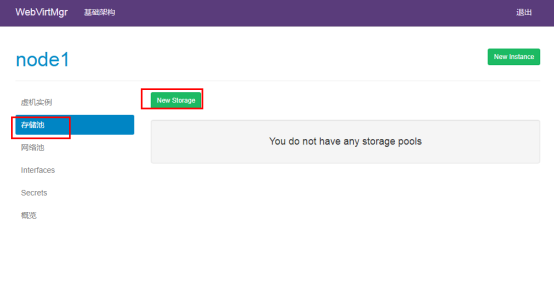
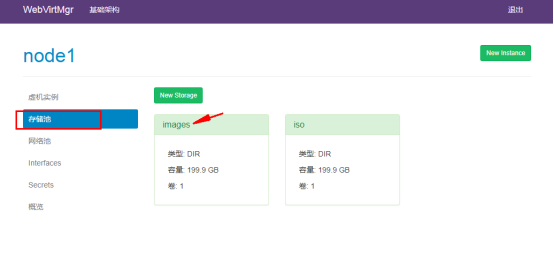
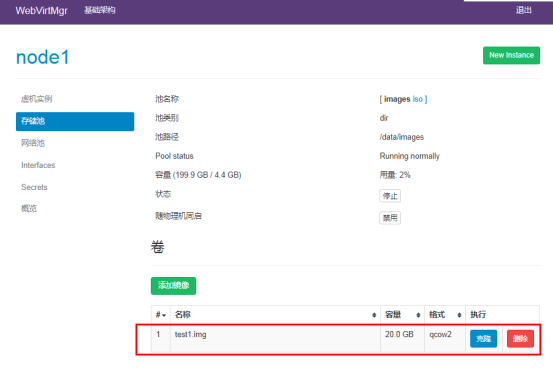
4.3创建存储池
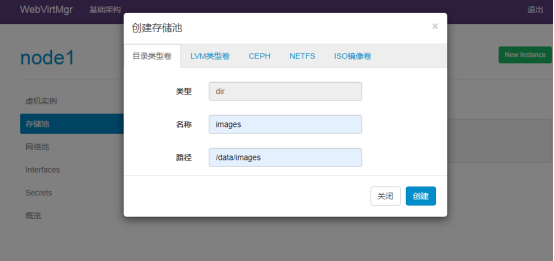
Kvm主机本地目录/data/images必须存在;

添加系统镜像
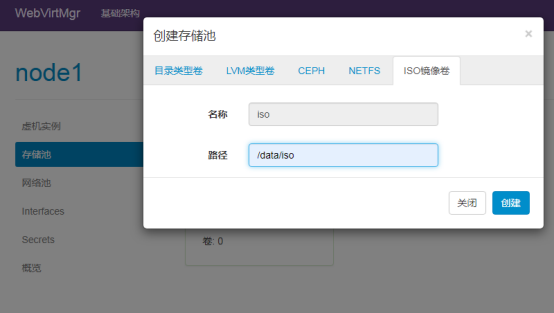
Kvm主机本地目录/data/iso下必须存在系统镜像;

4.4 创建虚拟机
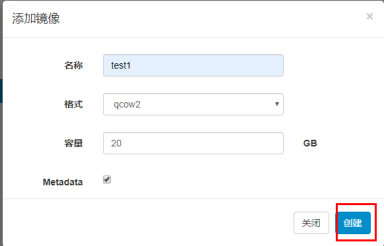
1.先创建一个qcow2空镜像;
点击进入images;

点击添加镜像;
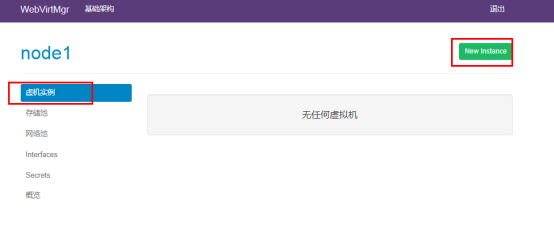
2.创建虚拟机实例
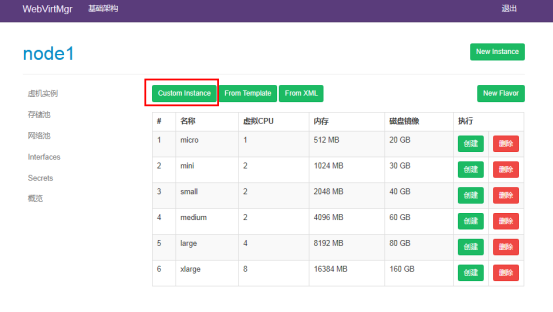
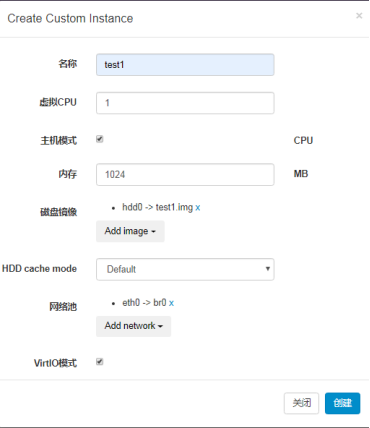
选择创建好的镜像文件test1和网络池br0;
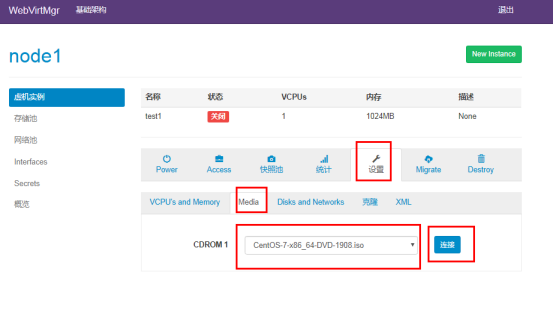
找到系统镜像并点击连接;
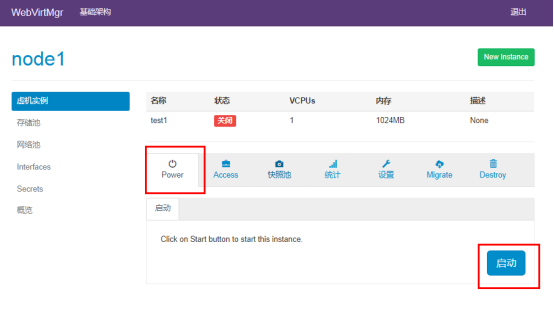
启动虚拟机;
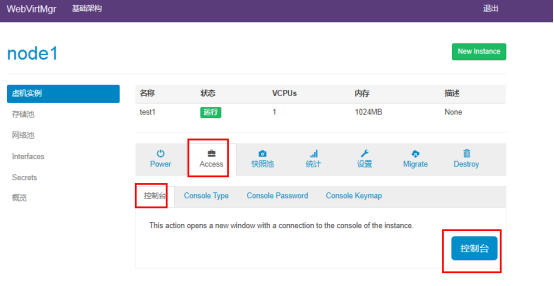
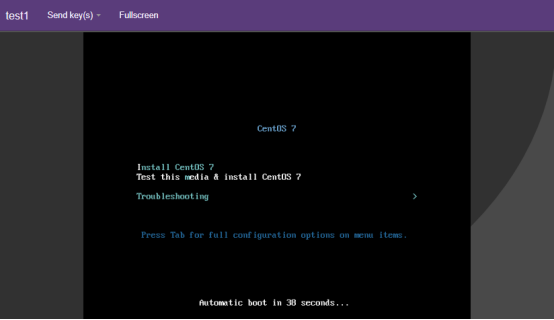
通过控制台进入看到虚拟机处于待安装操作系统的状态;
参考链接:
https://www.cnblogs.com/kevingrace/p/5737487.html
https://www.cnblogs.com/hukey/p/11344676.html
https://www.cnblogs.com/djlsunshine/p/11032494.html
https://www.cnblogs.com/nulige/p/9236191.html