微信公众号开发文档:https://mp.weixin.qq.com/wiki
微信公众平台接口调试工具:https://mp.weixin.qq.com/debug/cgi-bin/apiinfo
所有的开发接口API及接口调试都是基于以上两个官方文档地址.
前言.
这里引用文档中的描述
微信公众平台是运营者通过公众号为微信用户提供资讯和服务的平台,而公众平台开发接口则是提供服务的基础,开发者在公众平台网站中创建公众号、获取接口权限后,可以通过阅读本接口文档来帮助开发。
为了识别用户,每个用户针对每个公众号会产生一个安全的OpenID,如果需要在多公众号、移动应用之间做用户共通,则需前往微信开放平台,将这些公众号和应用绑定到一个开放平台账号下,绑定后,一个用户虽然对多个公众号和应用有多个不同的OpenID,但他对所有这些同一开放平台账号下的公众号和应用,只有一个UnionID,可以在用户管理-获取用户基本信息(UnionID机制)文档了解详情。
请开发者注意:
1、微信公众平台开发是指为微信公众号进行业务开发,为移动应用、PC端网站、公众号第三方平台(为各行各业公众号运营者提供服务)的开发,请前往微信开放平台接入。
2、在申请到认证公众号之前,你可以先通过测试号申请系统,快速申请一个接口测试号,立即开始接口测试开发。 3、在开发过程中,可以使用接口调试工具来在线调试某些接口。
4、每个接口都有每日接口调用频次限制,可以在公众平台官网-开发者中心处查看具体频次。 5、在开发出现问题时,可以通过接口调用的返回码,以及报警排查指引(在公众平台官网-开发者中心处可以设置接口报警),来发现和解决问题。
6、公众平台以access_token为接口调用凭据,来调用接口,所有接口的调用需要先获取access_token,access_token在2小时内有效,过期需要重新获取,但1天内获取次数有限,开发者需自行存储,详见获取接口调用凭据(access_token)文档。
7、公众平台接口调用仅支持80端口。
springMvc后台服务器的搭建.
使用idea搭建一个基于springmvc的demo项目,新建好maven项目后,首先是配置web.xml文件
1.项目搭建
web.xml文件的配置
<?xml version="1.0" encoding="utf-8"?>
<web-app xmlns:xsi="http://www.w3.org/2001/XMLSchema-instance" xmlns="http://java.sun.com/xml/ns/javaee"
         xsi:schemaLocation="http://java.sun.com/xml/ns/javaee http://java.sun.com/xml/ns/javaee/web-app_3_0.xsd"
         id="WebApp_ID" version="3.0">
<context-param>
  <param-name>contextConfigLocation</param-name>
  <param-value>classpath:spring-context.xml</param-value>
</context-param>

<listener>
  <listener-class>org.springframework.web.context.ContextLoaderListener</listener-class>
</listener>

  <!-- 防止spring内存溢出监听器,比如quartz -->
  <listener>
    <listener-class>org.springframework.web.util.IntrospectorCleanupListener</listener-class>
  </listener>
  <listener>
    <listener-class>org.springframework.web.util.Log4jConfigListener</listener-class>
  </listener>

  <!-- 编码过滤器 -->
  <filter>
    <filter-name>encodingFilter</filter-name>
    <filter-class>org.springframework.web.filter.CharacterEncodingFilter</filter-class>
    <init-param>
      <param-name>encoding</param-name>
      <param-value>UTF-8</param-value>
    </init-param>
  </filter>
  <filter-mapping>
    <filter-name>encodingFilter</filter-name>
    <url-pattern>/*</url-pattern>
  </filter-mapping>

  <!-- spring mvc servlet-->
<servlet>
  <servlet-name>springMvc</servlet-name>
  <servlet-class>org.springframework.web.servlet.DispatcherServlet</servlet-class>
  <init-param>
    <param-name>contextConfigLocation</param-name>
    <param-value>classpath:spring-mvc.xml</param-value>
  </init-param>
  <load-on-startup>1</load-on-startup>
</servlet>
  <servlet-mapping>
    <servlet-name>springMvc</servlet-name>
    <url-pattern>/</url-pattern>
  </servlet-mapping>

</web-app>
一个简单的web.xml的配置,需要注意的是url-pattern 路径配置尽量配置成'/'或者*.do等 这中形式
接下来就是两个xml文件的配置
spring-context.xml
<?xml version="1.0" encoding="utf-8" ?>
<beans xmlns="http://www.springframework.org/schema/beans"
       xmlns:xsi="http://www.w3.org/2001/XMLSchema-instance"
       xmlns:context="http://www.springframework.org/schema/context"
       xsi:schemaLocation="http://www.springframework.org/schema/beans http://www.springframework.org/schema/beans/spring-beans.xsd http://www.springframework.org/schema/context http://www.springframework.org/schema/context/spring-context.xsd">
             <context:component-scan base-package="com.wx4jdemo.*"/>
</beans>
spring-mvc.xml
<?xml version="1.0" encoding="utf-8" ?>
<beans xmlns="http://www.springframework.org/schema/beans"
       xmlns:xsi="http://www.w3.org/2001/XMLSchema-instance"
       xmlns:mvc="http://www.springframework.org/schema/mvc"
       xmlns:context="http://www.springframework.org/schema/context"
       xsi:schemaLocation="http://www.springframework.org/schema/beans
           http://www.springframework.org/schema/beans/spring-beans.xsd
           http://www.springframework.org/schema/mvc
           http://www.springframework.org/schema/mvc/spring-mvc.xsd
           http://www.springframework.org/schema/context
           http://www.springframework.org/schema/context/spring-context.xsd">

    <!--注解驱动 -->
    <!--
        会自动注册RequestMappingHandlerMapping与RequestMappingHandlerAdapter两个Bean(spring3.0以后的版本),
       这是Spring MVC为@Controller分发请求所必需的,并且提供了数据绑定支持,
       @NumberFormatannotation支持,@DateTimeFormat支持,
        @Valid支持读写XML的支持(JAXB)和读写JSON的支持(默认Jackson)等功能。
      -->
    <mvc:annotation-driven/>
    <!-- 对静态资源文件的访问, 将无法mapping到Controller的path交给default servlet handler处理 -->
    <!--<mvc:default-servlet-handler />-->
    <!-- 自动扫描  @Controller-->
    <context:component-scan base-package="com.wx4jdemo.controller"/>
    <!-- 视图解析器 -->
    <bean class="org.springframework.web.servlet.view.InternalResourceViewResolver">
        <property name="prefix" value="/WEB-INF/jsp/"/>
        <property name="suffix" value=".jsp"></property>
    </bean>
</beans>
至此简单的demo案例代码写完,接下来需要做的就是将项目放到外网访问.
2.外网端口映射
这里使用https://natapp.cn/提供的客户端来做端口映射,在官网上注册后购买免费隧道.配置如下
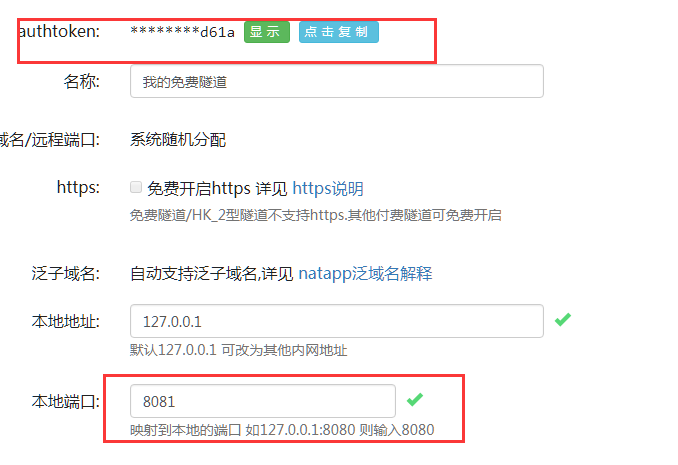
本地端口即是配置的将本地的端口映射到外网的80端口(公众平台接口调用仅支持80端口。).
配置复制上图中的authortoken,接着下载客户端到本地磁盘
打开CMD定位到客户端的目录,

输入一下命令: natapp -authtoken=6fa8db450371d61a
其中authtoken的值即为在https://natapp.cn/购买的免费隧道authtoken
配置成功出现一下日志即为成功:
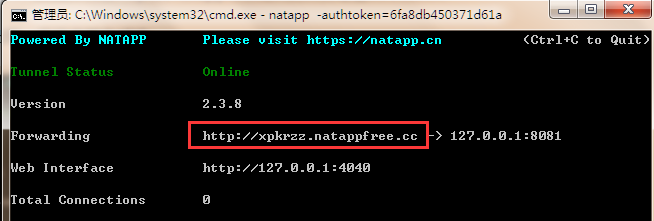
这里的Forwarding 对应的值(红框内)即为外网访问项目的地址,项目测试期间窗口不能关闭
3.服务器测试.
外网端口映射已经完成,接下来运行项目测试外网访问
(注意tomcat的访问端口需与natapp官网配置的本地端口保持一致) 本例中配置的为8081
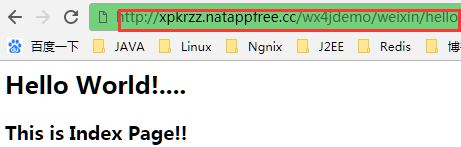
这里的/weixin/hello 是我配置的controller的RequestMapping的值.
后台服务器的搭建已经基本完成,由于外网映射工具为免费的,所以访问域名不是很优雅,这个可以后期在实战中购买阿里云或是腾讯云的服务器.