文章转载自2019年11月20日,如果比较贴近这个时间,此文可以参考。
一、概述
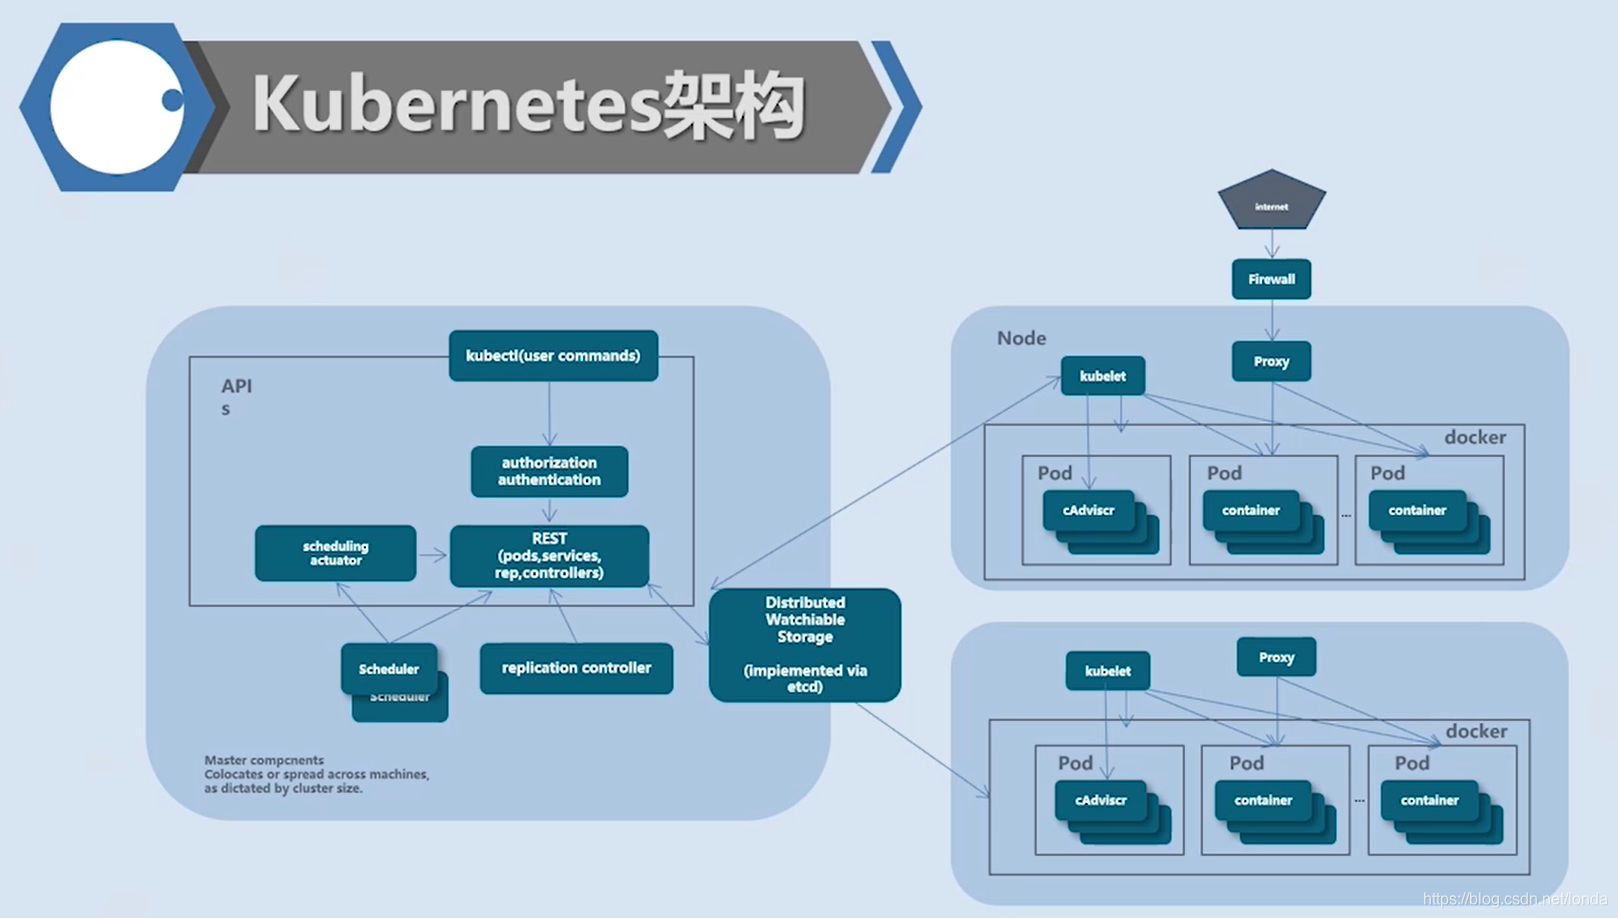
手工搭建 Kubernetes 集群是一件很繁琐的事情,为了简化这些操作,就产生了很多安装配置工具,如 Kubeadm ,Kubespray,RKE 等组件,我最终选择了官方的 Kubeadm 主要是不同的 Kubernetes 版本都有一些差异,Kubeadm 更新与支持的会好一些。Kubeadm 是 Kubernetes 官方提供的快速安装和初始化 Kubernetes 集群的工具,目前的还处于孵化开发状态,跟随 Kubernetes 每个新版本的发布都会同步更新, 强烈建议先看下官方的文档了解下各个组件与对象的作用。
https://kubernetes.io/docs/concepts/
https://kubernetes.io/docs/setup/independent/install-kubeadm/
https://kubernetes.io/docs/reference/setup-tools/kubeadm/kubeadm/
系统环境
| 系统 | 内核 | docker | ip | 主机名 |
|---|---|---|---|---|
| centos 7.6.1810 | 3.10.0-957.el7.x86_64 | 19.03.5 | 192.168.58.133 | k8smaster |
| centos 7.6.1810 | 3.10.0-957.el7.x86_64 | 19.03.5 | 192.168.58.134 | k8snode01 |
二、准备工作
关闭防火墙
如果各个主机启用了防火墙,需要开放Kubernetes各个组件所需要的端口,可以查看Installing kubeadm中的”Check required ports”一节。 这里简单起见在各节点禁用防火墙:
systemctl stop firewalld
systemctl disable firewalld
禁用SELINUX
# 临时禁用
setenforce 0
# 永久禁用
vim /etc/selinux/config    # 或者修改/etc/sysconfig/selinux
SELINUX=disabled
修改k8s.conf文件
cat <<EOF >  /etc/sysctl.d/k8s.conf
net.bridge.bridge-nf-call-ip6tables = 1
net.bridge.bridge-nf-call-iptables = 1
EOF
sysctl --system
关闭swap
# 临时关闭
swapoff -a
修改 /etc/fstab 文件,注释掉 SWAP 的自动挂载(永久关闭swap,重启后生效)
# 注释掉以下字段
/dev/mapper/cl-swap     swap                    swap    defaults        0 0
安装docker
这里就不再叙述了,请参考链接:
https://www.cnblogs.com/xiao987334176/p/11771657.html
修改主机名
vi /etc/hostnamek8smaster注意:主机名不能带下划线,只能带中划线
否则安装k8s会报错
could not convert cfg to an internal cfg: nodeRegistration.name: Invalid value: "k8s_master": a DNS-1123 subdomain must consist of lower case alphanumeric characters, '-' or '.', and must start and end with an alphanumeric character (e.g. 'example.com', regex used for validation is '[a-z0-9]([-a-z0-9]*[a-z0-9])?(\.[a-z0-9]([-a-z0-9]*[a-z0-9])?)*')三、安装kubeadm,kubelet,kubectl
在各节点安装kubeadm,kubelet,kubectl
修改yum安装源
cat <<EOF > /etc/yum.repos.d/kubernetes.repo
[kubernetes]
name=Kubernetes
baseurl=https://mirrors.aliyun.com/kubernetes/yum/repos/kubernetes-el7-x86_64/
enabled=1
gpgcheck=1
repo_gpgcheck=1
gpgkey=https://mirrors.aliyun.com/kubernetes/yum/doc/yum-key.gpg https://mirrors.aliyun.com/kubernetes/yum/doc/rpm-package-key.gpg
EOF
安装软件
目前最新版本是:1.16.3
yum install -y kubelet-1.16.3-0 kubeadm-1.16.3-0 kubectl-1.16.3-0
systemctl enable kubelet && systemctl start kubelet
以上,就是master和node都需要操作的部分。
四、初始化Master节点
运行初始化命令
kubeadm init --kubernetes-version=1.16.3 \
--apiserver-advertise-address=192.168.58.133 \
--image-repository registry.aliyuncs.com/google_containers \
--service-cidr=10.1.0.0/16 \
--pod-network-cidr=10.244.0.0/16
参数解释:
–kubernetes-version: 用于指定k8s版本;
–apiserver-advertise-address:用于指定kube-apiserver监听的ip地址,就是 master本机IP地址。
–pod-network-cidr:用于指定Pod的网络范围; 10.244.0.0/16
–service-cidr:用于指定SVC的网络范围;
–image-repository: 指定阿里云镜像仓库地址
这一步很关键,由于kubeadm 默认从官网k8s.grc.io下载所需镜像,国内无法访问,因此需要通过–image-repository指定阿里云镜像仓库地址
集群初始化成功后返回如下信息:
记录生成的最后部分内容,此内容需要在其它节点加入Kubernetes集群时执行。
输出如下:
[root@k8smaster /root]$kubeadm init --kubernetes-version=1.16.3 --apiserver-advertise-address=192.168.58.133 --image-repository registry.aliyuncs.com/google_containe
rs --service-cidr=10.1.0.0/16 --pod-network-cidr=10.244.0.0/16
[init] Using Kubernetes version: v1.16.3
[preflight] Running pre-flight checks
        [WARNING SystemVerification]: this Docker version is not on the list of validated versions: 19.03.5. Latest validated version: 18.09
[preflight] Pulling images required for setting up a Kubernetes cluster
[preflight] This might take a minute or two, depending on the speed of your internet connection
[preflight] You can also perform this action in beforehand using 'kubeadm config images pull'
[kubelet-start] Writing kubelet environment file with flags to file "/var/lib/kubelet/kubeadm-flags.env"
[kubelet-start] Writing kubelet configuration to file "/var/lib/kubelet/config.yaml"
[kubelet-start] Activating the kubelet service
[certs] Using certificateDir folder "/etc/kubernetes/pki"
[certs] Generating "ca" certificate and key
[certs] Generating "apiserver" certificate and key
[certs] apiserver serving cert is signed for DNS names [k8smaster kubernetes kubernetes.default kubernetes.default.svc kubernetes.default.svc.cluster.local] and IPs [10.1.0.1 192.168.58.133]
[certs] Generating "apiserver-kubelet-client" certificate and key
[certs] Generating "front-proxy-ca" certificate and key
[certs] Generating "front-proxy-client" certificate and key
[certs] Generating "etcd/ca" certificate and key
[certs] Generating "etcd/server" certificate and key
[certs] etcd/server serving cert is signed for DNS names [k8smaster localhost] and IPs [192.168.58.133 127.0.0.1 ::1]
[certs] Generating "etcd/peer" certificate and key
[certs] etcd/peer serving cert is signed for DNS names [k8smaster localhost] and IPs [192.168.58.133 127.0.0.1 ::1]
[certs] Generating "etcd/healthcheck-client" certificate and key
[certs] Generating "apiserver-etcd-client" certificate and key
[certs] Generating "sa" key and public key
[kubeconfig] Using kubeconfig folder "/etc/kubernetes"
[kubeconfig] Writing "admin.conf" kubeconfig file
[kubeconfig] Writing "kubelet.conf" kubeconfig file
[kubeconfig] Writing "controller-manager.conf" kubeconfig file
[kubeconfig] Writing "scheduler.conf" kubeconfig file
[control-plane] Using manifest folder "/etc/kubernetes/manifests"
[control-plane] Creating static Pod manifest for "kube-apiserver"
[control-plane] Creating static Pod manifest for "kube-controller-manager"
[control-plane] Creating static Pod manifest for "kube-scheduler"
[etcd] Creating static Pod manifest for local etcd in "/etc/kubernetes/manifests"
[wait-control-plane] Waiting for the kubelet to boot up the control plane as static Pods from directory "/etc/kubernetes/manifests". This can take up to 4m0s
[apiclient] All control plane components are healthy after 18.503711 seconds
[upload-config] Storing the configuration used in ConfigMap "kubeadm-config" in the "kube-system" Namespace
[kubelet] Creating a ConfigMap "kubelet-config-1.16" in namespace kube-system with the configuration for the kubelets in the cluster
[upload-certs] Skipping phase. Please see --upload-certs
[mark-control-plane] Marking the node k8smaster as control-plane by adding the label "node-role.kubernetes.io/master=''"
[mark-control-plane] Marking the node k8smaster as control-plane by adding the taints [node-role.kubernetes.io/master:NoSchedule]
[bootstrap-token] Using token: zqj4sl.5dlnxyew63pcc7lp
[bootstrap-token] Configuring bootstrap tokens, cluster-info ConfigMap, RBAC Roles
[bootstrap-token] configured RBAC rules to allow Node Bootstrap tokens to post CSRs in order for nodes to get long term certificate credentials
[bootstrap-token] configured RBAC rules to allow the csrapprover controller automatically approve CSRs from a Node Bootstrap Token
[bootstrap-token] configured RBAC rules to allow certificate rotation for all node client certificates in the cluster
[bootstrap-token] Creating the "cluster-info" ConfigMap in the "kube-public" namespace
[addons] Applied essential addon: CoreDNS
[addons] Applied essential addon: kube-proxy

Your Kubernetes control-plane has initialized successfully!

To start using your cluster, you need to run the following as a regular user:

  mkdir -p $HOME/.kube
  sudo cp -i /etc/kubernetes/admin.conf $HOME/.kube/config
  sudo chown $(id -u):$(id -g) $HOME/.kube/config

You should now deploy a pod network to the cluster.
Run "kubectl apply -f [podnetwork].yaml" with one of the options listed at:
  https://kubernetes.io/docs/concepts/cluster-administration/addons/

Then you can join any number of worker nodes by running the following on each as root:

kubeadm join 192.168.58.133:6443 --token zqj4sl.5dlnxyew63pcc7lp \
    --discovery-token-ca-cert-hash sha256:fcf730bb86251f0b086a3d43a0c1f6a35b632eee79f69e37554515a2d034d95d
配置kubectl工具
mkdir -p $HOME/.kube
sudo cp -i /etc/kubernetes/admin.conf $HOME/.kube/config
sudo chown $(id -u):$(id -g) $HOME/.kube/config
安装Calico
mkdir k8s
cd k8s
wget https://docs.projectcalico.org/v3.10/getting-started/kubernetes/installation/hosted/kubernetes-datastore/calico-networking/1.7/calico.yaml

## 将192.168.0.0/16修改ip地址为10.244.0.0/16
sed -i 's/192.168.0.0/10.244.0.0/g' calico.yaml
加载Calico
kubectl apply -f calico.yaml查看Pod状态
等待几分钟,确保所有的Pod都处于Running状态
[root@k8smaster /root/Documents/k8s]$kubectl get pod --all-namespaces -o wide
NAMESPACE     NAME                                       READY   STATUS    RESTARTS   AGE   IP               NODE        NOMINATED NODE   READINESS GATES
kube-system   calico-kube-controllers-6b64bcd855-29mx6   1/1     Running   0          81s   10.244.16.129    k8smaster   <none>           <none>
kube-system   calico-node-b7cc7                          1/1     Running   0          81s   192.168.58.133   k8smaster   <none>           <none>
kube-system   coredns-58cc8c89f4-95fc5                   1/1     Running   0          30m   10.244.16.131    k8smaster   <none>           <none>
kube-system   coredns-58cc8c89f4-cn2lc                   1/1     Running   0          30m   10.244.16.130    k8smaster   <none>           <none>
kube-system   etcd-k8smaster                             1/1     Running   0          30m   192.168.58.133   k8smaster   <none>           <none>
kube-system   kube-apiserver-k8smaster                   1/1     Running   0          30m   192.168.58.133   k8smaster   <none>           <none>
kube-system   kube-controller-manager-k8smaster          1/1     Running   0          30m   192.168.58.133   k8smaster   <none>           <none>
kube-system   kube-proxy-6l7kg                           1/1     Running   0          30m   192.168.58.133   k8smaster   <none>           <none>
kube-system   kube-scheduler-k8smaster                   1/1     Running   0          29m   192.168.58.133   k8smaster   <none>           <none>
确保 calico-kube-controllers ip地址是10.244.0.0/16 网段了。
设置开机启动
systemctl enable kubelet五、node加入集群
修改主机名
vi /etc/hostnamek8snode01加入节点
登录到node节点,确保已经安装了docker和kubeadm,kubelet,kubectl
kubeadm join 192.168.58.133:6443 --token zqj4sl.5dlnxyew63pcc7lp \
    --discovery-token-ca-cert-hash sha256:fcf730bb86251f0b086a3d43a0c1f6a35b632eee79f69e37554515a2d034d95d
设置开机启动
systemctl enable kubelet查看节点
登录到master,使用命令查看
[root@k8smaster /root/Documents/k8s]$kubectl get nodes -o wide
NAME        STATUS   ROLES    AGE   VERSION   INTERNAL-IP      EXTERNAL-IP   OS-IMAGE                KERNEL-VERSION          CONTAINER-RUNTIME
k8smaster   Ready    master   64m   v1.16.3   192.168.58.133   <none>        CentOS Linux 7 (Core)   3.10.0-957.el7.x86_64   docker://19.3.5
k8snode01   Ready    <none>   73s   v1.16.3   192.168.58.134   <none>        CentOS Linux 7 (Core)   3.10.0-957.el7.x86_64   docker://19.3.5
六、创建Pod
创建nginx
kubectl create deployment nginx --image=nginx
kubectl expose deployment nginx --port=80 --type=NodePort
查看pod和svc
[root@k8smaster /root/Documents/k8s]$kubectl get pod,svc -o wide
NAME                         READY   STATUS    RESTARTS   AGE   IP              NODE        NOMINATED NODE   READINESS GATES
pod/nginx-86c57db685-28qkb   1/1     Running   0          37s   10.244.249.65   k8snode01   <none>           <none>

NAME                 TYPE        CLUSTER-IP     EXTERNAL-IP   PORT(S)        AGE   SELECTOR
service/kubernetes   ClusterIP   10.1.0.1       <none>        443/TCP        81m   <none>
service/nginx        NodePort    10.1.137.110   <none>        80:31339/TCP   31s   app=nginx
允许外网访问nodePort
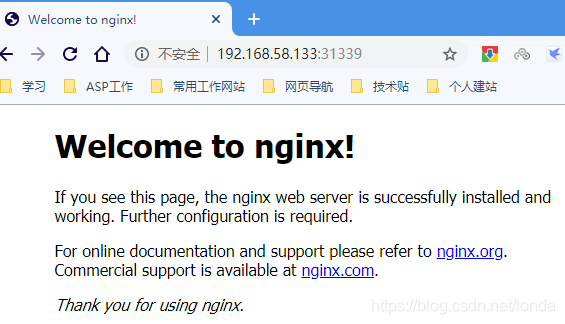
iptables -P FORWARD ACCEPT测试访问
使用master ip+nodeport端口方式访问
http://192.168.58.133:31339/效果如下:
命令补全
(仅master)
yum install -y bash-completion

source <(kubectl completion bash)
echo "source <(kubectl completion bash)" >> ~/.bashrc
source  ~/.bashrc
必须退出一次,再次登录,就可以了
七、使用yml发布应用
以 flaskapp 为例子
flaskapp-deployment.yaml
apiVersion: apps/v1
kind: Deployment
metadata:
  name: flaskapp-1
spec:
  selector:
    matchLabels:
      run: flaskapp-1
  replicas: 1
  template:
    metadata:
      labels:
        run: flaskapp-1
    spec:
      containers:
      - name: flaskapp-1
        image: jcdemo/flaskapp
        ports:
        - containerPort: 5000
flaskapp-service.yaml
apiVersion: v1
kind: Service
metadata:
  name: flaskapp-1
  labels:
    run: flaskapp-1
spec:
  type: NodePort
  ports:
  - port: 5000
    name: flaskapp-port
    targetPort: 5000
    protocol: TCP
    nodePort: 30005
  selector:
    run: flaskapp-1
加载yml文件
kubectl apply -f flaskapp-service.yaml
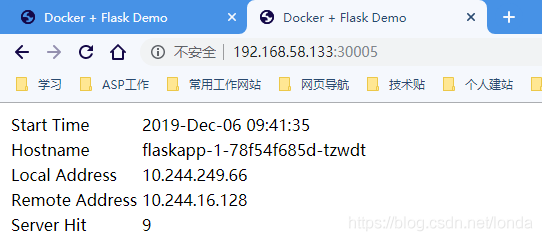
kubectl apply -f flaskapp-deployment.yaml 访问页面
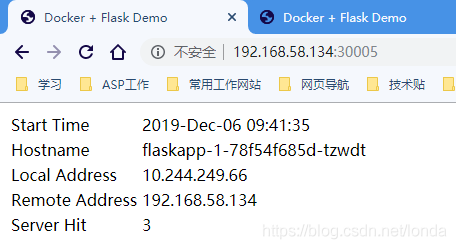
使用master ip+nodeport访问
http://192.168.58.133:30005/效果如下:
注意:使用node节点ip+nodeport也可以访问。
本文参考链接:
https://yq.aliyun.com/articles/626118
https://blog.csdn.net/fenglailea/article/details/88745642
