Hystrix仪表板介绍
Hystrix仪表板使您可以实时监视Hystrix指标。
可以使用此仪表板时,通过减少发现和恢复运营事件所需的时间来改善其运营。大多数生产事件的持续时间(由于Hystrix而已经不那么频繁了)变得更短了,并且影响减小了,这是由于Hystrix仪表板提供了对系统行为的实时洞察力。
Hystrix提供了对于微服务调用状态的监控信息,但是需要结合spring-boot-actuator模块一起使用。Hystrix Dashboard是Hystrix的一个组件,Hystrix Dashboard提供一个断路器的监控面板,可以使我们更好的监控服务和集群的状态
Hystrix仪表板使用
搭建Hystrix仪表板项目
1、新建项目(test-springcloud-hystrix7979),引入依赖:
1 <!-- hystrix-dashboard -->
2 <dependency>
3     <groupId>org.springframework.cloud</groupId>
4     <artifactId>spring-cloud-starter-netflix-hystrix-dashboard</artifactId>
5 </dependency>
完整pom文件如下:


 1 <?xml version="1.0" encoding="UTF-8"?>
 2 <project xmlns="http://maven.apache.org/POM/4.0.0"
 3          xmlns:xsi="http://www.w3.org/2001/XMLSchema-instance"
 4          xsi:schemaLocation="http://maven.apache.org/POM/4.0.0 http://maven.apache.org/xsd/maven-4.0.0.xsd">
 5     <parent>
 6         <artifactId>test-springcloud</artifactId>
 7         <groupId>com.test</groupId>
 8         <version>1.0-SNAPSHOT</version>
 9     </parent>
10     <modelVersion>4.0.0</modelVersion>
11
12     <artifactId>test-springcloud-hystrix7979</artifactId>
13
14     <dependencies>
15
16         <!-- hystrix-dashboard -->
17         <dependency>
18             <groupId>org.springframework.cloud</groupId>
19             <artifactId>spring-cloud-starter-netflix-hystrix-dashboard</artifactId>
20         </dependency>
21
22         <!-- spring boot -->
23         <dependency>
24             <groupId>org.springframework.boot</groupId>
25             <artifactId>spring-boot-starter-web</artifactId>
26         </dependency>
27
28         <dependency>
29             <groupId>org.springframework.boot</groupId>
30             <artifactId>spring-boot-starter-actuator</artifactId>
31         </dependency>
32
33
34         <dependency>
35             <groupId>org.springframework.boot</groupId>
36             <artifactId>spring-boot-devtools</artifactId>
37             <scope>runtime</scope>
38             <optional>true</optional>
39         </dependency>
40
41         <dependency>
42             <groupId>org.projectlombok</groupId>
43             <artifactId>lombok</artifactId>
44             <optional>true</optional>
45         </dependency>
46         <dependency>
47             <groupId>org.springframework.boot</groupId>
48             <artifactId>spring-boot-starter-test</artifactId>
49             <scope>test</scope>
50         </dependency>
51
52     </dependencies>
53
54     <build>
55         <finalName>test-springcloud-hystrix7979</finalName>
56     </build>
57
58 </project>
2、编写application.yml配置文件
1 # 端口
2 server:
3   port: 7979
3、编写主启动类,并使用@EnableHystrixDashboard注解开启HystrixDashboard
1 // 开启HystrixDashboard
2 @EnableHystrixDashboard
3 @SpringBootApplication
4 public class HystrixMain7979 {
5     public static void main(String[] args) {
6         SpringApplication.run(HystrixMain7979.class, args);
7     }
8 }
4、启动项目
访问地址:http://localhost:7979/hystrix
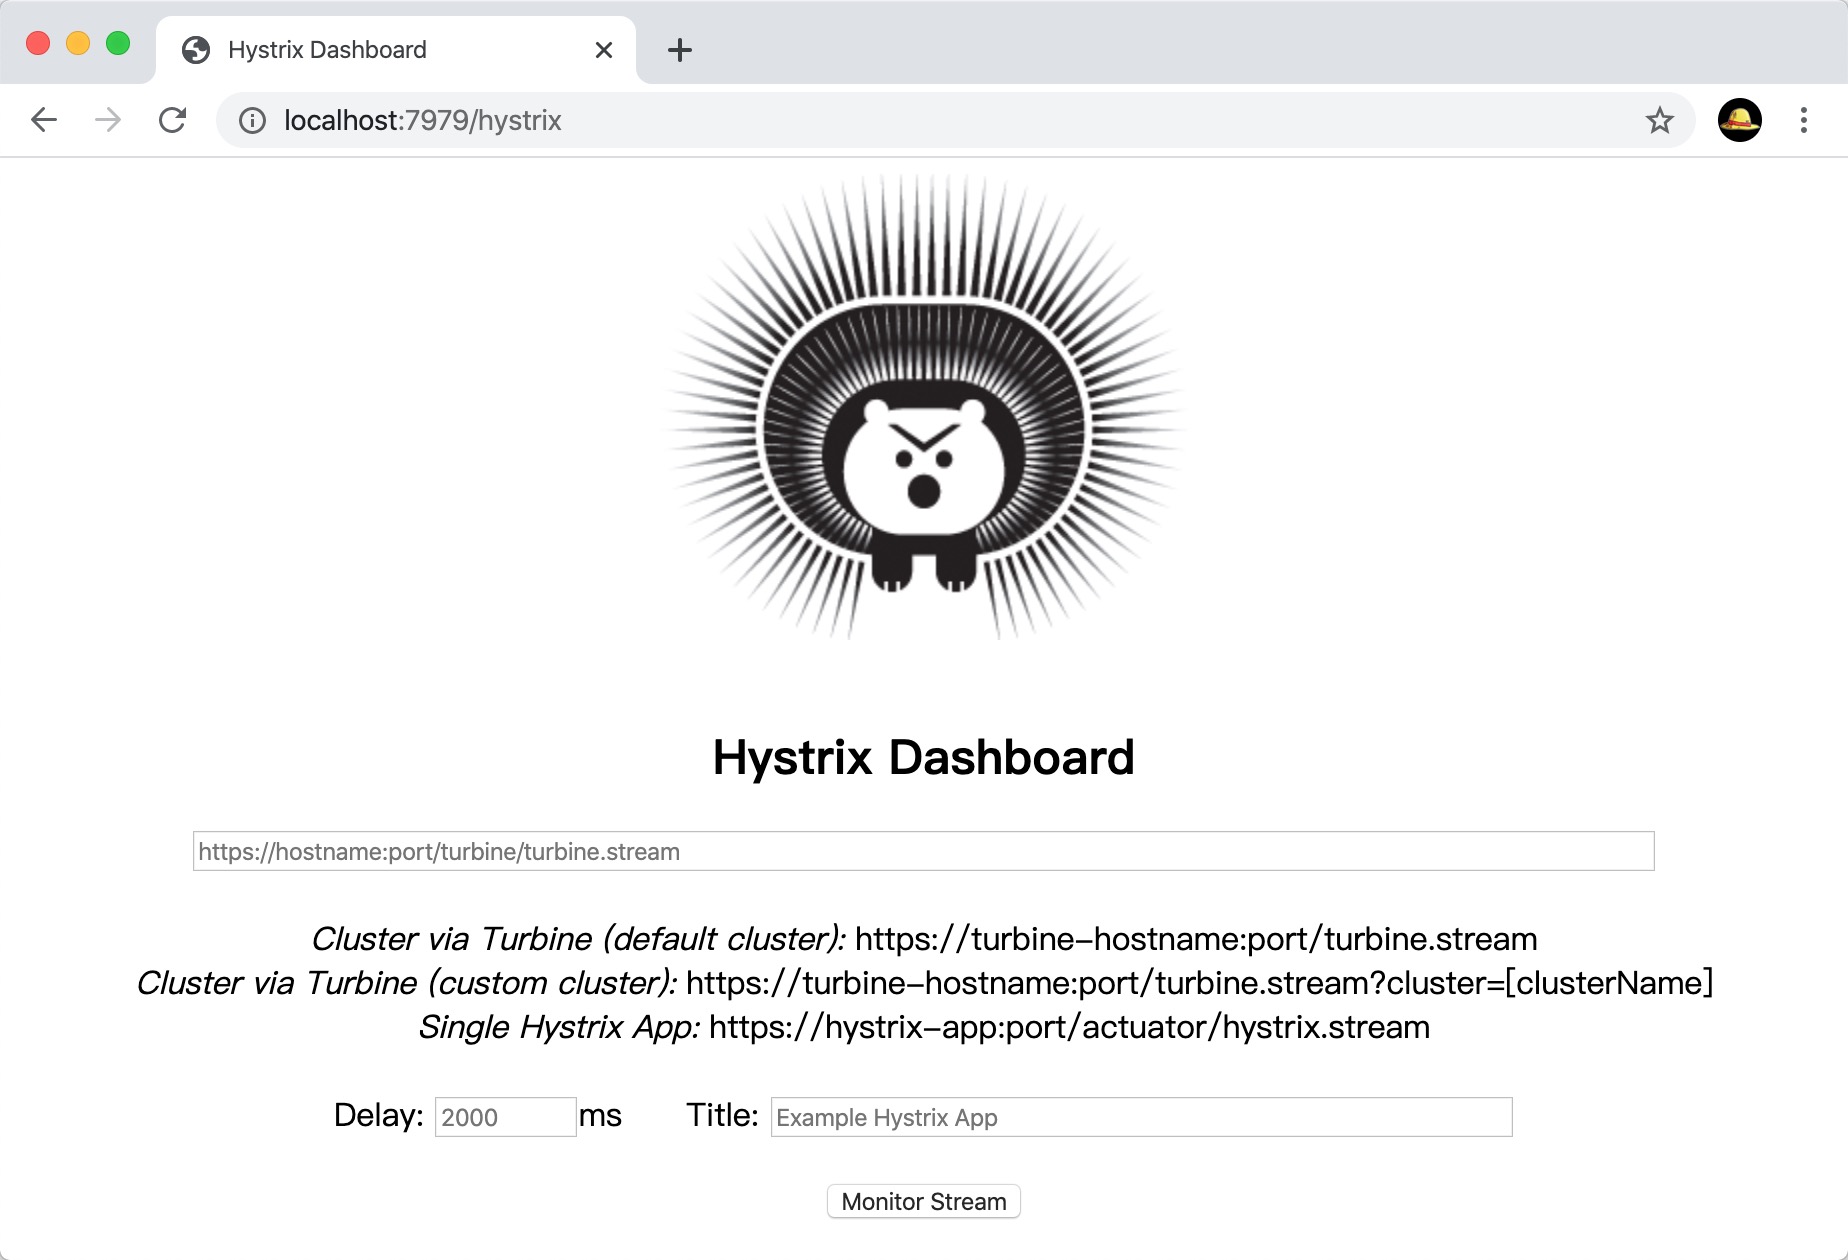
到此Hystrix仪表板项目,搭建完成
监控Hystrix服务项目
1、使用上一章的项目,确保在Hystrix服务项目(test-springcloud-provider-payment8008)中有依赖如下:
 1 <!-- hystrix -->
 2 <dependency>
 3     <groupId>org.springframework.cloud</groupId>
 4     <artifactId>spring-cloud-starter-netflix-hystrix</artifactId>
 5 </dependency>
 6
 7 <dependency>
 8     <groupId>org.springframework.boot</groupId>
 9     <artifactId>spring-boot-starter-actuator</artifactId>
10 </dependency>
2、在配置文件中新增以下内容,启动“hystrix.stream”端口
1 management:
2   endpoints:
3     web:
4       exposure:
5         include: health,info,hystrix.stream
3、启动项目测试
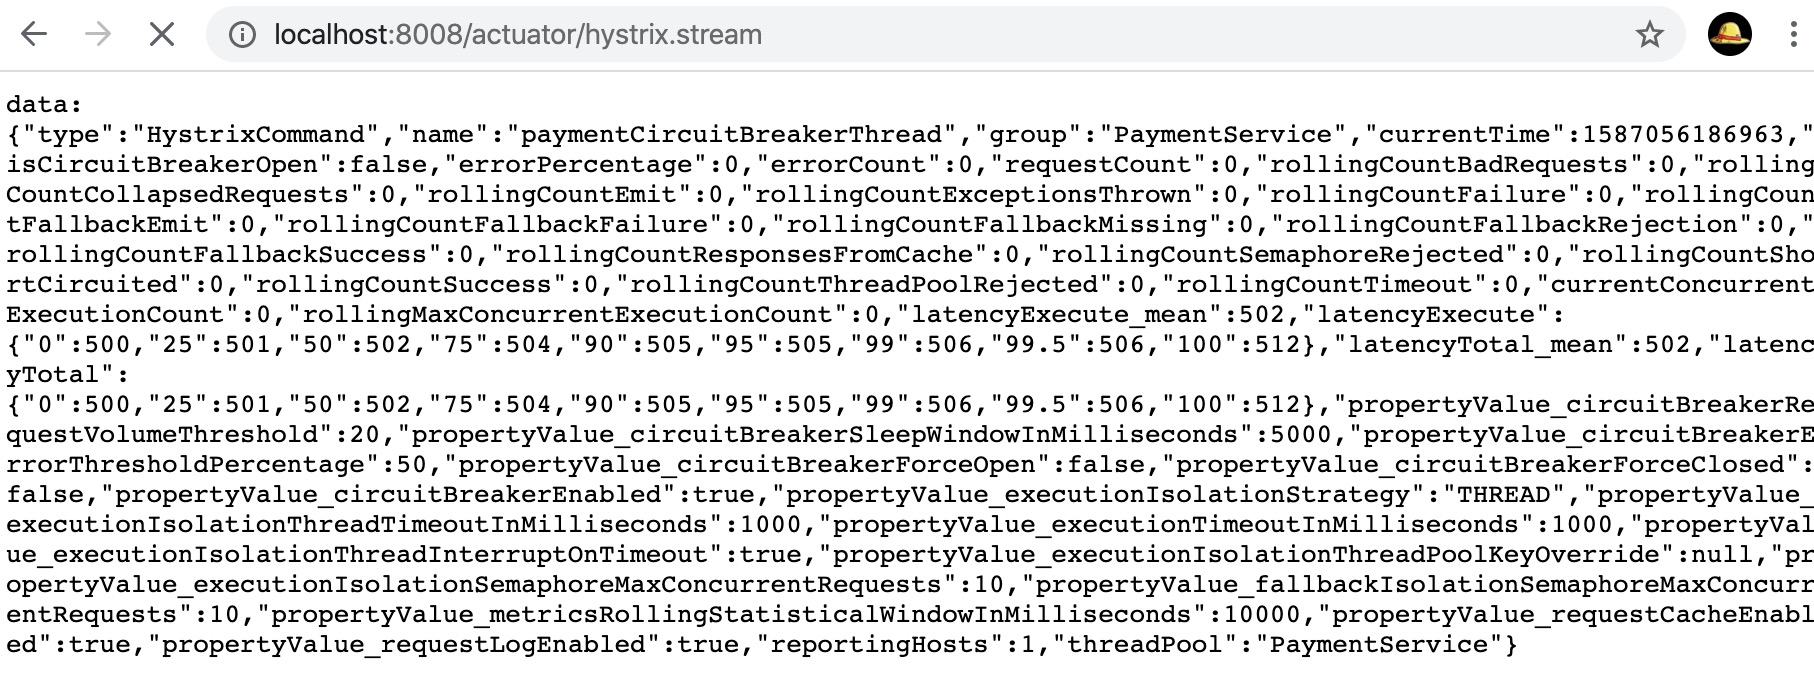
1)访问地址:http://localhost:8008/actuator/hystrix.stream
2)在Hystrix仪表板输入监控地址:http://localhost:8008/actuator/hystrix.stream
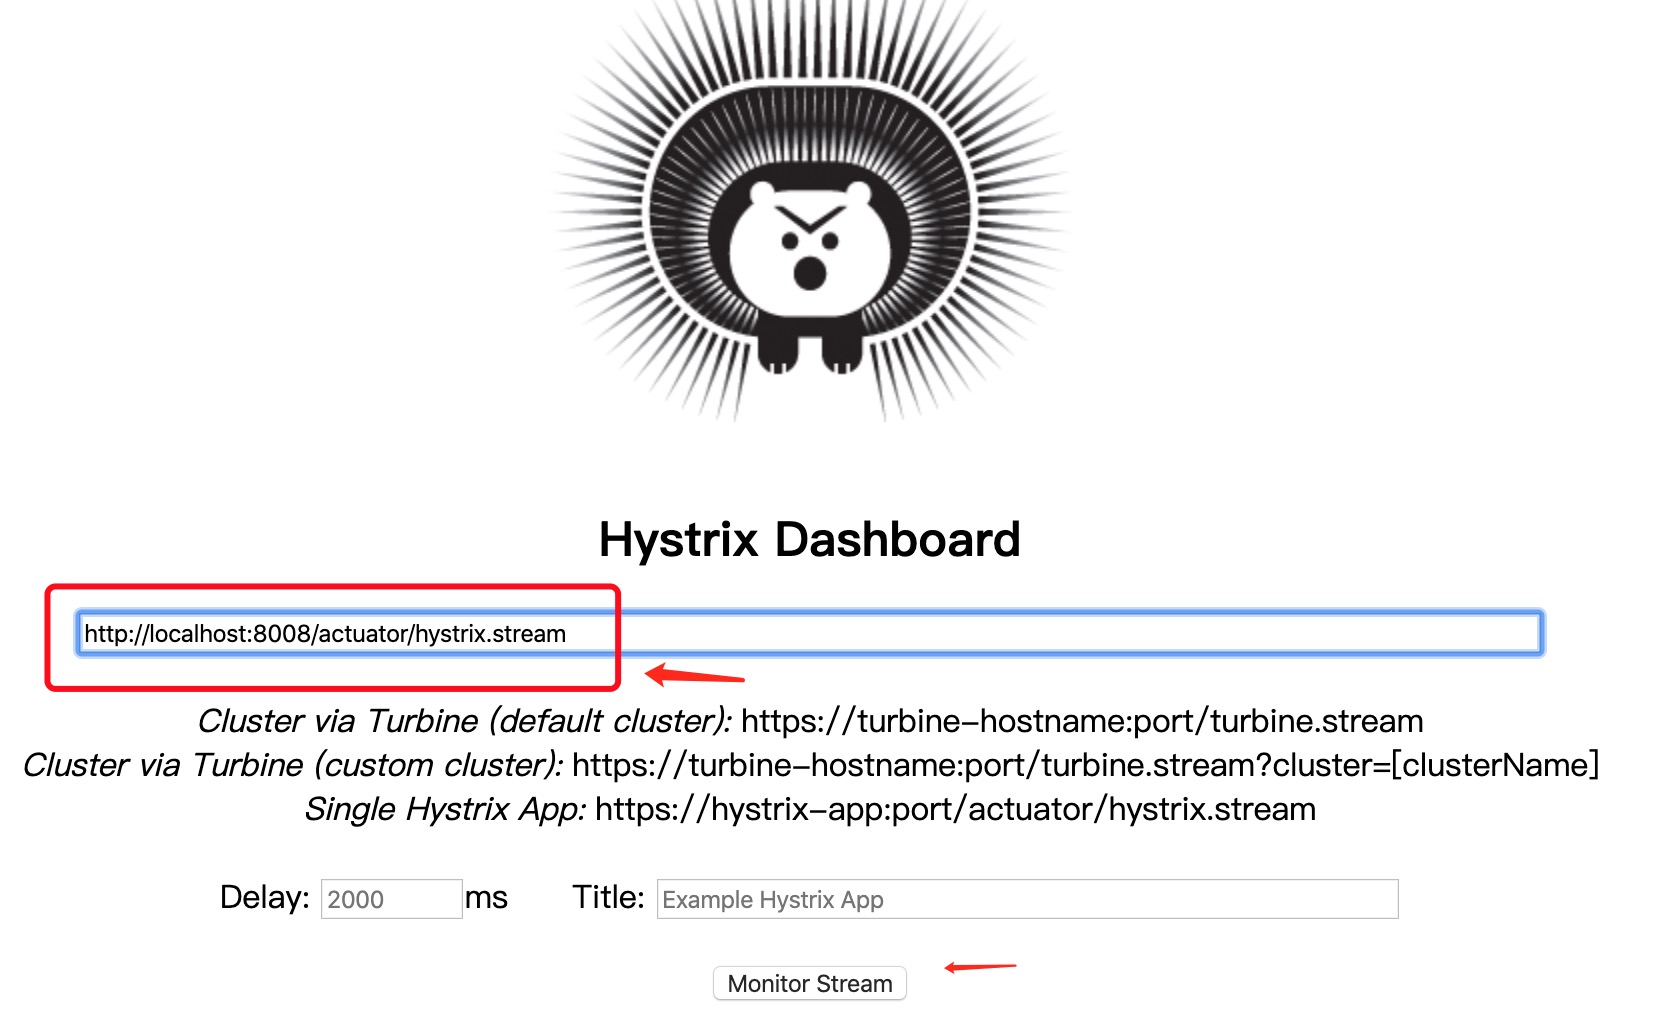
3)点击Monitor Stream,进入如下界面,使用JMeter请求Hystrix的服务:
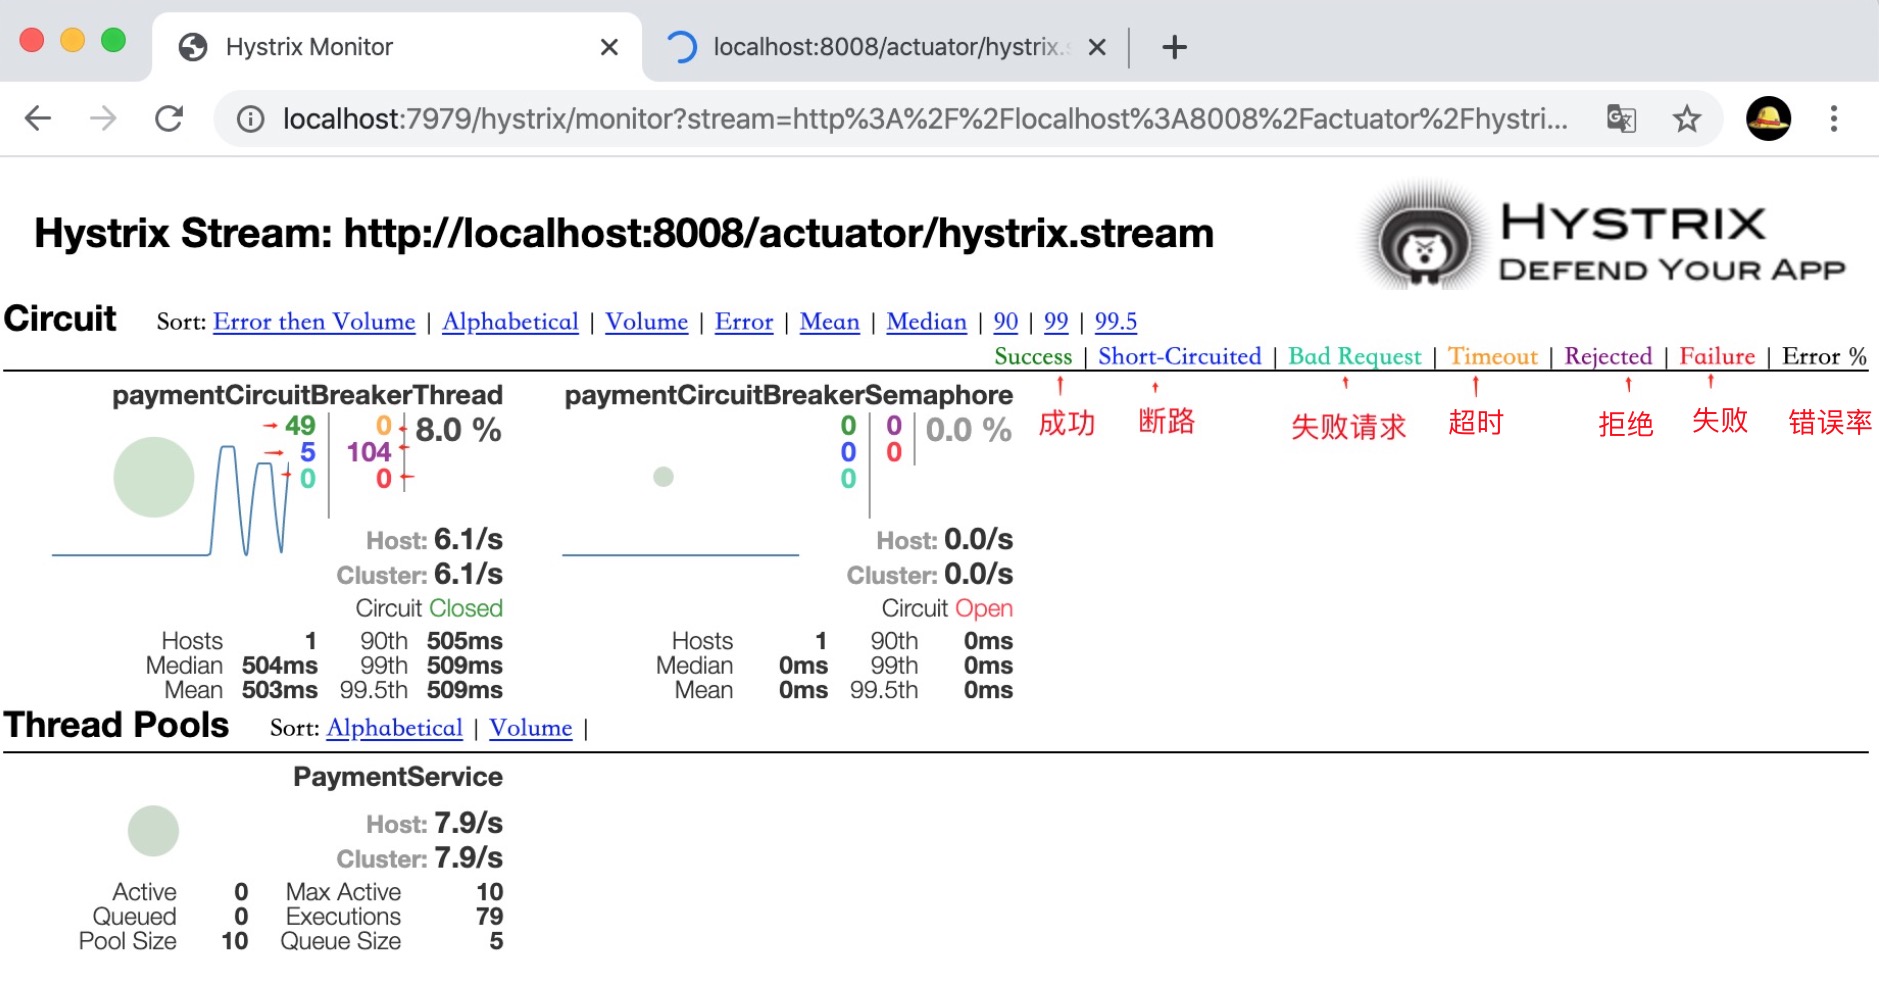
说明:
圆圈:健康颜色,从绿色、黄色、橙色、红色递减
圆圈:流量越大改实心圆越大
颜色数字:对于请求处理各个结果的统计值