一:所需软件
ps:
1.需要依赖jdk环境(可以参考:Linux Centos7.5 安装配置Oracle jdk1.8)。当前Linux是centos7.5版本;
2.如果是linux centos6.+可以参考:Linux centos6.8 安装配置elasticsearch6.3.2 【单机】(一),Linux centos6.8 安装配置elasticsearch6.3.2 【单机】(二)
二:安装elasticsearch-7.4.2
#解压
tar -zxvf elasticsearch-7.4.2-linux-x86_64.tar.gz

#将文件夹移动到/usr/local目录下
mv elasticsearch-7.4.2 /usr/local

#进入到elasticsearch目录下
cd elasticsearch-7.4.2/

#创建data空文件夹(用于存放数据)
mkdir data

#进入config目录
/cd usr/local/elasticsearch-7.4.2/config

#编辑elasticsearch.yml(elasticsearch的核心配置文件)
vim elasticsearch.yml
注:如果没有vim命令,可以使用vi命令,或者安装vim
编辑elasticsearch.yml:
#集群名字
cluster.name: lucifer-elasticsearch

#节点
node.name: node-1

#存放数据路径
path.data: /usr/local/elasticsearch-7.4.2/data

#存放日志路径
path.logs: /usr/local/elasticsearch-7.4.2/logs

#设置network.host
network.host: 0.0.0.0

#与node.name一致
cluster.initial_master_nodes: ["node-1"]
编辑jvm.options:
#编辑jvm.options
vim jvm.options

#原本1g修改为:
-Xms256m
-Xmx256m
ps:whoami命令用于显示自身用户名称.
问题1:
can not run elasticsearch as root,也就是说不能使用root用户去启动elasticsearch,因为elasticsearch内置的安全性。
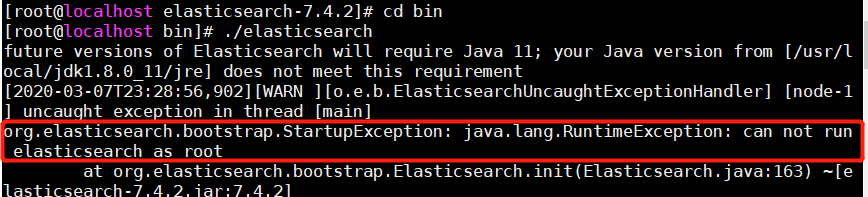
解决:
#用于显示当前用户
whoami

#添加用户
useradd esuser

#授权esuser用户拥有elasticsearch-7.4.2目录的权限
chown -R esuser /usr/local/elasticsearch-7.4.2
截图1:

问题2:
Cannot open file logs/gc.log due to Permission denied;由于权限被拒绝,无法打开文件日志/gc.log

解决:
#解决问题
[esuser@localhost bin]$ su root
Password:
[root@localhost bin]# cd ..
[root@localhost elasticsearch-7.4.2]# pwd
/usr/local/elasticsearch-7.4.2
[root@localhost elasticsearch-7.4.2]# chown -R esuser:esuser /usr/local/elasticsearch-7.4.2


#再次使用esuser用户执行elasticsearch命令
[root@localhost elasticsearch-7.4.2]# su esuser
[esuser@localhost elasticsearch-7.4.2]$ cd bin
[esuser@localhost bin]$ ./elasticsearch
问题出现两个:

问题3:
max file descriptors [4096] for elasticsearch process is too low, increase to at least [65535]
[esuser@localhost bin]$ su root
Password:
[root@localhost bin]# vim /etc/security/limits.conf
解决:
ps:需要切换到root的用户,系统文件需要root用户权限才可以修改。
#添加如下内容:
* soft nofile 65536
* hard nofile 65536
* soft nproc 4096
* hard nproc 4096
问题4:
max virtual memory areas vm.max_map_count [65530] is too low, increase to at least [262144]
解决:
#编辑sysctl.conf
[root@localhost bin]# vim /etc/sysctl.conf
[root@localhost bin]# sysctl -p
vm.max_map_count = 262144
[root@localhost bin]# su esuser
[esuser@localhost bin]$ ./elasticsearch
这次启动,正常。
访问浏览器http://192.168.160.130:9200/,可以看到elasticsearch的相关配置信息。

ps: 也可以后台启动elasticsearch ,命令:./elasticsearch -d
[esuser@localhost bin]$ ./elasticsearch -d
future versions of Elasticsearch will require Java 11; your Java version from [/usr/local/jdk1.8.0_11/jre] does not meet this requirement
[esuser@localhost bin]$
可以使用命令查看:jps

或者ps -ef | grep elasticsearch

三、安装es-header插件
方式一:使用谷歌商店提供的es-header插件(需要会科学上网)
插件名:ElasticSearch Head

 四、安装ik分词器
1.安装ik分词器
[root@localhost opt]# unzip elasticsearch-analysis-ik-7.4.2.zip -d /usr/local/elasticsearch-7.4.2/plugins/ik
[root@localhost opt]# cd /usr/local/elasticsearch-7.4.2/plugins/ik/
[root@localhost ik]# ls
commons-codec-1.9.jar                httpclient-4.5.2.jar
commons-logging-1.2.jar              httpcore-4.4.4.jar
config                               plugin-descriptor.properties
elasticsearch-analysis-ik-7.4.2.jar  plugin-security.policy
[root@localhost ik]# su esuser
[esuser@localhost ik]$ jps
58434 Jps
39194 Elasticsearch
[esuser@localhost ik]$ kill 39194
[esuser@localhost ik]$ cd /usr/local/elasticsearch-7.4.2/bin
[esuser@localhost bin]$ ./elasticsearch -d
future versions of Elasticsearch will require Java 11; your Java version from [/usr/local/jdk1.8.0_11/jre] does not meet this requirement
[esuser@localhost bin]$ jps
58507 Elasticsearch
58526 Jps
ps:安装完ik分词器后,需要重启elasticsearch。
测试:使用postman测试ik分词效果:
ps: ik_max_word 会将文本做最细粒度的划分。
ik_smart 会将文本做最粗粒度的划分。
效果1: ik_max_word:

分词效果:
{
    "tokens": [
        {
            "token": "中华人民共和国",
            "start_offset": 0,
            "end_offset": 7,
            "type": "CN_WORD",
            "position": 0
        },
        {
            "token": "中华人民",
            "start_offset": 0,
            "end_offset": 4,
            "type": "CN_WORD",
            "position": 1
        },
        {
            "token": "中华",
            "start_offset": 0,
            "end_offset": 2,
            "type": "CN_WORD",
            "position": 2
        },
        {
            "token": "华人",
            "start_offset": 1,
            "end_offset": 3,
            "type": "CN_WORD",
            "position": 3
        },
        {
            "token": "人民共和国",
            "start_offset": 2,
            "end_offset": 7,
            "type": "CN_WORD",
            "position": 4
        },
        {
            "token": "人民",
            "start_offset": 2,
            "end_offset": 4,
            "type": "CN_WORD",
            "position": 5
        },
        {
            "token": "共和国",
            "start_offset": 4,
            "end_offset": 7,
            "type": "CN_WORD",
            "position": 6
        },
        {
            "token": "共和",
            "start_offset": 4,
            "end_offset": 6,
            "type": "CN_WORD",
            "position": 7
        },
        {
            "token": "国",
            "start_offset": 6,
            "end_offset": 7,
            "type": "CN_CHAR",
            "position": 8
        },
        {
            "token": "国歌",
            "start_offset": 7,
            "end_offset": 9,
            "type": "CN_WORD",
            "position": 9
        }
    ]
}
效果2: ik_smart:

{
    "tokens": [
        {
            "token": "中华人民共和国",
            "start_offset": 0,
            "end_offset": 7,
            "type": "CN_WORD",
            "position": 0
        },
        {
            "token": "国歌",
            "start_offset": 7,
            "end_offset": 9,
            "type": "CN_WORD",
            "position": 1
        }
    ]
}
2、自定义词库
2.1

{
    "tokens": [
        {
            "token": "骚",
            "start_offset": 0,
            "end_offset": 1,
            "type": "CN_CHAR",
            "position": 0
        },
        {
            "token": "年在",
            "start_offset": 1,
            "end_offset": 3,
            "type": "CN_WORD",
            "position": 1
        },
        {
            "token": "干嘛",
            "start_offset": 3,
            "end_offset": 5,
            "type": "CN_WORD",
            "position": 2
        }
    ]
}
2.2 编辑IKAnalyzer.cfg.xml
[esuser@localhost ~]$ cd /usr/local/elasticsearch-7.4.2/plugins/ik/config
[esuser@localhost config]$ ls
extra_main.dic                  extra_stopword.dic  quantifier.dic
extra_single_word.dic           IKAnalyzer.cfg.xml  stopword.dic
extra_single_word_full.dic      main.dic            suffix.dic
extra_single_word_low_freq.dic  preposition.dic     surname.dic
[esuser@localhost config]$ su root
Password:
[root@localhost config]# vim IKAnalyzer.cfg.xml
IKAnalyzer.cfg.xml:
<?xml version="1.0" encoding="UTF-8"?>
<!DOCTYPE properties SYSTEM "http://java.sun.com/dtd/properties.dtd">
<properties>
        <comment>IK Analyzer 扩展配置</comment>
        <!--用户可以在这里配置自己的扩展字典 -->
        <entry key="ext_dict">custom.dic</entry>
         <!--用户可以在这里配置自己的扩展停止词字典-->
        <entry key="ext_stopwords"></entry>
        <!--用户可以在这里配置远程扩展字典 -->
        <!-- <entry key="remote_ext_dict">words_location</entry> -->
        <!--用户可以在这里配置远程扩展停止词字典-->
        <!-- <entry key="remote_ext_stopwords">words_location</entry> -->
</properties>
ps:这里的custom.dic是自己的词库。
[root@localhost config]# vim custom.dic
[root@localhost config]# ls
custom.dic                      extra_stopword.dic  stopword.dic
extra_main.dic                  IKAnalyzer.cfg.xml  suffix.dic
extra_single_word.dic           main.dic            surname.dic
extra_single_word_full.dic      preposition.dic
extra_single_word_low_freq.dic  quantifier.dic
[root@localhost config]# cd ..
[root@localhost ik]# cd /usr/local/elasticsearch-7.4.2/bin
[root@localhost bin]# su root
[root@localhost bin]# su esuser
[esuser@localhost bin]$ jps
58938 Jps
58507 Elasticsearch
[esuser@localhost bin]$ kill 58507
[esuser@localhost bin]$ jps
59034 Jps
[esuser@localhost bin]$ ./elasticsearch -d
future versions of Elasticsearch will require Java 11; your Java version from [/usr/local/jdk1.8.0_11/jre] does not meet this requirement
ps:custom.dic内容如下:

重启elasticsearch后:
再次测试,”骚年“两个字已经变成了一个词了。

以上部分是单机。
================================搭建集群====================================
以下部分就是改造为集群模式。
五、搭建集群
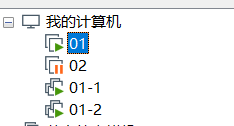
| 虚拟机 | ip地址 |
| 01 | 192.168.160.130 |
| 01-1 | 192.168.160.133 |
| 01-2 | 192.168.160.134 |
ps:01-1,01-2为虚拟机01的克隆虚拟机。
ps:由于是克隆虚拟机,所以在每一台虚拟机中都删除cd /usr/local/elasticsearch-7.4.2/data的nodes文件夹中所有文件。
5.1 删除data文件夹下notes文件数据(三台虚拟机都需要删除)
[root@localhost ~]# cd /usr/local/elasticsearch-7.4.2/data
[root@localhost data]# ls
nodes
[root@localhost data]# rm -rf nodes/
[root@localhost data]# ls
[root@localhost data]#
5.2 编辑elasticsearch.yml(三台虚拟机都需要配置)
192.168.160.130:
[root@localhost config]# vim elasticsearch.yml
[root@localhost config]# more elasticsearch.yml | grep ^[^#]
cluster.name: lucifer-es-cluster
node.name: node-1
path.data: /usr/local/elasticsearch-7.4.2/data
path.logs: /usr/local/elasticsearch-7.4.2/logs
network.host: 0.0.0.0
http.cors.enabled: true
http.cors.allow-origin: "*"
node.master: true
node.data: true
discovery.seed_hosts: ["192.168.160.130","192.168.160.133","192.168.160.134"]
cluster.initial_master_nodes: ["node-1"]
ps: more elasticsearch.yml | grep ^[^#] 表示查看elasticsearch.yml中除去#注释的配置
192.168.160.133;192.168.160.134这两台虚拟机elasticsearch.yml大致相同,除了node.name。192.168.160.130==》node.name: node-1;192.168.160.133==》node.name: node-2;92.168.160.134==》node.name: node-3;
再次切换为esuser用户,启动elasticsearch;
ps:
如果遇到如下报错信息:java.io.FileNotFoundException: /usr/local/elasticsearch-7.4.2/logs/lucifer-es-cluster_index_indexing_slowlog.json (Permission denied)
解决:删除logs文件夹下所有文件
[esuser@localhost elasticsearch-7.4.2]$ cd logs
[esuser@localhost logs]$ pwd
/usr/local/elasticsearch-7.4.2/logs
[esuser@localhost logs]$ rm -rf *
三台虚拟机均启动成功后,访问浏览器:


用Elasticsearch Head查看es集群信息:

