文章目录
一、security简介
- Spring Security是一个专注于为Java应用程序提供身份验证和授权的框架,其分为两个部分:Authentication(认证)和 Authorization(授权)
二、功能体验
Authentication(认证)
1. 默认登录验证
- 创建springboot工程,springboot版本 2.2.2.RELEASE,security版本5.2.1
- 引入security 依赖包
<dependency> <groupId>org.springframework.boot</groupId> <artifactId>spring-boot-starter-security</artifactId> </dependency> - 启动springboot 工程,security 会生成一个默认的用户信息,用户名 user
- 控制台打印默认密码:

- 浏览器浏览服务任意地址会进入登录验证:
- 控制台打印默认密码:
2. 默认内存登录验证
-
security 默认提供两种认证方式in-memory和jdbc,下边例子为 in-memory方式
-
添加几个页面
-
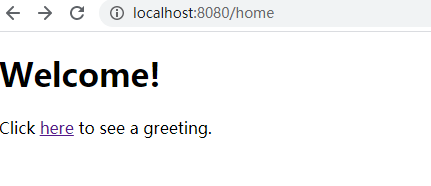
home.html作为主页
<!DOCTYPE html> <html xmlns="http://www.w3.org/1999/xhtml" xmlns:th="https://www.thymeleaf.org" xmlns:sec="https://www.thymeleaf.org/thymeleaf-extras-springsecurity3"> <head> <title>Spring Security Example</title> </head> <body> <h1>Welcome!</h1> <p>Click <a th:href="@{/hello}">here</a> to see a greeting.</p> </body> </html> -
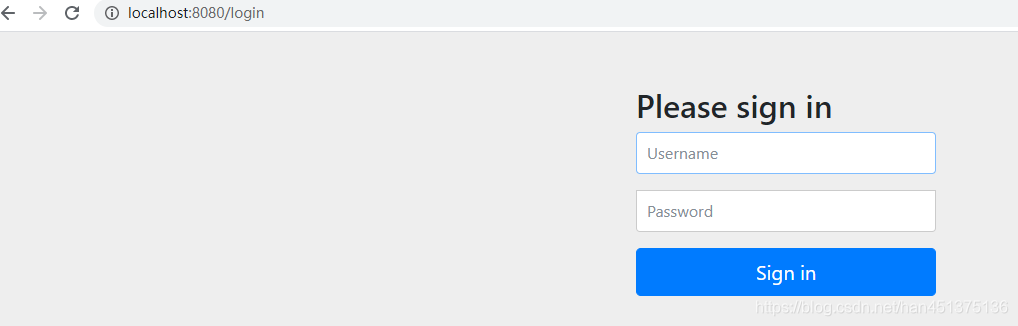
login.html 登录验证页面
<!DOCTYPE html> <html xmlns="http://www.w3.org/1999/xhtml" xmlns:th="https://www.thymeleaf.org" xmlns:sec="https://www.thymeleaf.org/thymeleaf-extras-springsecurity3"> <head> <title>Spring Security Example </title> </head> <body> <div th:if="${param.error}"> Invalid username and password. </div> <div th:if="${param.logout}"> You have been logged out. </div> <form th:action="@{/login}" method="post"> <div><label> User Name : <input type="text" name="username"/> </label></div> <div><label> Password: <input type="password" name="password"/> </label></div> <div><input type="submit" value="Sign In"/></div> </form> </body> </html> -
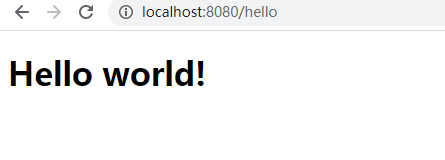
hello.html 登录成功后的页
<!DOCTYPE html>
<html xmlns="http://www.w3.org/1999/xhtml" xmlns:th="https://www.thymeleaf.org"
      xmlns:sec="https://www.thymeleaf.org/thymeleaf-extras-springsecurity3">
<head>
    <title>Hello World!</title>
</head>
<body>
<h1>Hello world!</h1>
</body>
</html>
-
-
配置视图解析器
@Configuration public class MvcConfig implements WebMvcConfigurer { public void addViewControllers(ViewControllerRegistry registry) { registry.addViewController("/home").setViewName("home"); registry.addViewController("/").setViewName("home"); registry.addViewController("/hello").setViewName("hello"); registry.addViewController("/login").setViewName("login"); } } -
配置安全策略
-
@EnableWebSecurity 启用security 安全策略支持,覆盖WebSecurityConfigurerAdapter类配置一些安全细节
-
configure(HttpSecurity)方法定义哪些URL路径应该受到保护,哪些不应该受到保护,如:本例:‘/’,’/home’路径不受安全校验。
-
userDetailsService()方法用于用户信息的构建。
@Configuration
@EnableWebSecurity
public class WebSecurityConfig extends WebSecurityConfigurerAdapter {
    @Override
    protected void configure(HttpSecurity http) throws Exception {
        http.authorizeRequests()
            .antMatchers("/", "/home").permitAll()
            .anyRequest().authenticated()
            .and()
            .formLogin()
            .loginPage("/login")
            .permitAll()
            .and()
            .logout()
            .permitAll();
    }

    @Bean
    @Override
    public UserDetailsService userDetailsService() {
        UserDetails user =
                User.withDefaultPasswordEncoder()
                        .username("user")
                        .password("password")
                        .roles("USER")
                        .build();
        return new InMemoryUserDetailsManager(user);
    }
}
-
-
运行结果
- 进入home页
- 进入login页

- 输入自定义账号进入 hello页
- 进入home页
3. 登出
-
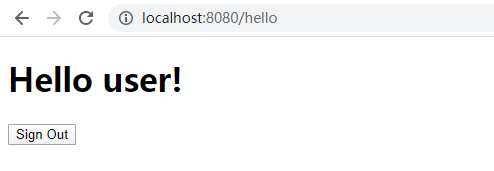
修改hello 页面,指定默认登出路径 /logout
<!DOCTYPE html> <html xmlns="http://www.w3.org/1999/xhtml" xmlns:th="https://www.thymeleaf.org" xmlns:sec="https://www.thymeleaf.org/thymeleaf-extras-springsecurity3"> <head> <title>Hello World!</title> </head> <body> <h1 th:inline="text">Hello [[${#httpServletRequest.remoteUser}]]!</h1> <form th:action="@{/logout}" method="post"> <input type="submit" value="Sign Out"/> </form> </body> </html> -
展示结果
- hello 页
- 点击登出,跳转到登录页,注意浏览器地址: /login?logout
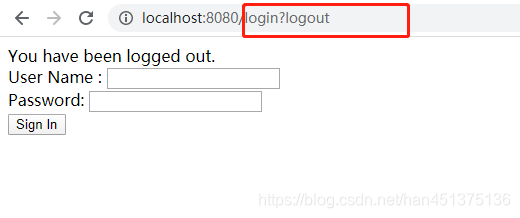
- hello 页
4. 自定义登录验证
-
自定义实现参考
https://docs.spring.io/spring-security/site/docs/5.2.1.RELEASE/reference/htmlsingle/#tech-userdetailsservice
-
security 的核心接口UserDetails 作为用户的信息载体,如要自定义用户表单需对其进行实现
-
UserDetailsService 接口作为UserDetails 的提供方,在自定义时也需对其重写
-
pom文件引入orm框架,本次选择mybatis
<dependency> <groupId>org.mybatis.spring.boot</groupId> <artifactId>mybatis-spring-boot-starter</artifactId> <version>2.1.1</version> </dependency> -
配置数据源
spring.datasource.driver-class-name=com.mysql.cj.jdbc.Driver spring.datasource.url=jdbc:mysql://localhost:3306/security02?serverTimezone=UTC spring.datasource.username=root spring.datasource.password=password -
用户表
DROP TABLE IF EXISTS `user`; CREATE TABLE `user` ( `id` bigint(11) NOT NULL AUTO_INCREMENT, `username` varchar(255) NOT NULL, `password` varchar(255) NOT NULL, PRIMARY KEY (`id`) ) ENGINE=InnoDB AUTO_INCREMENT=2 DEFAULT CHARSET=utf8; -
user 定义实现UserDetails 接口,其默认提供5中方法,包括账号是否过期、是否锁定等信息,默认是false ,将其修改为true
public class User implements UserDetails,Serializable { private Integer id; private String username; private String password; @Override public Collection<? extends GrantedAuthority> getAuthorities() { return null; } @Override public boolean isAccountNonExpired() { return true; } @Override public boolean isAccountNonLocked() { return true; } @Override public boolean isCredentialsNonExpired() { return true; } @Override public boolean isEnabled() { return true; } //get、set 方法略 } -
定义userMapper
@Mapper public interface UserMapper { @Select("select * from user where username = #{username} ") User getUserByUsername(String username); } -
自定义service 实现UserDetailsService,其只有一个方法loadUserByUsername,将我们自定义的user 响应即可
@Service public class MyUserDetailsService implements UserDetailsService { @Autowired private UserMapper userMapper; @Override public UserDetails loadUserByUsername(String username) throws UsernameNotFoundException { User user = userMapper.getUserByUsername(username); return user; } } -
WebSecurityConfig 配置修改引入自定义的service
@Autowired private MyUserDetailsService userDetailsService; @Override protected void configure(AuthenticationManagerBuilder auth) throws Exception { auth.userDetailsService(userDetailsService).passwordEncoder(new BCryptPasswordEncoder()); } -
用户密码加密建一个工具类用于生成密码,讲其生成的密码存入库中
public class PasswordEncoderUtil { public static void main(String[] args) { BCryptPasswordEncoder encoder = new BCryptPasswordEncoder(); String encoded = encoder.encode("123456"); System.out.println(encoded); } } -
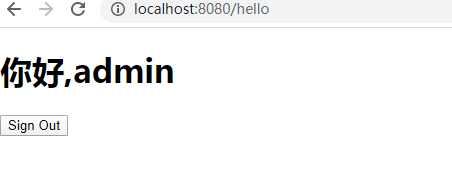
写一个接口修改hello页面响应
@Controller public class LoginController { @RequestMapping(value = "/hello") public ModelAndView hello(){ Object principal = SecurityContextHolder.getContext().getAuthentication().getPrincipal(); String username = null; if (principal instanceof UserDetails) { username = ((UserDetails)principal).getUsername(); } else { username = principal.toString(); } System.out.println(username); ModelAndView modelAndView = new ModelAndView(); modelAndView.addObject("username1",username); modelAndView.setViewName("hello"); return modelAndView; } } -
hello 页面修改
<!DOCTYPE html>
<html xmlns="http://www.w3.org/1999/xhtml" xmlns:th="https://www.thymeleaf.org"
      xmlns:sec="https://www.thymeleaf.org/thymeleaf-extras-springsecurity3">
<head>
    <title>Hello World!</title>
</head>
<body>
<h1 th:text = "'你好,'+ ${username1}"></h1>
<form th:action="@{/logout}" method="post">
    <input type="submit" value="Sign Out"/>
</form>
</body>
</html>
11 结果显示
5. 记住我功能
- 是服务记住用户登录一段时间功能,使用户免于短时内重复登录。security提供了两种实现方式。一种将用户信息加密存入cookie中,用户发送请求时用于验证。另一种方式更安全一些,系将用户信息加密生成token值存入数据中,再配合cookie存一个随机串用于取值校验。
参考:https://docs.spring.io/spring-security/site/docs/5.2.1.RELEASE/reference/htmlsingle/#ns-remember-me
- 本文选用第二种。security提供了一张表结构用于存用户token信息
DROP TABLE IF EXISTS `persistent_logins`; CREATE TABLE `persistent_logins` ( `username` varchar(64) NOT NULL, `series` varchar(64) NOT NULL, `token` varchar(64) NOT NULL, `last_used` timestamp NOT NULL DEFAULT CURRENT_TIMESTAMP ON UPDATE CURRENT_TIMESTAMP, PRIMARY KEY (`series`) ) ENGINE=InnoDB DEFAULT CHARSET=utf8; - security配置引用token配置
@Autowired private DataSource dataSource; @Bean public PersistentTokenRepository persistentTokenRepository() { JdbcTokenRepositoryImpl jdbcTokenRepository = new JdbcTokenRepositoryImpl(); jdbcTokenRepository.setDataSource(dataSource); jdbcTokenRepository.setCreateTableOnStartup(false);//启动创建表,自己创建了这里设置false return jdbcTokenRepository; } - configure 配置rememberMe,userDetailsService实现需要引用,过期设置1小时
protected void configure(HttpSecurity http) throws Exception { http.authorizeRequests() .antMatchers("/", "/home").permitAll() .anyRequest().authenticated() .and() .formLogin() .loginPage("/login") .permitAll() .and() .logout() .permitAll() .and() .rememberMe().tokenRepository(persistentTokenRepository()) .tokenValiditySeconds(3600).userDetailsService(userDetailsService).key("security_key"); http.exceptionHandling().accessDeniedHandler(new CustomizeAccessDeniedHandler()); } - login 页面修改
<div><label><input name="remember-me" type="checkbox" />remember me</label></div> - 结果,数据库中生成一条数据,用户在1小时内免登陆

Authorization(授权)
1. 角色验证
-
添加角色表和 用户角色关系表
DROP TABLE IF EXISTS `role`; CREATE TABLE `role` ( `id` bigint(11) NOT NULL AUTO_INCREMENT, `name` varchar(255) NOT NULL, PRIMARY KEY (`id`) ) ENGINE=InnoDB AUTO_INCREMENT=3 DEFAULT CHARSET=utf8; DROP TABLE IF EXISTS `user_role`; CREATE TABLE `user_role` ( `user_id` bigint(11) NOT NULL, `role_id` bigint(11) NOT NULL ) ENGINE=InnoDB DEFAULT CHARSET=utf8; -
建立对应表的mapper
@Mapper public interface RoleMapper { @Select(" SELECT t1.* FROM role t1,user_role t2 WHERE t1.id = t2.role_id and t2.user_id = #{userId}") List<Role> getRolesByUserId(Integer userId); } -
WebSecurityConfig(WebSecurityConfigurerAdapter接口的实现) 类上添加注解@EnableGlobalMethodSecurity(prePostEnabled=true) 开启security 全局注解应用
-
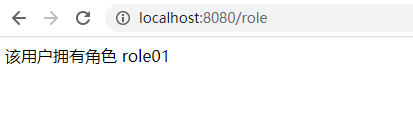
添加一验证接口,添加 @PreAuthorize(“hasRole(‘role02’)”) 注解用于验证用户拥有的角色
    @RequestMapping("/role")
    @ResponseBody
    @PreAuthorize("hasRole('role02')")
    public String hashRole(){
        return "该用户拥有角色 role01";
    }
hasRole 系security 提供的用于验证角色的功能,其模式添加一前缀“ROLE_”,所以在数据库中保存的角色名需要按其格式来。
源码中:private String defaultRolePrefix = “ROLE_”;
文档中: Returns true if the current principal has the specified role. By default if the supplied role does not start with ‘ROLE_’ it will be added. This can be customized by modifying the defaultRolePrefix on DefaultWebSecurityExpressionHandler. -
添加角色表实体,其实现了接口GrantedAuthority,GrantedAuthority用于存security
的权限,此处权限包括 角色 和 其他权限,默认区分是通过 ROLE_ 前缀,此处知识参考https://www.cnblogs.com/longfurcat/p/9417422.html
public class Role implements Serializable, GrantedAuthority { private Integer id; private String name; public Integer getId() { return id; } public void setId(Integer id) { this.id = id; } public String getName() { return name; } public void setName(String name) { this.name = name; } @Override public String getAuthority() { return name; } } -
修改User实体,用于给用户赋角色,修改getAuthorities()方法
public class User implements UserDetails,Serializable { private List<Role> authorities; public void setAuthorities(List<Role> authorities) { this.authorities = authorities; } @Override public List<Role> getAuthorities() { return authorities; } //其他代码略,可参考源码 } -
修改自定义类MyUserDetailsService,用于取用户的角色信息
@Override public UserDetails loadUserByUsername(String username) throws UsernameNotFoundException { User user = userMapper.getUserByUsername(username); if (user != null){ user.setAuthorities(roleMapper.getRolesByUserId(user.getId())); } return user; } -
hello.html 添加一行
<a href="/role" >检查角色权限</a> -
验证通过
-
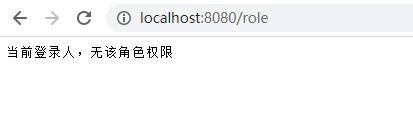
如果验证未通过,控制台打印
org.springframework.security.access.AccessDeniedException: 不允许访问
AccessDeniedException页面默认会跳转到error.html.
-
如果想自定义角色验证异常处理,对AccessDeniedHandler 实现
public class CustomizeAccessDeniedHandler implements AccessDeniedHandler {

    @Override
    public void handle(HttpServletRequest request, HttpServletResponse response, AccessDeniedException e) throws IOException, ServletException {
        response.setCharacterEncoding("utf-8");
        response.setContentType("text/javascript;charset=utf-8");
        response.getWriter().print("当前登录人,无该角色权限");
    }
}
WebSecurityConfig配置自定义的权限配置
http.exceptionHandling().accessDeniedHandler(new CustomizeAccessDeniedHandler()); -
效果
2. 权限验证
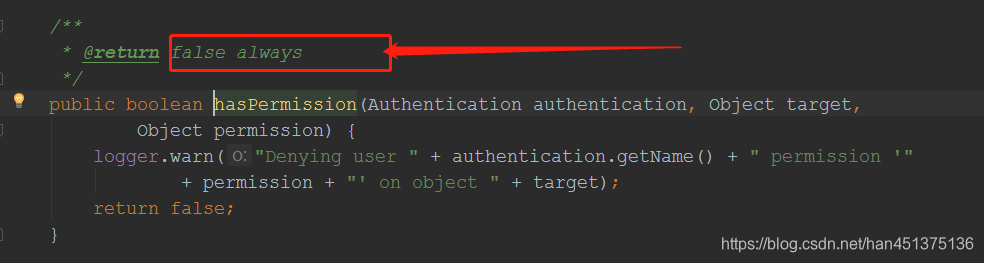
- security 通过PermissionEvaluator接口提供权限校验,如果想用其hasPermission做权限校验,需自定对PermissionEvaluator接口进行实现,框架默认的实现一致返回false
- 自定义权限表,本例权限表与角色为多对多关系,故建立关系表,permission表中permission 为权限 如 增删改查 信息,target 为资源信息,可以是url,目标等任何信息。
DROP TABLE IF EXISTS `permission`; CREATE TABLE `permission` ( `id` int(11) NOT NULL AUTO_INCREMENT, `permission` varchar(255) DEFAULT NULL COMMENT '权限', `name` varchar(255) DEFAULT NULL COMMENT '权限名', `target` varchar(255) DEFAULT NULL COMMENT '权限目标', PRIMARY KEY (`id`) ) ENGINE=InnoDB AUTO_INCREMENT=3 DEFAULT CHARSET=utf8; DROP TABLE IF EXISTS `role_permission`; CREATE TABLE `role_permission` ( `role_id` int(11) NOT NULL, `permission_id` int(11) DEFAULT NULL ) ENGINE=InnoDB DEFAULT CHARSET=utf8; - entity
public class Permission implements Serializable { private int id; private String permission; private String name; private String target; //set get 略 } - mapper. 根据userId 查询权限集
@Mapper public interface PermissionMapper { @Select("SELECT t5.* from `user` t1 INNER JOIN user_role t2 " + " ON t1.id = t2.user_id INNER JOIN role t3 on " + " t2.role_id = t3.id INNER JOIN role_permission t4 ON " + " t4.role_id = t3.id INNER JOIN permission t5 on " + " t5.id = t4.permission_id WHERE t1.id = #{userId}") List<Permission> queryPermissionByUserId(Integer userId); } - 自定义PermissionEvaluator,重写hasPermission方法,查询登录用户的权限集与接口访问信息匹配,有匹配上的返回true,结束校验。
@Component public class CustomPermissionEvaluator implements PermissionEvaluator { @Autowired private PermissionMapper permissionMapper; @Override public boolean hasPermission(Authentication authentication, Object targetDomainObject, Object permission) { if (authentication == null || targetDomainObject == null || permission == null){ return false; } User user = (User) authentication.getPrincipal(); List<Permission> permissions = permissionMapper.queryPermissionByUserId(user.getId()); if (!CollectionUtils.isEmpty(permissions)){ for (Permission permission1 : permissions) { if (permission1.getTarget().equals(targetDomainObject) && permission1.getPermission().equals(permission)){ return true; } } } return false; } @Override public boolean hasPermission(Authentication authentication, Serializable targetId, String targetType, Object permission) { return false; } } - 将自定义的类 注入到WebSecurityConfig中配置,此处官方建议用DefaultMethodSecurityExpressionHandler 处理,表示方法级别权限校验,配上之后报:No ServletContext set error.异常,暂不知原因。先用DefaultWebSecurityExpressionHandler 处理。
@Bean public DefaultWebSecurityExpressionHandler methodSecurityExpressionHandler() { DefaultWebSecurityExpressionHandler handler = new DefaultWebSecurityExpressionHandler(); handler.setPermissionEvaluator(new CustomPermissionEvaluator()); return handler; } - controller添加一接口
@RequestMapping(value = "/permission") @ResponseBody @PreAuthorize("hasPermission('user','query')") public String hasPermission1(){ return "该用户对资源‘user’有查的权限"; } - 如果权限通过
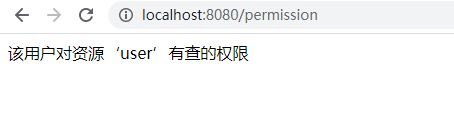
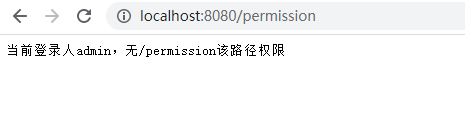
- 如果权限不通过,依然被AccessDeniedException异常处理所捕获,稍微改造一下
public class CustomizeAccessDeniedHandler implements AccessDeniedHandler { @Override public void handle(HttpServletRequest request, HttpServletResponse response, AccessDeniedException e) throws IOException, ServletException { response.setCharacterEncoding("utf-8"); response.setContentType("text/javascript;charset=utf-8"); Object principal = SecurityContextHolder.getContext().getAuthentication().getPrincipal(); String username = null; if (principal instanceof UserDetails){ username = ((UserDetails)principal).getUsername(); } String servletPath = request.getServletPath(); response.getWriter().print("当前登录人"+username+",无"+servletPath+"该路径权限"); } } - 效果
三 源码地址
https://github.com/hanpengbo/SpringBoot/tree/master/springboot-security
四 本文参考知识地址
https://spring.io/guides/gs/securing-web/
https://docs.spring.io/spring-security/site/docs/5.2.1.RELEASE/reference/htmlsingle/
https://docs.spring.io/spring-security/site/docs/5.2.1.RELEASE/api/
五 未完待续
- 刚接触security ,写文章的目的是为了 督促自己了解知识尽量全面系统,未完待续。
- security 学的不舒服,不得劲。我喜欢条条大路通罗马的感觉,学这个有种过独木桥的感觉,慢慢来吧,么得办法
- 过两天看看shiro对照一下吧
