Springboot: 2.1.6.RELEASE
SpringCloud: Greenwich.SR1
如无特殊说明,本系列教程全采用以上版本
前面两篇文章我们聊了Spring Cloud Config配置中心,当我们在更新github上面的配置以后,如果想要获取到最新的配置,需要手动刷新或者利用webhook的机制每次提交代码发送请求来刷新客户端,客户端越来越多的时候,需要每个客户端都执行一遍,这种方案就不太适合了。使用Spring Cloud Bus(国人很形象的翻译为消息总线,我比较喜欢叫消息巴士)可以完美解决这一问题。
- Spring Cloud Bus
Spring cloud bus通过轻量消息代理连接各个分布的节点。这会用在广播状态的变化(例如配置变化)或者其他的消息指令。Spring bus的一个核心思想是通过分布式的启动器对spring boot应用进行扩展,也可以用来建立一个多个应用之间的通信频道。目前唯一实现的方式是用AMQP消息代理作为通道,同样特性的设置(有些取决于通道的设置)在更多通道的文档中。
大家可以将它理解为管理和传播所有分布式项目中的消息既可,其实本质是利用了MQ的广播机制在分布式的系统中传播消息,目前常用的有Kafka和RabbitMQ。利用bus的机制可以做很多的事情,其中配置中心客户端刷新就是典型的应用场景之一,我们用一张图来描述bus在配置中心使用的机制。
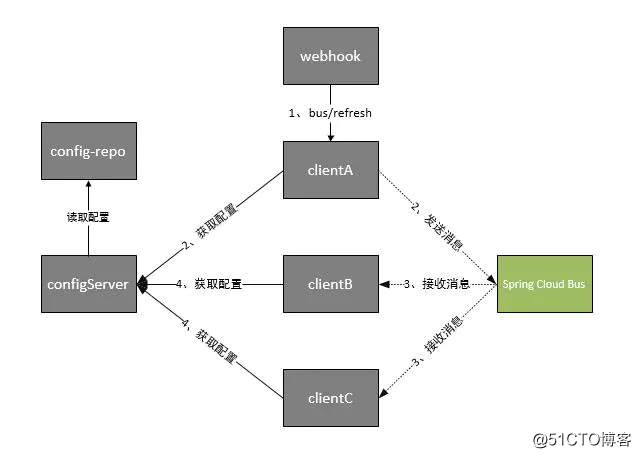
根据此图我们可以看出利用Spring Cloud Bus做配置更新的步骤:
提交代码触发post给客户端A发送bus/refresh
客户端A接收到请求从Server端更新配置并且发送给Spring Cloud Bus
Spring Cloud bus接到消息并通知给其它客户端
其它客户端接收到通知,请求Server端获取最新配置
全部客户端均获取到最新的配置
- 项目示例
我们使用上一篇文章中的config-server和config-client来进行改造,mq使用rabbitmq来做示例。
2.1 客户端config-client
2.1.1 添加依赖
<dependency>
<groupId>org.springframework.cloud</groupId>
<artifactId>spring-cloud-starter-bus-amqp</artifactId>
</dependency>
复制代码需要多引入spring-cloud-starter-bus-amqp包,增加对消息总线的支持
2.1.2 配置文件 bootstrap.properties
spring.application.name=spring-cloud-config-client
server.port=8081
spring.cloud.config.name=springcloud-config
spring.cloud.config.profile=dev
spring.cloud.config.label=master
spring.cloud.config.discovery.enabled=true
spring.cloud.config.discovery.serviceId=spring-cloud-config-server
eureka.client.service-url.defaultZone=http://localhost:8761/eureka/
management.endpoints.web.exposure.include=*
开启消息跟踪
spring.cloud.bus.trace.enabled=true
spring.rabbitmq.host=127.0.0.1
spring.rabbitmq.port=5672
spring.rabbitmq.username=
spring.rabbitmq.password=
复制代码配置文件需要增加RebbitMq的相关配置,这样客户端代码就改造完成了。
2.1.3 测试
依次启动eureka,config-serve,config-client。
修改config-client启动配置,同时在8081和8082端口启动服务。
启动完成后,浏览器分别访问连接:http://localhost:8081/hello, http://localhost:8082/hello, 可以发现页面显示的内容都是:hello dev update1,说明客户端都已经读取到了server端的内容。
现在我们更新github上的配置文件,将配置内容改为hello dev update,先访问一下http://localhost:8081/hello,可以看到页面依然显示为:hello dev update1。
我们对端口为8081的服务发送一个/actuator/bus-refresh的POST请求,在win10下使用下面命令来模拟webhook。
curl -X POST http://localhost:8081/actuator/bus-refresh
复制代码注意: 在springboot2.x的版本中刷新路径为:/actuator/bus-refresh,在springboot1.5.x的版本中刷新路径为:/bus/refresh。
执行完成后,我们先访问http://localhost:8082/hello,可以看到页面打印内容已经变为:hello dev update,这样说明,我们8081端口的服务已经把更新后的信息通过rabbitmq推送给了8082端口的服务,这样我们就实现了图一中的示例。
2.2 改进版
上面的流程中,虽然我们做到了利用一个消息总线触发刷新,而刷新所有客户端配置的目的,但是这种方式并不合适,如下:
打破了微服务的职责单一性。微服务本身是业务模块,它本不应该承担配置刷新的职责。
破坏了微服务各节点的对等性。
如果客户端ip有变化,这时我们就需要修改WebHook的配置。
我们可以将上面的流程改进一下

这时Spring Cloud Bus做配置更新步骤如下:
提交代码触发post给Server端发送bus/refresh
Server端接收到请求并发送给Spring Cloud Bus
Spring Cloud bus接到消息并通知给其它客户端
其它客户端接收到通知,请求Server端获取最新配置
全部客户端均获取到最新的配置
这样的话我们在server端的代码做一些改动,来支持/actuator/bus-refresh
和上面的client端的改动基本一致
2.2.1 添加依赖
<dependency>
<groupId>org.springframework.cloud</groupId>
<artifactId>spring-cloud-starter-bus-amqp</artifactId>
</dependency>
需要多引入spring-cloud-starter-bus-amqp包,增加对消息总线的支持
2.2.2 配置文件application.yml
server:
port: 8080
spring:
application:
name: spring-cloud-config-server
cloud:
config:
server:
git:
uri: https://github.com/meteor1993/SpringCloudLearning
search-paths: chapter6/springcloud-config
username:
password:
rabbitmq:
host: 217.0.0。1
port: 5672
username:
password:
management:
endpoints:
web:
exposure:
include: "*"
eureka:
client:
service-url:
defaultZone: http://localhost:8761/eureka/
配置文件需要增加RebbitMq的相关配置,actuator开启所有访问。
2.2.3 测试
依次启动eureka,config-serve,config-client。
修改config-client启动配置,同时在8081和8082端口启动服务。
按照上面的测试方式,访问两个客户端测试均可以正确返回信息。同样修改配置文件,将值改为:hello im dev update并提交到仓库中。在win10下使用下面命令来模拟webhook。
curl -X POST http://localhost:8081/actuator/bus-refresh
复制代码执行完成后,依次访问两个客户端,返回:hello im dev update。说明三个客户端均已经拿到了最新配置文件的信息,这样我们就实现了上图中的示例。