openwrt 开发外围准备工作:(零)编译openwrt固件
前言
在开发过程中我发现下载的固件里没有我需要的功能,因此我学习了一下自定义固件的相关操作。
本文将简单描述如何从零开始编译一个自己的固件。
我的固件需求是,x86,有luci,带串口驱动ch341,带rt3070驱动。
编译自定义固件是学习openwrt不可跳过的一个环节,切记!
准备编译工具
为了防止在编译过程中出现error说某种工具不足,先提前准备好相关内容。
注意: 后面的…OK类似的是我为了标记进度自己添加的,实际使用过程中应输入类似:sudo apt-get install g++
sudo apt-get install g++  。。。OK
sudo apt-get install libncurses5-dev  …OK
sudo apt-get install zlib1g-dev …OK
sudo apt-get install bison  …OK
sudo apt-get install flex   …OK
sudo apt-get install unzip  …OK
sudo apt-get install autoconf  …OK
sudo apt-get install gawk  …OK
sudo apt-get install make  …OK
sudo apt-get install gettext  …OK
sudo apt-get install gcc  …OK
sudo apt-get install binutils   …OK
sudo apt-get install patch  …OK
sudo apt-get install bzip2  …OK
sudo apt-get install libz-dev  …OK
sudo apt-get install asciidoc  …OK
sudo apt-get install subversion  …OK
sudo apt-get install sphinxsearch  …OK
sudo apt-get install libtool   …OK
sudo apt-get install sphinx-common  …OK
sudo apt-get install libssl-dev  …OK
sudo apt-get install libssl0.9.8  …OK
sudo apt-get install git-core  …OK
sudo apt-get install build-essential   …OK
sudo apt-get install mercurial   …OK
克隆所需源码
找一个空的文件夹,用非root模式打开,然后执行下面这个指令
git clone git://github.com/openwrt/openwrt.git
下载组件
承接上一步,进入目录
cd openwrt
然后进行组件下载和安装
./scripts/feeds update
./scripts/feeds update -a
./scripts/feeds install –a
注意有时候会出现组件下载不完全导致安装过程报错的情况,通常只需要重复以上的3行指令就可以解决。
到此如果能够没有error则可以进行下一步操作了
配置功能
目录不变,使用指令
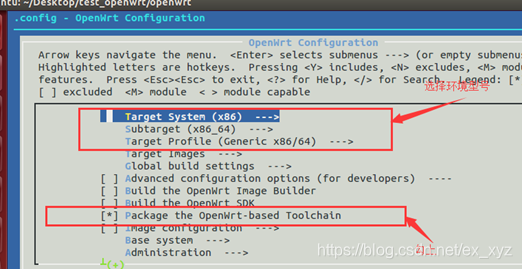
make menuconfig
然后会开启一个界面,大致如下
需要关注的页面上半段:
需要关注的页面下半段:
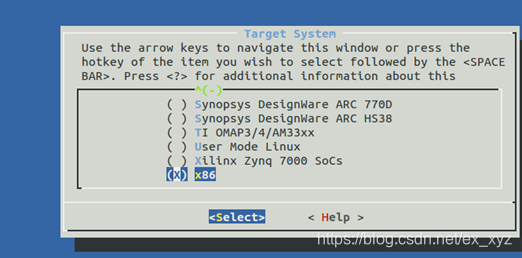
选择环境型号
请自行根据自己的设备选择,我是虚拟机,因此选择x86_64
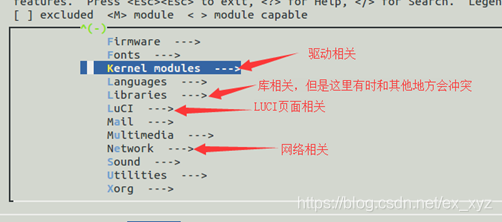
驱动相关
进入驱动相关的条目后重点关注一下我指示的这几个条目,接下来就要配置这些相关的内容了。
配置网络相关驱动
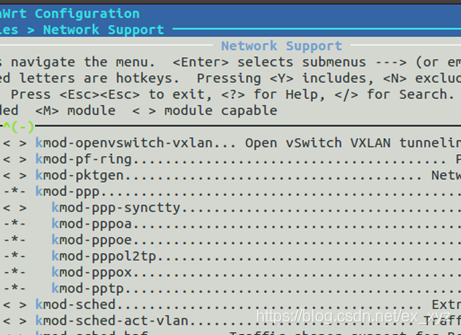
因为我们想玩ppp拨号所以这些需要选上。
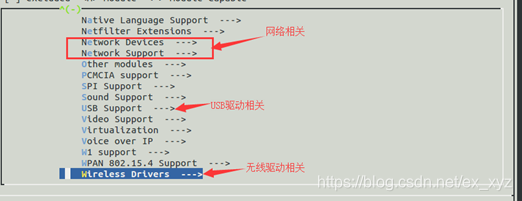
配置USB相关驱动
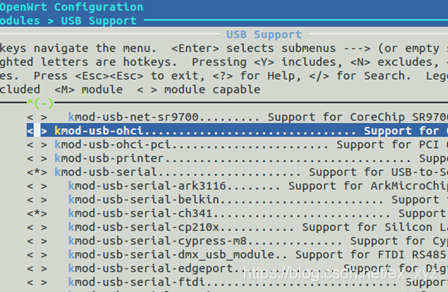
主要是两部分一个支持串口转USBCH341

另一个是为了网卡做准备
配置无线驱动相关
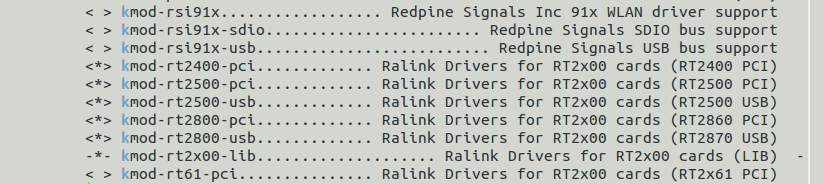
我也忘了3070是哪一个了,都选上,不亏。(有的地方多选会有bug,比如luci,需要注意)。
添加LUCI页面
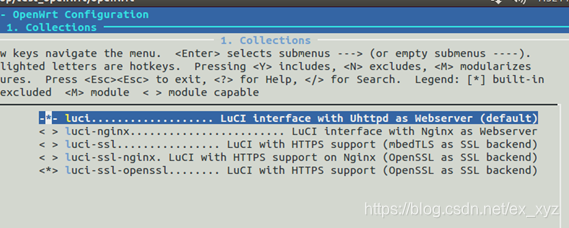
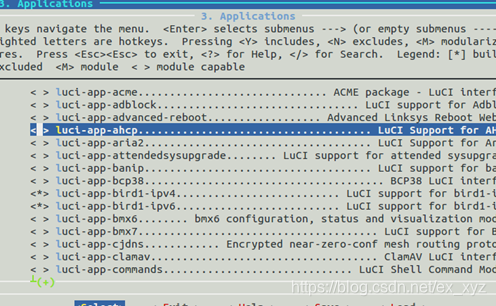

如图,勾选条目。
在这里我吃过一次亏,由于没有勾选相关条目导致我打不开ipv4的luci界面,只能开启ipv6的界面。具体是哪一个条目我忘了,如果出现一样的问题,请各位仔细检查luci相关的功能是否被勾选。
目前图中应该是勾上了。
配置网络相关
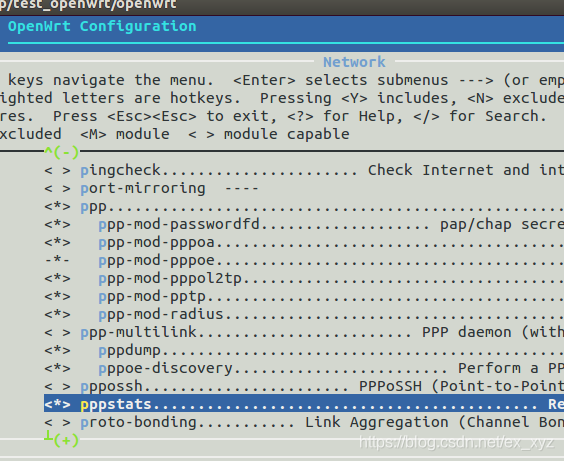
还是一样主要是把ppp勾上
保存配置

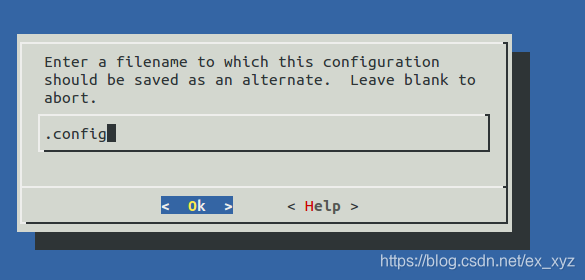
不要忘记保存!!
不要忘记保存!!
不要忘记保存!!
(重要的事情说3遍)
执行编译
清除旧数据
make clean
进行编译
make v=99
编译过程中也许会出现这样的错误:
···
- check_data_file_clashes: Package libustream-openssl20150806 wants to install file /home/b/Desktop/test_openwrt/openwrt/build_dir/target-i386_pentium4_musl/root-x86/lib/libustream-ssl.so
But that file is already provided by package * libustream-mbedtls20150806 - opkg_install_cmd: Cannot install package libustream-openssl20150806.
- check_data_file_clashes: Package nginx-mod-luci-ssl wants to install file /home/b/Desktop/test_openwrt/openwrt/build_dir/target-i386_pentium4_musl/root-x86/etc/nginx/conf.d/luci.locations
But that file is already provided by package * nginx-mod-luci - check_data_file_clashes: Package nginx-mod-luci-ssl wants to install file /home/b/Desktop/test_openwrt/openwrt/build_dir/target-i386_pentium4_musl/root-x86/etc/uci-defaults/60_nginx-luci-support
But that file is already provided by package * nginx-mod-luci - opkg_install_cmd: Cannot install package nginx-mod-luci-ssl.
···
解决方案:取消勾选:
nginx-mod-luci-ssl ,nginx-mod-luci-ssl ,libustream-openssl20150806
遇到这种错误要仔细检查配置选项的时候是不是多选择了什么内容。
make menuconfig
仔仔细细的查看
然后再编译
如果实在找不到,那就只能,
mv .config .config.bak
make clean
从头开始
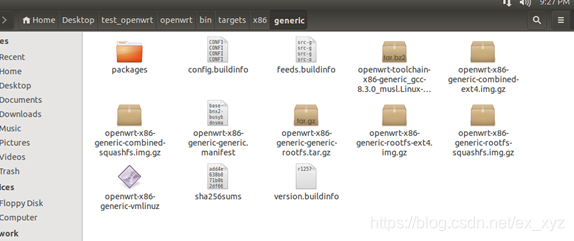
获取编译结果
在编译完成后,在没有出现报错导致编译终止的情况下,到下图的目录里有所需的烧录文件(我所需的是:openwrt-x86-generic-combined-squashfs.img.gz)
记录一些坑:
make -C /home/b/Desktop/test_openwrt/openwrt/build_dir/target-x86_64_musl/linux-x86_64/linux-5.4.24 KCFLAGS="-ffile-prefix-map=/home/b/Desktop/test_openwrt/openwrt/build_dir/target-x86_64_musl=target-x86_64_musl" HOSTCFLAGS="-O2 -I/home/b/Desktop/test_openwrt/openwrt/staging_dir/host/include -I/home/b/Desktop/test_openwrt/openwrt/staging_dir/hostpkg/include -I/home/b/Desktop/test_openwrt/openwrt/staging_dir/target-x86_64_musl/host/include -Wall -Wmissing-prototypes -Wstrict-prototypes" CROSS_COMPILE="x86_64-openwrt-linux-musl-" ARCH="x86" KBUILD_HAVE_NLS=no KBUILD_BUILD_USER="" KBUILD_BUILD_HOST="" KBUILD_BUILD_TIMESTAMP="Wed Mar 18 22:55:51 2020" KBUILD_BUILD_VERSION="0" HOST_LOADLIBES="-L/home/b/Desktop/test_openwrt/openwrt/staging_dir/host/lib" KBUILD_HOSTLDLIBS="-L/home/b/Desktop/test_openwrt/openwrt/staging_dir/host/lib" CONFIG_SHELL="bash" V=''  cmd_syscalls= KERNELRELEASE=5.4.24 CC="x86_64-openwrt-linux-musl-gcc" M="/home/b/Desktop/test_openwrt/openwrt/build_dir/target-x86_64_musl/wifidog-ng-nossl" modules
make[4]: Entering directory `/home/b/Desktop/test_openwrt/openwrt/build_dir/target-x86_64_musl/linux-x86_64/linux-5.4.24'
  CC [M]  /home/b/Desktop/test_openwrt/openwrt/build_dir/target-x86_64_musl/wifidog-ng-nossl/main.o
/home/b/Desktop/test_openwrt/openwrt/build_dir/target-x86_64_musl/wifidog-ng-nossl/main.c:17:10: fatal error: net/netfilter/nf_nat_l3proto.h: No such file or directory
 #include <net/netfilter/nf_nat_l3proto.h>
          ^~~~~~~~~~~~~~~~~~~~~~~~~~~~~~~~
compilation terminated.
make[6]: *** [/home/b/Desktop/test_openwrt/openwrt/build_dir/target-x86_64_musl/wifidog-ng-nossl/main.o] Error 1
make[5]: *** [/home/b/Desktop/test_openwrt/openwrt/build_dir/target-x86_64_musl/wifidog-ng-nossl] Error 2
make[4]: *** [sub-make] Error 2
make[4]: Leaving directory `/home/b/Desktop/test_openwrt/openwrt/build_dir/target-x86_64_musl/linux-x86_64/linux-5.4.24'
make[3]: *** [/home/b/Desktop/test_openwrt/openwrt/build_dir/target-x86_64_musl/wifidog-ng-nossl/.built] Error 2
make[3]: Leaving directory `/home/b/Desktop/test_openwrt/openwrt/feeds/packages/net/wifidog-ng'
time: package/feeds/packages/wifidog-ng/nossl/compile#2.52#3.63#6.61
make[2]: *** [package/feeds/packages/wifidog-ng/compile] Error 2
make[2]: Leaving directory `/home/b/Desktop/test_openwrt/openwrt'
make[1]: *** [/home/b/Desktop/test_openwrt/openwrt/staging_dir/target-x86_64_musl/stamp/.package_compile] Error 2
make[1]: Leaving directory `/home/b/Desktop/test_openwrt/openwrt'
解决方案: 放弃wifidog,进入源码一看,源码本身语法错误,但是我又不会修,摸索了一天放弃了。
结语
编译的速度是非常慢的,真的很慢,如果是clean后从头开始,大概要3~5个小时,具体取决于你的性能和网速(很多内容需要从网上下载),也有很多办法可以加快这个速度,但是对于初次编译的玩家来说,还是按流程走完可以用再考虑比较合适。如果编译出现了错误积极解决错误然后继续编译,不要直接进行继续编译,错误还是错误不会自己消失的(网络导致的错误除外)
祝各位顺利获得想要的固件,加油|ू・ω・` )
