一、Flume1.6.0概述

Flume 作为 cloudera 开发的实时日志收集系统,受到了业界的认可与广泛应用。Flume 初始的发行版本目前被统称为 Flume OG(original generation),属于 cloudera。但随着 FLume 功能的扩展,Flume OG 代码工程臃肿、核心组件设计不合理、核心配置不标准等缺点暴露出来,尤其是在 Flume OG 的最后一个发行版本 0.9.4. 中,日志传输不稳定的现象尤为严重,为了解决这些问题,2011 年 10 月 22 号,cloudera 完成了 Flume-728,对 Flume 进行了里程碑式的改动:重构核心组件、核心配置以及代码架构,重构后的版本统称为 Flume NG(next generation)。之后 Flume 被纳入 apache 旗下,cloudera Flume 改名为 Apache Flume。
二、Flume核心概念
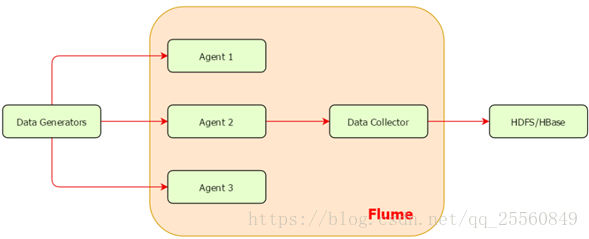
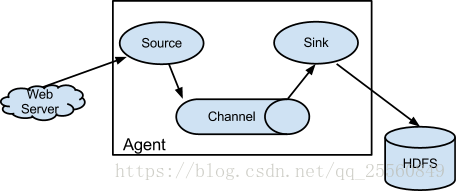
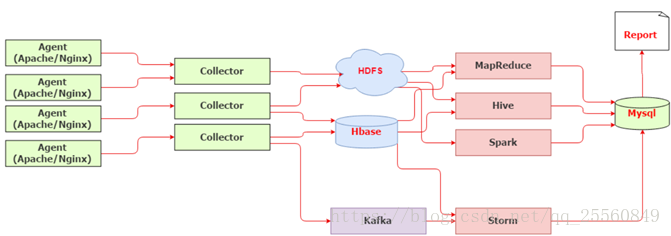
• 数据发生器(如:facebook,twitter)产生的数据被运行在数据发生器所在服务器上的agent所收集,之后数据收集器从各个agent上汇集数据并将采集到的数据存入到HDFS或者HBase中。
1.事件(Flume Event)
• Flume使用Event对象来作为传递数据的格式,event是内部数据传输的最基本单元,由两部分组成:转载数据的字节数组+可选头部。

• Header是key/value形式的,可以用来制造路由决策或携带其他结构化信息(如事件的时间戳或事件来源的服务器主机名),可以把它想象成和HTTP头一样来传输正文之外的额外信息。Flume提供的不同source会给其生成的event添加不同的header。
• Body是一个字节数组,包含了实际的内容。
2.代理(Flume Agent)
• Flume内部有一个或者多个Agent,每一个Agent是一个独立的守护进程(JVM)。
• Agent从客户端接收数据,或者从其他的Agent接收数据,然后迅速将获取的数据传给下一个Agent。
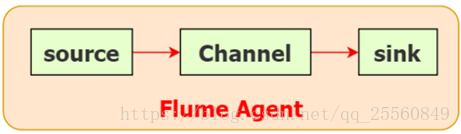
• Agent主要由source、channel、sink三个组件组成。
3.Agent Source
• 负责一个外部源(数据发生器),如一个web服务器传递给他的事件,该外部源将它的事件以Flume可以识别的格式发送到Flume中。
• 当一个Flume源接收到一个事件时,其将通过一个或者多个通道存储该事件。
4.Agent Channel
• Channel是一种短暂的存储容器,它将从source处接收到的event格式的数据缓存起来,直到它们被sinks消费掉,它在source和sink间起着一共桥梁的作用,channel是一个完整的事务,这一点保证了数据在收发的时候的一致性。并且它可以和任意数量的source和sink链接。
• 可以通过参数设置存储的最大event数和每次传输的最大event数。
• Flume通常选择FileChannel,而不使用Memory Channel。
– Memory Channel:内存存储事务,吞吐率极高,但存在丢数据风险
– File Channel:本地磁盘的事务实现模式,保证数据不会丢失(WAL实现)
5.Agent Sink
• Sink会将事件从Channel中移除,并将事件放置到外部数据介质上或者放置到下一个Flume的Source,等到下一个Flume处理。例如:通过Flume HDFS Sink可以将数据放置到HDFS中。对于缓存在通道中的事件,Source和Sink采用异步处理的方式。
• Sink成功取出Event后,将Event从Channel中移除
• 不同类型的Sink:
– 存储Event到最终目的的终端:HDFS、Hbase
– 自动消耗:Null Sink
– 用于Agent之间通信:Avro
6.Agent Interceptor
• Interceptor是作用于Source的一组拦截器,对events进行过滤和自定义处理。可以在app(应用程序日志)和source之间,对app日志进行拦截处理,在日志进入到source之前,对日志进行一些包装、清洗、过滤等等动作。
• 官方上提供的已有的拦截器有:
– Timestamp Interceptor:在event的header中添加一个key叫:timestamp,value为当前的时间戳
– Host Interceptor:在event的header中添加一个key叫:host,value为当前机器的hostname或者ip
– Static Interceptor:可以在event的header中添加自定义的key和value
– Regex Filtering Interceptor:通过正则来清洗或包含匹配的events
– Regex Extractor Interceptor:通过正则表达式来在header中添加指定的key,value则为正则匹配的部分
• flume的拦截器也是chain形式的,可以对一个source指定多个拦截器,按先后顺序依次处理。
7.Agent Selector
• channel selectors有两种类型:
– Replicating ChannelSelector(default):将source过来的events发往所有channel
– MultiplexingChannel Selector:Multiplexing可以选择发到哪些channel
• 对于有选择性数据源,明显需要使用Multiplexing这种分发方式
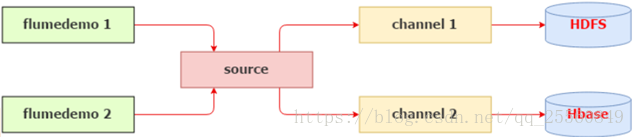
• 问题:Multiplexing需要判断header里指定key的值来决定分发到某个具体的channel,如果demo1和demo2在不同的服务器上运行,我们可以在source上加上一个host拦截器,通过header中的host来判断event该分发给哪个channel,而在同一个服务器上,由host是区分不出来日志的来源的,我们必须想办法在header中添加一个key来区分日志的来源。
8.可靠性
• Flume 使用事务性的方式保证传送Event整个过程的可靠性。 Sink 必须在Event 被存入 Channel 后,或者,已经被传达到下一站agent里,又或者,已经被存入外部数据目的地之后,才能把 Event 从 Channel 中 remove 掉。这样数据流里的 event 无论是在一个 agent 里还是多个 agent 之间流转,都能保证可靠,因为以上的事务保证了 event 会被成功存储起来。比如 Flume支持在本地保存一份文件 channel 作为备份,而memory channel 将event存在内存 queue 里,速度快,但丢失的话无法恢复。
• Source和Sink封装在一个事务的存储和检索中,即事件的放置或者提供由一个事务通过通道来分别提供。这保证了事件集在流中可靠地进行端到端的传递。
• 当节点出现故障时,日志能够被传送到其他节点上而不会丢失。Flume提供了三种级别的可靠性保障,从强到弱依次分别为:end-to-end(收到数据agent首先将event写到磁盘上,当数据传送成功后,再删除;如果数据发送失败,可以重新发送),Store on failure(这也是scribe采用的策略,当数据接收方crash时,将数据写到本地,待恢复后,继续发送),Besteffort(数据发送到接收方后,不会进行确认)。
三、搭建基于Flume日志收集系统
1.安装配置
• 安装apache-flume-1.6.0-cdh5.7.0-bin
• 修改配置文件flume-env.sh:配置JAVA_HOME即可
• 配置系统变量
export FLUME_HOME=/usr/local/src/apache-flume-1.6.0-cdh5.7.0-bin
export PATH=$PATH:$FLUME_HOME/bin
2.实践一:NetCat方式
# Name the components on this agent
a1.sources = r1 #定义了agent名称为a1,source、channel、sink名称为r1,k1,c1
a1.sinks = k1
a1.channels = c1

# Describe/configure the source
a1.sources.r1.type = netcat #通过netcat的方式获得数据,获取数据的地方是masteractive的44444端口
a1.sources.r1.bind = masteractive
a1.sources.r1.port = 44444

# Describe the sink
a1.sinks.k1.type = logger #sink为logger的形式

# Use a channel which buffers events inmemory
a1.channels.c1.type = memory #channel将event保存在内存中
a1.channels.c1.capacity = 1000 #最大的存储量为1000
a1.channels.c1.transactionCapacity = 100 #最大的传输量为100

# Bind the source and sink to the channel
a1.sources.r1.channels = c1 #因为r1,k1,c1只是定义在a1上,但是a1还可以定义出其他很多的source、channel和sink,所以这里必须要指定哪个source对接哪个channel,哪个channel对接哪个sink
a1.sinks.k1.channel = c1
首先安装Telnet
# rpm -qa|grep telnet #检查是否安装Telnet和Telnet-server
# yum install -y telnet-server
# yum install -y telnet
• 运行flume-ng
flume-ng agent --conf conf --conf-file ./conf/flume_netcat.conf --name a1 -Dflume.root.logger=INFO,console
--conf conf 表示指定配置文件的目录,--conf-file ./conf/flume_netcat.conf表示配置文件的名称,--name a1表示agent的名称,-Dflume.root.logger=INFO,console表示sink的logger信息直接到输出到控制台
• 验证:
# telnet masteractive 44444
3.实践二:Exec方式
# Name the components on this agent
a1.sources = r1
a1.sinks = k1
a1.channels = c1

# Describe/configure the source
a1.sources.r1.type = exec
a1.sources.r1.command = tail -f /usr/local/src/apache-flume-1.6.0-cdh5.7.0-bin/1.txt

# Describe the sink
a1.sinks.k1.type = logger

# Use a channel which buffers events inmemory
a1.channels.c1.type = memory
a1.channels.c1.capacity = 1000
a1.channels.c1.transactionCapacity = 100

# Bind the source and sink to the channel
a1.sources.r1.channels = c1
a1.sinks.k1.channel = c1
•运行flume-ng
flume-ng agent --conf conf --conf-file ./conf/flume_exec.conf --name a1 -Dflume.root.logger=INFO,console
•验证:
# echo 'ccc' >> 1.txt
4.实践三:Flume监听日志变化,并且把增量的日志文件写入到hdfs中
# Name the components on this agent
a1.sources = r1
a1.sinks = k1
a1.channels = c1

# Describe/configure the source
a1.sources.r1.type = exec
a1.sources.r1.command = tail -F /usr/local/src/apache-flume-1.6.0-cdh5.7.0-bin/1.log
a1.sources.r1.channels = c1

# Describe the sink
a1.sinks.k1.type = hdfs
a1.sinks.k1.channel = c1

## 下面的配置告诉用hdfs去写文件的时候写到什么位置,下面的表示不是写死的,而是可以动态的变化的。表示输出的目录名称是可变的
a1.sinks.k1.hdfs.path =/flume/tailout/%y-%m-%d/%H%M/

##表示最后的文件的前缀
a1.sinks.k1.hdfs.filePrefix = events-

## 表示到了需要触发的时间时,是否要更新文件夹,true:表示要
a1.sinks.k1.hdfs.round = true

## 表示每隔1分钟改变一次
a1.sinks.k1.hdfs.roundValue = 1

## 切换文件的时候的时间单位是分钟
a1.sinks.k1.hdfs.roundUnit = minute

## 表示只要过了3秒钟,就切换生成一个新的文件
a1.sinks.k1.hdfs.rollInterval = 3

## 如果记录的文件大于20字节时切换一次
a1.sinks.k1.hdfs.rollSize = 20

## 当写了5个事件时触发
a1.sinks.k1.hdfs.rollCount = 5

## 收到了多少条消息往dfs中追加内容
a1.sinks.k1.hdfs.batchSize = 10

## 使用本地时间戳
a1.sinks.k1.hdfs.useLocalTimeStamp = true

#生成的文件类型,默认是Sequencefile,可用DataStream:为普通文本
a1.sinks.k1.hdfs.fileType = DataStream

# Use a channel which buffers events inmemory
##使用内存的方式
a1.channels.c1.type = memory
a1.channels.c1.capacity = 1000
a1.channels.c1.transactionCapacity = 100

# Bind the source and sink to the channel
a1.sources.r1.channels = c1
a1.sinks.k1.channel = c1
• 运行flume-ng
./bin/flume-ng agent --conf conf --conf-file./conf/flume.conf -name a1 -Dflume.root.logger=DEBUG,console
• 验证:
echo "11113">> 1.log
5.实践四:avro
1) exec-memory-avro.conf
exec-memory-avro.sources = exec-source
exec-memory-avro.sinks = avro-sink
exec-memory-avro.channels = memory-channel
exec-memory-avro.sources.exec-source.type =exec
exec-memory-avro.sources.exec-source.command= tail -F /usr/local/src/apache-flume-1.6.0-cdh5.7.0-bin/1.log

exec-memory-avro.sources.exec-source.shell= /bin/sh -c

exec-memory-avro.sinks.avro-sink.type =avro
exec-memory-avro.sinks.avro-sink.hostname =masteractive
exec-memory-avro.sinks.avro-sink.port =44444
exec-memory-avro.channels.memory-channel.type= memory

exec-memory-avro.sources.exec-source.channels= memory-channel
exec-memory-avro.sinks.avro-sink.channel =memory-channel
2) avro-memory-logger.conf
avro-memory-logger.sources = avro-source
avro-memory-logger.sinks = logger-sink
avro-memory-logger.channels =memory-channel

avro-memory-logger.sources.avro-source.type= avro
avro-memory-logger.sources.avro-source.bind= masteractive
avro-memory-logger.sources.avro-source.port= 44444

avro-memory-logger.sinks.logger-sink.type =logger
avro-memory-logger.channels.memory-channel.type= memory

avro-memory-logger.sources.avro-source.channels= memory-channel
avro-memory-logger.sinks.logger-sink.channel= memory-channel
先启动avro-memory-logger再启动exec-memory-avro
【yum install psmisc
fuser -v -n tcp 8080解除端口占用】
3) avro-memory-kafka
avro-memory-kafka.sources = avro-source
avro-memory-kafka.sinks = kafka-sink
avro-memory-kafka.channels = memory-channel

avro-memory-kafka.sources.avro-source.type= avro
avro-memory-kafka.sources.avro-source.bind= masteractive
avro-memory-kafka.sources.avro-source.port= 44444

avro-memory-kafka.sinks.kafka-sink.type =org.apache.flume.sink.kafka.KafkaSink
avro-memory-kafka.sinks.kafka-sink.brokerList= masteractive:9092
avro-memory-kafka.sinks.kafka-sink.topic =hello_topic
avro-memory-kafka.sinks.kafka-sink.batchSize= 5
avro-memory-kafka.sinks.kafka-sink.requiredAcks=1

avro-memory-kafka.channels.memory-channel.type= memory
avro-memory-kafka.sources.avro-source.channels= memory-channel
avro-memory-kafka.sinks.kafka-sink.channel= memory-channel
6.实践五:interceptor
1)时间戳
了解信息创建的时间,系统会默认给值。
a1.sources = r1
a1.sinks = k1
a1.channels = c1

a1.sources.r1.type = http
a1.sources.r1.host = masteractive
a1.sources.r1.port = 52020
a1.sources.r1.channels = c1

a1.sources.r1.interceptors = i1
a1.sources.r1.interceptors.i1.preserveExisting= false
a1.sources.r1.interceptors.i1.type = timestamp

a1.sinks.k1.type = hdfs
a1.sinks.k1.channel = c1
a1.sinks.k1.hdfs.path =hdfs://masteractive:9000/flume/%Y-%m-%d/%H%M
a1.sinks.k1.hdfs.filePrefix = timestamp.
a1.sinks.k1.hdfs.fileType=DataStream

a1.channels.c1.type = memory
a1.channels.c1.capacity = 1000
a1.channels.c1.transactionCapacity = 100

a1.sources.r1.channels = c1
a1.sinks.k1.channel = c1
[root@master apache-flume-1.6.0-bin]# flume-ng agent -c conf -f conf/interceptor_test/flume_ts_interceptor.conf -n a1 -Dflume.root.logger=INFO,console #启动
[root@master interceptor_test]# curl -X POST -d '[{"headers":{"h1":"slave1 is header", "h2":"slave2 is header"}, "body":"1:2:3"}]' http://master:52020 #向端口发送数据
2)hostname
了解信息的来源
flume_hostname_interceptor.conf
a1.sources = r1
a1.sinks = k1
a1.channels = c1

a1.sources.r1.type = syslogtcp
a1.sources.r1.host = master
a1.sources.r1.port = 52020
a1.sources.r1.channels = c1

a1.sources.r1.interceptors = i1 i2
a1.sources.r1.interceptors.i1.preserveExisting= false
a1.sources.r1.interceptors.i1.type = timestamp
a1.sources.r1.interceptors.i2.type = host
a1.sources.r1.interceptors.i2.hostHeader = hostname
a1.sources.r1.interceptors.i2.useIP = false

a1.sinks.k1.type = hdfs
a1.sinks.k1.channel = c1
a1.sinks.k1.hdfs.path =hdfs://master:9000/flume/%Y-%m-%d/%H%M
a1.sinks.k1.hdfs.filePrefix = %{hostname}.
a1.sinks.k1.hdfs.fileType=DataStream

a1.channels.c1.type = memory
a1.channels.c1.capacity = 1000
a1.channels.c1.transactionCapacity = 100

a1.sources.r1.channels = c1
a1.sinks.k1.channel = c1
[root@master apache-flume-1.6.0-bin]# flume-ng agent -c conf -f conf/interceptor_test/flume_hostname_interceptor.conf -n a1 -Dflume.root.logger=INFO,console #启动
[root@master interceptor_test]# echo "23132" | nc master 52020 #模拟系统日志
3)自定义
flume_static_interceptor.conf
a1.sources = r1
a1.sinks = k1
a1.channels = c1

a1.sources.r1.type = http
a1.sources.r1.host = master
a1.sources.r1.port = 52020
a1.sources.r1.channels = c1

a1.sources.r1.interceptors = i1
a1.sources.r1.interceptors.i1.type = static
a1.sources.r1.interceptors.i1.key = badou_flume
a1.sources.r1.interceptors.i1.value = so_easy

a1.sinks.k1.type = logger

a1.channels.c1.type = memory
a1.channels.c1.capacity = 1000
a1.channels.c1.transactionCapacity = 100

a1.sources.r1.channels = c1
a1.sinks.k1.channel = c1
[root@master apache-flume-1.6.0-bin]# flume-ng agent -c conf -f conf/interceptor_test/flume_static_interceptor.conf -n a1 -Dflume.root.logger=INFO,console #启动
[root@master interceptor_test]# curl -X POST -d '[{"headers":{"h1":"slave1 is header", "h2":"slave2 is header"}, "body":"1:2:3"}]' http://master:52020 #向端口发送数据,可以发现header中自动添加了自定义的header
4)正则过滤
flume_regex_interceptor.conf
a1.sources = r1
a1.sinks = k1
a1.channels = c1

a1.sources.r1.type = syslogtcp
a1.sources.r1.host = master
a1.sources.r1.port = 52020
a1.sources.r1.channels = c1

a1.sources.r1.interceptors = i1
a1.sources.r1.interceptors.i1.type =regex_filter
a1.sources.r1.interceptors.i1.regex =^[0-9]*$  #如果都是数字就会被过滤掉
a1.sources.r1.interceptors.i1.excludeEvents =true

a1.sinks.k1.type = logger

a1.channels.c1.type = memory
a1.channels.c1.capacity = 1000
a1.channels.c1.transactionCapacity = 100

a1.sources.r1.channels = c1
a1.sinks.k1.channel = c1
[root@master apache-flume-1.6.0-bin]# flume-ng agent -c conf -f conf/interceptor_test/flume_regex_interceptor.conf -n a1 -Dflume.root.logger=INFO,console #启动
[root@master interceptor_test]# echo "23132a" | nc master 52020 #可以被接收到
[root@master interceptor_test]# echo "23132" | nc master 52020 #不能被接收到,会报错 Invalid Syslog data
5)正则抽取
将信息中满足正则条件的,添加到header中
flume_regex_interceptor.conf_extractor
a1.sources = r1
a1.sinks = k1
a1.channels = c1

a1.sources.r1.type = http
a1.sources.r1.host = master
a1.sources.r1.port = 52020
a1.sources.r1.channels = c1

a1.sources.r1.interceptors = i1
a1.sources.r1.interceptors.i1.type = regex_extractor
a1.sources.r1.interceptors.i1.regex = (\\d):(\\d):(\\d)
a1.sources.r1.interceptors.i1.serializers = s1 s2 s3
a1.sources.r1.interceptors.i1.serializers.s1.name = one
a1.sources.r1.interceptors.i1.serializers.s2.name = two
a1.sources.r1.interceptors.i1.serializers.s3.name = three

a1.sinks.k1.type = logger

a1.channels.c1.type = memory
a1.channels.c1.capacity = 1000
a1.channels.c1.transactionCapacity = 100

a1.sources.r1.channels = c1
a1.sinks.k1.channel = c1
[root@master apache-flume-1.6.0-bin]# flume-ng agent -c conf -f conf/interceptor_test/flume_regex_interceptor.conf_extractor -n a1 -Dflume.root.logger=INFO,console
[root@master interceptor_test]# curl -X POST -d '[{"headers":{"h1":"slave1 is header", "h2":"slave2 is header"}, "body":"hhhh1:2:3h"}]' http://master:52020
输出的信息为:
2018-05-22 20:15:39,000 (SinkRunner-PollingRunner-DefaultSinkProcessor) [INFO - org.apache.flume.sink.LoggerSink.process(LoggerSink.java:94)] Event: { headers:{two=2, one=1, three=3, h1=slave1 is header, h2=slave2 is header} body: 68 68 68 68 31 3A 32 3A 33 68 hhhh1:2:3h } #可以看到header已经添加了匹配到的数字
7.实践六:selector
1)replicating
下游接收到的信息一样,相当于广播。
flume_client_replicating.conf
# Name the components on this agent
a1.sources = r1
a1.sinks = k1 k2
a1.channels = c1 c2

# Describe/configure the source
a1.sources.r1.type = syslogtcp
a1.sources.r1.port = 50000
a1.sources.r1.host = master
a1.sources.r1.selector.type = replicating
a1.sources.r1.channels = c1 c2

# Describe the sink
a1.sinks.k1.type = avro
a1.sinks.k1.channel = c1
a1.sinks.k1.hostname = slave1
a1.sinks.k1.port = 50000

a1.sinks.k2.type = avro
a1.sinks.k2.channel = c2
a1.sinks.k2.hostname = slave2
a1.sinks.k2.port = 50000

# Use a channel which buffers events inmemory
a1.channels.c1.type = memory
a1.channels.c1.capacity = 1000
a1.channels.c1.transactionCapacity = 100

a1.channels.c2.type = memory
a1.channels.c2.capacity = 1000
a1.channels.c2.transactionCapacity = 100
2)multiplexing
向指定的下游agent发送信息
# Name the components on this agent
a1.sources = r1
a1.sinks = k1 k2
a1.channels = c1 c2

# Describe/configure the source
a1.sources.r1.type= org.apache.flume.source.http.HTTPSource
a1.sources.r1.port= 50000
a1.sources.r1.host= master
a1.sources.r1.selector.type= multiplexing
a1.sources.r1.channels= c1 c2

a1.sources.r1.selector.header= areyouok #如果头中是ok就选择c1,否则是c2
a1.sources.r1.selector.mapping.OK = c1
a1.sources.r1.selector.mapping.NO = c2
a1.sources.r1.selector.default= c1

# Describe the sink
a1.sinks.k1.type = avro
a1.sinks.k1.channel = c1
a1.sinks.k1.hostname = slave1
a1.sinks.k1.port = 50000

a1.sinks.k2.type = avro
a1.sinks.k2.channel = c2
a1.sinks.k2.hostname = slave2
a1.sinks.k2.port = 50000

# Use a channel which buffers events inmemory
a1.channels.c1.type = memory
a1.channels.c1.capacity = 1000
a1.channels.c1.transactionCapacity = 100

a1.channels.c2.type = memory
a1.channels.c2.capacity = 1000
a1.channels.c2.transactionCapacity = 100
[root@master apache-flume-1.6.0-bin]# flume-ng agent -c conf -f conf/selector_test/flume_client_multiplexing.conf -n a1 -Dflume.root.logger=INFO,console
测试:
[root@master interceptor_test]# curl -X POST -d '[{"headers":{"areyouok":"ok","h1":"slave1 is header", "h2":"slave2 is header"}, "body":"hhhh1:2:3h"}]' http://master:52020 #slave1将接收到信息
8.实践七:故障转移
场景:有1个主agent和2个从agent,正常工作时,只有1个从agent接收主agent信息,另外1个agent作为备份,不接收agent信息。一旦从agent宕机,会自动切换到另外1个从agent。这里需要配置主agent和从agent,2个从agent的配置基本相同,只在监听的主机名上有所不同。
flume-client.properties
# agent1 name
agent1.channels = c1
agent1.sources = r1
agent1.sinks = k1 k2

#set group
agent1.sinkgroups = g1

#set channel
agent1.channels.c1.type = memory
agent1.channels.c1.capacity = 1000
agent1.channels.c1.transactionCapacity = 100

agent1.sources.r1.channels = c1
agent1.sources.r1.type = exec
agent1.sources.r1.command = tail -F /usr/local/src/apache-flume-1.6.0-cdh5.7.0-bin/1.log


# set sink1
agent1.sinks.k1.channel = c1
agent1.sinks.k1.type = avro
agent1.sinks.k1.hostname = slave1
agent1.sinks.k1.port = 52020

# set sink2
agent1.sinks.k2.channel = c1
agent1.sinks.k2.type = avro
agent1.sinks.k2.hostname = slave2
agent1.sinks.k2.port = 52020

# set sink group 将k1,k2和g1绑定,从而实现自动故障转移
agent1.sinkgroups.g1.sinks = k1 k2

# set failover
agent1.sinkgroups.g1.processor.type = failover
agent1.sinkgroups.g1.processor.k1 = 10
agent1.sinkgroups.g1.processor.k2 = 1 #数字越大,权限越高
agent1.sinkgroups.g1.processor.maxpenalty = 10000
flume-server.properties
# agent1 name
a1.channels = c1
a1.sources = r1
a1.sinks = k1

#set channel
a1.channels.c1.type = memory
a1.channels.c1.capacity = 1000
a1.channels.c1.transactionCapacity = 100

# other node, slave to master
a1.sources.r1.type = avro
a1.sources.r1.bind = slave1 #对于slave2机器上,是slave2
a1.sources.r1.port = 52020


a1.sources.r1.channels = c1

# set sink to hdfs
a1.sinks.k1.type = logger

a1.sinks.k1.channel=c1
a1.sinks.k1.hdfs.filePrefix = %Y-%m-%d
启动时候先把2个从agent启动,再启动主agent。
9.实践八:负载均衡
使消息比较均衡地传输到下游的agent中,在这里,2个从agent的配置和实践六中一致,只修改主节点的配置文件。
flume-client.properties_loadbalance
# Name the components on this agent
a1.sources = r1
a1.sinks = k1 k2
a1.channels = c1

# Describe/configure the source
a1.sources.r1.type = exec
a1.sources.r1.command = tail -f /usr/local/src/apache-flume-1.6.0-cdh5.7.0-bin/1.log


# Describe the sink
a1.sinks.k1.type = avro
a1.sinks.k1.hostname = slave1
a1.sinks.k1.port = 52020

a1.sinks.k2.type = avro
a1.sinks.k2.hostname = slave2
a1.sinks.k2.port = 52020

# Use a channel which buffers events in memory
a1.channels.c1.type = memory
a1.channels.c1.capacity = 1000
a1.channels.c1.transactionCapacity = 100

# Bind the source and sink to the channel
a1.sources.r1.channels = c1
a1.sinks.k1.channel = c1
a1.sinks.k2.channel = c1

a1.sinkgroups = g1
a1.sinkgroups.g1.sinks = k1 k2
a1.sinkgroups.g1.processor.type = load_balance
a1.sinkgroups.g1.processor.selector = round_robin # 每个agent接收几个消息后,就轮到下一个agent接收消息

# a1.sinkgroups.g1.processor.type = failover
# a1.sinkgroups.g1.processor.priority.k1 = 10
# a1.sinkgroups.g1.processor.priority.k2 = 1
# a1.sinkgroups.g1.processor.priority.maxpenality = 10000