这篇我们依然撇开播放器,讲一讲桌面widget中最基本的功能,大家先把最基本的给弄懂了,下篇再来实现播放器的桌面widget,可见实现一个复杂的桌面widget是多么的困难。
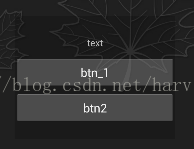
先看下这篇的实现效果:
在widget中实现一个text和两个button,当点击第一个button的时候,text中显示一个随机数。

在上一篇中《桌面widget详解(一)——基本demo构建》,我们简单介绍了怎么显示了widget,但如何让widget中的按钮得到交互等问题还没有涉及,这篇中,虽然是新开的布局,但有关显示的部分,我就不再细讲,大家可以参考上一篇。
一、widget布局
本来我不打算列出这部分内容,但考虑到这个布局是新的,所以还是给大家简单列一下吧。但有关xml下的<appwidget-provider和AndroidManifest.xml下的注册就不再讲了。不过,为了区分,我把丑小孩的头像改成了小猫咪。其它没变化,看代码就知道了,下面列出widget的布局:
<?xml version="1.0" encoding="utf-8"?>
<LinearLayout xmlns:android="http://schemas.android.com/apk/res/android"
    android:layout_width="match_parent"
    android:layout_height="match_parent"
    android:background="#33000000"
    android:orientation="vertical" >

    <TextView
        android:id="@+id/text"
        android:layout_width="match_parent"
        android:layout_height="wrap_content"
        android:layout_marginBottom="5dip"
        android:layout_marginTop="30dip"
        android:gravity="center_horizontal"
        android:text="text"
        android:textSize="14sp" />

    <Button
        android:id="@+id/btn1"
        android:layout_width="match_parent"
        android:layout_height="wrap_content"
        android:text="btn_1" />

    <Button
        android:id="@+id/btn2"
        android:layout_width="match_parent"
        android:layout_height="wrap_content"
        android:layout_marginTop="5dip"
        android:text="btn2" />

</LinearLayout>
这个布局很简单,一个textView和两个btn,没什么难度。
二、AppWidget中控件交互(ExampleAppWidgetProvider.java)
1、发送广播与按钮事件绑定
因为appwidget运行的进程和我们创建的应用不在一个进程中,所以我们也就不能像平常引用控件那样来获得控件的实例。这时候,我们就要靠RemoteViews,直译成中文应该是远程视图; 也就是说通过这个东西我们能够获得不在同一进程中的对象,这也就为我们编写appwidget的处理事件提供了帮助。我们使用一下代码来创建一个RemoteViews。
RemoteViews remoteViews = new RemoteViews(context.getPackageName(),R.layout.example_appwidget);

// 绑定事件
remoteViews.setOnClickPendingIntent(R.id.btn1, pendingIntent);
第一句创建了一个remoteViews实例,然后将其中的按钮与点击事件绑定,后面的参数中又出来了一个PendingIntent。下面看看PendingIntent又是个什么玩意。
intent英文意思是意图,pending表示即将发生或来临的事情。
PendingIntent这个类用于处理即将发生的事情。比如在通知Notification中用于跳转页面,但不是马上跳转。所以我们可以将它理解成一个封装成消息的intent的。即这个intent并不是立即start,而是像消息一样被发送出去,等接收方接到以后,再分析里面的内容。
Intent intent = new Intent();
intent.setClass(context, ExampleAppWidgetProvider.class);
intent.setData(Uri.parse("harvic:" + R.id.btn1));

// 设置pendingIntent的作用
PendingIntent pendingIntent = PendingIntent.getBroadcast(context, 0,intent, 0);
可以看到,PendingIntent是Intent的封装,在构造PendingIntent前,也要先构造一个Intent,并可以利用Intent的属性传进去action,Extra等,同样,在接收时,对方依然是接收Intent的,而不是接收PaddingIntent。这个问题,我们后面可以看到。
PendingIntent.getBroadcast(context, 0,intent, 0);指从系统中获取一个用于可以发送BroadcastReceiver广播的PendingIntent对象。
讲完这两个之后,我们看一下OnUpdate的内容:
其中:
String broadCastString = "harvic.provider";
@Override
public void onUpdate(Context context, AppWidgetManager appWidgetManager,
		int[] appWidgetIds) {

	Intent intent = new Intent();
	intent.setClass(context, ExampleAppWidgetProvider.class);
	intent.setData(Uri.parse("harvic:" + R.id.btn1));

	// 设置pendingIntent的作用
	PendingIntent pendingIntent = PendingIntent.getBroadcast(context, 0,intent, 0);
	RemoteViews remoteViews = new RemoteViews(context.getPackageName(),R.layout.example_appwidget);
	remoteViews.setOnClickPendingIntent(R.id.btn1, pendingIntent);
	// 更新Appwidget
	appWidgetManager.updateAppWidget(appWidgetIds, remoteViews);
}
这里的总体步骤就是,构造一个RemoteView,然后利用updateAppWidget()将构造的RemoteView更新指定的widget界面。
先看构造pendingIntent的过程:
Intent intent = new Intent();
intent.setClass(context, ExampleAppWidgetProvider.class);
intent.setData(Uri.parse("harvic:" + R.id.btn1));

// 设置pendingIntent的作用
PendingIntent pendingIntent = PendingIntent.getBroadcast(context, 0,intent, 0);
首先是构造一个广播时发送的intent,注意这个intent构造的是显示intent,直接将这个广播发送给ExampleAppWidgetProvider,附带的数据通过Data传送(最后附录中会讲为什么不通过putExtra传送额外值),这里传送过去的btn1的id值。
然后通过PendingIntent.getBroadcast();将intent封装到pendingIntent中,以待发送。
在构造了pendingIntent之后,就是将这个pendingIntent与btn1绑定,当用户点击btn1的时候,将广播发送出去。代码如下:
RemoteViews remoteViews = new RemoteViews(context.getPackageName(),R.layout.example_appwidget);
remoteViews.setOnClickPendingIntent(R.id.btn1, pendingIntent);
最后,是将这个remoteView更新到所有widget上。(因为用户对某一个apps可以创建多个widget,要保持所有的widget状态统一)
appWidgetManager.updateAppWidget(appWidgetIds, remoteViews);
注意这里有个appWidgetIds,这个参数是通过OnUpdate()传过来的,它是一个int数组,里面存储了用户所创建的所有widget的ID值。更新的时候也是通过widget的ID值,一个个更新的。
再絮叨一遍,我们这里做了两件事:
(1)、将按钮控件(R.id.btn1)与pendingIntent绑定。当用户点击按钮时,就会把所构造的intent发送出去。
涉及代码为:
Intent intent = new Intent();
intent.setClass(context, ExampleAppWidgetProvider.class);
intent.setData(Uri.parse("harvic:" + R.id.btn1));

// 设置pendingIntent的作用
PendingIntent pendingIntent = PendingIntent.getBroadcast(context, 0,intent, 0);
RemoteViews remoteViews = new RemoteViews(context.getPackageName(),R.layout.example_appwidget);
remoteViews.setOnClickPendingIntent(R.id.btn1, pendingIntent);
(2)、更新所有的widget
主要利用updateAppWidget(appWidgetIds, remoteViews);将remoteView根据widget的id值,一个个更新界面,涉及代码为:
RemoteViews remoteViews = new RemoteViews(context.getPackageName(),R.layout.example_appwidget);
// 更新Appwidget
appWidgetManager.updateAppWidget(appWidgetIds, remoteViews);
可以看到,这里如果不算绑定按钮的话,其实什么都没有更新,因为RemoteView除了绑定控件的点击事件,还可以设置textView的文字,ImageVIew的图片Resource等,我们这里都还没有涉及
2、接收广播
由于我们在创建广播的Intent时,使用的显示Intent,所以我们的广播不需要注册就会发到这们这个类(ExampleAppWidgetProvider.java)里面。
在接收到广播后,我们先判断Intent中是不是包含data,因为我们在发送广播时放data中塞了数据(btn1的ID),所以只要data中有数据就可以判定是用户点击btn1发来的广播。然后同样利用RemoteView将textView的文字改成btn click加一串随机数字,代码如下:
@Override
public void onReceive(Context context, Intent intent) {

	if (intent == null) {
		return;
	}

	String action = intent.getAction();
	if (broadCastString.equals(action)) {
		// 只能通过远程对象来设置appwidget中的控件状态
		RemoteViews remoteViews = new RemoteViews(context.getPackageName(),
				R.layout.example_appwidget);

		// 通过远程对象将按钮的文字设置为”一个随机数”
		Random random1 = new Random();
		remoteViews.setTextViewText(R.id.text,"btn click:" + random1.nextInt());

		// 获得appwidget管理实例,用于管理appwidget以便进行更新操作
		AppWidgetManager appWidgetManager = AppWidgetManager.getInstance(context);

		// 相当于获得所有本程序创建的appwidget
		ComponentName componentName = new ComponentName(context,ExampleAppWidgetProvider.class);

		// 更新appwidget
		appWidgetManager.updateAppWidget(componentName, remoteViews);
	}
	super.onReceive(context, intent);
}
同样还是利用updateAppWidget()函数来更新widget,对比OnUpdate()中的代码,这里有两点不同:
1、少了btn绑定,仅仅是更新界面,代码为:
RemoteViews remoteViews = new RemoteViews(context.getPackageName(),
		R.layout.example_appwidget);

// 通过远程对象将按钮的文字设置为”一个随机数”
Random random1 = new Random();
remoteViews.setTextViewText(R.id.text,"btn click:" + random1.nextInt());
在这里,我们将R.id.text的文字更新为btn click加一个随机数。因为每次点击按钮都会发送一个消息,所以每次点击产生的随机数是不同的,在界面上可以明显的表现出来。
2、改变了更新界面的方式
在OnUpdate中,我们更新界面是通过传过来的widget的id数组来更新所有widget的。而这里是通过获取ComponentName来更新的。其实这里还有另一种实现方式,即我们可以把OnUpdate中传过来的appWidgetIds保存起来,在这里同样使用OnUpdate中的appWidgetManager.updateAppWidget(appWidgetIds, remoteViews);来更新。但我更推荐这里利用ComponentName的这种方式来更新,因为当我们的应用程序进程一被杀掉,当应用程序再起来的时候,使用ComponentName这种更新方式的代码还是可以继续响应的,而利用保存appWidgetIds的代码是不会响应的。
三、进阶——如何响应多个按钮控件
上面的例子中,我们简单实现了所谓的交互,但并没有办法识别出当前是哪个控件发出的,并根据不同的控件做出响应,先看看这部分效果:

下面对上面的代码进行补充,首先在发送时,就应该加以区别当前是哪个控件发出的intent,代码如下:
private PendingIntent getPendingIntent(Context context,int resID){
	Intent intent = new Intent();
	intent.setClass(context, ExampleAppWidgetProvider.class);
	intent.setData(Uri.parse("harvic:" + resID));

	PendingIntent pendingIntent = PendingIntent.getBroadcast(context, 0,intent,0);
	return pendingIntent;
}

@Override
public void onUpdate(Context context, AppWidgetManager appWidgetManager,
		int[] appWidgetIds) {
	RemoteViews remoteViews = new RemoteViews(context.getPackageName(),R.layout.example_appwidget);

	remoteViews.setOnClickPendingIntent(R.id.btn1, getPendingIntent(context, R.id.btn1));

	remoteViews.setOnClickPendingIntent(R.id.btn2, getPendingIntent(context, R.id.btn2));
	// 更新Appwidget
	appWidgetManager.updateAppWidget(appWidgetIds, remoteViews);
}
先看OnUpdate中设置RemoteView的代码:
RemoteViews remoteViews = new RemoteViews(context.getPackageName(),R.layout.example_appwidget);

remoteViews.setOnClickPendingIntent(R.id.btn1, getPendingIntent(context, R.id.btn1));

remoteViews.setOnClickPendingIntent(R.id.btn2, getPendingIntent(context, R.id.btn2));
// 更新Appwidget
appWidgetManager.updateAppWidget(appWidgetIds, remoteViews);
创建一个RemoteView,然后将btn1,btn2分别进行绑定,这里我将PendingIntetn进行了封装:
private PendingIntent getPendingIntent(Context context,int resID){
	Intent intent = new Intent();
	intent.setClass(context, ExampleAppWidgetProvider.class);
	intent.setData(Uri.parse("harvic:" + resID));

	PendingIntent pendingIntent = PendingIntent.getBroadcast(context, 0,intent,0);
	return pendingIntent;
}
要设置data域的时候,把控件ID设置进去,因为我们在绑定的时候,是将同一个ID绑定在一起的,所以哪个控件点击,发送的intent中data中的id就是哪个控件的id,绑定Id的代码就是下面这行:
remoteViews.setOnClickPendingIntent(R.id.btn2, getPendingIntent(context, R.id.btn2));
然后就是接收的部分:
接收时主要就是先根据传送过来的Intent,找到data中的控件id:
Uri data = intent.getData();
int resID = -1;
if(data != null){
	resID = Integer.parseInt(data.getSchemeSpecificPart());
}
然后根据ID,定制RemoteView的TextView的字体内容
RemoteViews remoteViews = new RemoteViews(context.getPackageName(),R.layout.example_appwidget);
Random random1 = new Random();

switch (resID) {
case R.id.btn1:
	remoteViews.setTextViewText(R.id.text,"btn1 click:" + random1.nextInt());
	break;
case R.id.btn2:
	remoteViews.setTextViewText(R.id.text,"btn2 click:" + random1.nextInt());
	break;
}
同样,最后是更新所有的wiget界面:
// 获得appwidget管理实例,用于管理appwidget以便进行更新操作
AppWidgetManager appWidgetManager = AppWidgetManager.getInstance(context);
// 相当于获得所有本程序创建的appwidget
ComponentName componentName = new ComponentName(context,ExampleAppWidgetProvider.class);
// 更新appwidget
appWidgetManager.updateAppWidget(componentName, remoteViews);
经过上面的讲解,总体的接收代码就是这样的:
@Override
public void onReceive(Context context, Intent intent) {

	Uri data = intent.getData();
	int resID = -1;
	if(data != null){
		resID = Integer.parseInt(data.getSchemeSpecificPart());
	}

	// 通过远程对象将按钮的文字设置为”一个随机数”
	RemoteViews remoteViews = new RemoteViews(context.getPackageName(),R.layout.example_appwidget);
	Random random1 = new Random();

	switch (resID) {
	case R.id.btn1:
		remoteViews.setTextViewText(R.id.text,"btn1 click:" + random1.nextInt());
		break;
	case R.id.btn2:
		remoteViews.setTextViewText(R.id.text,"btn2 click:" + random1.nextInt());
		break;
	}

	// 获得appwidget管理实例,用于管理appwidget以便进行更新操作
	AppWidgetManager appWidgetManager = AppWidgetManager.getInstance(context);
	// 相当于获得所有本程序创建的appwidget
	ComponentName componentName = new ComponentName(context,ExampleAppWidgetProvider.class);
	// 更新appwidget
	appWidgetManager.updateAppWidget(componentName, remoteViews);

	super.onReceive(context, intent);
}
好了,到这所有的代码都讲完了。
四、附(通过匿名Intent发送广播------不推荐):
在很多例子中使用的是匿名Intent来发送广播,即设定intent的Action来发送广播,这种方法我是极不推荐的,因为不能识别发送控件的id,这主要是由于pendingIntent的原因。针对这个工程,我也写了一个匿名Intent广播的例子,在这我就不讲了,大家可以看源码。
